Plastheniker
-
Posts
832 -
Joined
-
Last visited
Content Type
Profiles
Forums
Events
Gallery
Everything posted by Plastheniker
-
Thanks for all further comments. Bill, yesterday I overlooked one model because it stood on my photo table. Its tyres should fit. It is the Academy Ferrari 250 LM. The 1:1 car had 5.50 x 15 front and 7.00 x 15 rear. The model tyres are only a bit wider than that. They look quite acceptable, the sidewalls are blank. As far as I know the kit is not available for some time, but should be found online. I hope this will help if necessary.
-

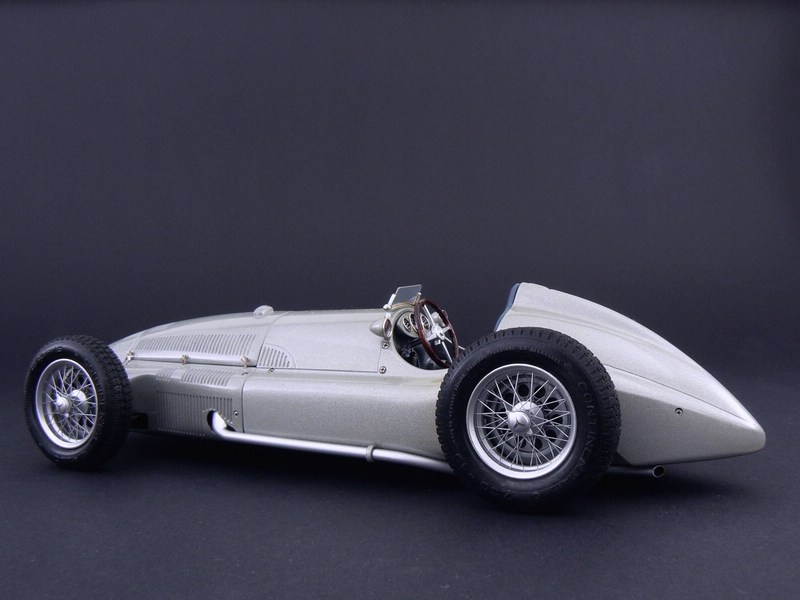
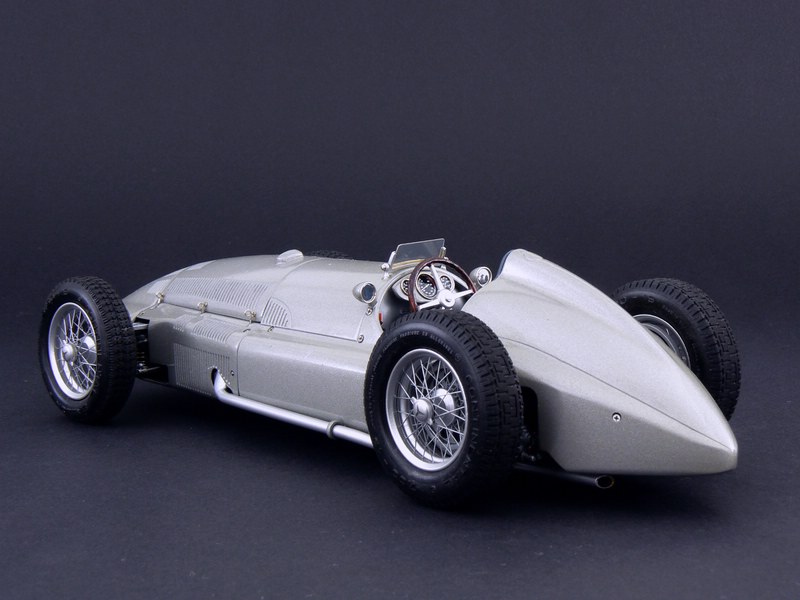
Mercedes W154 M163 - Grand Prix Champion 1939 1/20
Plastheniker replied to Plastheniker's topic in Model Cars
Thanks for your comments. I admit that I am a bit surprised that there is so little interest in one of the milestones of racing history. But I don't care , I have a thick skin. For the few GP connoisseurs I will go on. My next pair will be the 1951 Alfa Romeo Tipo 159 Alfetta. I hope you will be interested again.
-
Thanks for your further comments. Bill, the tyres might become a real problem: The tyre sizes of the GTO were 6.00 x 15 (appr. 155-15) front and 7.50 x 15 (appr. 195-15) rear - that is was nearly all my books say. By today's standards this is amazingly narrow. After reviewing contemporary pictures, however, I am not sure if this was always true for all GTOs because the rear rim offset seems to vary considerably. If you find your kit tyres not entirely in scale after measuring ( I find kit tyre sizes very often more or less incorrect, they seem to be "universal" for more than only one kit) let your eyes decide if they look convincing or not - this is modeling. In my last post four weeks ago I was wrong. Hard to believe, but Revell's release is really a poor old Protar kit. You can see here http://scaniagreifsons-modellbauforum.forenking.com/t2115-ferrari_250_gto.html that its tyres are obviously also too wide. Since Fujimi tyres are mostly much better than Gunze tyres I hope that they are correct. For the case that they are not I have rewiewed my numerous finished and unfinished kits, but I found no tyres that could solve the problem. If everything fails - fortunately you won't see very much of the tyres when the model stands on the shelf.
-
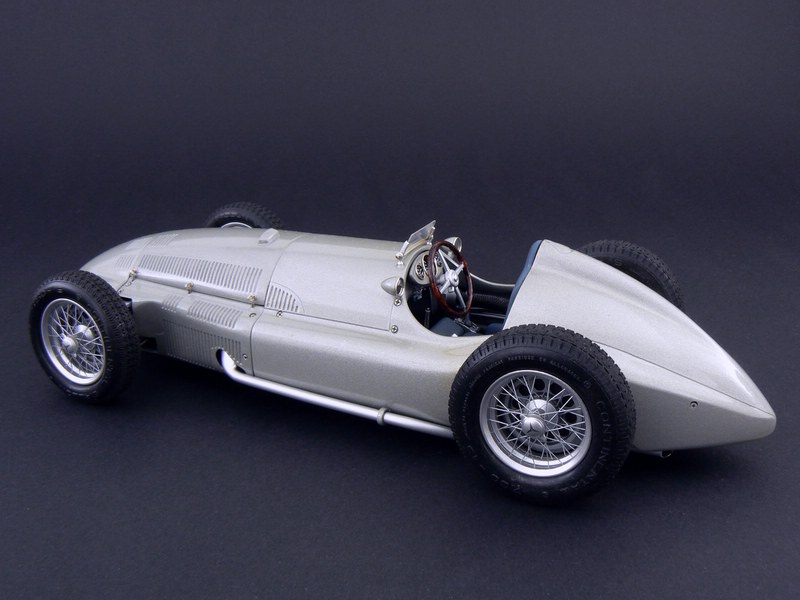
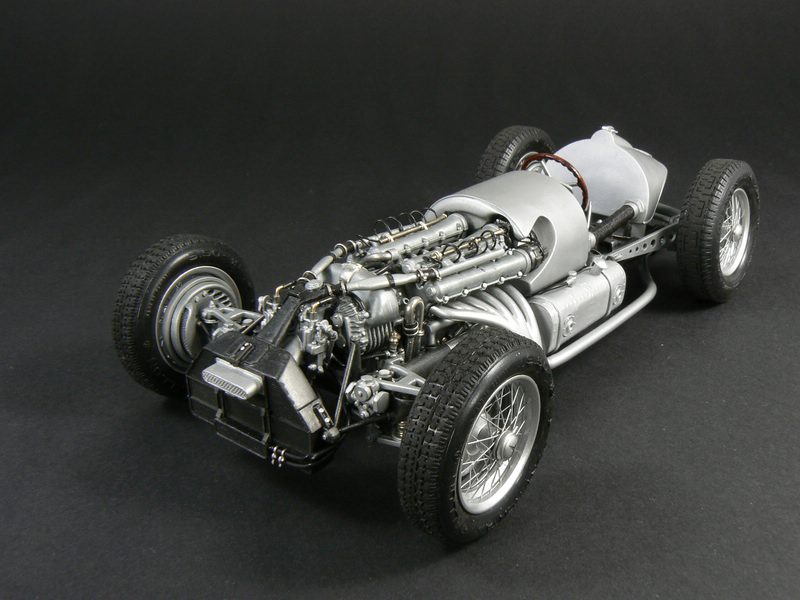
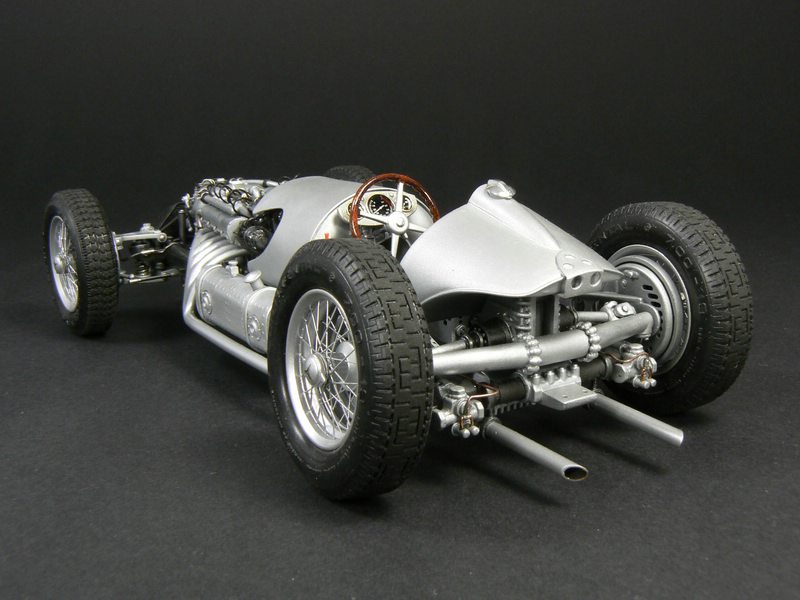
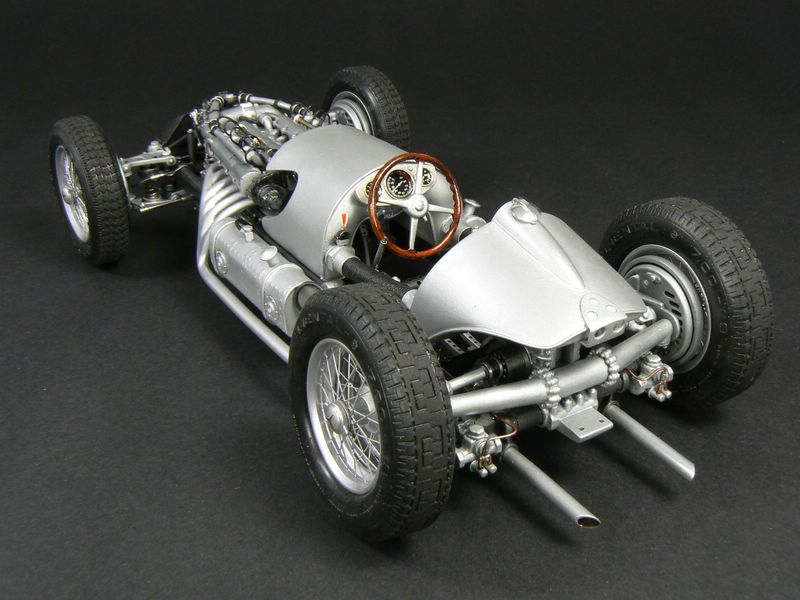
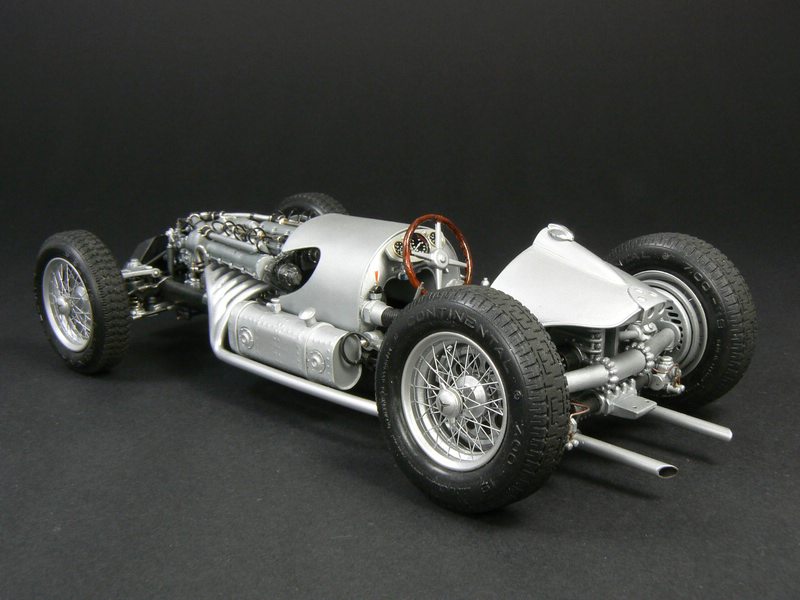
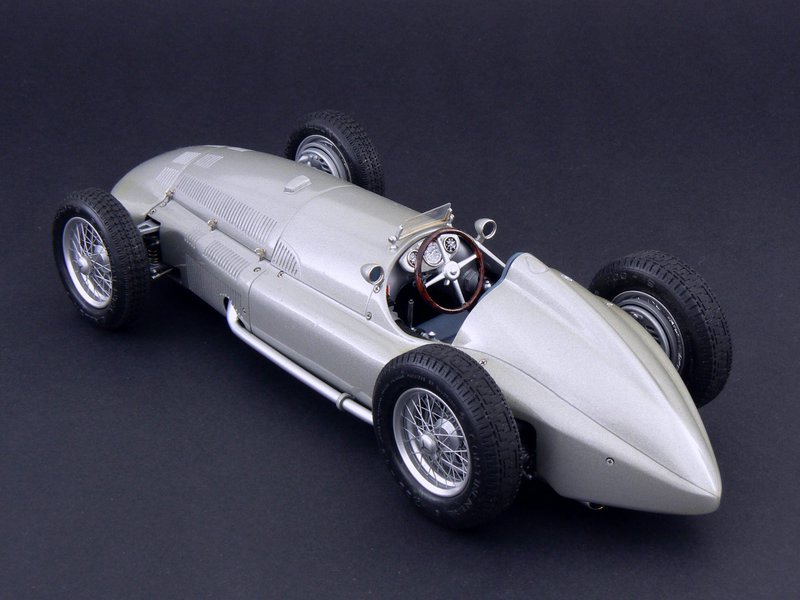
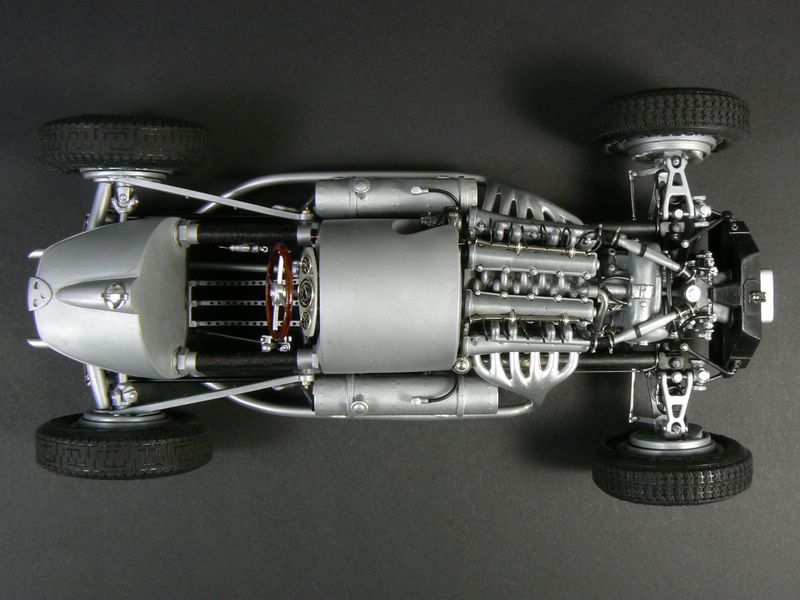
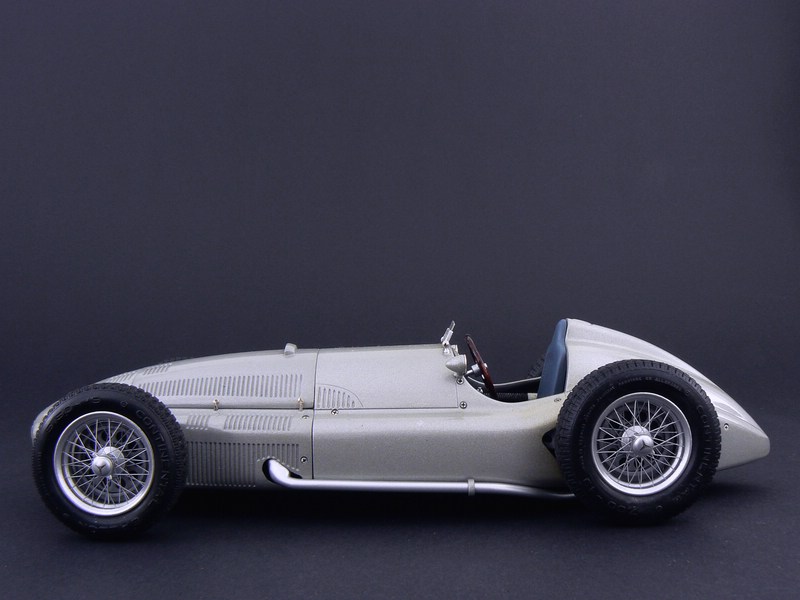
Hi, from 1935 Mercedes gained a superiority in GP racing that was never again achieved by any other manufacturer in GP (later F1) history. The only set-back in these years was 1936 when the Mercedes W25 was defeated by the Auto Union Typ C that I showed some weeks ago. Before 1938 there were no engine restrictions in GP racing. This resulted in insane top speeds of nearly 400 kph. Therefore from 1938 GP designers had to choose between a maximum displacement of 4500 cc for naturally-aspirated engines and a maximum displacement of 3000 cc for supercharged engines. Mercedes' completely new car for this new formula was the W(agen)154, that was technically so far ahead of its competitors that it dominated GP racing almost totally; the only serious competitor was the Auto Union Typ D. In 1938 f. e. there were several GPs where the W154s finished first, second and third simultaneously. For the 1939 season the W154 got a re-designed body and the new M(otor)163 engine. My model is a replica of this car. If you regard the pictures of the chassis you will see some technical features that made the W154 a real pacemaker in racing car development. Keep in mind that some competitors still used rigid axles, mechanical brakes, U-channel ladder-type frames, friction shock absorbers and leaf springs. 4ohc V-12, 48 valves, two-stage supercharger for improved torque at low revs Chassis made of oval tubes for higher rigidity An angled drive line made the driver sit beside the prop shaft for a lower center of gravity Double-wishbone front axle De Dion rear axle ingeniously guided by a pin moving up and down in a vertical groove in the transaxle housing Hydraulic brakes and hydraulic shock absorbers No more traditional coachwork: the surface of the rear tank and the saddle tank were part of the painted body; all panels were fixed by turn-to-open fasteners (looking like Philips screw heads on the complete car) and could be removed in seconds for repairs I spent about 1200 hours in the pre-www era building both models. Because I wanted to keep the characteristic connecting tubes between the rear and the saddle tank without covering the interesting rear axle I took the freedom of fitting a symbolic rear tank as I saw it on a picture of a 1:1 exhibition vehicle.The Casadio 1/20 metal kit is the crudest of all kits I know. Fit, parts quality, detail and authenticity are so poor that after a while I had the feeling of being fallen into quicksand. This picture of an old Casadio catalogue may give an impression of a chassis built OOB.. Nevertheless parents love a problem child most - so today this is one of my favourite models. Similar topics of mine: 1907 Fiat 130 HP Grand Prix Racer 1/20 http://www.modelcars...showtopic=75350 Auto Union Typ C - Grand Prix Champion 1936 1/20 http://www.modelcarsmag.com/forums/index.php?showtopic=76696
-
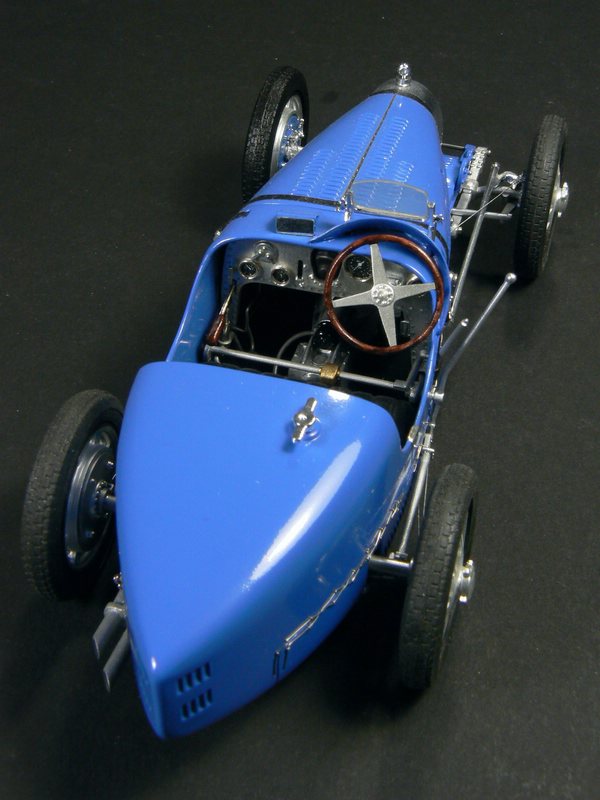
Thanks for your interest and for your comments so far. The wiring was a Bugatti-typical way of locking nuts/screws. There was no universal pattern, you find pictures that show cross-wise or zigzag patterns. Some non-historic photos show much more wiring, f. e. even on the small fairing in front of the steering wheel. Harry, Mike, Skip, what I did was very simple. I removed the plastic moulding and scribed the panel line. For each side I looked for 2 bright soft wires of about 0.2(?)mm diameter: a shorter one as the locking wire, and a longer one as the "retainer wire". I drilled holes of 0.5mm where the 1:1 car has locked nuts/screws. I inserted the retainer wire from the inside into the first hole, pulled it through, and grabbing the locking wire I returned into the first hole and pulled the retainer wire tight. Then with the same retainer wire I went to the second hole, again inserted it from the inside, pulled it through, and grabbing the locking wire I returned into the second hole and pulled the retainer wire tight - and so on and so on. When everything was finished I secured all wires by applying a small amount of liquid super glue into each hole from the inside, and let it dry thoroughly. In order to restore a smooth interior I sanded off all interior wiring cautiously. I hope this was understandable. Skip, my experiences with acrylic paints tell me that solvent-based paints are unsurpassed. When I need small amounts of paint I use Humbrol because I never had problems with Humbrol paints and because they are easy to obtain. I avoid the (in Germany) ubiquitous but often poor Revell paints. I never use Tamiya paints because in the seventies Tamiya sold rattle cans with a paint that was removed simply by touching the model - in case of a spoilt model I am unforgiving. When I need larger amounts of paint (f. e. for trucks and trailers) I use automotive paints or simply paints from house improvement stores. After applying the paint I never found any difference between them and modeling paints. When mixing paints I write down what I use. In case of this model my note reads: "Humbrol #14 (French Blue) brightened with a small amount of bright blue".
-
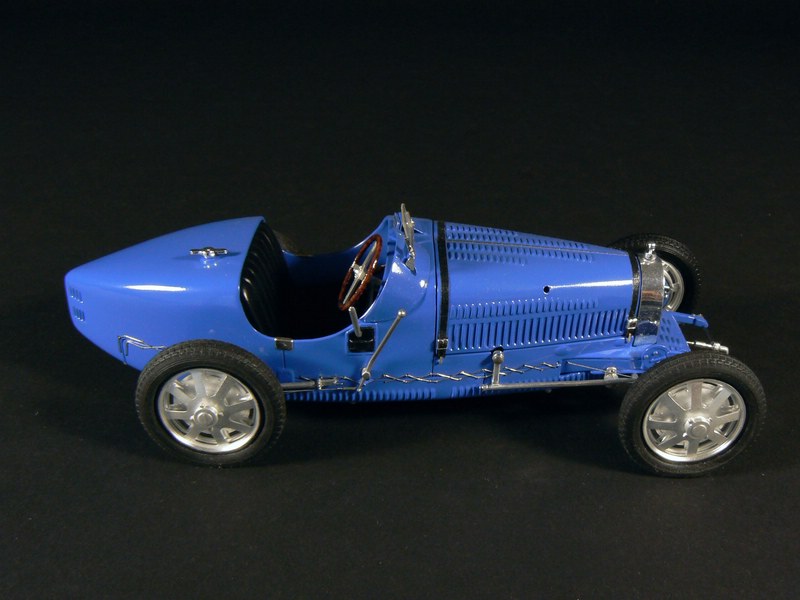
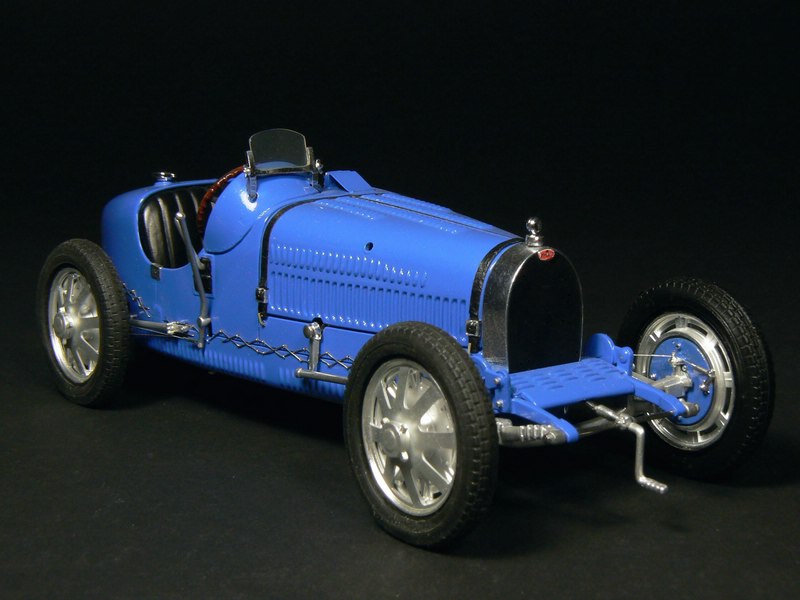
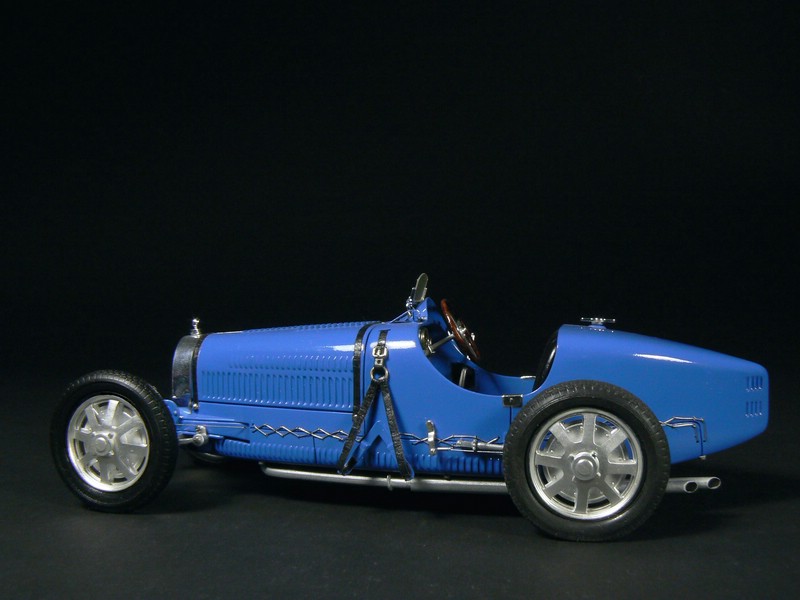
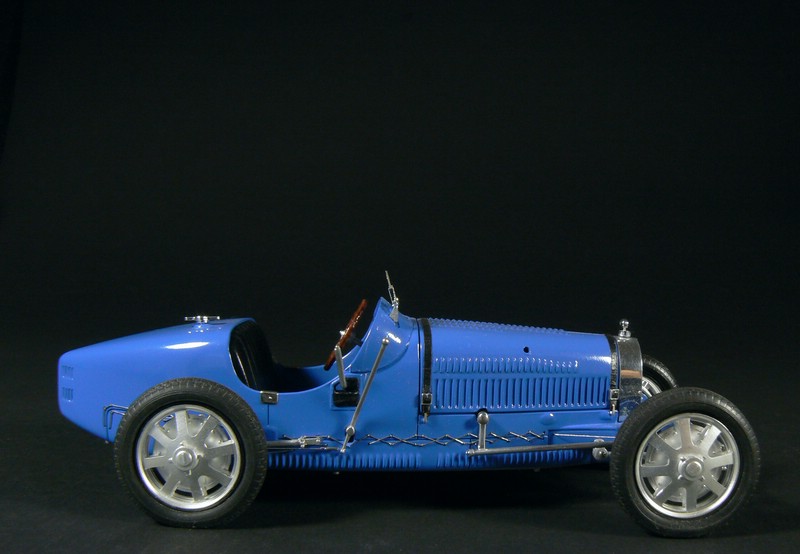
Hi, probably the most fascinating sight in pre-war GP racing were the duels of the lightweight, small Bugatti 35B with only 2.3 litre displacement and the heavy, brute Mercedes SS/SSK/SSKL with 7 litre displacement. Someone called this vividly the fight between foil and battle-axe. Monogram released an excellent kit of the 35B (not as stated 35 because of the supercharger) already in the seventies or eighties. Though the 35B was a pure racing car, some of them were fitted with fenders and lighting equipment and used as road cars. That is why the kit contains these parts, but of course I wanted to build a GP car in the French racing colour. I built my model in the early nineties. Because of the outstanding quality of the kit building is a real pleasure. Hard to believe that this kit is so old. Carefully built and painted and with further detailing it makes a very attractive model. A similar topic of mine: 1929 Mercedes SSKL 1/24 Conversion http://www.modelcarsmag.com/forums/index.php?showtopic=76128
-
Thanks for all further comments. One of my following topics will be the Mercedes 300 SLR Uhlenhaut-Coupé. I hope you will be interested.
-
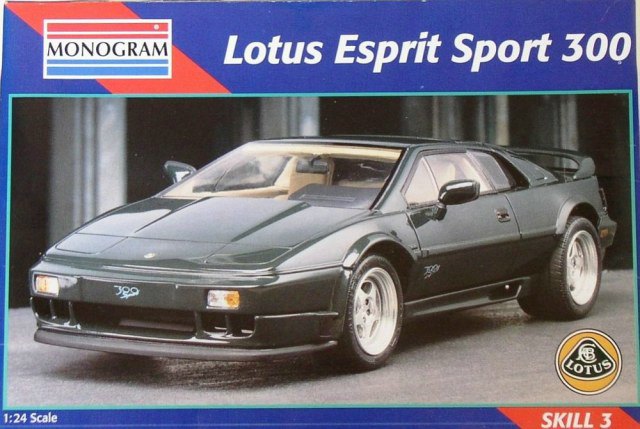
With some delay thanks for all comments. I would like to confirm what has been said. The Esprit Sport 300 was the only poor kit among more than 20 Monogram kits I have built in the past. If there should be a re-release I really would advise against building it unless there is a very strong interest in the subject.
-
Mercedes Actros & Trailer, Now
Plastheniker replied to kilrathy10's topic in Model Trucks: Big Rigs and Heavy Equipment
Very nice to see a German truck here. As a German I can say that your clean build is totally convincing. -
Thanks for all comments so far. Harry, yes, it is me in my avatar - before I became rich and famous. I am far from any attempt of proselytizing anyone. What I said about opening hoods grew over the years. Still in the seventies I built most cars with open hoods, but then I found that this detracted from the car's specific lines. Closing a movable hood was mostly unsatisfactory for the reasons I mentioned already. By the way if buying a second kit was too expensive (f.e. the former Pocher kits) it looked very attractive to display the kit engine and gearbox side to side with the car and replace the visible engine parts inside the engine bay by resin copies.
-
Thanks, no I am sorry, there are no engine pictures. Of course this is a matter of taste, but I hate opening hoods, doors, and trunk lids because mostly (if not always) they are not completely flush and properly aligned or show varying gaps. Eliminating these problems completely and finally means to me fixing these parts, all the more since I build only for my display case and nobody (including me) would ever open them. That is why I always build and detail only what could be visible if the model is turned upside down. Whenever I feel inclined to display an engine/gearbox I buy a second kit or superdetail a complete chassis as already shown on my Casadio GP models.
-
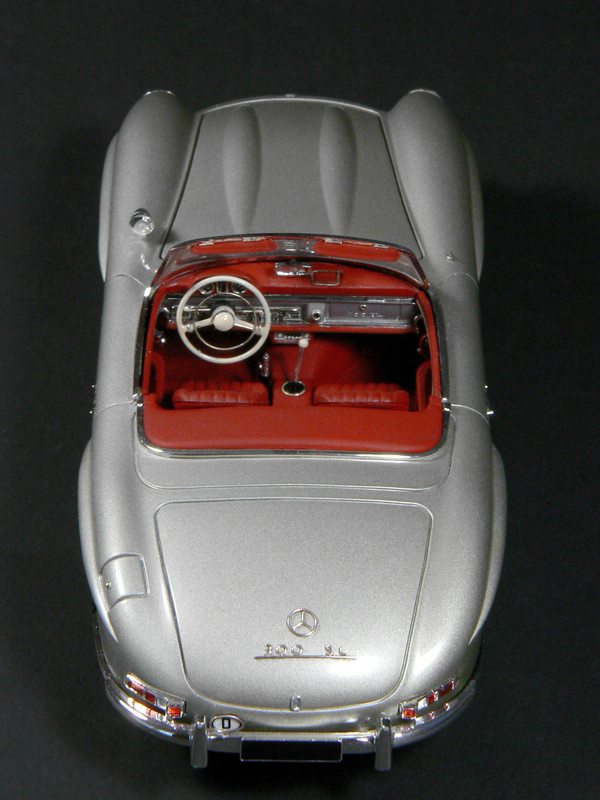
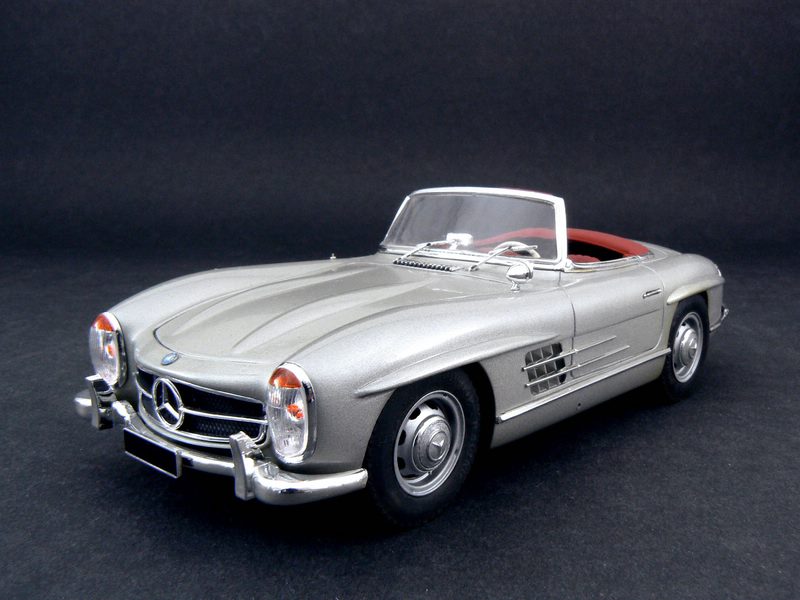
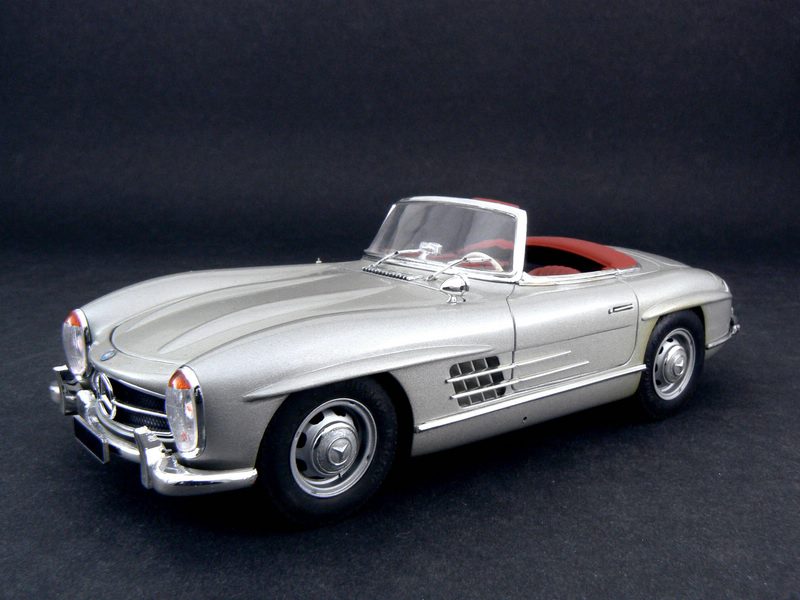
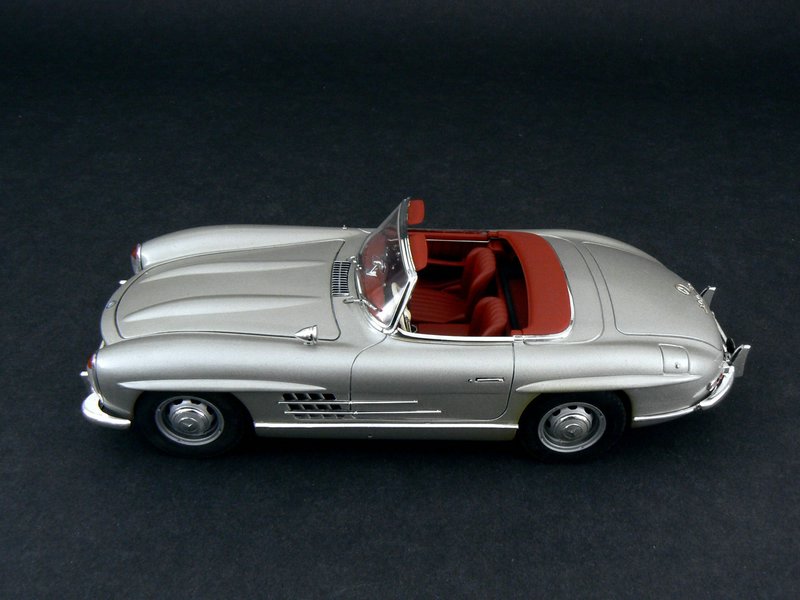
Hi, in my oppinion one of the best car kits ever released - if not the best - is Italeri's 1/24 Mecedes 300 SL. Fit, detail, and parts quality are excellent, the price is very favourable by comparison and, most important, the kit captures the appearance of the real car perfectly. I built mine in the nineties with only minor detailing. Mercedes delivered the 300 SL in the oddest colours if colour-blind customers ordered it http://300sl-club.mercedes-benz-clubs.com/ Silver/red, however, was the most typical and, of course a matter of taste, the best-looking combination by far.
-
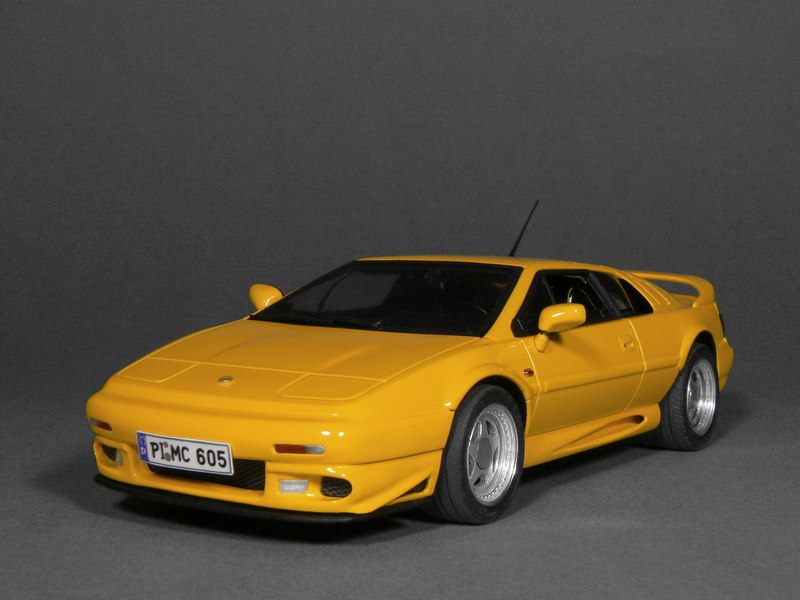
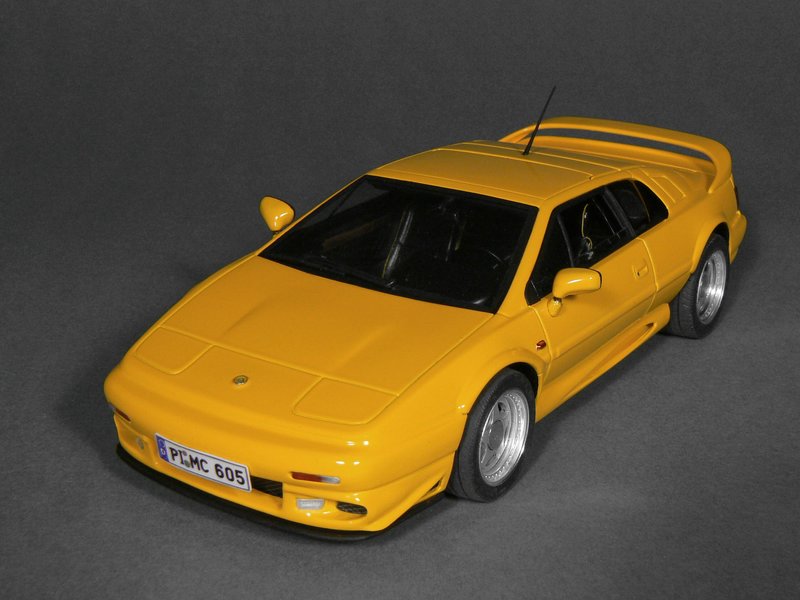
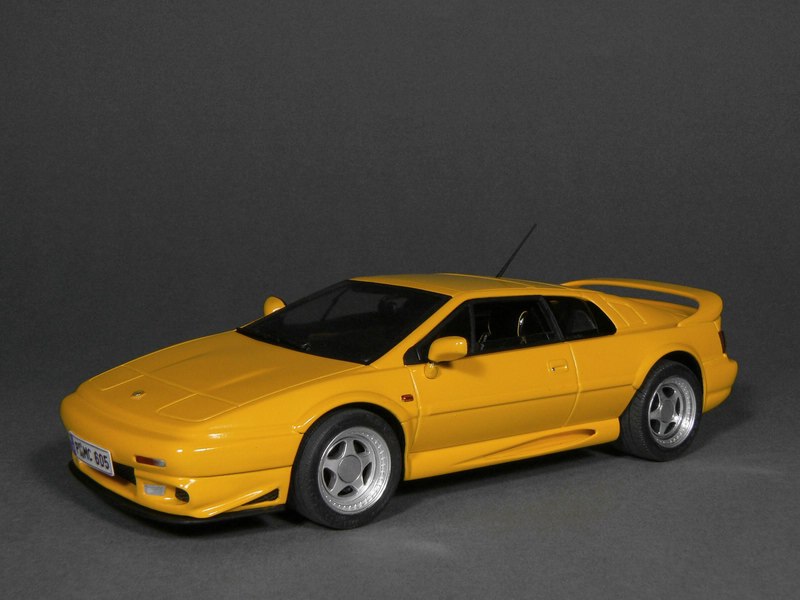
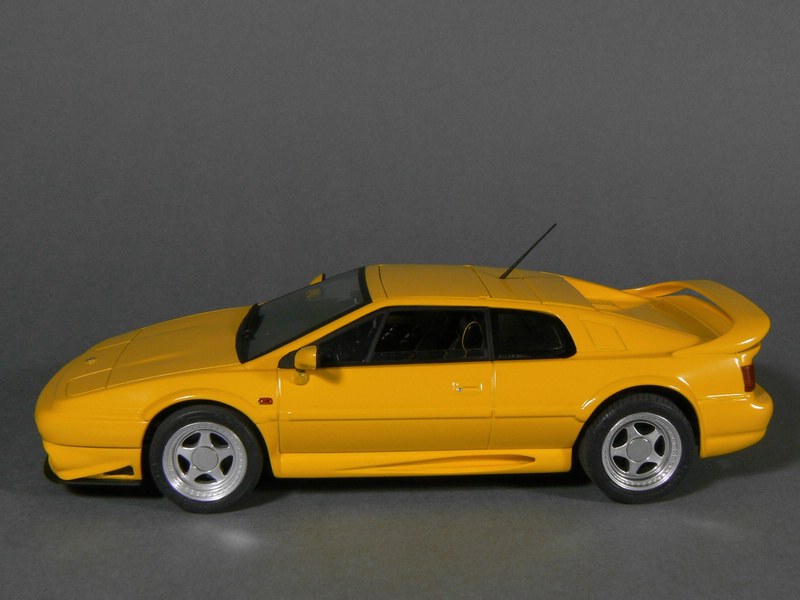
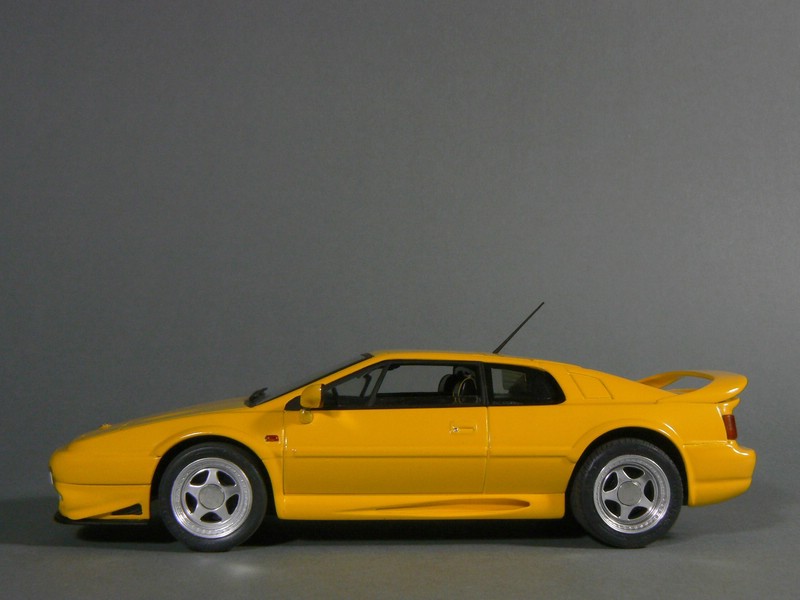
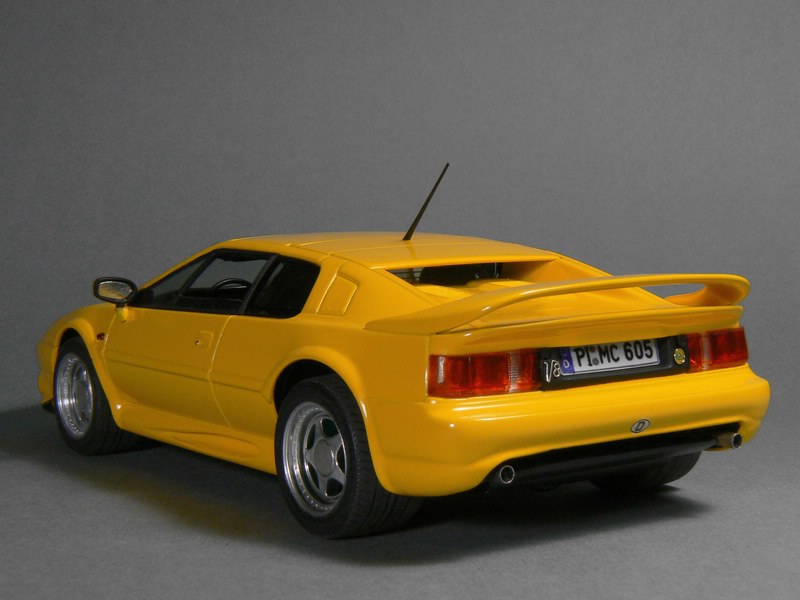
Hi, in 1996 Lotus replaced the four-cylinder engines of both Esprit models (i. e. the normal S4S and the Sport 300) by their brand new 3.5 litre twin turbo V8 and called this new version simply Lotus V8, mostly omitting the name Esprit. In 1996 or 1997 I wanted to build a replica of this very early V8 ( paint Norfolk yellow, interior charcoal with yellow piping, standard three-piece OZ-wheels) At that time Monogram offered a kit of the similar Sport 300 that I used as a basis. Unfortunately this kit was a very crude update of an early Esprit, probably the S3. The photo on the box alone showed little resemblance with the real Sport 300. Finally some effort was necessary. I remember the following: the unit front bumper/spoiler of the V8 was unique and had to be scratch-built the rear bumper of the V8 was the same as the one of the S4s and had to be scratch-built together with the wing below and the two sparate exhausts the kit parts below the doors with the brake vents (are they really called "rocker valance"?) looked odd and had to be scratch-built as well the kit interior was the interior of an older Esprit and had to be converted strangely the front deck lid of the kit had some kind of reversed scoop that no Esprit ever had This was the result:
-
Hi, many car interiors have stained wooden parts, mainly steering wheels and dashboards. The most common ways to simulate wood on plain plastic are replicating the grain with a pointed brown pencil or using artist's oil colours. I prefer a very quick and simple technique that I am using for decades. The results look like this: First paint the later "wood" surface gloss orange. Only here I use acrylic paint because it dries quickly and will not be attacked by enamel paint. Let it dry thoroughly. Then mix some solvent-based gloss clear with a small amount of gloss dark brown. Find out the best relation yourself, 10:1 may work. Apply this mixture with uneven strokes onto the orange surface. Because the clear and the brown will never merge properly surfaces as shown above are generated. To a certain extend you can vary the appearance by choosing a pointed or wide brush, a stiff or soft brush, parallel or erratic strokes. Try on a piece of cardboard. It may sound ridiculous but it really works.
-
Thanks to all for your interest and for your comments. Skip, Simón, I used a very simple and quick technique on the steering wheel. I am going to explain it the Tips, Tricks, and Tutorials subforum right now. Tom, fortunately the kit had no opening doors, so no problems in this respect either. Peter, I am quite sure that the Revell kit will be the Italeri model shown here. Already 10 or 15 years ago Revell sold most of the Italeri Ferraris under its own label. Thanks again!
-
Hi, Revell seems to re-release the Italeri kit of the Ferrari 250 GTO. This is a good occasion to show a finished model here. The original Italeri kit was released in the late eighties, so I suppose that I built my model about 25 years ago. At that time the kit was well-priced and offered excellent quality. However there was ( and will still be?) the same serious and incomprehensible shortcoming as with all other Italeri/Revell Ferrari kits: The wheels are much too wide. The least that the modeler has to do is reducing the width of the rims and the tyres. If you do not accept plastic spoke wheels (in those days the Italeri rims were not bad by comparison) replace them or make your own ones as I did. Besides this only some detailing particularly of the interior is necessary. Some GTOs were made road-legal so my model has number plates. Some GTOs had silver paint and looked great.
-
1948 Ford F-8 Milk Tanker
Plastheniker replied to Plastheniker's topic in Model Trucks: Big Rigs and Heavy Equipment
Thanks for your further comments. Frank, I am going to review my old files. I am quite sure that there are some useful pictures, drawings and tables concerning the F-8 frame. I will send them by pm. If anyone else should be interested too please let me know. -
If someone should be interested in such vehicles here is an excellent link for scale drawings of mostly German vans, trucks, busses and more http://www.gtp.de/zeichn/index.html Please consider an oddity on this site. By clicking the thumbnail of a drawing you open a larger picture that is still rather small. If you move the cursor onto it, no hand appears. Ignore this and click the larger picture. Then a very large drawing will open. Even if it sounds hackneyed and ludicrous: An excellent source for pictures and scale drawings are historic car and truck brochures offered on ebay. I use this link http://www.sportslinkup.com/ I enter the name of the manufacturer, probably even the model, and the key words brochure or pamphlet into the searchbox. The result is often amazing and the resolution mostly sufficient.
-
1948 Ford F-8 Milk Tanker
Plastheniker replied to Plastheniker's topic in Model Trucks: Big Rigs and Heavy Equipment
I would like to say for your friendly comments. Martin, you are right, I made my own decals. Since the tank is white it was no problem that decals printed on clear decal sheet always remain more or less translucent. Carl, for being free in my colour schemes I mostly use fictious letterings. I really didn't expect that there was (or still is) a "Twin Oaks Dairy" in reality. This is a funny coincidence. Rick, do you mean the truck or me? Harry, your spelling is not only ausgezeichnet, it is makellos! N.N., nice to meet German modelers here. Of course it is a matter of taste, but I hate opening hoods, doors, and trunk lids because mostly (if not always) they are not flush and properly aligned or show varying gaps. Eliminating these problems completely and finally means to me fixing these parts, all the more since I build only for my display case and nobody (including me) would ever try to open them. That is why I always build and detail only what could be visible if the model is turned upside down. On this model only a very small area of the lower part of the engine is visible so it was the least problem to replicate this. Whenever I feel inclined to display an engine I buy a second kit (or cast a copy) or superdetail a complete chassis as shown on my Casadio models. Thanks again for your interest.
-
Hi, among all those big rigs on the shelf a medium-size truck makes a nice contrast. I used the well-known Monogram F-1 pickup and the AMT C-600 as a basis. Originally intended as a quick change of pace between two larger projects this build turned out to be rather time-consuming: Numerous modifications were necessary to adjust the modern C-600 chassis The cab fenders had to be widened and the wheel openings had to be adjusted. Because of the wider fenders I had to make a new grille Running boards and bumper were different from the pickup and had to be replaced by self-made parts The contemporary steel spoke wheels had to be scratchbuilt The making of the oval milk tank required some pondering If you suffer from lactose intolerance you might prefer the conversion of an F-100 pickup into a 1955 F-800 Mobiloil-Mobilgas tanker I am going to show later.
-
"BIG UGLY"
Plastheniker replied to foundationsedge's topic in Model Trucks: Big Rigs and Heavy Equipment
Although I prefer a factory-clean antiseptic finish on my own builds your wheathered model is outstanding. I wonder if the driver looks as neglected as his truck. -
Sicard senior snow plow 1951
Plastheniker replied to mackd's topic in Model Trucks: Big Rigs and Heavy Equipment
Alain, chapeau! Among all the outstanding models you have shown in the forum this seems to be the highlight - so far. All those who do not yet know the difference between assembling a kit and modeling should take a very close look on your builds. -
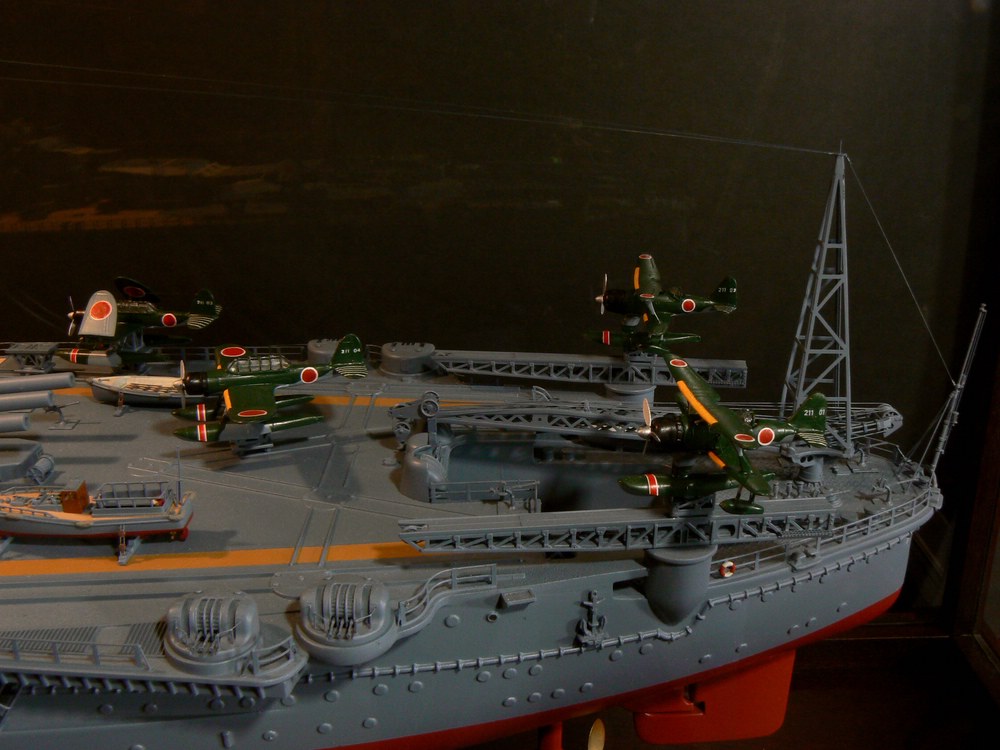
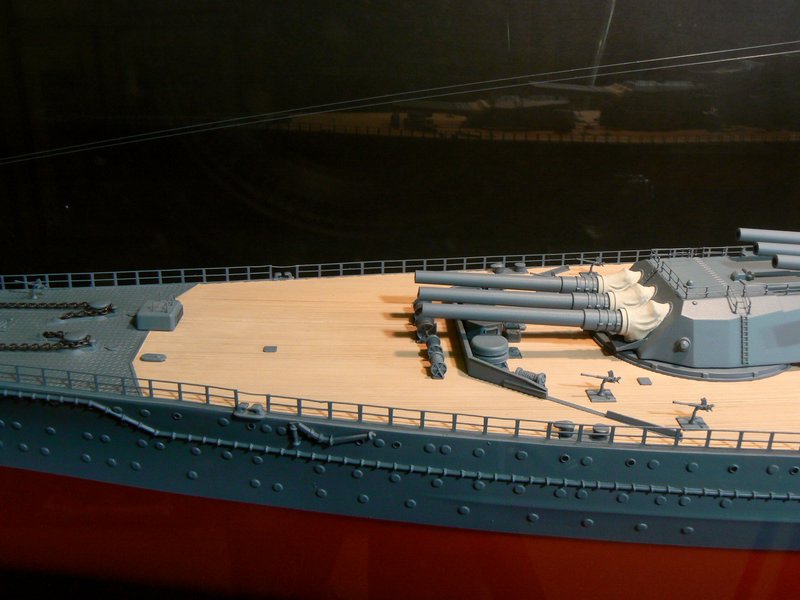
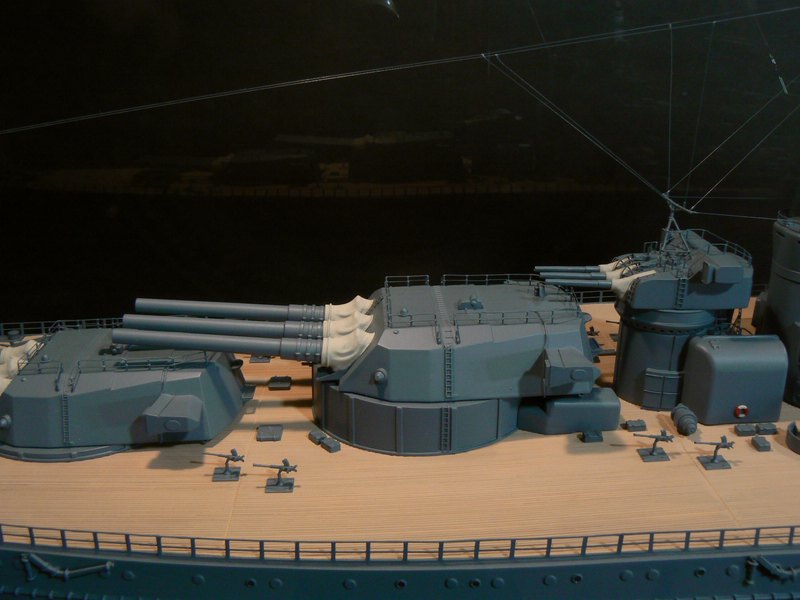
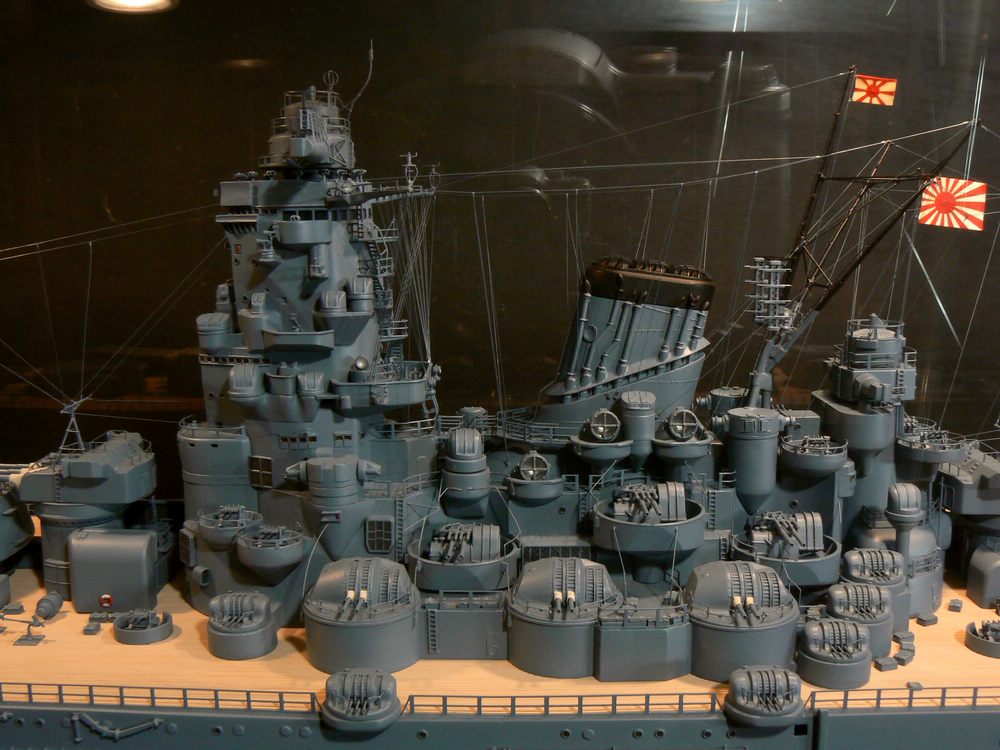
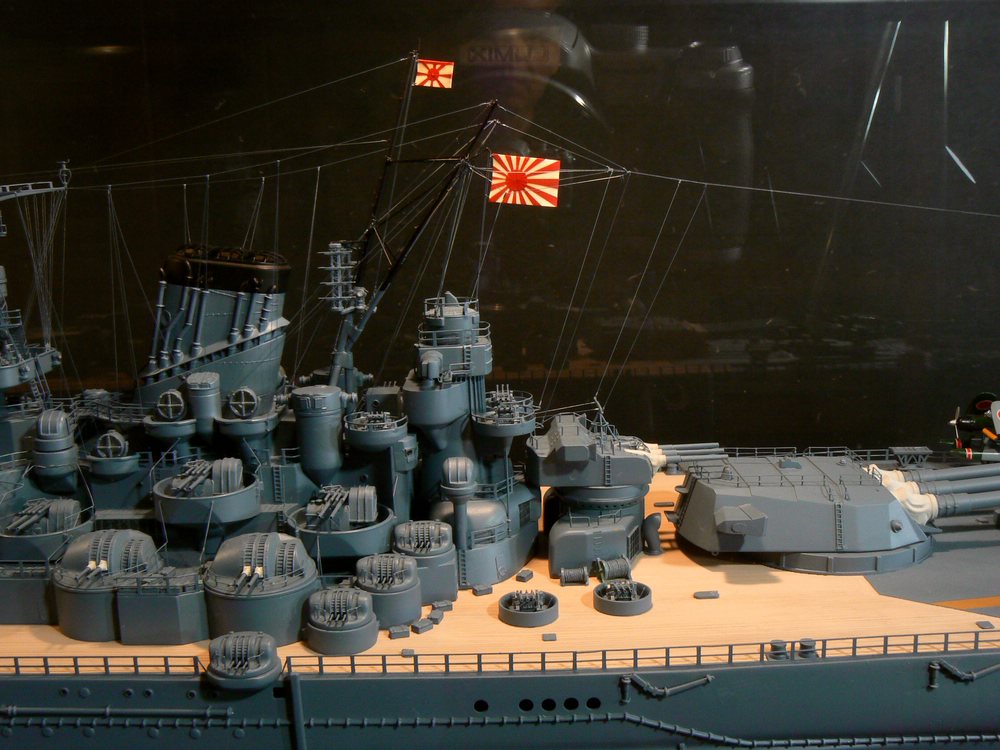
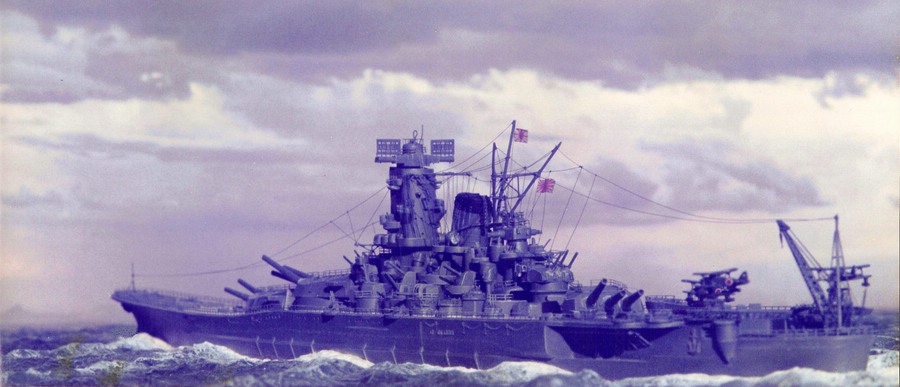
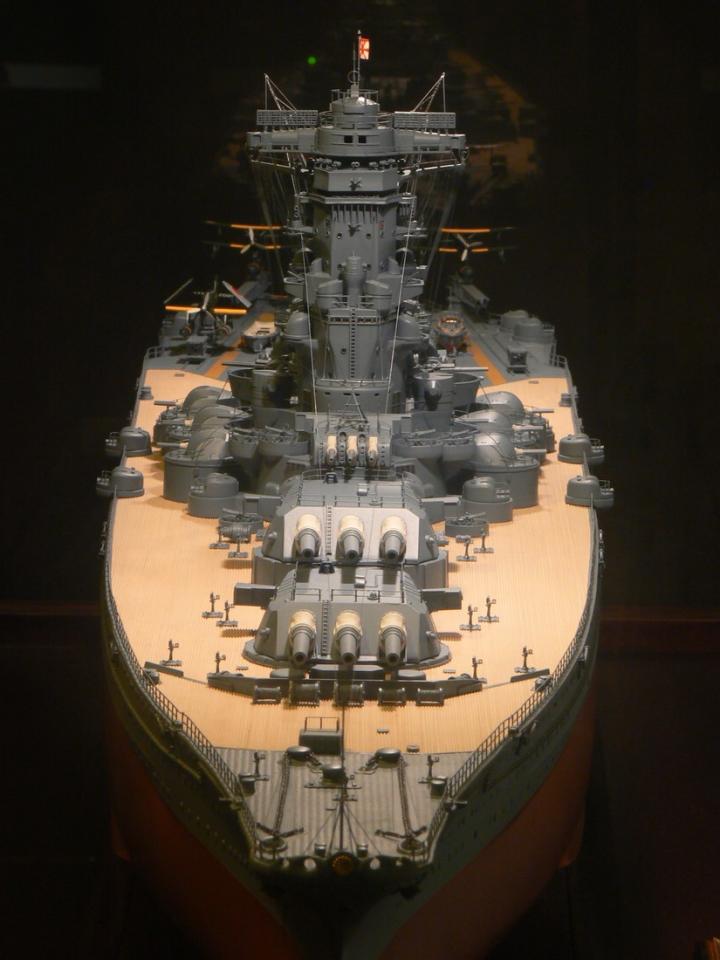
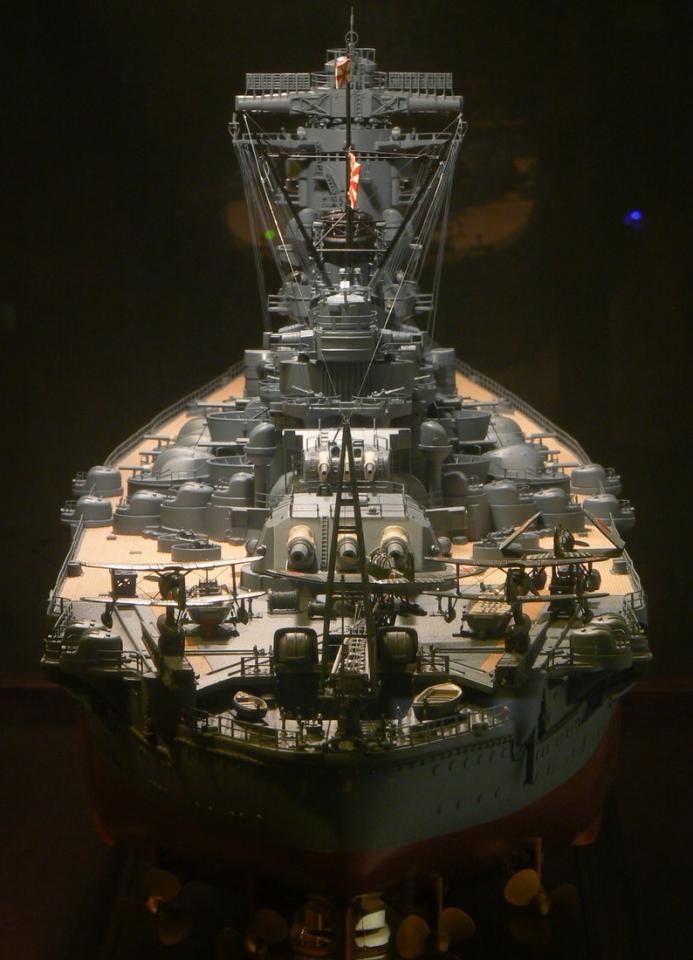
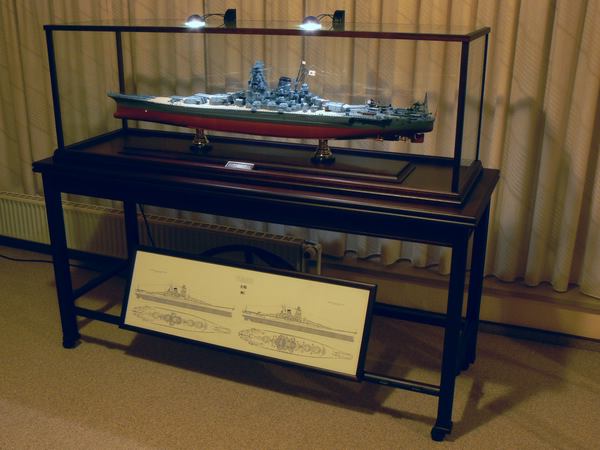
Hi, in the early eighties I built some 1/700 WL dioramas for a change of pace. From the modeler's point of view the Japanese Nagato/Mutsu and Yamato/Musashi are particularly attractive. After finishing this detailed 1/700 Yamato it was clear that one day I would build Nichimo's huge model. Some years later I purchased among others this normally quite pricey kit at a close-down sale and started it in the early nineties. I used a GMM photoetched set that was very rudimentary because it was a simple up-scaled 1/700 set. Some time later GMM released a new outstanding set in 1/200 - too late for me. I was determined to superdetail my model as far as possible. Originally I planned to write a magazine contribution about it, so I took a lot of notes. I realized however that this would go beyond the scope of any article. Anyway I can say that the model is made of more than 6000 parts and that I spent more than 2000 hours building it. This was necessary because the Nichimo kit was designed as an R/C model, so it is mostly rather crude. Some large parts were badly warped. Moreover the model is partially wrong and essential parts are missing. Today the work would be much easier because besides the new GMM set there are many aftermarket parts for those things I had to make myself. In more than 50 years of modeling this was the biggest callenge for me to this day. Building such a detailed model was only possible by the outstanding book "Anatomy of the Ship - The Battleship Yamato" which contained nearly 200 pages full of plans and detail drawings. Since such detailed model needs protection I made an appropriate showcase for it. I am going to post the most interesting pictures in high resolution. Please zoom them by holding your key ctrl pressed and pressing your key + several times. You will even recognize sights on the tiny single 25mm MGs.
-
Making real wire wheels in all scales
Plastheniker replied to Plastheniker's topic in Tips, Tricks, and Tutorials
Three minor additions: In V.2. I mentioned a stopgap for the case that you cannot obtain the larger of the two telescoping plastic tubes, but then I forgot to tell what it is. Remember that you need this larger tube only for making the green "support (large diameter)" on the drawing. You can substitute it by vertical pieces of plastic glued down to form a circle. This will be sufficient to hold the spoke ring in the jig. You may find it useful to choose a different lacing order. I usually prefer to stretch the wire not to the scrap wire exactly opposite. Instead I go f. e. from #1 to let's say # 15 or #17 (and not to opposite #13). This has two advantages: The lacing wire grips the hub unit firmly and the tendency of the lacing wire to slip from the hub ring while lacing is eliminated. Your wire wheel looks much more realistic if you give the hub (= the small metal tube) at the end of the inner side a considerably larger outside diameter. By this the pattern of the 48 inside spokes will become clearly different from the pattern of the 24 outside spokes. Simply glue on any fitting ring before lacing. -
Making real wire wheels in all scales
Plastheniker replied to Plastheniker's topic in Tips, Tricks, and Tutorials
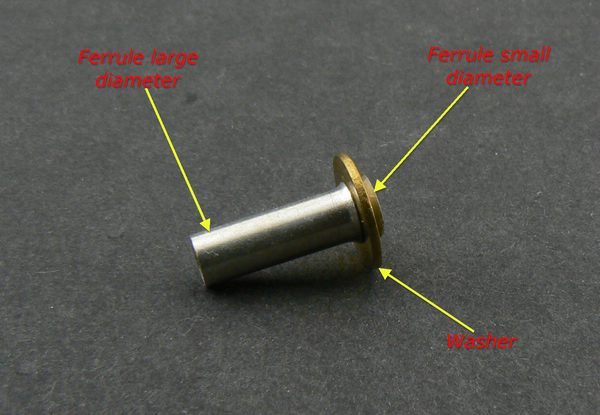
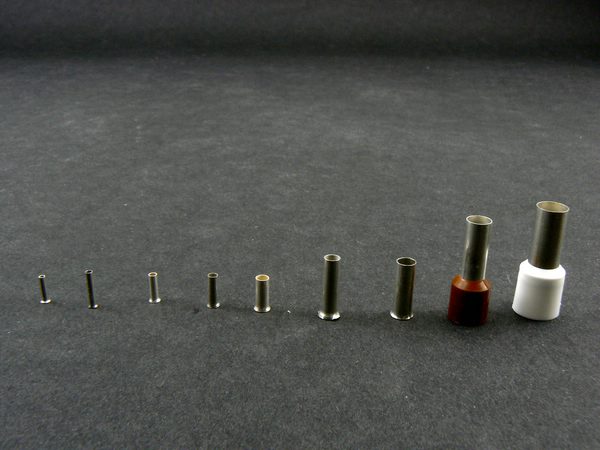
VIII. Standard rims In most cases you will make standard rims as shown on the photos at the beginning of the thread. Even more as with drop center rims a scale drawing is t h e key to a rim that looks exactly as you want. I have made about 130 wire wheels with my technique, but even now I would not be able to build one without drawing. Since the outside spokes of standard rims are, as already said, inclined from the hub to the rim well you have to bevel this surface of the spoke ring accordingly - otherwise the superglue cannot fix the inclined spokes properly. This is simple: paint the surface with a permanent marker, and with a #11 blade scrape until you see a bevel that seems sufficient. Don't overdo, leave a small strip of paint. This guarantees that you will not see ugly ups and downs in the spoke ring when the wheel is finished. On standard rims the hub unit can be seen very clearly, so it has to look authentic. There are several ways but the best and easiest result is achieved with these inexpensive parts electricians use As far as I know they are called "wire end ferrules" in English. Instead of stabilizing the end of a cable by soldering electricians slip on such a ferrule and crimp it. Since they are obtainable in various diameters and more or less telescoping, it is very easy to make realistic hub units. For this photo I have assembled two ferrules and a washer provisionally to make clear what I mean. You see these parts on almost all my rims. I can asure you that understanding my awkward description is the only difficult thing about my technique. Take the trouble and try to understand the technique. I am optimistic that - once understood - you will find it worth-while.