.png.e8a693cd7d5b778fc679de108eeb7eb9.png)
KurseD
-
Posts
70 -
Joined
-
Last visited
Content Type
Profiles
Forums
Events
Gallery
Everything posted by KurseD
-
Ordered a scoop from user "propsplus" on eBay. A little taller than I was hoping for, but hardly noticeable. I'm very happy with it.

-
Thanks guys, I appreciate the positive comments. Hopefully the distributor arrives soon, I'm dying to button this one up.
-
Thanks man.
-
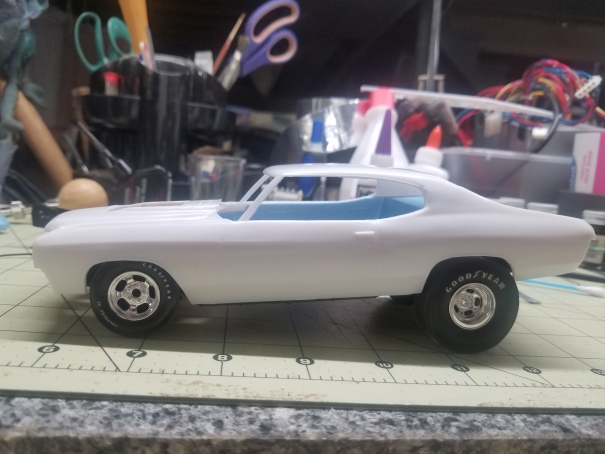
Not very happy with the job I did on the Pledge clear. It looked super wet and glass like when I finished clearing, but after drying it dulled quite a bit. I've also learned to apply the Molotow chrome pen after clear, as it dulled down quite a bit. Still, with all the flaws, I'm happy as it was a fun build. Still waiting on the distributor to arrive in the mail and I will finish it up. One small sag in the clear on the driver side quarter panel. it is what it is.
-
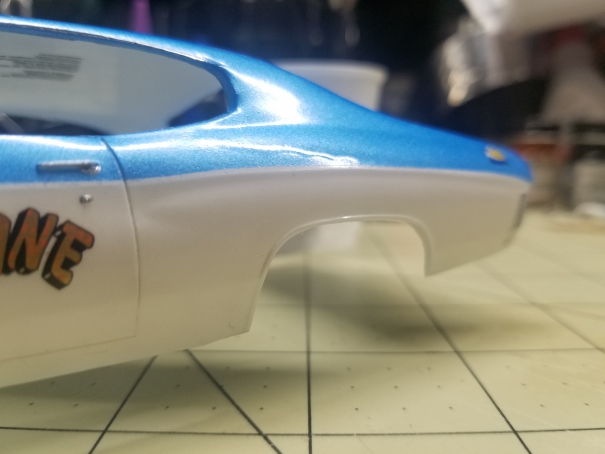
Decals are on, will clear tomorrow I hope.
-
Love it!
-
I built that Monogram 66 Malibu kit as a kid around 1990-ish. Loved it. I found a scoop exactly like that on eBay I'll be purchasing tonight along with some steelies for the rear.
-
Thanks!
-
I'm certain I had several models that had the correct Cragars, and even had the skinny fronts, but I'll be darned if I can find any of them now when I need one. LOL! Thanks for the comments.
-
Found some 5 star rims in the parts bin, but not really satisfied with the look. The spokes don't seem to have the same flat surface as the old Cragar S/S rims did. Popped the hood and interior pan in the freezer for a while. Broke the hood scoop and seats off without too much issue. Tiny bit of damage on the hood, and some holes in the pan, which have now been filled with green putty. Plan is to flock the floor pan anyway. Painted the chassis, axle, and leaf springs. Played with my new chrome pen on the diff cover. Assembled the 350 / 4 speed combo from the Camaro, found an old small block in the parts stash that donated headers and valve covers. Going to soak the valve covers to remove the paint and repaint them before installing.
-
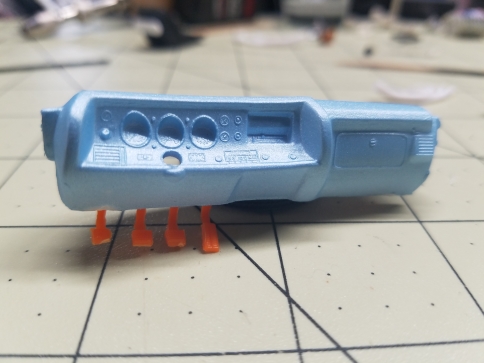
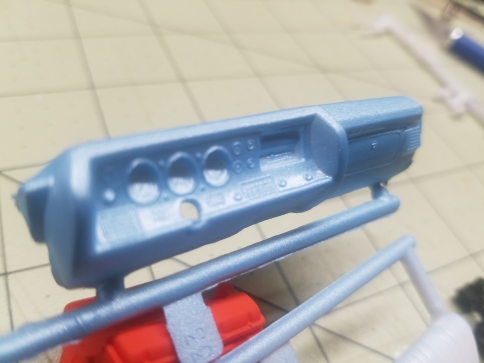
Molotow 1mm chrome pen came in, I'm VERY impressed with it so far. Tinkered a little, but I'm mostly in hover mode on this one until the decals arrive. Another mock-up, because I'm a sadist and enjoy knocking the headers off apparently. LOL! Played with the chrome pen on the fire extinguisher and dash. Also did the trim on the body, but forgot pics of that.
-
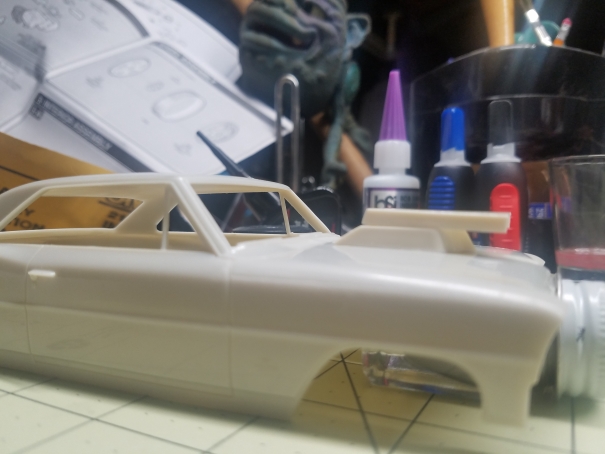
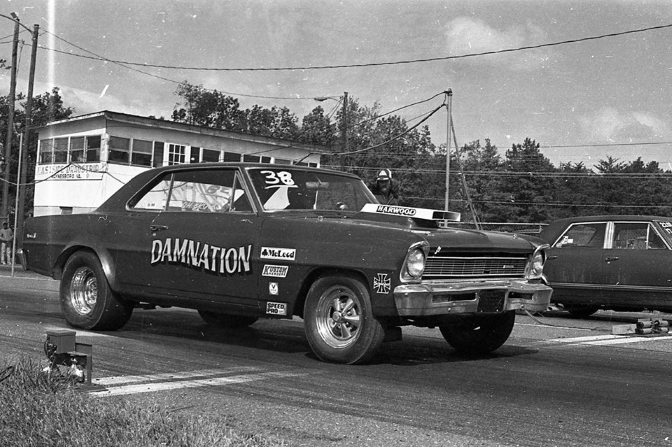
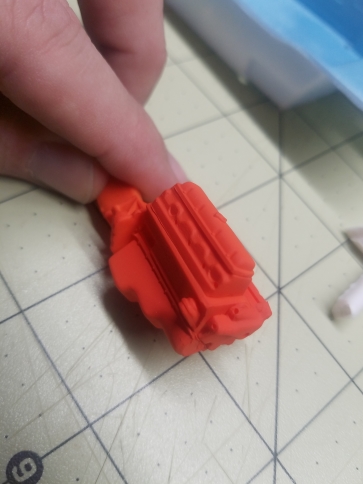
Sometime around 1980-81 my brother-in-law purchased this car from a local racer, and my dad helped him with tuning and driving it. They raced the car at our local track for a while, but it was constantly plagued with engine problems, so they eventually sold it to another local racer. I remember helping with pushing it down the staging lanes when I was a tiny little thing, and always thought it was one of the coolest cars in the world. I would love to build a 1:1 replica someday, but seeing the prices that 66 Novas are going for these days, sadly I don't believe I will ever come across one suited for the build at a cheap enough price. So I'm going to try my hand at a 1/25 replica. I've had this AMT kit sitting around since the early 2000's waiting to be built. It appears I had started building it at some point and lost a few small parts along the way, and also glued some together prematurely, no biggie I can work around that. The attached picture with the kid in the Spiderman tshirt is me at 3 or 4 years old, and my father sitting in the car at my brother-in-law's house. The black and white is from the local track on one of it's races. The car ran a 350 / 4 speed combo with a single 4 barrel, but the kit came with a 350 / th350 combo, so I'll be using a donor engine / trans from another 70 1/2 Camaro kit I have for various parts. So far the parts that I'm having a hard time locating in the spare parts boxes are a correct style hood scoop, and the steelie rear rims. Hopefully I can source something online.
-
Battery cables finished and fuel line run. I'm pretty impressed with these craft acrylics through the airbrush so far. They do seem quite week as far as adhesion goes, so after I finish these two models, I'll be giving MCW Finishes an order for the next one. Got the body in color. Now I'm just waiting on parts and things to arrive. Ordered some decals from SLIXX, a pre-wired distributor from Arrowhead, and a Molotow pen from Amazon I think. I've never messed with the Molotow pens either, so that should be fun.
-
Beuatiful build!
-
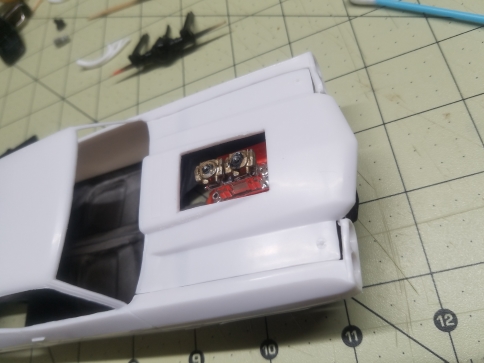
Wash in the grille, worked on the dash some. Used a push pin for the signal lever with a dab of CA painted black for the knob. Interior is coming along. I used a piece of the rubber tubing from the USB cable for the roll bar pad. Radiator support is on along with battery cables, the red cable will get tucked when the glue dries.
-
brake lines in the master cylinder and heater hoses on. I know most drag cars didn't run heater hoses, but this one does. LOL
-
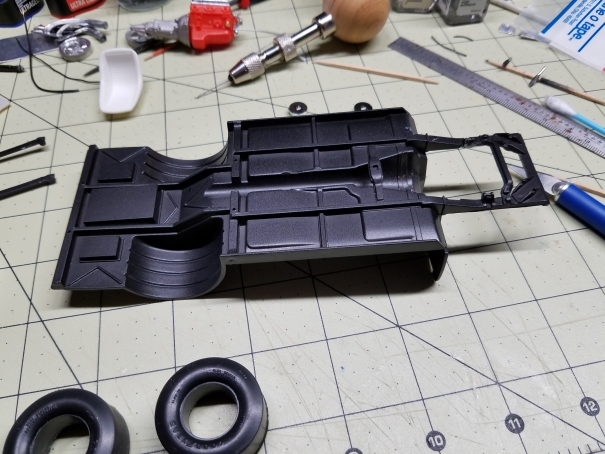
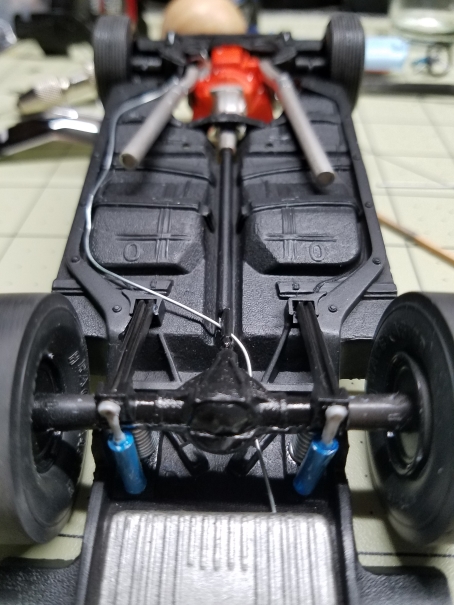
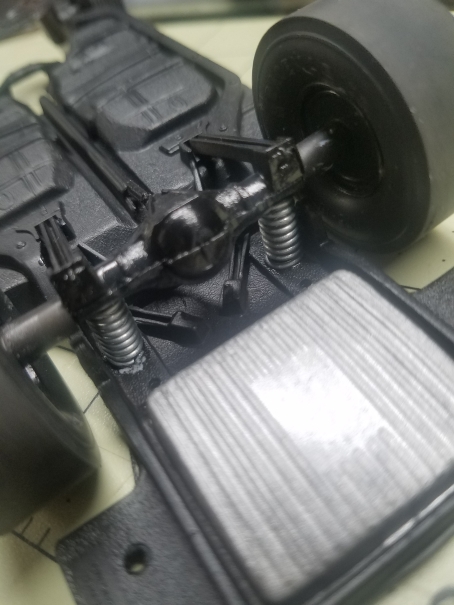
Got the springs and rearend mounted. Decided to just use some styrene tubing for the shocks. I just used a tubing with the correct inner diameter so that the original shocks fit inside, then used a small piece of tubing to work as a mount to the pan. The headers and exhaust pipes gave me a fit. Driver side went on perfect, but the passenger side was a total nightmare. I glued the pipes to the headers, then wrapped with aluminum ducting tape, then sprayed them a steel color with craft acrylics. Had to remove the passenger side header and bend it to allow the pipe to fit, in doing so the darn pipe came off ruining the tape. UGH! The passenger side pipe still sits at a weird angle, but it will suffice.
-
Mock up for ride height check. Still haven't figure out my shocks, but I'll find something.
-
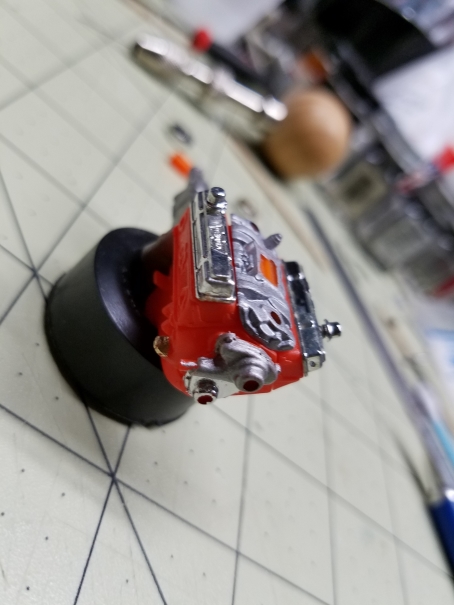
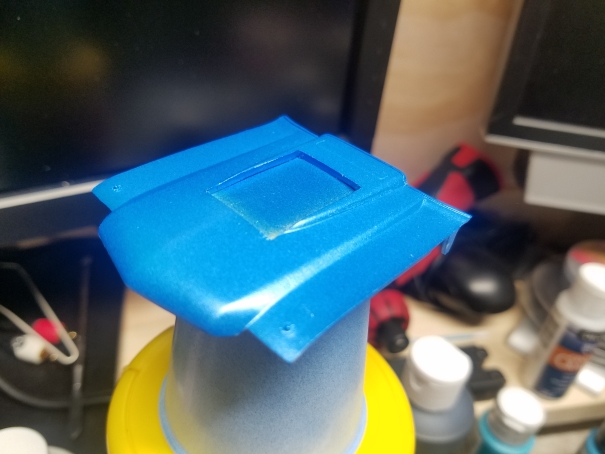
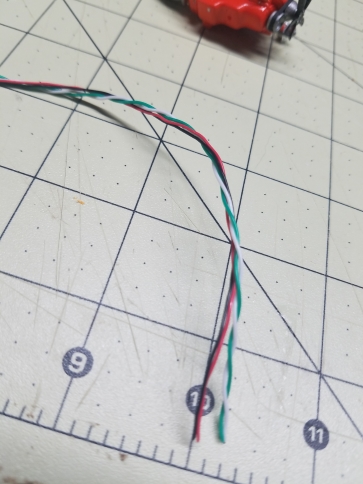
Got the engine mostly finished up. The box stock headers have no flange and look odd, so I tried reworking some fender dump headers, but still not pleased with those, so back to the stock headers I suppose. Had some scraps leftover from a 70 Camaro slot car build, so I cut the pedal assembly from the dash and added to the Chevelle dash. Used a piece of sprue cut from the door window to make a base for the race bucket seat. Worked on the chassis some. I made some coil springs from wire wrapped around extra sprue. Need to figure out some shocks as well, because it will need quite a bit of lift to clear the giant slicks. Not happy with the grille fit yet, still sanding and playing with it. I'm hoping it will look a bit better after glue and clamps. I decided to leave the funky bubbles on the side of the body. It's not a competition build, so no need to stress it. Also cut out the hood to clear the tunnel ram and carbs. I split open a USB cable for the guts, looks like it will make good plug wires.
-
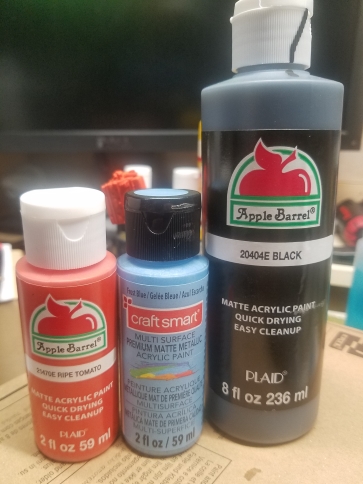
Thanks for all the kind remarks and advice guys. I'm going to try sanding the body lines down a bit before paint. I picked up an ultrasonic cleaner for my airbrush from Harbor Freight today, love it so far. I've airbrushed all sorts of things from motorcycle helmets to hand tooled leather chopper seats, but I'm not quite sure why I never broke one out for a model car yet. So I came across some info online today regarding craft acrylics and Pledge future, decided to give it a go. So far I'm pretty pleased with the results, but it's too early to be certain. I'm using a mixture of acrylics, some from Walmart, others from Michael's Crafts. I'm thinking about doing white body, blue interior, but not 100% on the white body yet. I was trying to match the light blue interior of the 70 SS, but it seems way too light to me. Not sure if I'll make a trip back to the hobby shop, or try darkening the blue with another shade I have. Got a few things painted tonight after a long battle between my airbrush and humidity levels. I need to find my water trap which has gone M.I.A.
-
.thumb.png.da75fca4d365911b38df51c5407cdaf2.png) Snow is holding me up from supplies so I started another. I've had these sitting around for a long time, finally getting around to knocking them out. Bought the pickup around 2003 I think and some time around then a friend gave me the Racer's Wedge he had already assembled.
Snow is holding me up from supplies so I started another. I've had these sitting around for a long time, finally getting around to knocking them out. Bought the pickup around 2003 I think and some time around then a friend gave me the Racer's Wedge he had already assembled.
-
Because I can't resist a mockup shot.
-
I thought about doing that after I first noticed the odd bulges, but honestly there are quite a few weak spots with this kit, so I just said the heck with it and drove on with what I have. I own a 1:1 1972 Chevelle, so maybe I'm just being too picky due to sentimental reasons. Either way, I'm having fun tinkering. Thank you for the suggestion though.
-
Found a few more parts in the stash, no idea which models they came from either. Bolt pattern doesn't match front/rear rims, but with the lacking quality of the kit out of the box, I'm just hoping to have a bit of fun with it at this point.
-
Just started this one today. Long way to go and I must say I'm very displeased with the quality of this model. You would think these companies would eventually update some of their poor castings with as advanced technologies as we have today. The body bulges on the quarters and fenders are way off, square gas tank instead of rectangular, etc. Just going for a decent looking drag strip basher on this one. Slicks and slot mags are from a Polar Lights funny car or rail I believe, not 100% sure as I've got a box of extra parts from previous builds and they were in there. The supplied Goodyear Polyglass street tires are really nice, so I'm going to keep them. Not sure if I'll stick with these 5 star rims for them or not though. I've also found a rollbar with fire extinguisher in the parts stash that I'll be using and omitting the rear seat.