
heptoman
-
Posts
98 -
Joined
-
Last visited
Content Type
Profiles
Forums
Events
Gallery
Everything posted by heptoman
-
What now??? There was some clear coat ghosting on the passenger front quarter panel, I've already sanded it out. But here is the killer: that awful "dust" spot on the trunk. I use quotations because I think it was dust but it was huge! I sanded it down but now what??? Do I have to re-sand the whole vehicle to make sure the base color and clear coat are equal???
-
Quick update but no pics. I dropped on the final wet coat and it looked really nice. Then I did the first clear coat, and then it looked REALLY nice. Then I did the final clear coat, and got a speck of SOMETHING on the trunk deck, even though I had it covered to cure!!!! Not happy!!!!!!
-
Thanks for the interior color comments. It's just Tamiya AS-27 Gunship Gray 2.
-
Nice. I'd post a pic of our 'stang but I still haven't washed it since our three snowocalypses a few weeks ago here in the Big D.
-
Thanks everyone! Like I said, this is a slow work but I've been getting stuff done, just haven't been taking very many pictures. I decided to repaint the valve covers to match the real engine. I don't know why the instructions say black! Also a shot of the completed interior and top of engine bay. I am cementing that space up front as soon as I'm done posting this! Another view. Undercarriage. Exhaust is Alclad steel. Rear suspension. Wanted to match our real life Mustang's orange Koni shocks and struts. And exterior. I tried to match the Ford Torch Red color as best I could but this may be a bit too bright. We'll see. This is after two mist coats and a wet sand.
-
Update time! I'm sorry I've been slacking on this but I've been working on it anyway. I'm done with the fender. It took me long enough, but I finished it and am sort of pleased with how it turned out. I just had to keep sanding the filler the right way. Anyway, I scribed the new trunk line, hit it up with primer sealer, and started the body color. I forgot to snag pics of all that process, but here it is as of a few days ago. I've since added a couple more coats of green plus some wet sanding. Rear view: Side view: Plan: final mist coat today, wet sand tomorrow, first wet coat Tuesday, wet sand Wednesday, final wet coat Thursday, decals on Friday, clear coat on Saturday. After that, it's details - Alclad, vinyl top, windshield wipers. I'm getting pretty close (finally).
-
This I know.... Once I seal the primer it cannot be modified???
-
Okay, I think I'll give it a shot. HOWEVER - if I do, is it like clearcoat with "no going back?"
-
Alright everyone, update: although no pics. I tried reattaching the front bumper last night and it didn't go very well at all, so I think I'm going to just order replacement parts. The body is now in a pretty sore shape. So this one is going to have to be shelved for a while. Need to focus on the GTO and the Mustang.
-
Hey everyone. I'm getting really frustrated with this fender. Here is the state of things: Upon closer inspection you can still see that stupid seam. (Easier to see in real life). And the driver's side, which was almost perfect? Back to BLAH_BLAH_BLAH_BLAH again! (edit: really??? Censoring Cee Arr Ayy Pee???) I'm at wit's end - about to trash the whole thing. If, by sealer, you mean clear coat after the body color is down, then definitely yes.
-
Wrench - if this next go-round isn't successful then that's something I might try. Otherwise...???
-
Justin - me too. We'll see. I think I've fixed my painting technique. Ryan - not being sarcastic...what do they say???
-

Another Duck
heptoman replied to heptoman's topic in WIP: All The Rest: Motorcycles, Aviation, Military, Sci-Fi, Figures
Scott, thanks! Being a Ducati Panigale superfan, I'm a bit biased when I judge the quality of this particular model. But subjectivity aside, I think it's a really good kit. Supremely detailed. The way I understand motorcycle construction, you pretty much build it as it comes from the factory. I liked the screw assembly, BUT, if I was in charge at Tamiya, I would have done it a bit differently (closer to the original). This kit has to be one of the most fun projects I have had (counting all of my million hobbies). -
Thanks, I think I'm set for the next eight or so months.
-
Remember me? Remember how dissatisfied with this paint job I was? Starting over! Paint is stripped, body wet-sanded, reassembling of parts.
-
Okay folks here is my current line-up. A few of you might remember the BRZ I did a while back, my first model since coming out of my dark age. Detailed here. I also did, in between the BRZ and the Panigale, a Lamborghini Countach which I have also started to re-do. (Dissatisfied with paint there, as well). Detailed here. I've already started slow work on the Mustang. Detailed here. The other shells are the Tamiya Lamborghini Murcielago LP670 and the Revell '67 Camaro. Those are way further down the road as I still need to finish my dad's GTO. Detailed here.
-
Another work in progress! This is to finish matching our real life auto garage. In true Model Cars Mag forum format, here is a mock up of the shell. The only thing on this that I have done is the basic engine. I've been having fun getting used to my new airbrush. This is Alclad aluminum on a gloss black base. Valve cover and oil pump are can painted Tamiya TS-29 semi-gloss black. Oil pan. That's all for now. This is a slow work.
-
Okay, so I thought about doing a restoration but I decided against it. I also wanted to have the full "joy" of rebuilding the thing and marvelling about how much I didn't understand back then. So I bought a whole new one and unfortunately I didn't take any pics of the process. But once she was done I was pretty pleased with it. Until I finished the Ducati. (Here). And was REALLY pleased with that, and compared to the Lambo, I still hadn't figured out paint yet. So I decided to strip it and redo it. So here I am in the process: Interior and engine: I thought I had more shots of the exterior "stripped" but I don't. I'll have to do that later. Too many pots on the stove!
-
Hey everyone, here with another Lambo. I did this version WAY back when I was 9 or so. Really awful. Apparently I didn't know masking tape existed back then. This model has also been in storage for over 20 years. Interior.
-
Still working, sorry for lack of updates. I am STILL trying to smooth out that rear fender, but I think I finally have it this time. More pics later - here are some other things with the car. Now that I have an airbrush (fun!), I stripped the chrome off of this puppy and am going to Alclad it. I need to micro mesh sand it, it's not as smooth as I want, but it's getting there. This is with Alclad gloss black base. Another view. Here's where I need to smooth it out and perhaps lay down another coat. More pics later tonight - body is primed for next inspection.
-
This is a great build. Big fan of Astons - and this kit is on my wishlist. Love the paint scheme. Keep it up!
-
Hey everyone, I'm still working on this rear passenger fender. I was really unhappy with how it was turning out. I'd add putty, sand it down, and I kept getting a ridge. So I decided to strip down almost all of the putty and start over. When I did that, I noticed that the seam was still pretty bad, so I added some more strip styrene to the inside to reinforce it better. Before: After: The weird flaky substance on the styrene is cement leftover from the binder clips I used while the cement cured. Easy to sand off. And the next (and hopefully last) layer of putty laid down. Currently waiting to dry/cure, then sanding, prime, body color (finally!!!) Pretty soon I'm going to start on my own Christmas presents. To finish matching the real garage: Then the future 1:1 restoration project with my dad: And then to continue my Lambo collection: And also there's a Tamiya 1/24 Countach restoration also, so plenty of work for me!
-
Another Duck
heptoman replied to heptoman's topic in WIP: All The Rest: Motorcycles, Aviation, Military, Sci-Fi, Figures
Thanks for the kind words, everyone. -
Another Duck
heptoman replied to heptoman's topic in WIP: All The Rest: Motorcycles, Aviation, Military, Sci-Fi, Figures
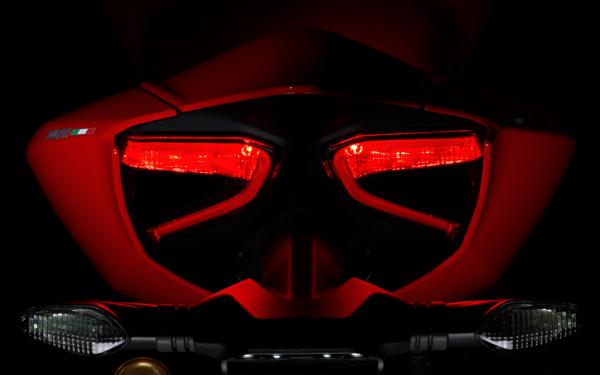
Teil Zwei! I tried to get some detail close up pics, some of them came out okay. Marchesini forged wheels - those decals were a PAIN. The red stripes are three separate decals on a tiny ridge of the wheel, and the Marchesini logo is a separate decal you place ON TOP of the striping. You can also see the exhaust wrap underneath the cover. I love this bike!!! Electronics. Another view of the rear lights. Aesthetically pleasing, IMHO. Front suspension and radiator. Ohlins forkset, Brembo brakes. THOSE decals were fun! Rear suspension. The can is metal. Rider's stance. The bit that covers the fork screw fell on the carpet and was lost forever, probably to Roomba. Oh well. Looks okay anyway. Close up of dash. The blue rings are part of the detail up set. "Beautiful blue." (Google/Bing Doyle Gammill. Awful but hilarious marching band judge tape.) My dream bike! I'm definitely going to do another one, make it white, and have a working chain and drive. Might also do some other things, especially now I have ALCLAD. Hope you all enjoyed! -
This post inspired me to take some pics of my Tamiya 1:12 Ducati Panigale 1199 that I finished in October. This is my dream motorcycle - so it was very exciting to build it. As per Tamiya, the kit was in excellent shape and well detailed. The only aftermarket items are the Tamiya detail up set with the machined forks and rear shock preload canister (which is well worth the money). Although it is not perfect, I'm extremely proud of the work that I did on this, especially since it was mostly can and brush paint - I didn't have my compressor or Badger yet, so no Alclad. Here we go! Since it's a Duck, I HAD to do Italian red. My next one will probably be the pearl white with red rims that they offer on the 899. I think single sided swingarms are the sexiest thing ever on two wheels. (Partly that is the reason why my next bike is going to be an Interceptor.) Rear view. I LOVE the tailights. I decided to not put the rear fender. Just gets in the way. Top view. Needs maintenance? No problem. (All body work was molded in white, so I'm especially proud of my paint job on the fairings.) Other side. Another thing I LOVE about this bike is how they wrapped the exhaust. No can to get in the way of that gorgeous single swing arm! Front view. LED lights.