
heptoman
-
Posts
98 -
Joined
-
Last visited
Content Type
Profiles
Forums
Events
Gallery
Everything posted by heptoman
-
Very cool. Following this for ideas - I got this kit for Christmas, looking forward to starting it after I'm done with the GTO.
-
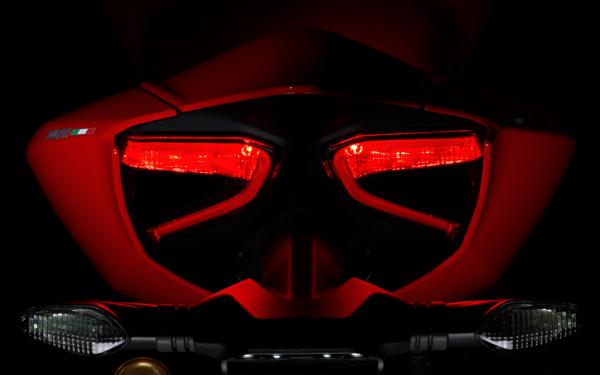
 I have this kit, it was thoroughly enjoyable to build. I love your fairing paintjob! What did you use to distinguish that flat black from the seats? Since this is also my dream bike I will be getting another one (or two or three), but this time I want a working chain! Larry (nice to see someone in my neck of the woods!) - that fork set is a metal detail from Tamiya. It includes the forks themselves, the preload valves and connectors (at the top of the forks where the blue parts are), as well as the Öhlins rear can. Very nice machining, worth the 25 bucks.
 -
Another update - and picture of the source of my "frustrating" challenge. In these first two shots, you don't see much issues. Yet, change the angle of the reflection and you can still see the tiny seam between the two parts. Granted - it's getting smaller but I'm having a heck of a time perfecting it. Part of me wants to shoot primer on it and see if it shows up but I have a limited amount of primer left here in the middle of nowhere.
-
This is very nice! I am definitely following this - like the car, like the kit.
-
Stunning. Makes my GTO look like a baby toy. Oh well. Keep up the great work.
-
Ok everyone, I was able to pull pictures from my phone onto my tablet. Here is the '66 bumper with the '67 grill inserts. And the rear trunk deck. Still some smoothing to do. I'm holding off on the trunk line... And here's the inside of the rear showing my styrene joints. This helped me IMMENSELY. The injector pin molding doesn't get in the way of anything in the '66 kit. Passenger side, more sanding, flattening. It's going to need a bit more body filler - there is the TINIEST of bumps! And the other side. I know it doesn't quite look like it, but I believe this side is ready to go. Very smooth, if I do say so myself. That's all for now - waiting for the wetsand to dry completely before another shot of primer and filler. Getting pretty close now, though. Also - you might have noticed I haven't been paying much attention to the roof - that's because I'm going to put on a black vinyl top to match what my dad had on his. That will be a whole other adventure.
-
Again, thank for the comments everyone. I can't get the quotes to work, so I'll answer everyone's questions. I decided to cut along the back end of the rear wheel wells because it seemed to me the best place to rescribe the trunk line, match up the panels, and give me enough room to get small pieces of reinforcing styrene on the inside (which I forgot to take picks of). I also decided to put the '67 end on the '66 body because overall, the '66 body was far superior to the '67 (as Art mentioned - vast year difference between the two kits!). The '66 front end is minutely different than the '67 but I'm not going to worry about it. I also took the grill inserts from the MPC with the angled grill and sanded them down super thin and inserted them into the '66 front fender. The '66s had a horiz/vert pattern to the grill, the '67s had angled, so I wanted to get that at least correct. The only things from the MPC kit that I'm using are the rear bumper, rear deck, and grills. Everything else is the '66 - so the chassis and interior will definitely fit, even with the '67 tail. I'm going to try to post more pictures but my wife and I are at my parents' ranch, limited internet/tech availability. I'm sure I'll find some way to make it work.
-
New distributor and ignition wiring. Real pain. I'm going to reroute the wires tomorrow once the glue sets. Close up of left rear on the body. Still a bit of levelling to do, but it's manageable and it's getting closer to where I want it. Right rear fender. This still needs a lot of work. That's all for today. Happy New Year everyone.
-
I decided to sand down where I had filler and make it a bit more even. The green paint magnified the tiny bump so I'm adding more. I will also resand down the rest of the exterior. Here's a pic of progress - before sanding. Okay, distributor and wiring removed, ready for the kit. And - another view of the interior. I forgot that I didn't show the dashboard! (The flash sort of covers the gauges but they're there - accurate for a '67).
-
Thanks for the comments, everyone. Got the rear suspension in last night. I used some left over battery cable for the springs. Flipped over. Engine. I'm redoing the distributor and spark plug wires today.
-
Ok great thanks! I will try that. Need to find my new blades.
-
Hey everyone, it's been a while but I've been model-busy nonetheless! My current project is a Christmas present for my dad (yes, I know Christmas was 5 days ago, but liturgically, it's still Christmas - 12 days!) His first car was a 1967 GTO and he's been lamenting selling it ever since. A long time ago I got him the MPC model kit, but he never finished it. So I decided to get a new one and do it for him. Big mistake! I read the reviews, but I should have paid heed. The new "Round 2" MPC is AWFUL! I got so frustrated trying to fix fitment and flashing and everything I hardly got anything done. So I saw the Revell '66 kit and decided to get it and make it look like a '67. Within the first three hours I had gotten more done on the Revell than I did in the two weeks I worked on the MPC. (Maybe some of you more experienced gurus could have fixed the MPC '67 but I sure can't and don't want to.) Revell is SO much better, but I still had to Frankenstein the '67 rear onto the '66 body. I should have taken more pics of the progress, I just wasn't thinking about it and I was also under a time crunch. Nevertheless, I am pretty pleased with how it's coming together SO FAR, considering that it was my first time with something like this. Here is a pic of the '67 body with the '66 end to see how much I chopped off/reassembled. Here is the '66 body with the '67 tail. Upon further examination I still need to do a little more body work to smooth it out. It wasn't a quite perfect fit (is it ever?) I also need to scribe a new trunk line - they didn't line up either. Pointers? Here is the interior and two wheels. I'm really proud of the woodwork and the seatbelts. And the undercarriage. Can't wait to put the rear suspension on so I can show the engine - really proud of that too. Of course, that is the authentic Pontiac Metallic Blue engine color. Running that brake line was a pain. It's not perfectly straight but oh well. Thoughts? Comments?
-
Update 11.09.2013 Part 2 - 99% complete Hey everyone, just finished up on this thing (mostly). Another view: Bonnet open: Rear quarter panel: Back: And compared to the real one: I will work on getting some better comparison and close up shots. The last 1% is body line painting and obviously the rear license plate. I'm holding off on that to make a custom one that matches the real one.
-
Thanks for the comments everyone! Hey everyone, sorry about the lack of updates - it's been busy around here and I've been forgetting to snag pictures of the small amount of work we've been doing. Anyway, here are the wheels, which were a huge PITA (I did use the method Tamiya suggested but the process still sucked): You have to paint the whole wheel and scrape the paint off where you want chrome. Mind numbing, tedious work. Here's the 95% completed engine bay (battery is missing a decal). Headlights are assembled also, but it's hard to see that in the pic. The model is about 99% complete - two more decals, one paint spot, and a quick polish. I should be able to post last pics tonight.
-
Update 04.09.2013 Hey everyone, update time. Got some detail painting done last night. Front and rear lights, painted, assembling tonight. Windshield with antenna decal. And body after a few touch ups. Going to wet sand tonight and apply last coat of clear. Also, working on wheels tonight. Getting near the end!
-
Ugh. Well, lesson learned for the second one. (I think I decided last week to go ahead and make another one later). Although the paint doesn't look like the real version, I do think it's pretty cool looking, in its own right. Update 01.09.2013 #2 (I wasn't able to get this copied from my other forum on Sunday, but here it is....) Rear view mirror. Small and blurry, sorry...but painted, ready for metal transfer for the mirror. After metal transfer: Same process for side mirrors: And after: Body with mirrors: Rear view: Top of body masked for more trim painting: Tonight: painting headlights and rearlights, detailing engine bay, touching up body. Tomorrow: possibly final assembly!
-
Thanks! Work's been a bit slow though the past few days. Hope to pick it up again tonight or tomorrow.
-
The factory color is "Dark Grey Metallic" so yes, it's SUPPOSED to be glossy. Earlier I expressed my doubts at Tamiya's suggestion to use "Dark Blue Silica" to replicate the color. I might do a wet sand, mask up the engine bay and do another few shots of Mr. Super Clear.
-
Update 01.09.2013 Hey everyone, sorry about the lack of updates. I wasn't able to pull pictures off the camera on my laptop for some reason. Problem resolved, for now. So this update is a few days worth of work. Here is the exterior, masked for painting the weatherstripping trim. Windshield and side windows, after painting and masking the rearview mirror connection. Both windows, masked for tint job. Interior. Windows after coat one of tint: More updates after church.
-
Update 29.08.2013 An update. Sorry for the blurry pictures - I'm now using an actual camera and trying to figure out settings. The camera also doesn't give a review of the picture once you take it, and I didn't notice it was blurred until I had moved on. Oh well. So I researched a bit for window tinting, and just decided to use Tamiya Smoke spray on the tint. I tested it on an old Countach model that I'm planning on redo-ing and it came out better than I thought. So, step one for windows, masking. Here is the rear window masked and ready to go. After painting and removing the mask. A couple of bleed through spots but that's easy to clean up. Cleaned up: Another shot (better): Front/side windows masked part one: Complete masking: Painted, mask removed. A couple more bleed throughs but it was better than the back window - until I noticed that the mask covered the top too much. I'll have to do some fine touch ups tonight. I thought I took more pictures but apparently that was it. I'll take more this afternoon. On the docket for today: finish window trim edging and then first light coat of smoke (of a great many).
-
Thanks! Don't worry - I'll have some comparison shots with the two together once I'm done, which should be about two weeks.
-
Okay, next step: I need to tint the windows. I was a good forum member and searched, and found the Big Three suggestions: RIT, Spray, and real window tint. But, Tamiya has provided a mask for the window framing, and that adds to my situation and concerns. 1. RIT dyes the WHOLE piece of plastic, unlike a 1:1 tint job which coats the inside of the glass only (I'm a striving perfectionist...want it to be just like the real one). 2. I'm not confident with my spray painting skills - I'm afraid I'd botch it with overspray (and I've also read the comments about Testor's not-so-great quality). I don't have spare windows hanging around to test, either. 3. Real window tint: too thick???? So - what to do, and what order? Should I mask and paint the trim, then tint, or opposite? Your thoughts?
-
Thanks for the welcome, everyone! Here is a link to my BRZ build - feel free to give me pointers and etc. I know it's a long post with lots of pictures, but I hope it's worth the read. http://www.modelcarsmag.com/forums/index.php?showtopic=78776
-
Thanks! Yeah I think she's a good one.
-
Thanks! I can't say enough good about the real BRZ. It isn't as fast as it looks, but the aftermarket is really ramping up. One of the forum members slapped on a supercharger. Lots of room in that engine bay! "For the most parts, people don't paint things still on the sprue tree for a number of reasons." This was a concern I had at the very beginning after studying the assembly directions - LOTS of tiny parts and my clumsy macro hands would have trouble with keeping prints off and etc. "Often this will need to be sanded flat, and on some kits these are in prominent places. Also, we usually have to clean up molding process imperfections like ejector pin marks and mold seams. That's all best done off the tree." When I have been painting on the sprue, I've been making sure to sand down and make everything look nice (I hope it looks nice!). "I do spray everything, so I mount the parts on toothpicks stuck into small Styrofoam blocks (taken from old electronics packaging) and spray accordingly." I can't spray everything...yet. "Also, for most kits, you will want to try out the fit of parts prior to painting them in case you need to sand / modify them to fit." I've also been making sure to do this, but it's a well made kit like you said and it hasn't needed anything except for the brake cylinder - I had to cut down the half circle that it mounted to - it wouldn't fit flush. "You are doing very well for your first kit in a long time!" Thanks! Please keep the comments coming, I love feedback. (Of course I do, I'm a musician...)