Field_Artillery63
-
Posts
74 -
Joined
-
Last visited
Content Type
Profiles
Forums
Events
Gallery
Everything posted by Field_Artillery63
-
 No problem Jim, and thanks allot blair!! That engine is aweSome! It's going to be mighty fun painting that insignia, any suggestions on what to use to apply the paint to the script?
 -
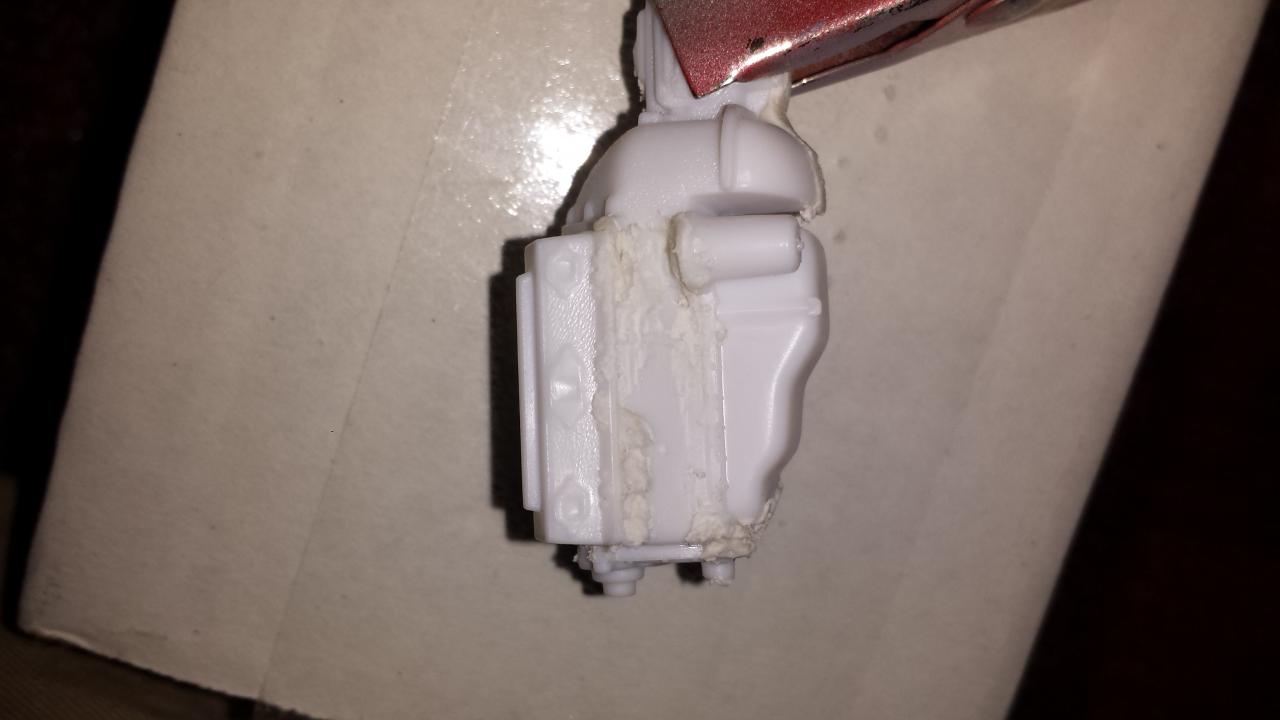
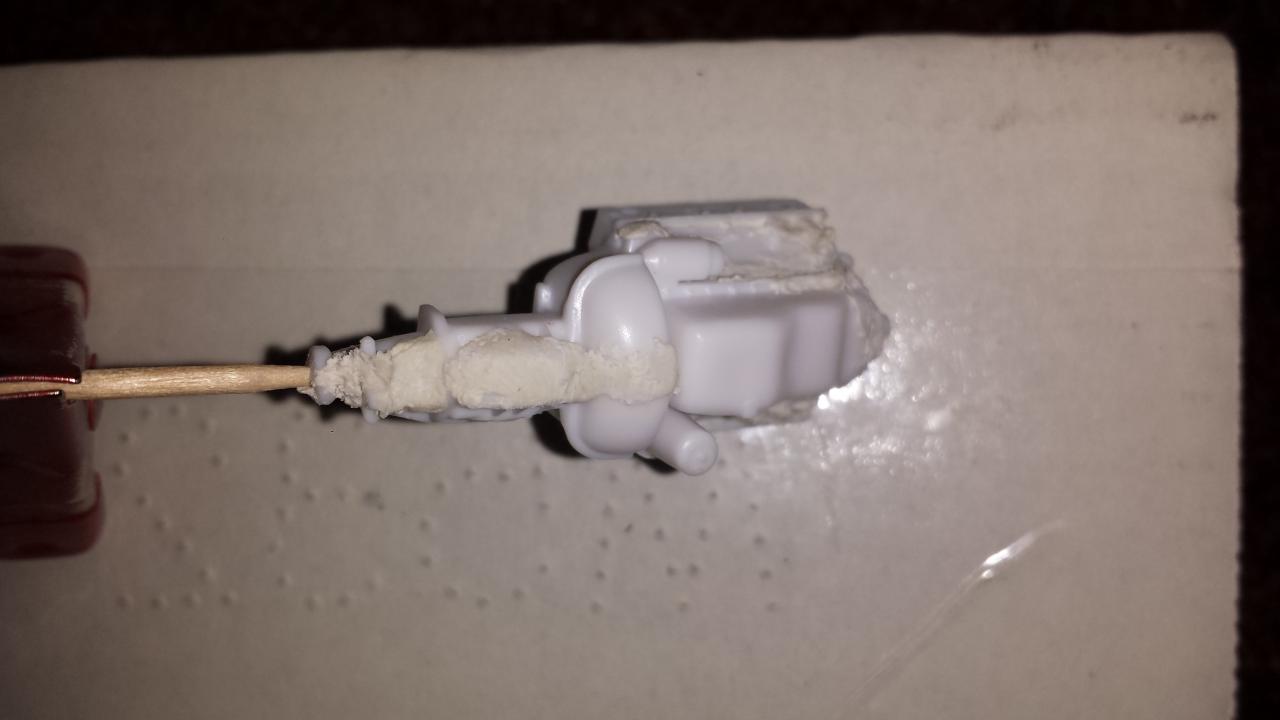
Ok guys, so first I glued all my "same color" engine parts together, and puddied all the creases with testors contour puddy. Didn't do this on my last engine and a suggestion was made to do it, very understandable since my creases were humongous lol. It seems like this stuff cures@/ dries pretty fast so 1st question, when should I begin sanding?? And question number 2, this kit came with basic white styrene valve covers and chrome valve covers...Any have any knowledge on what would look more authentic on this 65 chevy step side?? It's a 2 n 1 kit but I'm keeping it vintage, so I'll definitely not be putting the chromed out donkey rims and low pro tires. Sticking with hubs and white walls ))

-
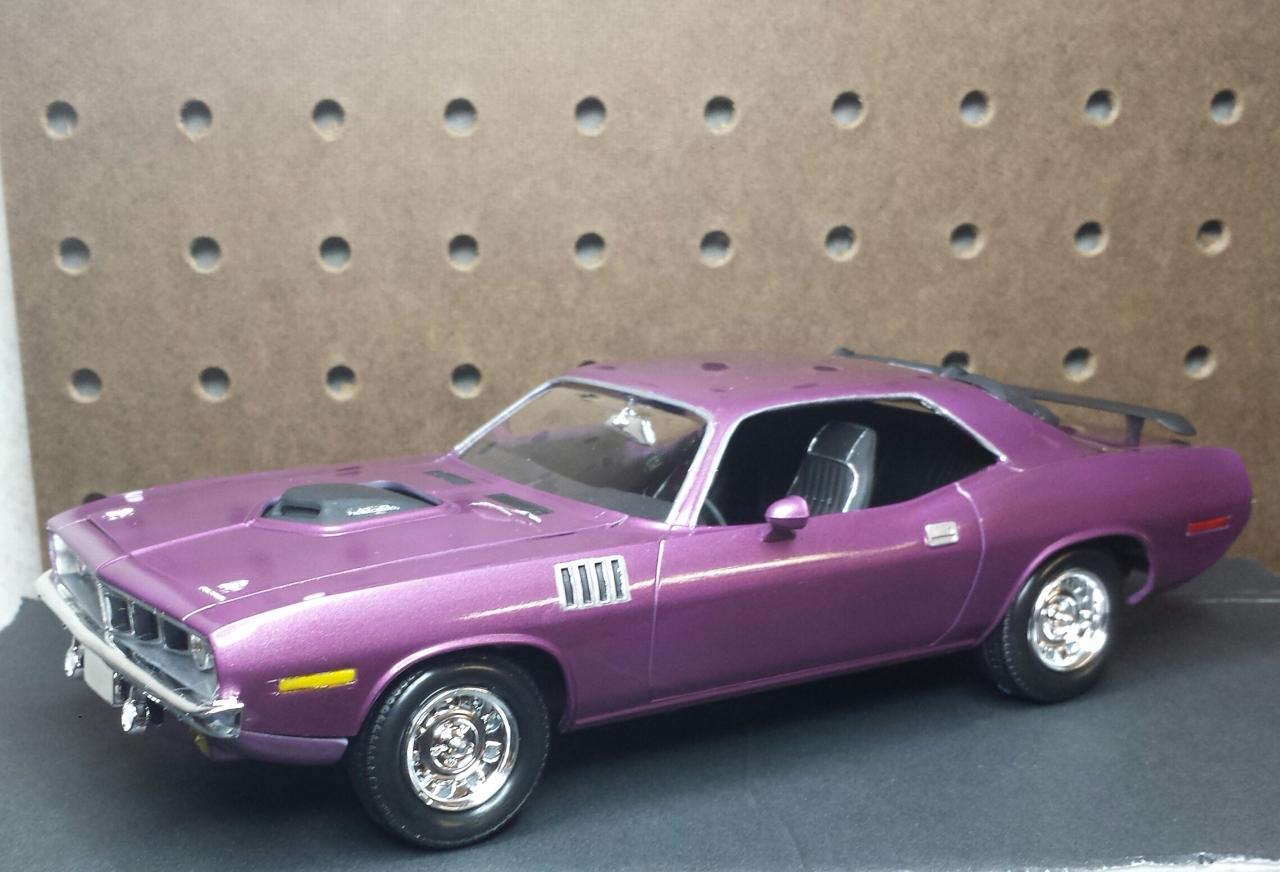
Alright guys, this is going to be my second model in 12 years. Just got done with the first, a 71 Plymouth hemi cuda. Came out pretty good, but there are allot of things I've learned to watch out for and things to do to better the overall detail of the engine, model, etc. Thanks to all the comments and constructive criticism I received from you guys! For me constructive criticism... it's a must and I'll accept it with open arms. Also I'm going to try wiring the engine, never did this before, but thanks to Jim Stepanek and his Crazy Scale Auto Parts I have all the wiring and colors of wiring I'll need to be able to accomplish this on this model and many models to come. Luckily I am an inspector at an oil field parts manufacturing machine shop, so I was able to get some really small drill bits, down to .015". Or, fifteen thousandth of an inch. Anyways, I'll be posting step by step pictures of the build, so feel free to come in. Thanks guys! Big Bruce
-
Help guys!
Field_Artillery63 replied to Field_Artillery63's topic in Model Building Questions and Answers
Thanks guys!!! I thought I was just over looking it. Even got the wife to look at the instructions. This kit is a 2 n 1. Different rims and lower/reg rear suspension. I'm going to keep it old school though. So 2n 1 kits are good for obtAining extra pieces to use for future builds I see. -
Help guys!
Field_Artillery63 replied to Field_Artillery63's topic in Model Building Questions and Answers
Why isn't it on the instructions booklet? -
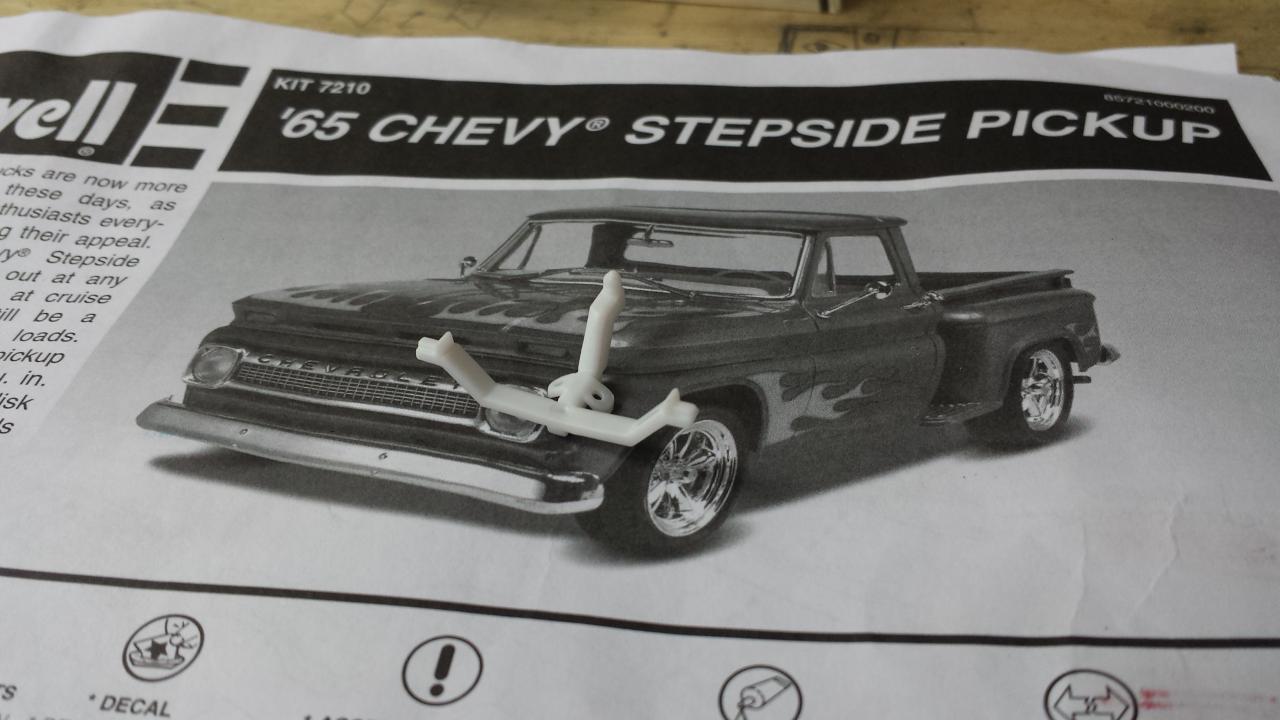
Hey guys, just got done taking all of my 65 chevy step side parts off the trees and cleaning them up and I came across this part, #62. But it's not anywhere on the instructions. I first thought it was something to hold a engine but it just popped in my head it could be a tow package/hitch. Any ideas???
-
Revell Customer Service
Field_Artillery63 replied to Rick Schmidt's topic in General Automotive Talk (Trucks and Cars)
Same with me, kept checking my email but figured they just couldn't replace it, then poof, in the mail . Why did my original post automatically get transferred to here? Just wondering? -
Revell Customer Service
Field_Artillery63 replied to Rick Schmidt's topic in General Automotive Talk (Trucks and Cars)
Before I finished my 71' Plymouth Hemi cuda, I had started on a 69' Z28 Camaro. I had completed the engine and was working on the chassis, I was putting it together,I got to the step to put on the rear axle. I COULDN'T FIND IT ANYWHERE!!! I knew I had it, and for a week I searched my house. If you have seen pictures of my workbench I keep things very organized as well as my house so finding it should have been easy....wrong... I was very upset. It was not connected to the tree when I first oPened the box, and I had put it in a container, then painted it with all of my other black parts. But it wasn't anywhere when I was ready to assemble it. So I wrote Revell and told them if there was anyway I could purchase another, and told them truthfully it was completely my fault and it was in the box, but I had misplaced it, ensured I wasn't trying to be mishonest, and once again was willing to pay for it plus shipping. it's been 3 weeks since I sent that message and I finished the 71' cuda. Well to my surprise the wife goes to get the mail and she gives me a small 1" by 3" x 4" box that has a Revell logo. It took a second for me to realize, maybe it's the rear axle! And sure enough, there it was!!! Wrapped in plastic and trimmed perfectly off the tree. I guess honesty goes a long way, I didn't have to pay for anything. Wish I had a way of calling the rep that handled my request because I would definitely thank them 10 fold. -
AweSome build. Wish I had a sweet ride like that so I could build a model of my car, don't think a 2000 Honda accord exists lol!!!
-
1970 Ford Torino GT, new pics added 3/14/14
Field_Artillery63 replied to bogger44's topic in Model Cars
Very Cool!! LOve the Colors -
Update: '49 Mercury Station Wagon!
Field_Artillery63 replied to Art Anderson's topic in WIP: Model Cars
Brilliant! You sir are a great artist! Love the wood grain! -
As for as the tires, it was two years ago but I think the width of the tires were allot wider on the rear.
-
1st 1 in 12 years finally complete
Field_Artillery63 replied to Field_Artillery63's topic in Model Cars
O I can assure you I'll never quit lol -
I just picked up a 65 chevy pick up and it had the same wheels but it also has the stock. Being only 24 I'm not really sure what rims you guys had back then, but after some questioning and research, never will I put rims like that on my old models. Everrrr. Lol
-
1st 1 in 12 years finally complete
Field_Artillery63 replied to Field_Artillery63's topic in Model Cars
Thanks everyone! Coming from you guys it means a lot!! I'm surprised without a clear coat it came out mirroring the peg board in the back ground. -
Next build
Field_Artillery63 replied to Field_Artillery63's topic in WIP: Model Trucks: Pickups, Vans, SUVs, Light Commercial
Wow!!! That's beautiful!!! The talents and skill of some People are just amazing. Thanks alot Niko!! -
1st 1 in 12 years finally complete
Field_Artillery63 replied to Field_Artillery63's topic in Model Cars
Thanks Mr Carl -
1st 1 in 12 years finally complete
Field_Artillery63 replied to Field_Artillery63's topic in Model Cars
It's there a way to level a bent hood?? The passenger side sticks up at the front.. -
1st 1 in 12 years finally complete
Field_Artillery63 replied to Field_Artillery63's topic in Model Cars
71' and you are correct. Thanks. I played this one safe. Think I'm going to do wiring on my engine for my next one -
1st 1 in 12 years finally complete
Field_Artillery63 replied to Field_Artillery63's topic in Model Cars
Thanks Bob and Lawrence! Greatly appreciated. -
Next build
Field_Artillery63 replied to Field_Artillery63's topic in WIP: Model Trucks: Pickups, Vans, SUVs, Light Commercial
Lol definitely not using those. That have the originals in the kit. Whose Watson?? -
your work bench
Field_Artillery63 replied to dabelltoller's topic in General Automotive Talk (Trucks and Cars)
Haha!!!!!!!!! -
1st one in 12 years finally complete. A lot of things I have learned that will be different on the next one. Small defects are so noticeable to the person building it I guess, but overall, I'm satisfied.
-
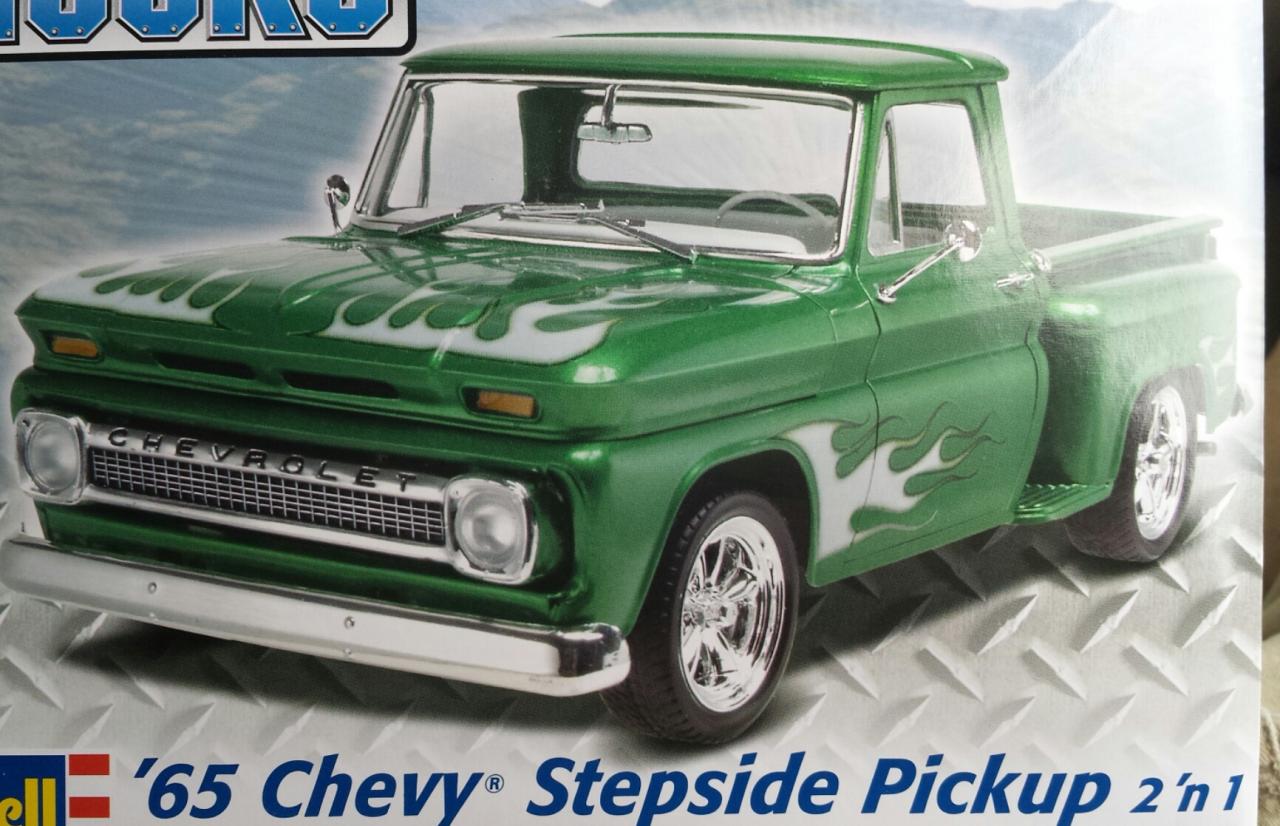
This is going to be my next build. Thinking of keePing it old school with original rims, but do the flames represent a 1960's era??? Need my older generation modelers to help me with this. You've been there. Thanks!!!
-
your work bench
Field_Artillery63 replied to dabelltoller's topic in General Automotive Talk (Trucks and Cars)
Once you learn the brush, safe handling when disassembling, and cleaning. They are very useful and fun to use. Plus you save allot of paint. I have cheap master air brush brand, Iwata, and badger. Badger and iwata are much easier to clean with parts that are less likely to rupture/ break. But they all spray pretty close to the same. For only using them for about a month now I've learned allot about them. There amazing little tools and make finishes so flawless.