GasPunkAlley
-
Posts
86 -
Joined
-
Last visited
Content Type
Profiles
Forums
Events
Gallery
Everything posted by GasPunkAlley
-
Sweet looking T bucket! I love the skull on the radiator.
-
Is that the MPC Switchers / AMT Boyd Coddington deuce kit? Cool green color. Is that Testo custom laq?
-

Dusting Off More Old Projects - 49 Ford Sectioned Custom
GasPunkAlley replied to GasPunkAlley's topic in WIP: Model Cars
Here is a pic of the 50 Ford convertible turned chopped hardtop using the original roof with a lot of evergreen plastic to recreate the moldings. There was an old Custom Rodder magazine I think that had both cars shown back in the '90's. The hardtop was metallic cobalt blue in color if memory serves me right. Also should I use a 49 coupe interior tub instead of the convert tub?
-
Dusting Off More Old Projects - 49 Ford Sectioned Custom
GasPunkAlley replied to GasPunkAlley's topic in WIP: Model Cars
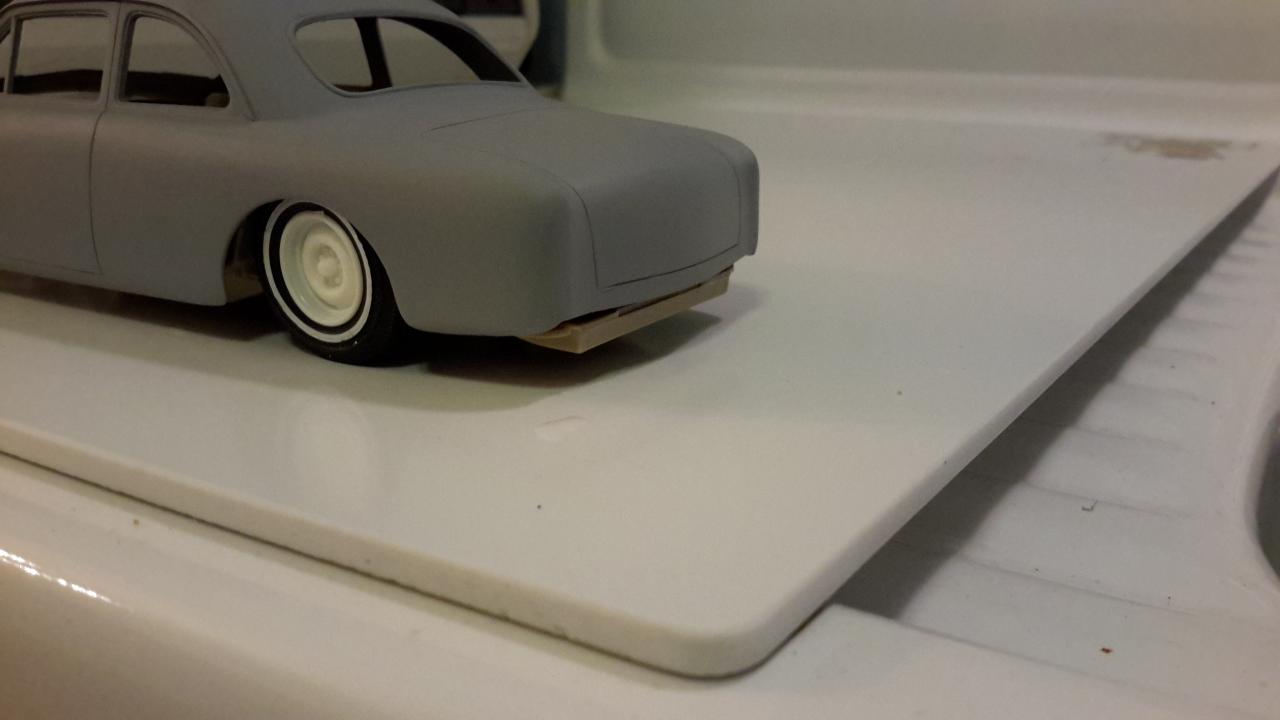
Well, broke out the primer tonight to see how my 17 year old body work looks. I use the cheapest KMART spray can primer. I like it because it has very fine pigment, for the lack of it, lol. I used to love Flo quilt platinum grey primer, but alas I found out that brand has gone the way of the Dodo. I found the usual file chatter here and there that I missed but the usual and anoying thing to me is the plastic raising around my work and ghosting of molded on detail that I removed. Has anyone found a cure to this problem? Is the any better sandals primer that won't ghost? I also figured out why I let this model sit in the box, the chassis hangs too low in the back and didn't know how to correct how the chassis plate is hanging below the rear fenders. I am thinking of taking a pie section out of the rails and angle it up and continue to shave material out of the hump in the chassis to clear the interior tub.
-
GW washes have worked wonders for me as well. Nuhn Oil, Sephriam Sepia and Agrax Earthshades are favorites of mine to use. I also like Nightshade mixed with Earthshade to make a warm black.
-
Dusting Off More Old Projects - 49 Ford Sectioned Custom
GasPunkAlley replied to GasPunkAlley's topic in WIP: Model Cars
Thanks Dr. Cranky! Tom, I am following the Valley Customs look and I am keeping the top unchopped. Just not sure if I am going to make a replica of the car or design something with my own front and rear end treatment. The next major engineering feat in the model is to massage the chassis to fit better. It is hanging up somewhere, I may need to trim the width of the chassis and floor pan as well as mod part of the floor pan just in front of the gas tank to clear the back seat. I will also have to massage the rear frame rails so it doesn't hang below the fender. Rod -
Found more old started projects today. I was working on a custom Ford using AMT 49 Coupeople as the base and Valley Customs iconic car as my inspiration. I took 3 to 4 scale inches out of the body, radius ed the rear wheel wells, remove the tail light pods and sectioned the interior tub. The model was left with no taillight treatment, bumper or front end styling. Also the chassis pan needs more work. I had to shave a portion out so it clears the rear seat. I think I need to make a pie cut out of the frame rail to get a better kick up in the back. Most of the body work is done with super glue w/ zip kicker and red Nitro Stan automotive putty. I Also found a Carson top and a started 50 Covert with chopped hardtop roof installed with trim molding added back on with Evergreen plastic. Rod
-
Great work Mr. Kren.
-
As for Stock, I am not concerned about that. I get to the nutz and boltz about replica stock Mustangs, but not in my Rods. I have been looking at my stash and considered offering some castings of some of my conversions and would people still be interested in a conversion from an AMT kit? Th body seems to fit the Revell chassis just fine.
-
what is flocking? help?
GasPunkAlley replied to the weapon x's topic in Model Building Questions and Answers
I agree, for stock vehicles the Fuzzi Fur is too tall and the new embossing material looks closer to the nap of modern car carpeting. -
Thanks Skip for the pic, it is pretty cool seeing a tubular chassis for the T bucket.
-
Thanks Scott, I have been building some historical models lately and in that group, if the tooling is old, then it is not good enough... It was odd, but then I looked at how much effort and detail has been put into an armor or airplane kit recently, looking at kits from the 1960's look a but crude by comparison. Once again I think finishing something I start is a good use of time.
-
Digging thru my old stash of kits, I am horrified by the amount of started models I never finished in my younger days. Now I want to make good use of the time spent and finish some stuff. I found my second top chop project I ever did, an AMT '32 Five Window coupe. Now with the new Revell kit out and seeing how the body is actually sectioned, is it worth finishing or should I just start with a Revell kit and chop away? I am into nostalgia rods and having a sectioned car wouoldn't be bad and I could make an East cast styled rod and use the Revell chassis. Any Thoughts? I think it is about a 3" chop. I used a soldering iron to fuse the plastic at the joins. It has held up well for over 20 years!
-
Dumbest Question Ever: Weathering Pigments?
GasPunkAlley replied to clovis's topic in Model Building Questions and Answers
Oh yah, the art pastel sets tend to have nice bright colors, you may want to mix a few tones together to mute the dirt and rusty colors. For oils I would mix 50% dark grey, 25% umber and 25% black to make a grimey oil and add white as needed. Mix it with some thinner to make a wash. Apply it in the area to be stained and then with a clean but moist brush (with thinner) draw the glop down as gravity will show how the grime will drip. -
Dumbest Question Ever: Weathering Pigments?
GasPunkAlley replied to clovis's topic in Model Building Questions and Answers
With most models, handling is considered a No-No. Also the powders will not stick to well to a gloss finish. There is a difference in the quality of art pastels and powdered pigments. The big difference is that the pastels have a binder added to make the sticks. The binder unfortunately does not help the powder stick to the model... Once again the alcohol as a pre-treated surface will keep the chalk in place and should allow for the texture to show through. -
what is flocking? help?
GasPunkAlley replied to the weapon x's topic in Model Building Questions and Answers
I recommend Ken's Kustom Fuzzi Fur, the best stuff and the most colors out there! -
Dumbest Question Ever: Weathering Pigments?
GasPunkAlley replied to clovis's topic in Model Building Questions and Answers
Hi Clovis, I built a wagaming tank and I used Dullcote and I lost half of the mud affect I applied, so in short no. The pigments are ground too fine and will fade. It depends on the desired affect. For light weathering for rust stains, dust and mild amount of dirt the powders are the last element applied to the model and no fixatives are used. If you apply Testors Dullcote, it will blow out the affects and the colors will fade. For heavier amounts applied you can wet the surface (which was previously sealed with a clear coat) with rubbing alcohol. The alcohol will act as a binder. You can layer and build up crusty textures this way. MIG and AK interactive have acrylic binders to make thicker mud pastes to get into wheel wells, treads and tracks. What brand of powders do you plan on using? Each brand has a different level of how fine the particles are ground too. The finer ( and more costly they are) the better the pigments stay on the surface. -
Mr. Kron, Love the chassis you built, do you have any more pictures of it?
-
Bill, The reissue of the Double T with the Chopped coupe was one of the factors of me getting back into building. I also want to understand better how the body is mounted to the rails on a T bucket or a fenderless '32. I understand how a '65 Mustang is put together since I helped my Dad fix his '65 back in the day but old rods on the models just rest in place. I know that have to be bolted together somewhere... Are the rims from an older issue of the AMT 40' coupe? I like the look and feel of the mock up. One model I never had was the Dream Rod.
-
Ok, I just made a Gallery with some old projects. I was not able to upload the pic of my chassis earlier in the thread, so here it goes:
-
Here is a pic of a '25 T Chassis i was monkeying with back some 18 - 20 years ago. I put some Revell front crossmember and I do not know what is in the back. I used a lot of NitroStan body putty on the outside of the rails and I see more sink marks on the inside of the rails, sigh. Maybe that is why I put this project aside way back when. The motor mounts are rubbish and the tranny support ain't much better. I may have to get a little radical if I want to get a really good looking chassis. Now where did I put all of my Evergreen polystyrene...
-
Thanks Skip! I did some more diggin' thru my boxs and I do have a build up of the Monogram little T in red plastic with all of the period bitz. I am putting that aside as well. i also have some parts from another T that AMT had as a double kit with the Tognotti T. I can't remebr the name of it, but it has buick style finned brakes on it. I also found my orginal '27T touring and XR6 kit. Ace, when i write late at night I tend to discombobuate my verbiage. I do know the difference between channeled and sectioned, lol but thanks for posting the pics of the vicky.
-
Test
-