

NJJeff
-
Posts
67 -
Joined
-
Last visited
Content Type
Profiles
Forums
Events
Gallery
Everything posted by NJJeff
-
 On my Nicholson Cyclone I ended up moving the interior pan and engine forward a bit. It put the motor closer to the windshield and brought the roll cage inside of the rear window. Of course, that required a longer driveshaft, cramped the fuel tank,fuel pump and steering shaft......lol. It's all part of the "fun"! Keep at it, you'll find something that works for you!
 -
With, without, open, closed, anodized, polished......it's all good. It looks great to me!
-
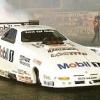
Joe, your project sent me down memory lane, lol Here's the Cyclone I mentioned and a picture of it that my brother took while we were there.
-
Great story Joe. I share a similar experience. In April of '68, my older brother took me to our local racetrack in Atco, NJ (I was 10 yrs old) where I was first exposed to drag racing. The featured attraction was a best of 3 funny car matchrace: Don Nicholson's Eliminator II vs. Doug Thorley's Corvair. The races were during the afternoon, so i couldnt see the header flames, but the noise, the tire smoke and the races really left an impression on me! I was, and still am, hooked on fc's.... Can't wait to see your Dart finished!
-
Beautiful. Great workmanship.
-
Mustang Funny Car Update- 10/ 27/ 2014
NJJeff replied to nitro norman's topic in WIP: Drag Racing Models
Love the color! You gotta finish this, really well done! -
Big Kahuna - 1/16 F/C - New Body Arrived - 1/12
NJJeff replied to Nitrozilla's topic in WIP: Drag Racing Models
I feel your pain! I had similar problems on the War Eagle Firebird I just finished. When I cleared it with Tamiya clear, the decals crazed. I ended up very carefully wetsanding it and clearing it with Testors clear. It's far from perfect, but I had so much time in it already I didn't want to strip it. In the end it came out fairly well. Good luck, I hope you can save it! -
Another nice job Brett, great color!
-
Nice job Bret! Love the old F/C's!
-
Looks great so far Stan. The tail might be a tad low, but it's well on the way to being a great racer! Can't wait to see this one completed!
-
Outstanding! Beautiful color and finish. (...love the subtle mural on the drivers side of the guy taking a picture....) :-)
-
outlaw 10.5 69 Nova (update engine 07-10-15)
NJJeff replied to gtcapri's topic in WIP: Drag Racing Models
Looks good Tim, I'll be following along on this. -
Nice touch with the yellow and white markings on the differential. I had forgotten about all the markings I used to see under new cars when I worked for a dealership back in the 70's. I assume they're marked during assembly.. Nice build Brandon!
-
Thanks Ron and Dave!
-
Thanks guys, I appreciate all the kind comments. I'm new to the site, and am really enjoying the work I see displayed here. It's easy to get inspired looking at all the fantastic builds here. Tons of tips and help as well.
-
Thanks Nitro Norman, the body was painted with Tamiya cans. Camel Yellow, then Clear Orange, then Pearl Clear. After the decals, I sprayed it with Tamiya clear, which promptly attacked the decals....the whole story is in the On the Workbench area. I ended up using Testors clear to finish it. It's my interpretation of how the car appeared in '82. I just used some reference photos from the net. It's far from perfect, but. I just build for the enjoyment of recreating cars I remember watching at the local tracks here. If I get too wrapped up in technical accuracy, it gets too frustrating, that's just me.
-
Finished up the build this afternoon. Despite all the issues along the way, I'm pleased with it. Thanks for checking it out. Next up, a Camaro Pro Mod......
-
Dale, Nice job, very well done!
-
Nice technique Jesse, nicely done! You might consider adding aome milky areas to the glass noteably the vent windows and the corners of the windshield. A lot of the older glass would show deterioration of the film inside the glass. Not meant as a criticism, just an observation from visiting a lot of salvage yards over the years. Looks good!.
-
Thanks James, After priming and waiting to see if the leaching issue would return (it didn't, thankfully), I painted it with 2 coats of TS34 Camel Yellow. After wet sanding, I added TS73 Clear Orange to the sides, hood and deck lid. Then coated it with two coats of TS63 Pearl Clear. After wet sanding and polishing, I added the decals. Then I hit it with Tamiya clear and watched the decals wrinkle up.....ugh. (Sometimes I can get away with it, sometimes I can't....seems to depend on the decals). Soooo, when it was barely dry to the touch, I did the best I could to press and flatten the decals. When cured, I carefully wet sanded it with 8000 grit paper to smooth it out without removing any of the decal color. Another coat of clear, sanding, polishing and repeat. Lastly, I doused it with Testor's Ultra Gloss Clearcoat. Sanded, polished, ....done. I think my list of modeling "What doesn't work" far exceeds my list of "What works", lol. Should be finished with this by the weekend. Thanks for your interest!
-
Coming down the home stretch. Body is finished, the Tamiya clear attacked the decals.....a just can't catch a break with this body.....so I fussed with it, color sanding, and applying additional coats of clear until I was able to get it smooth. Certainly not my best work, but for this shelf model its going to suffice. Now it's on to the tin work, windows and final detailing of the wheels and chassis. I'm ready to finish this one and move on.
-
i'm diggin' the smiley face on the blower belt.... :-)
-
Extraordinary workmanship and detail!
-
Resin leaching issue?......
NJJeff replied to NJJeff's topic in Model Building Questions and Answers
Update 7/30: Kudos to Roger at Competition Resins who promptly responded to my email regarding the issues I was having with the resin body. He shipped a replacement at no cost to me which arrived in less than a week. I cleaned, prepped, primed and painted it with no issues. I think James is correct. I don't think a bad casting can be salvaged. I tried everything I could think of but nothing helped. All I did was waste time and a lot of paint. Thanks to all for your thoughts and suggestions. Another lesson learnedalong the way.