CarlR
-
Posts
54 -
Joined
-
Last visited
Content Type
Profiles
Forums
Events
Gallery
Everything posted by CarlR
-
nicely done! The real car is at the top of my list if I ever win the lottery.
-
another fine model - a job well done!
-
thank you all for your positive comments
-
This model kit is a curious combination of some things done very well and others that fall woefully short of the mark. The mold is well done and those parts that are formed of styrene are crisp and fit well - except the windows. There are no positive location marks and their precise location is a guess at best with the front window being the worst offender. There is a vinyl insert that is supposed to fit into the windshield opening but I was unable to get that concept to work on my example. I did my best to simulate the rubber surround by applying a thin strip of masking tape and painting it black.Some parts of the kit that should have been made in styrene are made of black vinyl. That's ok for the tires but they also use black vinyl for the interior door panels, the inside wheel wells at the front and the bulkhead between the interior and the engine area. Securing and painting these areas was challenge to say the least! The decals on my example had yellowed and were too brittle to use but even if they had been brand new and serviceable, I still would have replaced them because the graphic quality was so poor. I searched the internet for appropriate photos of the speedometer and crests/badges on the steering wheel and hood. They were shrunk to the correct size and secured to the model with white glue. In spite of these challenges, I am quite pleased with how this model turned out. Thanks to my brother who supplied me with the kit.
-
This model is my attempt to save an incomplete started kit I had purchased from a vendor on Ebay. I started by filling in the spare tire wells on the front fenders and moving the spare to the rear. The spotlights from the front windscreen were re-purposed as brake lights. The molding on the edges of the fenders was removed as was the ribbing on the forward portions of the rear fenders. The model is curbside because the previous owner had botched the engine assembly with over-generous applications of tube cement. The finished model is sort of a poorer cousin to the box stock model but I think I almost prefer the understated look of it to the kit's "flaunt it if you got it" version.
-
thank you all for your kind comments
-
This model is a combination of the body, seats, wheels and tires from the Round 2/AMT Vicky, the dash, sterring wheel, side panels, chassis, radiator shell and running gear from the Revell 1932 5 window coupe and the flathead V-8 from the Revell 1932 sedan. The body was lowered over the frame which necessitated a corresponding reduction in height of the seats. I used the optional 1940 dash and steering wheel. The radiator and shell was sectioned. It wasn't until after I had installed the engine into the completed chassis that I realized that I had forgotten to reengineer the cooling system's hose connections - too late to make the necessary modifications. Engine cooling accomplished by good intentins and pixie dust... I attached the vanity plates and called her done.
-
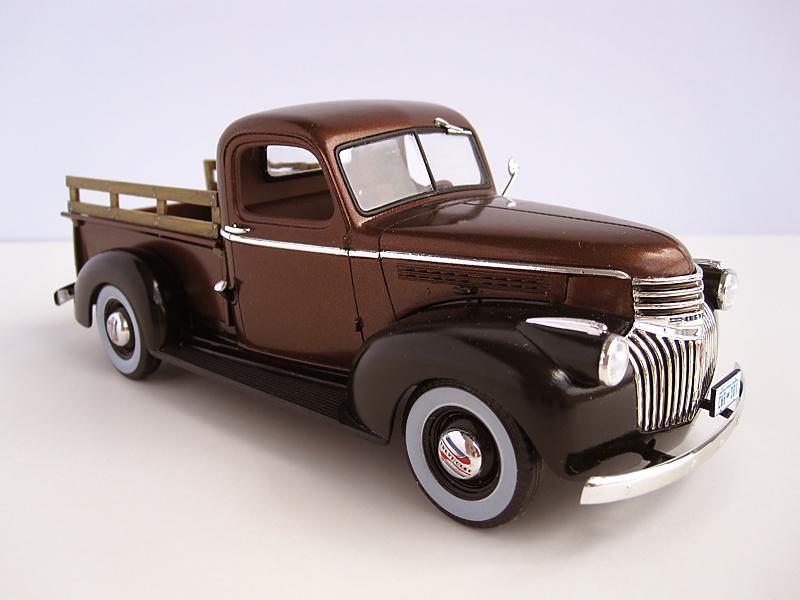
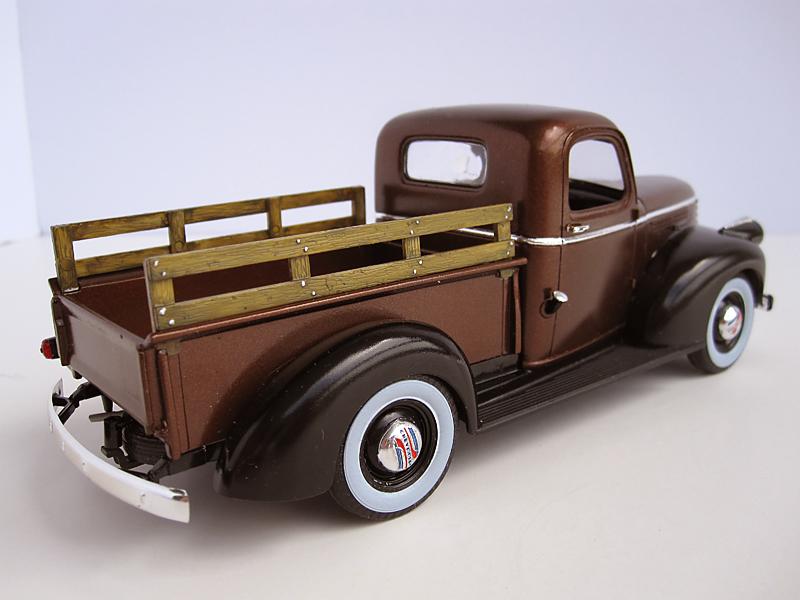
 I'm not a truck kinda guy but the look of this pickup really appealed to me - perhaps it's the art deco influence on its styling. I don't have the painting skills to duplicate a worn, torn and abused example of this truck so I went the slightly easier route of creating a restored stock version. The kit was a pleasure to build but I did run into a couple of areas that required some extra thought and attention. The attachment of the spare tire was flimsy at best and I had to modify some parts to get a more secure fit. The locations where the rear fenders attach to the truck bed do not have any positive locating/attachment points so some careful trial fitting was required. Once I had determined where the fenders would mate to the box I glued some small pieces of plastic on the box to correctly locate the fenders during final assembly. The floor of the bed is the supplied kit decal which required numerous applications of Solvaset to get it to conform properly. I lucked out in getting a (close enough for me) paint match on the stakes on the side. The whitewalls were surplus decals from the Revell 32 Ford kit. Again, Solvaset was required to get the decals to conform to the tire contours. This kit was a pleasant diversion from what I usually build but I may stray from the norm yet again - I just found out that there is a kit of the 1937 ford pickup!
-
congratulations on an excellent job on your '40 Ford - I especially like (and am envious of) the paint job
-
thanks for posting - it's given me a couple of ideas for the Vicky I'm planning on building
-
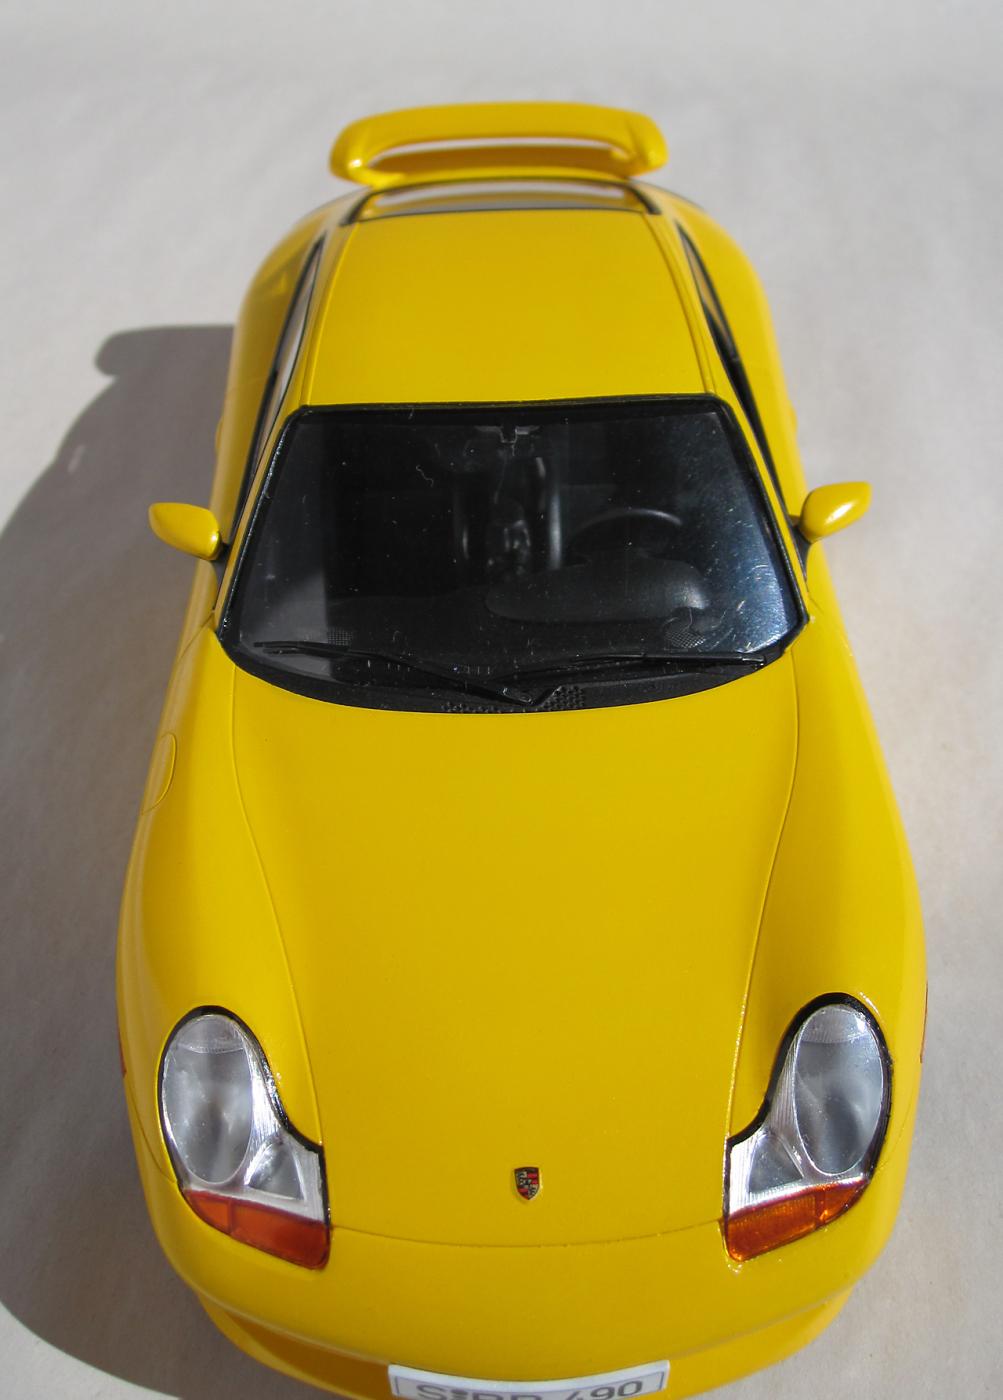
My most recently completed model is the Revell Germany BMW I8. It was a real pleasure working on this kit. The kit is complex enough to make assembly interesting and a bit of a challenge but the pieces fit together well. With a bit of planning and judicious cutting / assembly I was able to add a completed body to the frame instead of in sections as advised by the instructions. The only niggle I have with the kit is that the body panels required a session of block sanding to eliminate the unevenness that was present. I don't care for the garish color schemes that BMW is offering as standard so I painted as I would have wanted it if I had pockets deep enough to purchase a real one.
-
This is the 1940 Standard Coupe as offered by Revell built out of the box with the addition of spark plug wires. It was enjoyable and relaxing to assemble this kit. The real challenge in this kit was the paint job - black is very unforgiving. Any unevenness in body finish or blemish in the paint may as well have a big flashing neon arrow pointing to it. Anyway, I finally got a paint job I can live with but it'll be a while before I go pure black again! Can't say what color it will be but I'm pretty sure there will be another '40 Ford in my future sometime.
-
I enjoyed building the kit kit but I was very disappointed and frustrated with the decals. They were prone to fracturing and even though they were thin they could not be convinced to conform to the kit's contours by any of the decal setting solutions I have on hand.
-
kudos for a job well done
-
thank you all for your kind comments
-
The base kit is the Revell 32 ford highboy with the addition of fenders from the Revell 5 window coupe kit
-
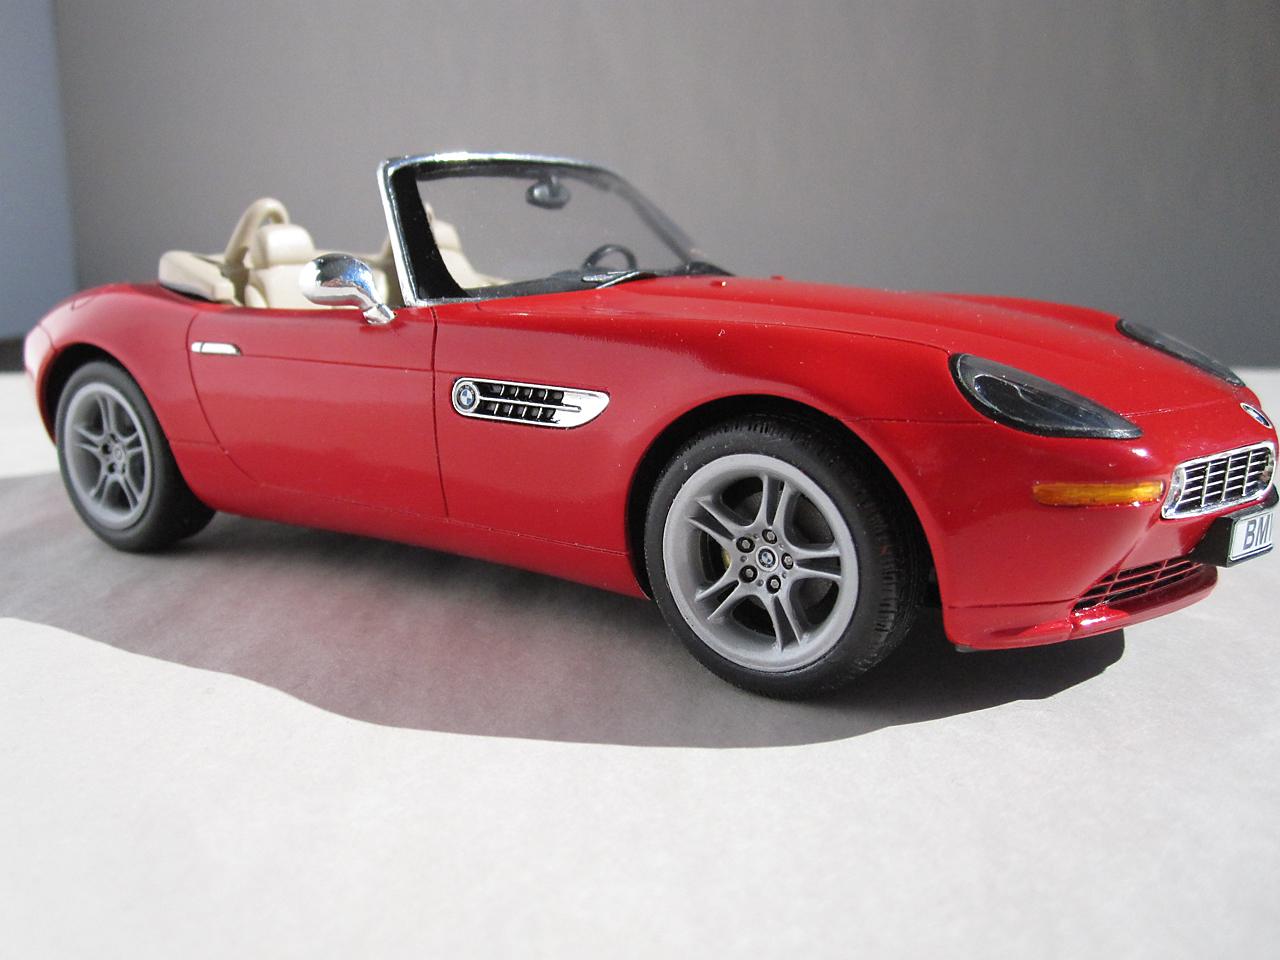
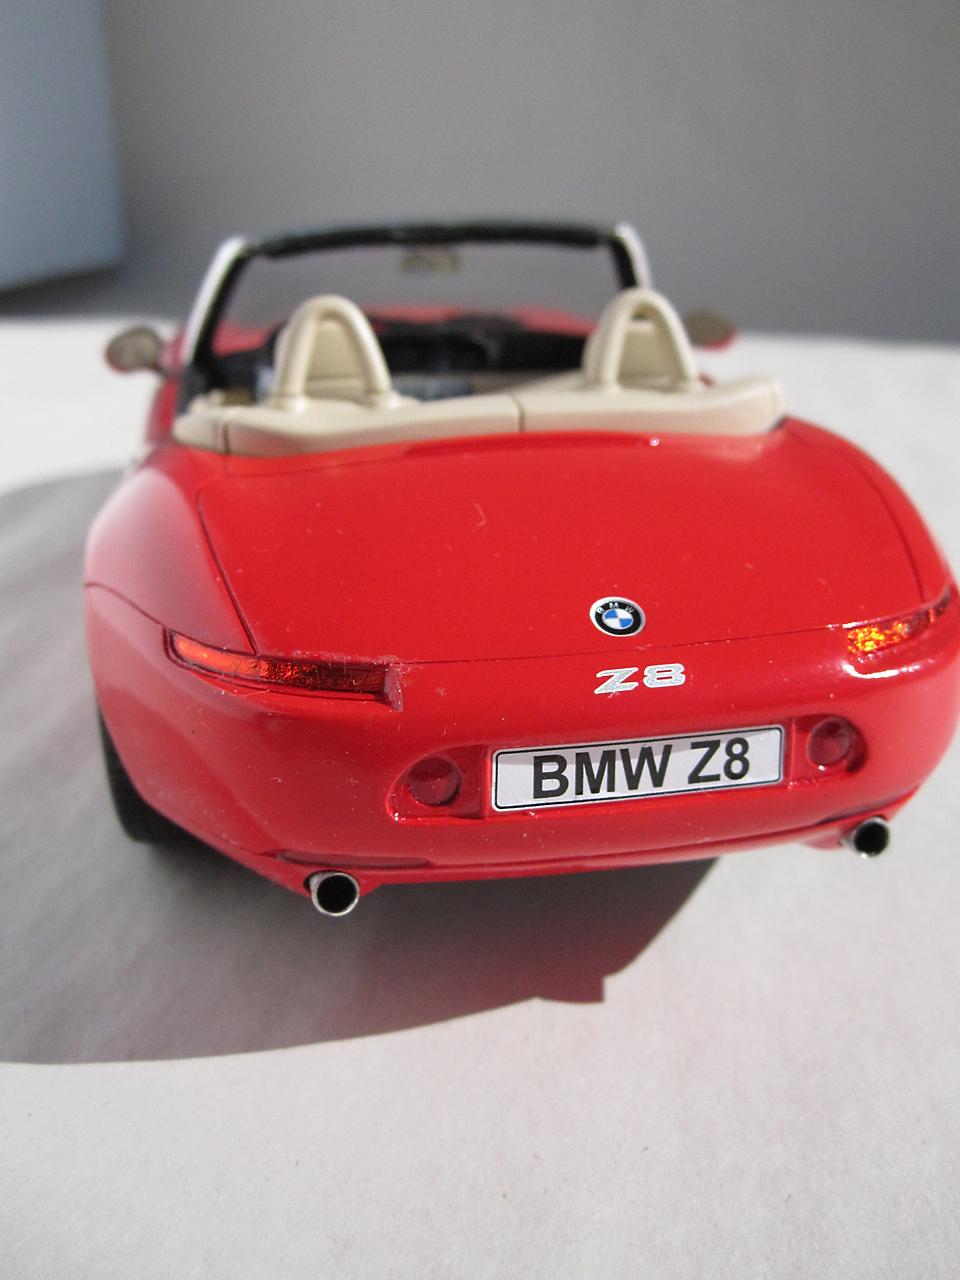
This is the Revell Germany BMW Z8 kit The BMW styling has always attracted me and this car is one of my favourites. While I am more than pleased that Revell has made this kit available I think it's execution falls a little bit short of the mark. I know to not expect Tamiya quality when it comes to the Revell kits but the detail (particularly in the interior) is poorly defined and the fit of some of the parts (the headlight covers in particular) is pretty sad. However, considering the reasonable price for this kit, I do feel a person is getting good value for their money - just be prepared to put in extra time and effort to get an acceptable result. Construction followed the instruction sheet with the following departures. The disc brakes and rotors were modified so that they were not as recessed giving them a more realistic appearance. The interior, dash and seats were scribed with a sewing needle in a pin vise. This sharpened up the detail which helped in both the model's appearance and in detail painting at a later stage. A lot of time was spent getting the headlight covers to fit properly. I had to adjust both the body opening and the clear portion to get a decent fit. The body panels also needed to be sanded to get smooth surfaces. Admittedly not a lot of work but still something I don't usually have to do. Even though I have some complaints about this kit, I will definitely have some more Revell auto kits in my future.
-
The base kit for this model is the Monogram/Revell '31 Ford Model A. I wanted to build it as a more modern hot rod. Shouldn't be too hard I thought - just use some of the parts from the Revell 32 Ford kit and we're done - right? Shouldn't be too hard - that statement probably originated about the same time as "what could possibly go wrong?" Anyway, suffice to say that my limited hot rod building skills were taxed to the limit and fell short in a few places. Probably as in real life, by instituting a change in one place it necessitated a number of (unforeseen at the time) changes further down the line. But (they tell me) part of the fun of modeling is facing and defeating these challenges. For the most part I am pleased with how the model turned out but the constant curves thrown at me by the concept I had in mind took some of the fun out of the building of it. So, in the end, it was "let's just get the thing finished and move on to something else." The frame, engine, transmission, headlamps and rear bumper came from the 32 Ford kit with the rest originating with the 31 Ford. The door hinges were removed and the folding hood assembled into one unit to give the model a cleaner look. Looking at the model now I probably should have continued the body moulding onto the hood. Spark plug wires would be nice too but like I said - I just wanted done with it. Maybe next time I'll try converting one of the AMT kits... or maybe not!
-
thank you gentlemen for your kind comments
-
This model was built pretty much straight out of the box. The only change I made was to remove the driver's side door window.
-
For a change of pace from my usual automobile and aircraft models I thought I'd finally build this Aurora kit that's been rattling around in my stash for years. I omitted the two prairie dogs and the nameplate that were included - I felt they detracted from the subject.
-
Occassionally I try my hand at building a figure model and this was one of the more enjoyable figures I've done. Even though the molds are quite old ( apparently they originated with Aurora 'way back when) the fit was quite good and very little in the way of filler was required. There were some serious sink marks in the palms of both of the figure's hands but they were easily taken care of. The kit was built pretty much out of the box - the only thing I added was a back to the rear of the headstone.
-
Thank you all for the positive comments to answer stichdup's questions... the kit was a pleasure to build - no flash, parts fit well, positive location points, excellent chrome and a comprehensive decal sheet. The engine is quite detailed - don't know how I missed not taking a photo of it. I wouldn't hesitate to recomend this kit to anyone interested in building a bug - I would say the quality is right up there with Tamiya. As to why I built it right hand drive? Over here RH drive is unusual so I did it for a change in pace
-
Beer Wagon - custom scheme
CarlR replied to CarlR's topic in Model Trucks: Pickups, Vans, SUVs, Light Commercial
thank you for your compliments -
thank you all for your kind comments