Chariots of Fire
-
Posts
2,780 -
Joined
-
Last visited
Content Type
Profiles
Forums
Events
Gallery
Everything posted by Chariots of Fire
-
 This is a scratch built piece with a brass frame, brass fenders and hood, resin cast tires and wheels and a sheet plastic body. The engine reworked from an Ertl diecast. All of the details in the back are scratch built as well. Decals are printed by ALPS. Headlights are turned aluminum. There are some in progress photos on my photobucket page. Firemodeler is the name you need to look for.
 -
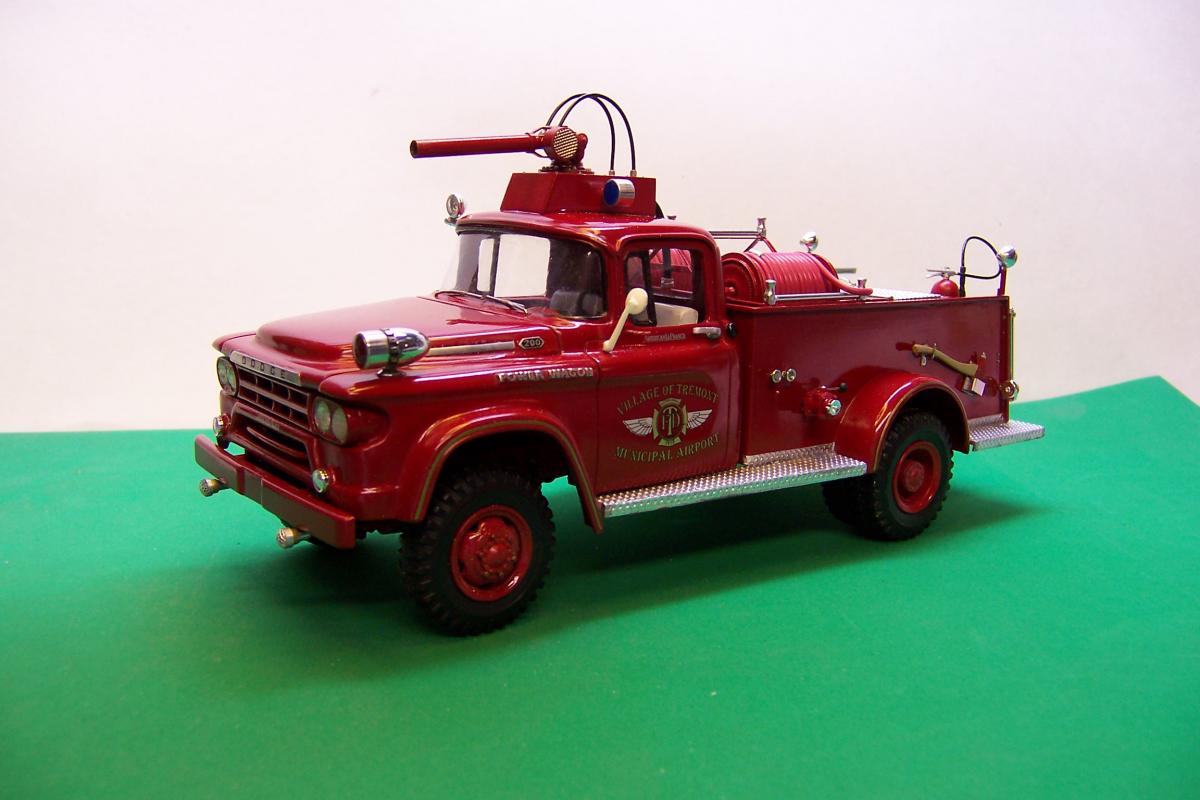
Finished this up just a few weeks ago. It's now ready to take its place on the ramp in case there is a rescue needed. Will spend its time along side the Type 0-5 crash rig that is a bit older but still servicable.

-
For the window molding cut a piece of 0.020 sheet the same shape ss the window opening but just a bit larger so that it overlaps the opening evenly all around. Round off the outside edges. Don't bother cutting out a strip just yet. Glue the whole piece of sheet over the window opening. Then cut out the sheet leaving a small lip that is slightly smaller than the original opening. Round it off also. This will leave you a small surface to place the glass against. And it will look like the molding you are after. I use epoxy to set the window glass. Mix it up, dab a small amount around the molding lip and let it set up so that it is tacky but not stringy. Then set your window glass against it. You should not have to worry about smudges on the glass or that it would pop out later. Hope this helps.
-
1968 Diamond T ALF Pumper
Chariots of Fire replied to maxwell48098's topic in WIP: Model Trucks: Big Rigs and Heavy Equipment
That is a nice combination. It looks right. Thanks for sharing the photos! -
POWER WAGONS
Chariots of Fire replied to wraith's topic in Model Trucks: Pickups, Vans, SUVs, Light Commercial
Here is a 1959 Power Wagon built from a resin kit and a lot of scratch building. The cab came from Scale Equipment Ltd and was originally a '58. I changed the grill, fender flairs and constructed the body from plastic sheet. The prototype was built by American La France as the Little Mo. New York state bought some for use on their interstate. -
I NEED SOME FEEDBACK ON THIS BUILD
Chariots of Fire replied to jaymichaelsdesigns's topic in WIP: Model Cars
How about the oval grill from the 38 Ford P/U? Would still be Ford but a little different. -
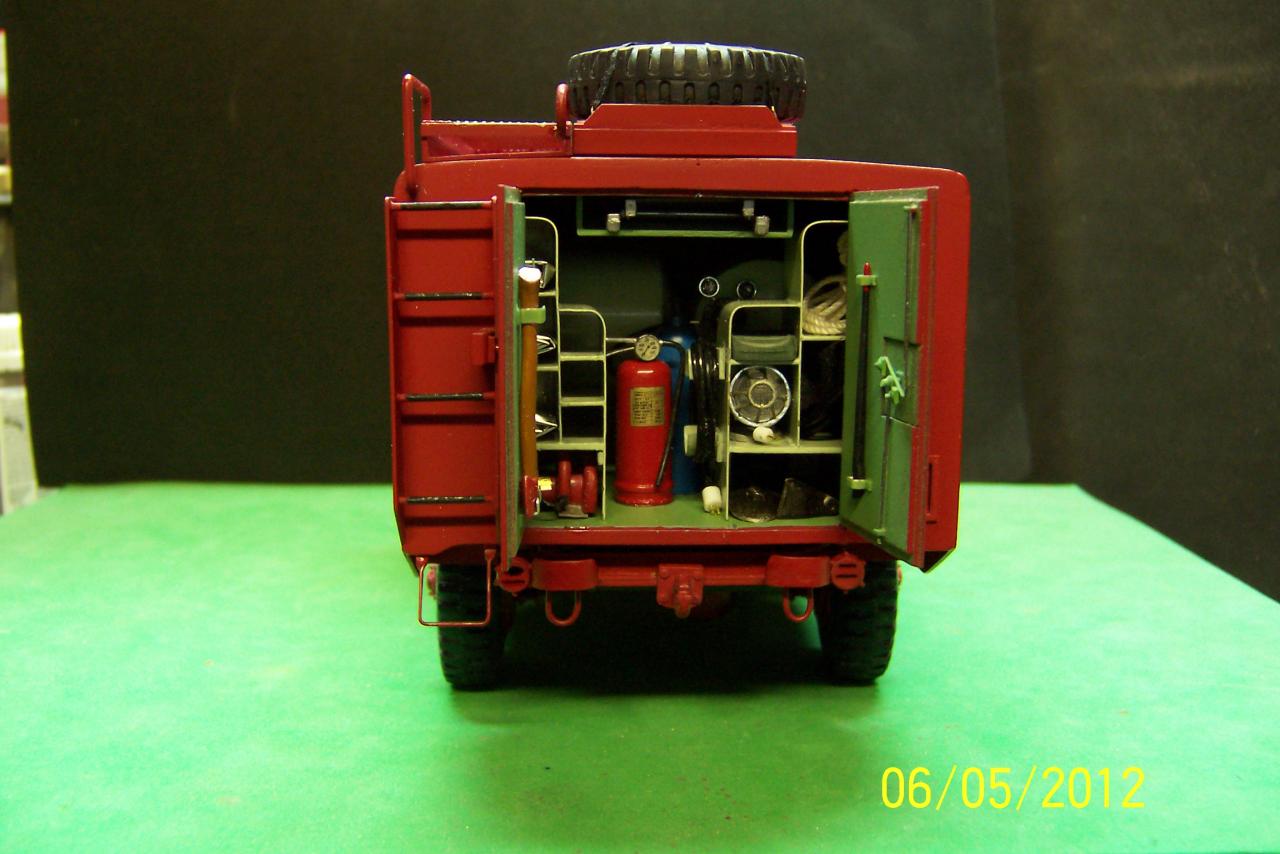
I've been at this project since the first of the year. In the early 1950's the Air Force had built the R-2 rescue based on the M-37 chassis but with a 126" wheelbase. Using limited dimension info, a series of photos from someone who owns a restored one and my own unrestored M-37 this 1/25 scale replica has been constructed. Most of the body is plastic but the front fenders, frame, springs and hood are brass. I still have some external details to add and the complete interior of the body to do.
-
Thanks, guys. will give it a try.
-
Now that I'm back at it again I see that there is a limit on the size of pics that can be posted. What do you guys do to get multiple pics up without going over the limit on size?
-
Just got back on! I know it's been a while. I've got a new one to post but will have to see if I can downsize the pics a bit because it needs more than one view to let you see the details.
-
I picked the resin kit for the cab and standard pickup box at GSL XX back in '05. At that time it was from Scale Equipment, Ltd. out of Bradenton, FL. I just searched his website and I don't see resin truck kits listed any more. The kit was a curbside and I made some changes to the front fender flairs and changed the grill from a '58 to a '59.
-
This Scale Equipment Ltd. based '59 Dodge Power Wagon was built a few months ago. The cab is resin. Body is scratch built plastic. The rear fenders are resin that I found at NNL East. They were made on a 3-D printer. Tires and wheels are resin castings based on a 1/25 scale diecast and modified Aurora 1/32 scale wheels. Decals are computer generated. The foam turret is a Rockwood and was constructed of brass and plastic from drawings from the manufacturer.
-
The Connecticut Fire Photographers Association is holding a photo shoot and model show in Meriden, Ct next Saturday, July 17 at the Four Points Sheraton Hotel. There will be two days of visits to various fire stations to photograph apparatus, reps from Fire Apparatus Journal and Toy Trucker will be there and there are 15 modelers who have committed to displaying model apparatus including yours truly. Anyone interested in attending should contact Mike Quinn at his e-mail addy. M1968Q@aol.com. Tim McCue who does the scale model column in Fire Apparatus Journal is attending and so is Larry Phillips from Toy Trucker.
-
International Loadstar(s)
Chariots of Fire replied to cargostar's topic in WIP: Model Trucks: Big Rigs and Heavy Equipment
Do the batwing first------------PLEASE????????!!!!!!!!!!!!! I've got just the fire apparatus project for one! -
Rusty Bedford
Chariots of Fire replied to Andrew's topic in WIP: Model Trucks: Big Rigs and Heavy Equipment
Nicely done, Andrew! Military weathering techniques can add a good amount realism and that is evidenced in your build! Great job! -
No I did not scratch build the hinges. They are brass piano hinges that I got from Phoenix Model Development in England. Micro-Mark used to sell them but no more. Kind of expensive but they really do the trick. They are on line and readily take credit cards for payment. I found them a good company to do business with.
-
That is some nice work! Like the color combo!
-
Aaron: That would be great! I'd certainly put them to good use.
-
For the past few months I've been working on this rig. 1/25 scale and modeled after an actual rig used at Otis Air Force Base on Cape Cod back in the 1950's Engine is detailed under the hood and a second engine and pump are in the rear.
-
trumpeter fire truck
Chariots of Fire replied to showbuilder's topic in WIP: Model Trucks: Big Rigs and Heavy Equipment
Super job! -
Believe they were made in North Carolina back in the 1940's
-
Been working on the truck the last couple of weekends.Working with brass where it is needed. Plastic elsewhere.
-
Always a treat, Tim looking at your latest work! Great graphix and paint work!!
-
here is a bit more progress. Radiator shroud and grill guard are done. Got the front fenders roughed out in brass today.
-
Les: Go to photobucket. My work is under "firemodeler" Charlie