
brewsterg6
-
Posts
118 -
Joined
-
Last visited
Content Type
Profiles
Forums
Events
Gallery
Everything posted by brewsterg6
-
Went out and bought a decal set today. I was just looking for pin stripes, but they didn't have any. I figured I would look in the train stuff for a company name, and settled on CNR. I was pleasantly surprised when I got home, opened the package and found stripes on a second sheet! I will give my Dad the remainder of the decals for his railway. I did one side, but will be re-doing the stripe,as I am not happy with it.
-
Well, now that the Christmas season is over at home and work, it's time for me to get back to the hobby table. I really have to get moving on this project as my next one is to redo the floors in the hobby room. Putting everything away is going to be a real downer so I need to finish my Chevy first. I have started on the interior. The original truck had two bucket seats. This kit came with street rod seats only so I have had to build my own factory ones. I did this by cutting in half an AMT 1940 Ford front bench seat. The ends are being filled with ends cut from an original release '40 Ford kit. The rest of that kit is long gone so please don't ride me about it! The plastic in the old half was really hard to cut but the new seat cut like butter. Just have to putty and paint it. Door panels are also primed and drying. More coming soon...
-
Thought I'd drop this pic in.... The body from the coupe kit still fits! At first I was going to build a coupe, but was stuck on the hood sides. Then I saw the SD and realized it came with the right hood. Yesterday I realized the SD has no Interior panels at all!! I'm cutting up the coupe ones to fit the front today.
-
Well, it's been a while since my last update...so much for moving this along quickly! We've just been busy with Christmas coming and all! Any way, last night I wired up and finished the motor... just needs the fuel line and a few detail bits.
-
Tonight I asembled the motor, then figured out the mounts. Not exactly factory stock, but I cut the frame sections out of the'41 framerails and glued them behind (front) and above (tranny) the ones in the kit. This gave the motor a bit of a lift, as it sat too low in the frame before.
-
Thanks Ol'skool... Was there a door over the spare, or was it open from the back door? Was there a metal floor under the spare, and a plywood shelf? Mocked up the rims from the '41 kit. Tires look to be a better size than the ones on the Galaxie kit. Now the question remains... White walls or Black walls????
-
Well, after several inquiries around about the interior, I have recieved no answers. When in doubt...start cutting!!!! The underside of the floor shows a metal imprint, so I've cut the floor out of another pan, and am going to reverse it on top of the existing floor. Anyone know if it's supposed to have a wood floor? PLEASE STOP ME IF I'M WRONG!!!!
-
Here's Corvette Row from my case...sorry about the pic quality, will have to reshoot sometime! 1953 - 1958 - 1967 - 1993
-
Thanks, cranky... i'm taking a bit of a breather now...I need to do a little research into the interior. As the factory car was so rare it is hard to find pics of it...too many were made into street rods! Any idea if it had a wood floor, or if the frame on the inside was exposed metal framework, or any wood? The seats were different from the cars as well, kind of a cut down version... any pics from anyone would help. Thanks, Brewster.
-
I've started to mock up the supension. I think it will be the trickiest part of this build. I am surprised at how much I like the accuracey of the '41 truck kit I bought, and may be using parts from it instead of the Galaxie kit. I still like the Galaxie motor better, but the '41 has better sized tires. front and rear axles from the '41 will be used as they are wider and fill out the wheel wells better. In the picture you can see the front axle is the new one, while the rear one is the narrow one that came with the kit. The frame rails on the '41 are a bit wider, so the leaf springs on the rear will have to be moved in on the axle to fit the '39 frame. I also put one head light together for the pic!
-
Have started my next project...a low rider kit I am going to go back to factory stock on. First step was to remove the dual exhaust with the Dremel. I bought the Galaxie kit for motor and suspension pieces, but may change my mind. Today I bought the Revel '41 Chev truck, so I may use this kit, and build the Galaxie one right. Just have to figure out which pieces fit better.
-
Well, it's finally done! I cut down the front bumper, and also took about 2 mm out of the rear frame rails to bring that bumper closer too. On to the next project!
-
Marco and Mr. Moto... Thanks for checking it out! This Nomad will be replacing this mess of a kit in my cabinet. Did what I could with it, just the proportions are waaaayyyy off! Look at the size of that front wheel opening!
-
I'm working really hard to get this long term project wrapped up. Revell '56 Nomad with Model car Garage detail set. Finished the interior and chassis tonight.
-
Great tip Moon Pie... I'm at this point, and I'll give it a try. This (and moving!) has halted this build. But things should move along now that I've unpacked the hobby room, and figured out how I'm going to ice Bubba's lip!!
-
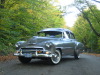
Oops! I can't believe I screwed up my first post like that! Sorry...IT will never happen again! Thanks for the comments on the 60...great kit to build, and Mr. O., I hope they don't come out with a 60 convert, or I'm going to feel like I wasted my time! Probably too many of us feeling that after the chopped '50 Merc, eh?!!!
-
Thanks Lizard...I'll probably break a few rules, but it's great to get a friendly welcome and correction!
-
Hey there...I'm new to posting on this forum. I recognize some of you from other places, so my builds will look familiar to some. Here's a 60 Impala from the hard top kit, combined with the convert peices from the 59 kit. The trunk was properly shortened. Model Car Garage photo etch set.