
brewsterg6
-
Posts
118 -
Joined
-
Last visited
Content Type
Profiles
Forums
Events
Gallery
Everything posted by brewsterg6
-
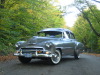
I've started the final assembly of this build. Some real effort went into polishing and waxing the finish to get the shine from the clear coat over the flat base coat paint. I'm Ok with the results, but look forward to making improvements on my next build. I scratch built the vacuum pump for the top and detailed the firewall. The interior has been a pain getting it to go together, but hopefully I have it set. The next major thing will be getting the rear bumper to fit the pan. I've also given up on BMF, stripped the whole car, and redid it with foil tape. I'm thinking that my next update will be Under Glass! Look for it in a couple of weeks...
-
I started fitting some of the trim on, and have encountered some problems. I always worry that when kitbashing, the sum of the individual parts does not always add up to a great fit overall. I chose to use the head light rings from the diecast, (they are slimmer and look a little more realistic) and wanted to use the lenses from the kit. The diecast ones have a clear squre shape that shows from the spike holding them onto the kit, so the glass looks funny. The kit ones are too small, and are not rounded enough. I went for the die cast ones, buat am not happy with how they look. The other thing I did was test fit the bumper and grille. The shape of the hood by the grille is horrible, but I won't have time to fix it. It would mean repainting the whole model...and you know how fast I work! I also hacked off the too big fog lights...I like fog lights on the real car, but they are just too big and wrong looking on this model. The gap will shorten up below the hood... the grille is not glued on yet, and the hood is not right down... With the big fog lights... Without the lights...
-
Thanks for the comments, guys. Charlie... The nicer models did have some good interior combos for 1950. I think they look a little nicer then the '51's and '52's. Here's a couple pics from ebay that I'm using to work off of...
-
Rob... sorry I missed your reply... I haven't been around in a bit! I've finally got the interior sorted out... The paint was giving me fits, as I couldn't match the Beige to what it should be like, and I kept getting it running with the green. The paint is Tamiya acrylics... I airbrushed the green, and hand brushed the beige over white. Then I had to touch up the green by hand. The interior panels are just the plastic from the die cast. The back seat and window garnish are spliced in from the '51 kit.
-
I also forgot to add that I fixed the rear of the roof. The kit has a solidpiece that runs below the window, and the entire opening is too high. I didn't want to lose the shape of the opening, so I cut the entire window and moved it down, and filled the gap at the top. I still need to redo the fold down part in the tape, as it has a wrinkle in it.
-
I am back on the table, and still working away at this... I finished painting it, added the BMF, but still have to clear it.
-
How Many Of You Guys Live In Canada
brewsterg6 replied to Nick Winter's topic in The Off-Topic Lounge
Sorry it took me awhile to see this thread, but the correct answer to your question is... no, the old TTC Red Rockets are no longer running on the Harbourfront line. They were deemed too expensive to upkeep, and got mothballed. The city still owns a couple that they use for special occasions, and some were donated to museums like the Halton County Radial Railway in Rockwood, Ont. The cars you saw running, Harry, were PCC cars, used from about 1938 to early 2000's. Here's a pic I took of my '51 Chev at Rockwood with a streetcar used before the PCC's, called a Witt car, after it's designer Peter Witt. -
What do you drive?
brewsterg6 replied to gasman's topic in General Automotive Talk (Trucks and Cars)
Hey Charlie... The picture was taken at the Halton County Radial Rail Museum in Rockwood, Ont. Canada. It operates off a mile long section of what used to be an inter-urban line running from Toronto to Guelph and Kitchener. Lots of ex-Toronto Transit Commission cars in restored operating condition including ex-PCC cars and this early Peter Witt car from about 1918. The staff there was kind enough to let me pull into the park for the pictures. Emo... I've been on a bit of a hiatus from the model building recently, and have been doing my Chevy chatting at the VCCA site. I'm always lurking about though...so stay in line!! -
What do you drive?
brewsterg6 replied to gasman's topic in General Automotive Talk (Trucks and Cars)
Lots of beautiful rides and interesting projects here! Here's the daily drivers: 2007 Pontiac G6 coupe, and 2008 Mazda B4000 4X4 And here's my pride and joy... 1951 Chevrolet Styleline Deluxe Sedan, Bought new by my great uncle. -
Model Work Areas
brewsterg6 replied to Scott H.'s topic in General Automotive Talk (Trucks and Cars)
Here's my hobby room... I share space with a scrapbooker! -
C'mon up Raisin... we let anyone in up here!!
-
I'm going to try and attend again this year.... hope to have my Chev convertible done in time. Their swap meet was excellent...last year I cleaned up!! On a side note, their web site doesn't have pics of last years show up yet:(
-
I took a couple weeks off and went to Europe on vacation. (Lots of donkeys, but few old Chevies in Moracco!) I'm back into the swing of things here now that work has settled down again, so it's back to the work table A trip to my parents house, and my first paint job by airbrush is done. I'll be doing a little body work and going back for another couple coats, but here is the first attempt. The colour is Tamiya Pale Green, mixed with white. It is a flat colour, so I will be clearing it after.
-
James, Sorry I missed this thread, as I was on vacation for a couple weeks. I built a '51 two door post using a fleetline for the front half, and a Belair Hard top for the back. For the rear window, I turned the fleetline rear window upside down. The trunk is shortened as the Belairs had a longer trunk.
-
Last night I tackled the roof issue. The back glass is from a Jo-han 1931 Cadillac Cabriolet kit. It is a bit too big yet, but I don't want to risk sanding it down and ending up with something not straight. The canvas zip up is masking tape, but I am going to re-do it so it goes right to the bottom of the roof and attatches at the belt line. Another thing I did was reverse the angle of the edge of the beltline where it touches the roof so that it is angled parallel to the roof angle. Now the top comes from under the body, like on the real car, instead of sitting on top of the belt line like the kit does. I primered the body, but still have some smoothing to do...
-
I started to piece together the interior last night. The seats are from the diecast, with a lot of trimming. I may still have to section the rear seat. The rear panels are from the '51 kit, and the fronts are from the diecast with the upper trim from the '51 kit. The dash has been all stretched out to fit the body. I cut the top of the AMT'51 dash to fill in the curve against the windshield, and lengthened the glove box side to centre the radio grill with the centre line of the car (It was off centre in the diecast car)
-
Thanks again for the comments... I'm glad you like it! Emo... Sorry I'm keeping the Elky... I ran out and bought another glass shelf for the cabinet to display it! Apparently it is going with the plastic...
-
Thanks for the comments, guys. The paint is Tamiya Wooden Deck Tan over Tremclad Gloss Black. The stripe is Dark Earth, and the wheels are Testers Hugger Orange. The white walls are the stickers that came in the kit (hence the wrinkle in each one!) Oddly enough, my kit didn't come with the file... but it was opened when I bought it. The roof is a testers interior leather... but I may lighten it up a bit so it doesn't look so similar to the body colour.
-
I agree with you Dave... If you stay out of the arguments and just focus on your build, and the other guys builds, it is no different from here. There are a bunch of great guys there... and just ignore the rest. Jim has decided it's a business... and it's his business, so most of the problems when they occur are violations of his rules. Ninety percent of them are people selling or advertising another site or product, which is clearly against the rules. Another thing to remember is that Kalmbach is a like the rest of Corperate America... big and inflexible. If Jim has been told by his boss "No advertising without paying, and nothing religious" then that's the way it is. I enjoy this site as well, due to it's freedom and self policeing, but one thing I don't like is the subject layout. I build one type of model (Factory Stock) and it's kind of time consuming searching through 100's of muscle cars and hot rods to find what really interests me. ( Not that I don't look anyway... just sometimes I'm short on time) There's definately room for more than one site... so I guess the trick is to find the one that suits you the best...
-
Thanks gbk1... This ones wrapped up and moved to 'Under Glass'!!
-
TA-Daaaaa!!! Here's the mostly finished model! I have to build a trunk box, and I have one or two under hood wires to do. My takes on this kit... NASTY!!! Plastic is a way easier medium to deal with, and for the scale of this car (1:20) there is not much detail. The amount of flash at the begining was terrible as well! That said... I can't wait to find the Phaeton kit!! Wow, I'm a sucker for punishment! Here's the pics!
-
Well, the paint is finally on!! I have zero experience doing metal bodies, so I am sure this could have turned out better! The colours are Tamiya Deck Tan over Classic Black with a Dark Earth belt line. I added some detail to the firewall... not sure what the screws hold in the 1:1, but they are there! I have to make the rad support rods, then some final assembly and it's done! (That wonky rear tire is just mocked up...)
-
Thanks for the comments, guys... Yes, it will have the straight six, with three on the tree. The rear bumpers are off the diecast, and have the correct guards and optional corner guards on them. Right now they stick out a bit too far to the rear of the car and will require som trimming to tuck them in closer.
-
In the summer of 1972, My Mom and Dad were out for a drive near Smith Falls, Ont. They used to drive the back roads looking for old cars, specificly a 1951 Chevrolet Convertible to match the 1951 2dr sedan that has been in the family since it was new. My Mom spotted what she thought was the roof of the elusive '51 'vert sitting in a farmers grain field. (to this day, I hold out it was me that kicked her from within) The car turned out to be a 1950... sunk six inches into the muck and holding it's share of rust. $300 changed hands, and the car was towed home. Fourteen years later it hit the road again, good as new. The restoration was not as a show car, but as a driver. It has toured with the VCCA and local car shows for years... I have wanted to build a model of it for years now, but have put it off due to my inexperiance, and inability to find the right parts. Joining this and other forums has got my confidence and skill to the point that I feel I can tackle the job. I found a 1950 die cast hard top for parts, and this week the final piece of the puzzle fell into my lap... the reintroduction of this... I am no stranger to the AMT '51 Convertible, as I have my Dad's kit from the 1970's that I rebuilt a few years back... My goal for this model is to build the 1950 how my Dad's would have left the factory. Our car started life in the colours of Seafoam Green, with a black canvas top. When they bought the car, it had been painted over in an off-white. The restoration was done in black with a white top. I am going to do my model in the green because I already have the black convert in my cabinet, and because if the real car ever gets redone (and it needs it now!) It will likely be done factory stock... This is the pic I'll be working from at home... I pulled this from an E-bay listing. A few things wrong with it (rear window), but I will fill in the details on the model! First thing I have done is strip the trim from the front fender, and started reshaping the rear fender and trunklid. The correct bumpers are from the diecast... My areas of concern are the back window, the rear fenders, the dash, and the side trim. I finished one of the side spears using .040 Evergreen strip. This is the first time I have used Evergreen, and it was easier than I thought it would be. The dash that I have from the die cast is too narrow, but after looking at the real deal, the fix is going to be fairly easy. I thought the whole dash was smaller, but it appears that it was shortened on the glove box side to fit. The radio grille was off-centre in the diecast, and it will centre up by extending the dash on the right side.
-
This is really coming together now... I have the body painted, the interior ready, and the dash completed. I used the sticker of the gauges that came with the kit, cutting each gauge out and gluing it to the console. I used left over photo etch for the free wheeling knob, and the knobs on the panel. Not far to go now, just plumbing under the hood, pinstriping, and assembly...Are you guys still watching?
