

SelineManson
-
Posts
39 -
Joined
-
Last visited
4 Followers


SelineManson's Achievements
MCM Regular (3/6)
-
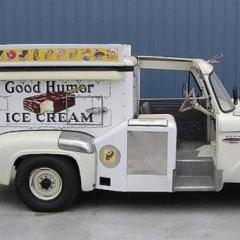
This is phenomenal. Wouldn't mind one of these in real life lol.
-
This has been 99% finished for a while now, around the same time my R32 was done, I just procrastinated on adding the finishing touches. Overall i'm happy with how it turned out, all things considered (had to strip it to re-do the paint, issues like that etc), some things I wish I could have done better, but these are only micro scale issues so I'm willing to let it slide. I didn't like the wheels that came with the kit, they seemed too small. I tried using some wheels off of an R32 kit but they also looked too small, so I went with some spare R34 wheels as thats all I had, but I think they suit it quite well. Let me know what you think and thanks for stopping by.
-
True, also it will look different once it's tied together with all the other bits, which are going to be black so hopefully it will all work out in the end. And yeah you're right, having a solid no thrills colour like this definitely suits the antiquity of the car.
-
Hmm....not too happy. I have attempted to airbrush some heat staining on the exhaust, but it looks kinda lame. It looks more like bruised flesh than anything lol. I'll be repainting this in just plain old silver for now, obviously my airbrushing skills need some serious work.
-
Paint and lacquer time! I'm not 100% sold on the shade of red, but theres not much I can do about it now. I tried to darken it with some candy in the lacquer, but it all went wrong and I had to strip and repaint it all over again. Not happy about that, just a waste of time and resources so I wont go into it now, but I've got it back to the way it was so I'm sticking with it. Hopefully the shade will grow on me the more I complete it. The red looks better in lacquer: Obviously this is not the final finish as i'll be wet sanding it down and buffing it next, but the shade is growing on me so hopefully it'll all tie itself together once its finished.
-
You spray a light misty coat of black over your primer, and then wet sand it down until all the black is gone. The idea is that the black will get trapped inside tiny scratches and imperfections that you might miss by eye, so they'll stick out and you can see them more easily so that you can fix any imperfections before you spray your colour coats instead of spotting something after when it's too late. It's a trick most body shops use before they spray cars or repairs, I do it all the time. Doesn't really scale down so well but it still has the intended effect.
-

1989 Nissan Skyline GT-R R32 - Bayside Blue Godzilla
SelineManson replied to Italianhorses's topic in WIP: Model Cars
I cant help you with the website stuff but your pictures really helped me with my first kit. They were perfectly big enough for my phone screen lol. -
Got everything primed and guide coated, next up paint!
-
1989 Nissan Skyline GT-R R32 - Bayside Blue Godzilla
SelineManson replied to Italianhorses's topic in WIP: Model Cars
OMG that was yours?! I used that page for photo reference when I was building my first ever kit! I feel like I've met a celebrity! -
1989 Nissan Skyline GT-R R32 - Bayside Blue Godzilla
SelineManson replied to Italianhorses's topic in WIP: Model Cars
Loving it! I'm a bit obsessed with skylines and have just completed two and have another 3 on the go. Despite this I haven't done one in Bayside blue yet so I might just have to make one more! XD Can't wait to see it finished. -
Thank you. It's going well so far, just got everything in primer, no nasty surprises.
-
Another day another Skyline This time I'm going old skool! I love all the extras this kit comes with! I've never worked with anything photo etched before so I'm very excited to start putting everything together! Not sure i'll paint the little man up, but we'll see. Thinking of going with black and red two-tone on this one. The kit: As usual work starts with finding and removing all the mold seams: That's all for now!
-
Some more work done on this. Painted and built up the majority of the chassis, once I add the front struts and drive shafts i'll mount the poly caps and brake discs then move on to the interior tub, i'll probably start polishing the bodywork soon too. Im really happy with the rear coil-overs, fronts look the same too just having taken photos of them yet. Its the little things...
-
Thank you! The paint is black with very fine silver metallic flakes which don't show up well in the pictures. The purple you're seeing is indeed a reflection. Thank you all for the very nice feedback!
-
Thank you! I was quite happy with the bonnet as I had to do it all by hand and I wasn't sure if I could pull it off and I was worried I'd ruin the bonnet so I was quite relieved when it turned out half decent XD