Dougboy
-
Posts
25 -
Joined
-
Last visited
Dougboy's Achievements
MCM Regular (3/6)
-
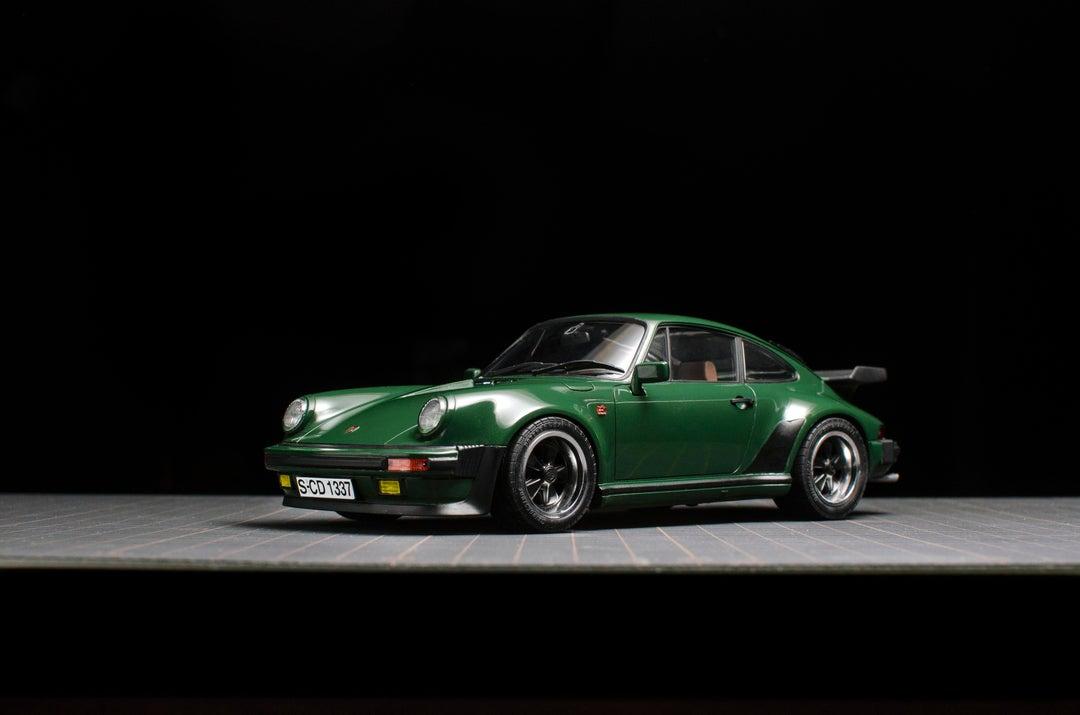
It was slightly lowered and wheels slightly spaced out for a more aggressive stance, while still maintaining an OEM+ look and period-correctness.
-
Just finished this one. A very simple kit with very few parts, but it comes together very well. Its all molded in one piece so the masking is the make or break for this one. Painted with Mr. Surfacer 1000 > Mr. Color 124 > Tamiya TS13. I originally wanted Tamiya TS9 but it was out of stock locally so I thought this would be a close match. Its darker in ambient light, the photo lighting makes it appear slightly lighter.

-
-
Just completed. Really enjoyed this build -quality kit from Aoshima. I've always wanted to build one since I had a 1/1 BRZ with Enkei RS05RR.
-
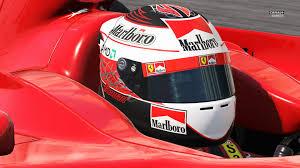
Hello folks, Worked on this Ebbro Mclaren Honda for about 3 months on and off and this is my second completed F1 scale model. Paint is Tamiya TS40. Even though its debatably the "wrong color", I am more than happy with the outcome and I think its a good representation of Mclaren Predator Grey. . . . . . . . Two Mclarens, 24 years apart, both Honda powered, both driven by World Champions, one faired much better than the other
-
Thanks gijoe, your suggestion of dispersing the liquid with a Q-tip before it has a chance to fully dry does help. I guess the key is really just to be more patient, doing few more dab/soak of the decal solution and doing more low low heat passes with the hairdryer. The clear coat after should take care of the rest in hiding the watermarks. As for heating up the decal as it dries, its not really necessary for cars, especially older model vehicles with flatter panels. But its absolutely necessary for Formula 1 bodies and more so when CF decals are used around complex aero bits.
-
So I guess the issue stems from the stronger solutions from Japanese manufacturers. I love how this "stronger" stuff could make any decal conform , especially when working with CF. I've not used microsol before and I'm afraid it wont be quite as effective, especially with thicker decals from Japanese kit makers like Tamiya....or would require extra application and patience.
-
Not sure if this has been brought up before: When applying thick decals over compound curves, the combination of decal solution, heat from a hairdryer and plenty of patience will usually give me a decent result. Problem is.... the heat from the hairdryer seems to dry up the decal solution pretty quickly and what's left is a sort of white residue. It's almost like watermarks that don't come off. I've tried gently rubbing it with a cotton swab soaked in water and the decal solution itself and it doesnt seem to go away completely. My next course of action will likely be a very light sanding or polishing to rub off the watermarks but that seem abrasive and might risk damaging the decals that took so much effort to lay on in the first place. Any tips and pointers would be much appreciated. I use Mr. Mark Softer if that matters. Do "weaker" stuff like microsol not have this issue?
-
Thank you all. The Super Touring Class 318 actually ran a lot of camber front and back, and the hubs on this hasegawa kit was already slanted to reflect that. Made it easier to go for that "stanced" look. The yellow lenses were just colored with a yellow sharpie. After sharpie'ing, I use a tiny brush and a bit of rubbing alcohol to smooth out the sharpie ink's unevenness and it becomes really clear and smooth.
-
Hello folks, Latest completed project. Kit is a BMW e36 318i Super Touring class race car which I've built as a modified street car. Paint used is Mr. Color Gx3 to replicate BMW hellrot, cleared with Tamiya TS13. Wheels are Aoshima Volks TE37rt. Cut out the grates in the front bumper and made a small lip with styrene and some putty. Everything else is out-of-box.
-
Airbrush in between coats
Dougboy replied to Dougboy's topic in Model Building Questions and Answers
Thank you gentlemen for the replies and suggestions. It appears that dump/clean/backwash/reload is still the preferred method. Yes I do use a gravity fed airbrush, and I simply give the cup a stir with a little paintbrush or toothpick before spraying if I'm concerned about metallic particles settling to the bottom. As for wait time between coats, I guess I dont necessarily have to wait 20-30min. My go-to thinner is Mr. Hobby Self Levelling Thinner and it does give a really smooth finish, but at the expense of slower dry time because of the paint retarder. With thicker coats, I'd rather leave it for at least 15+min before I lay down another coat. -
Ok, this might seem like a silly question: For those who paint with an airbrush, what do you do between coats? Dump any remaining paint and clean it out? Leave it and hope it doesnt dry in the brush? Now I'm not talking about color change, I mean when waiting in between coats of the same spray. I mainly use solvent-based paints like Tamiya TS or Mr. Color and wait 15-30min in between coats. Its tedious to empty/clean/reload an airbrush just to lay down another coat of the same paint 20min later..... yet I feel like the paint will dry and clog within 20min if I just leave it. Any tips and pointers would be appreciated.
-
Canned Tamiya TS vs Bottled Tamiya LP
Dougboy replied to aurfalien's topic in Model Building Questions and Answers
TS cans cost less $/ml but I'm more concerned about cost per application. Unless you are someone who builds many models or plan on building another model using the exact same color, the extra ml in a TS can just ends up being unused or sits on the self for an unknown amount of time. So for me, it ends up being a question of spending $4 to paint a model or spend $7 to paint a model and having leftovers that I might or might not ever use (if its not a commonly used color like white or black). That being said, a few dollars here and there is really nothing in the grand scheme of things. I still gravitate towards TS cans for the color choices available. PS* off topic but has anyone mixed decanted TS with Mr. Color? Any issues? Thanks -
Hello folks, Here's and my first attempt at an F1 build. This is the 1991 Brazilian Grand Prix version. Had I done more research on this kit, I would probably have skipped it all together due to the various well-documented issues. It's a shame as I think the MP4/6 is the best looking of Senna's World Championship winning cars. Body is decanted Tamiya TS26 and TS36 with Mr. Topcoat as clear. The chassis parts were painted with Tamiya acrylics. This was also my first build completed using an airbrush instead of spraycans. Built Out-Of-Box with nothing else (not even tobacco stickers...I know :oops: ). The biggest issue was the cowling fitment as discussed on other forums So I just ended up gluing it shut after shaving and modifying a bunch of internals. The front uprights had also been modified as the original ride height is way too high and super inaccurate. Aside from the cowling, the overall fit and finish of this Fujimi kit is very subpar and can be frustrating to inexperienced builders such as myself, so I ended up just glue-bombing a lot of the parts.
-
Not sure what I'd make of the end result. Not my automotive cup of tea. But theres no denying the excellent execution and craftsmanship of a very interesting automotive idea.