himynameisgreg1
-
Posts
20 -
Joined
-
Last visited
Content Type
Profiles
Forums
Events
Gallery
Everything posted by himynameisgreg1
-
Pre-ordered one of these too, can't wait to get it. Will be following along for sure!
-
 Not sure how many other brand bottles these would work on but I bought a pack of these and when the cap gets bad I just switch to a fresh one. You might be able to find other sizes. https://www.amazon.com/gp/product/B001NI8MS0/ref=ppx_yo_dt_b_asin_title_o07_s01?ie=UTF8&psc=1 I use these on the 2oz Super Gold bottles. https://www.amazon.com/gp/product/B0000DD1QN/ref=ppx_yo_dt_b_asin_title_o01_s00?ie=UTF8&psc=1
 -
Magnifier 1/12 Ford Gt40
himynameisgreg1 replied to kpnuts's topic in WIP: Other Racing: Road Racing, Land Speed Racers
Just finished this one up recently and while it's a ton of work, it was a lot of fun. Good luck, I'll be following along! -
Gravity colors USA problems?
himynameisgreg1 replied to Polaco's topic in Model Building Questions and Answers
+1 for the Spanish store. I've bought from them 4 or 5 times now and it's always pretty quick, maybe 5 business days at most. -
Thanks for the kind words everyone! Thanks! I initially put off starting this one because I knew it was going to take a lot longer than the typical week I put into the 1/24 scale. My style is to do as much as possible as quick as I can, so 5+ hour stints for multiple days in a row lol. I kinda forced my self to take this one slow and it made it a lot more enjoyable and relaxed. I only did 1-3 hours maybe 3 to 4 times a week and it helped keep me from getting burned out. It did take roughly 2 months from unboxing to finished pictures though.
-
Thanks for looking! Greg

-
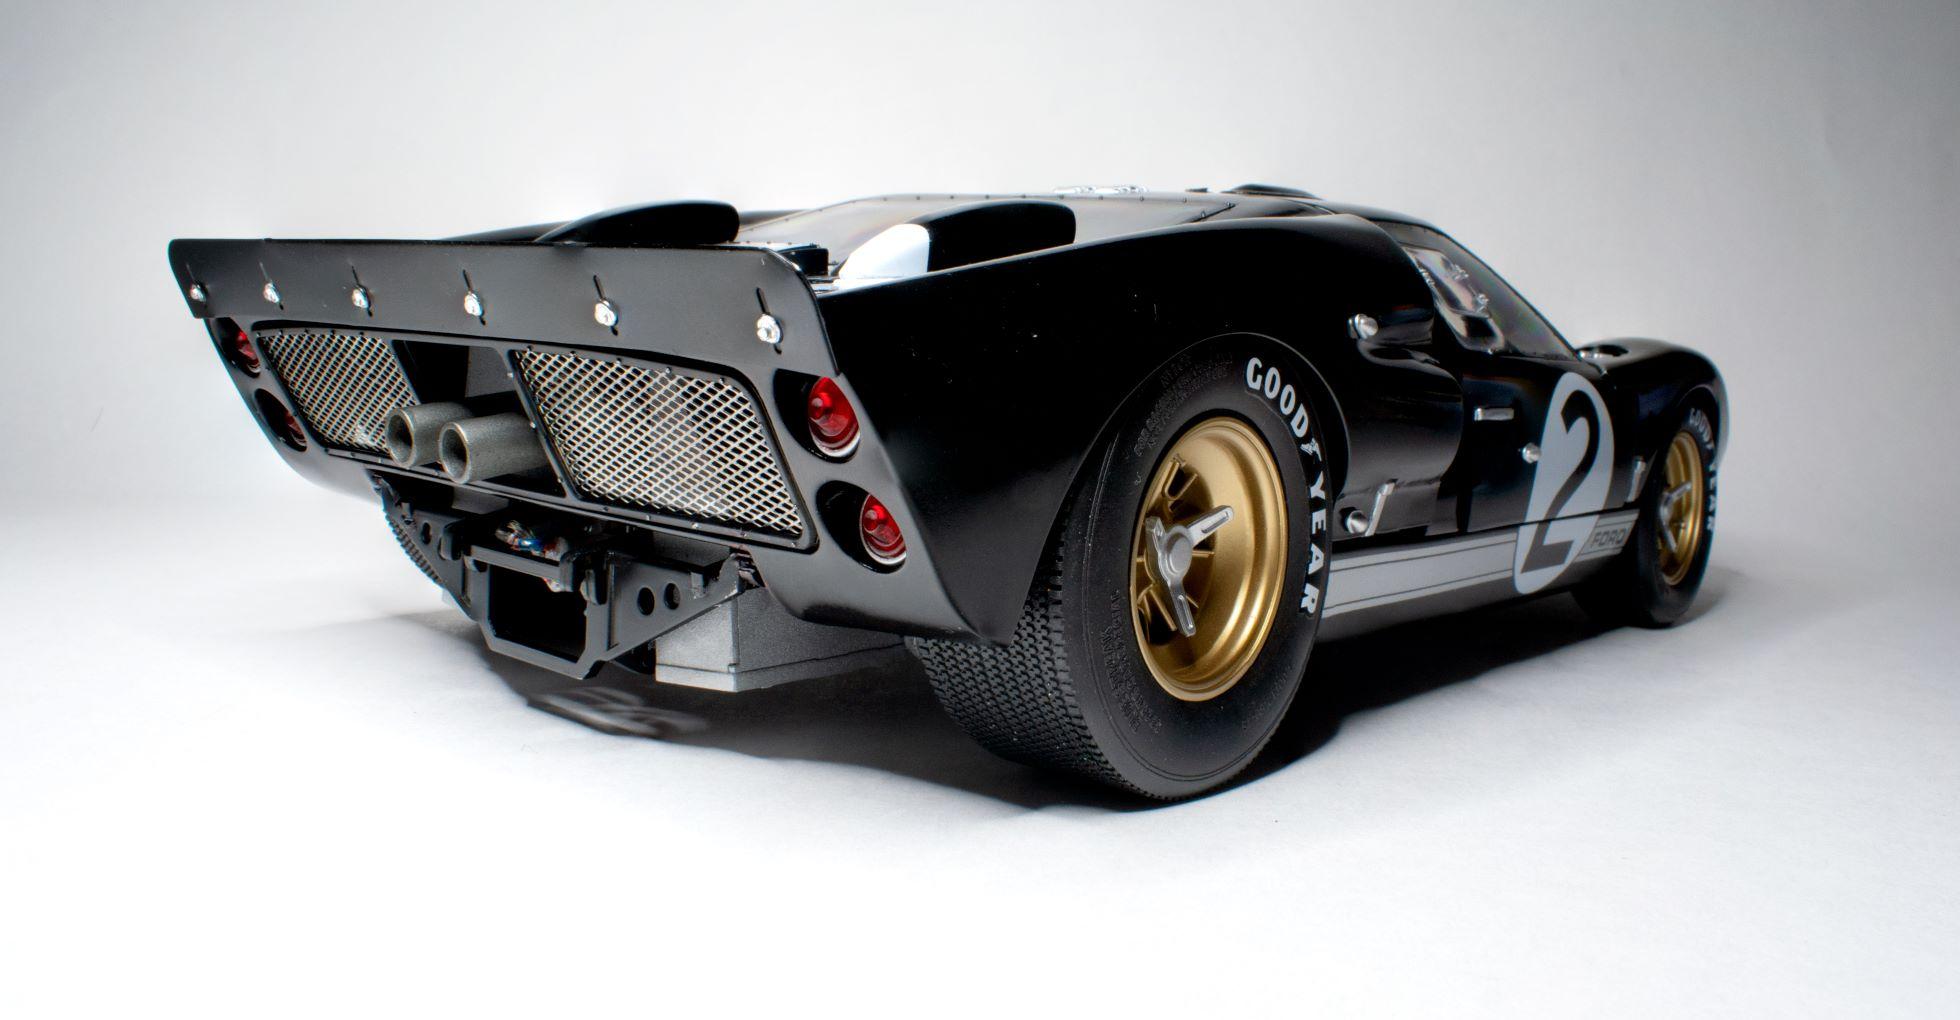
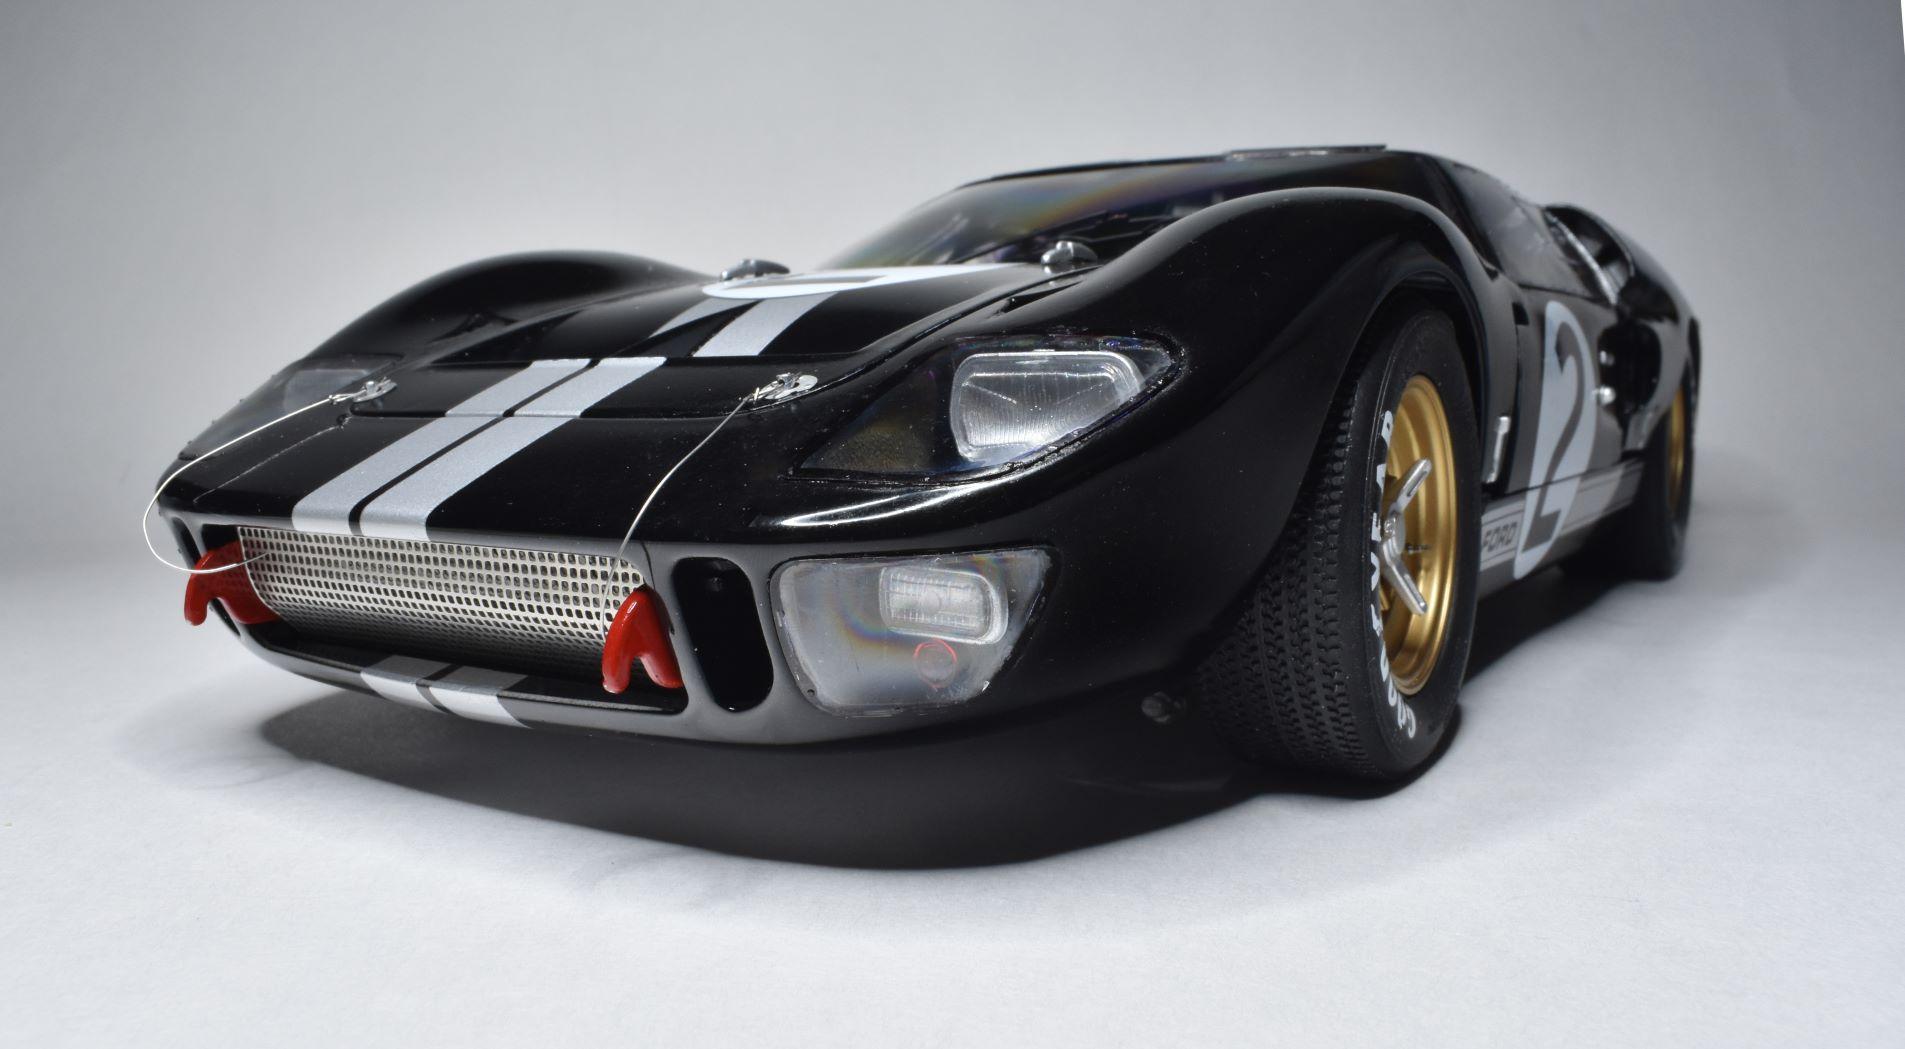
Finished this thing over the weekend. It's not perfect, but I'm very happy with it!
-
Thanks for the correction.
-
Thank you! This scale has def provided me with new challenges, but it's not turned me off to doing more at this scale in the future!
-
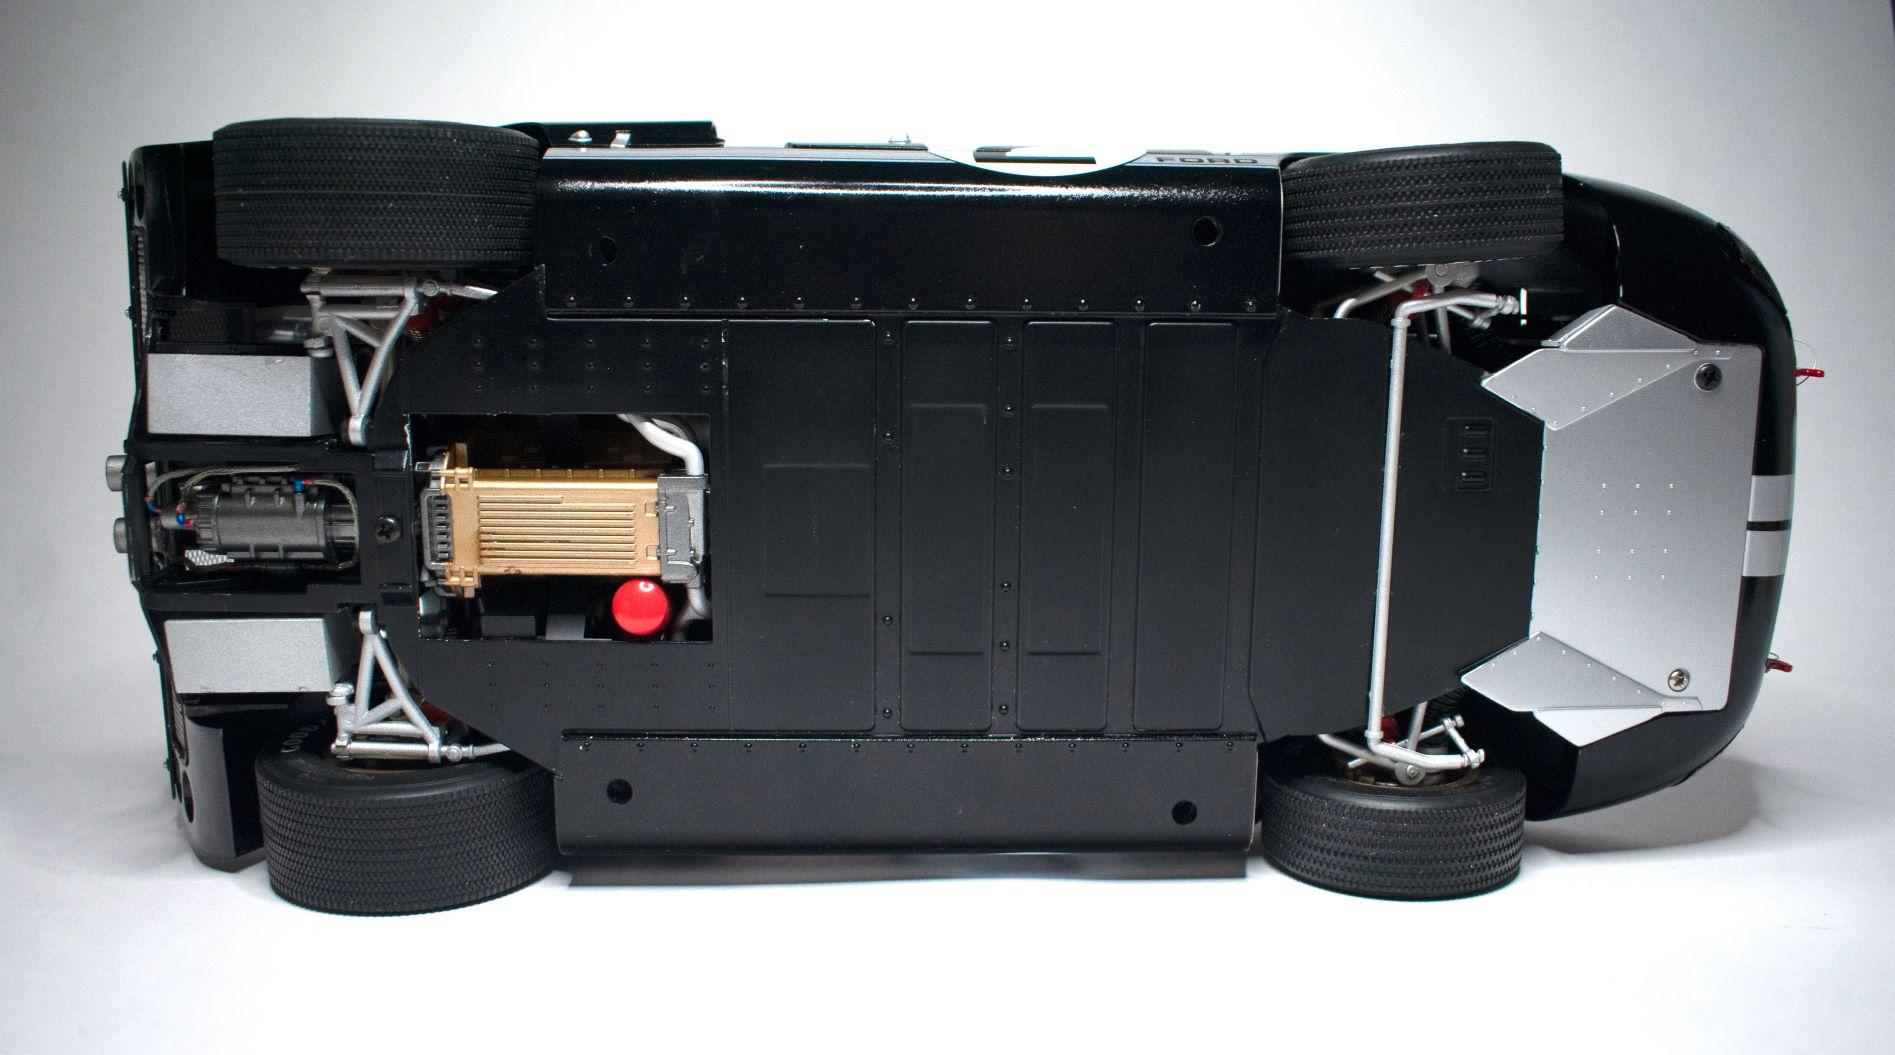
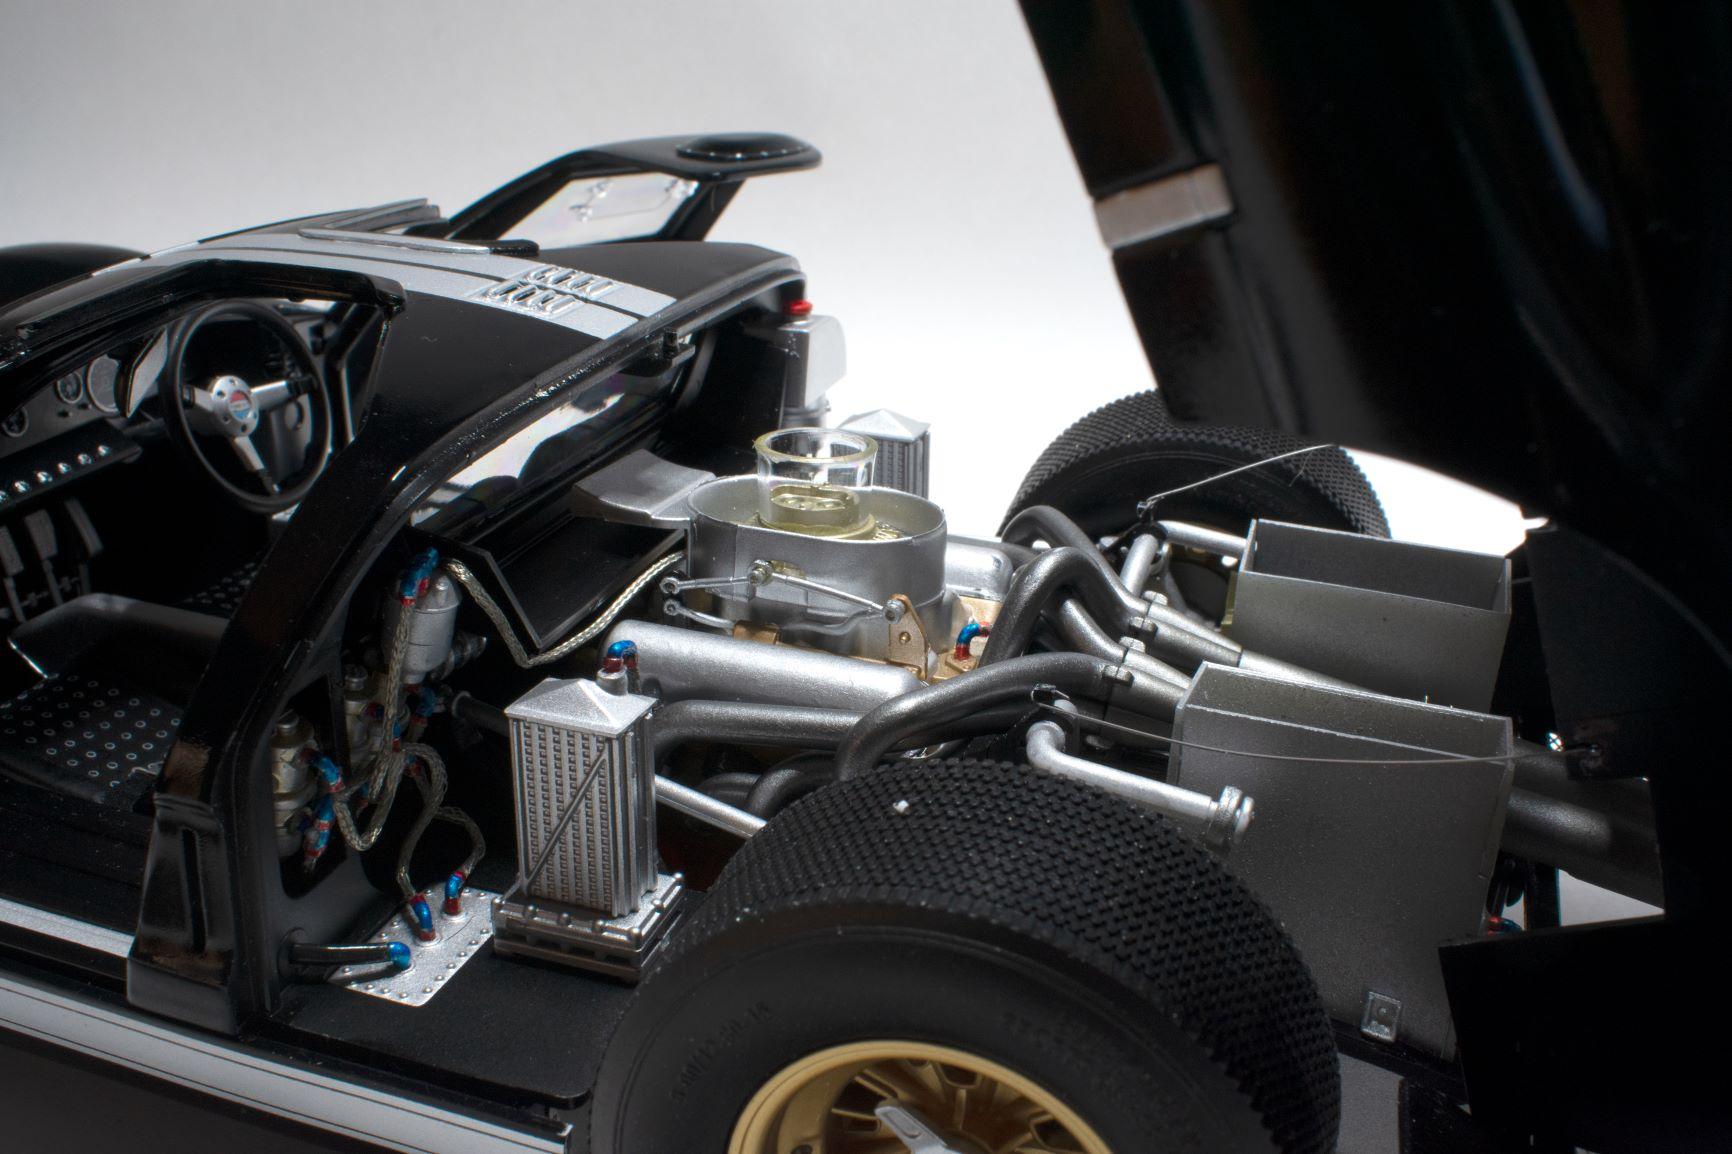
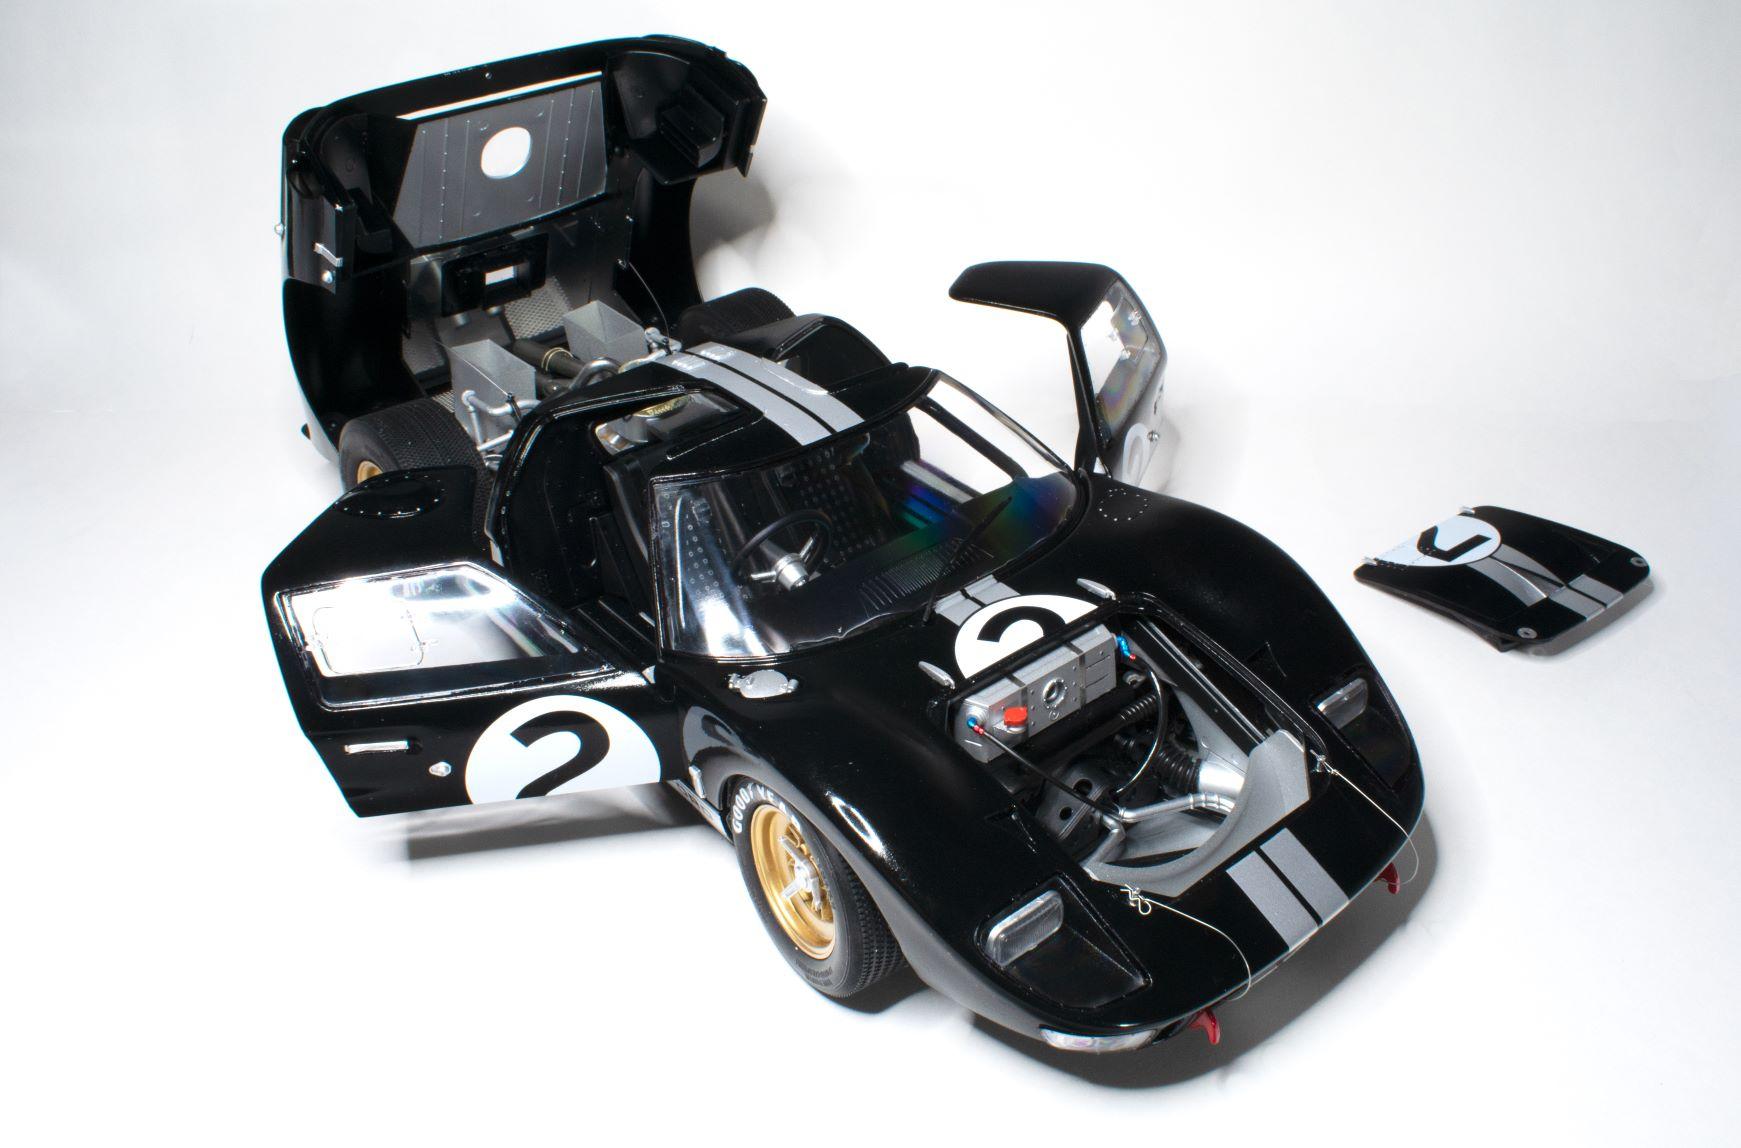
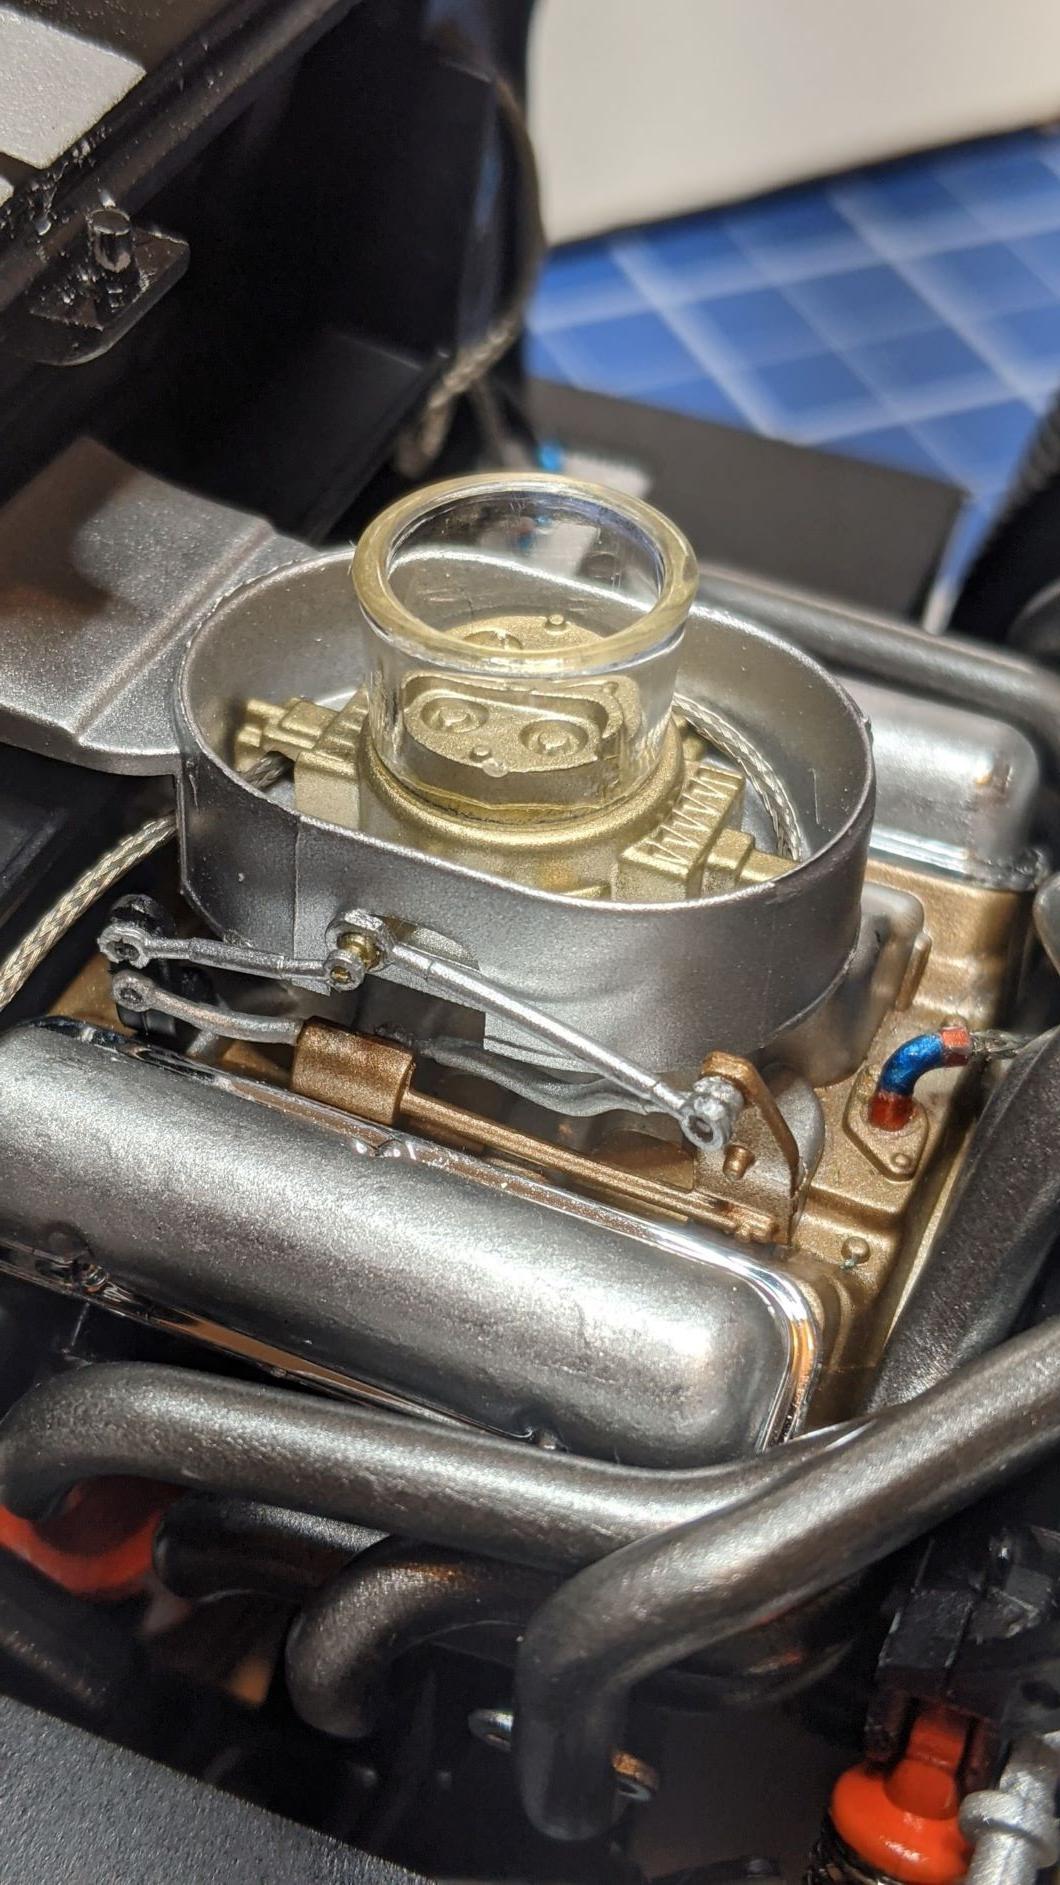
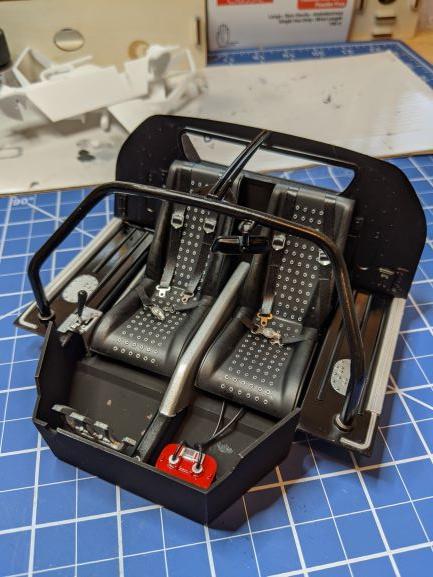
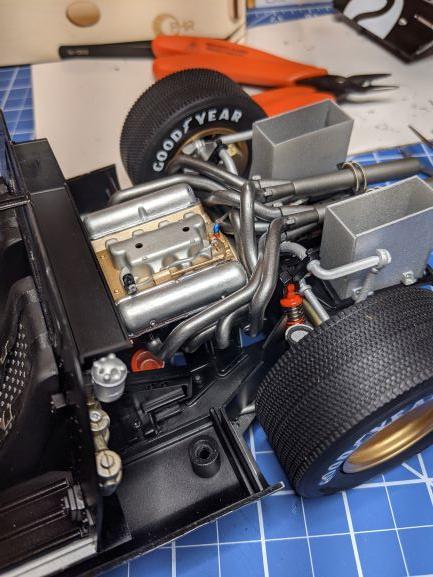
Got a little further on the engine. I feel the top parts of the motor supplied are sufficient with the Trumpeter kit, but the distributor piece would be nice. Although, the distributor itself I don't think is super noticeable as it slightly obscured between the firewall and the pan thing, the missing wires are. Also, not exactly sure what those pieces on the left and back of the link would go, they look to be just a bit more detailed pulley parts rather than the one piece that comes with the trumpeter. Once the motor is screwed in, that part is invisible as it's right up against the firewall below where the distributor would be. Luckily it's not too expensive if you want extra detail.
-
They are embossed. The part comes in white, I first painted them black and then started brushing over with silver paint on the raised parts but could not get them as sharp as I wanted, so I took a sanding stick and carefully sanded the black down to the white plastic. Luckily, it looks a bit silver.
-
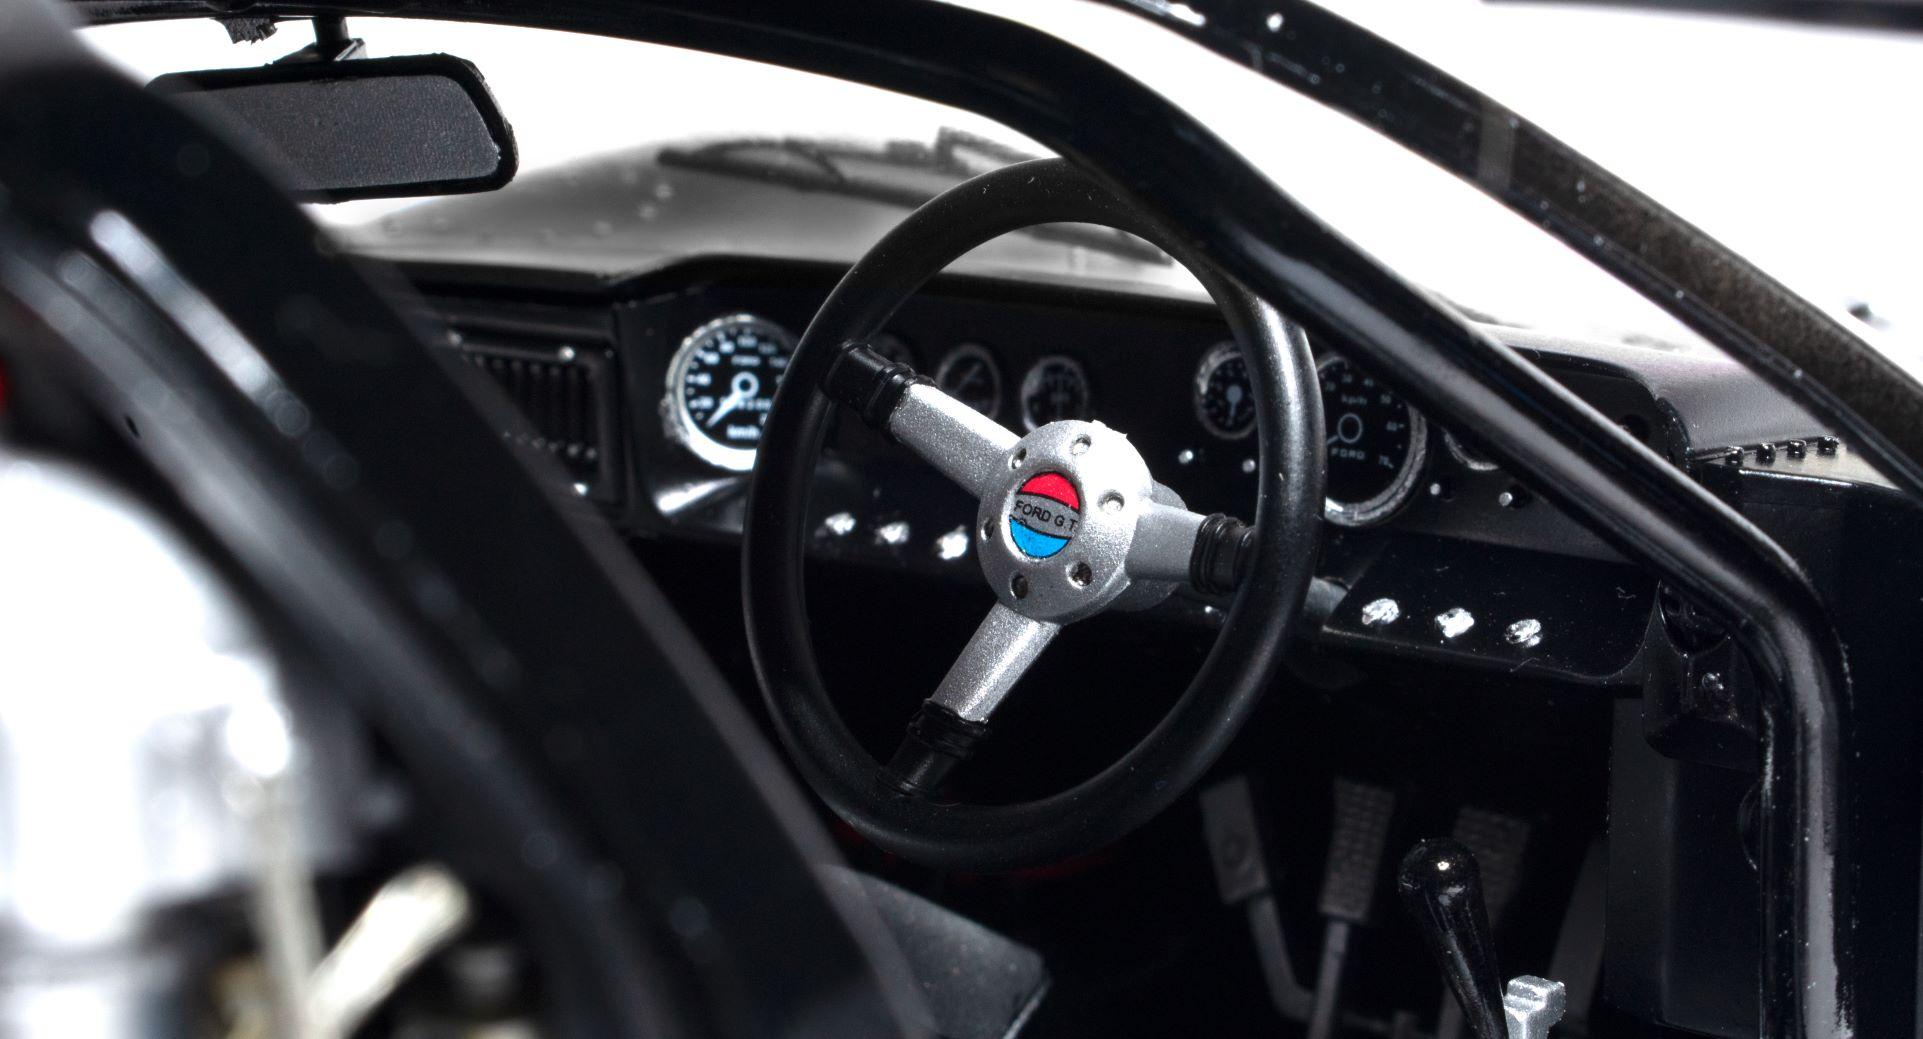
Thanks! Yeah, that was one thing I found out before I started when I was trying to find tips from others who have done it. I'm not quite to the scratch building level so I decided to to let that part be. There is quite a bit more buildup in that area, so hopefully it won't be quite as noticeable to most people when finished. Thank you! Thanks! I had this for a few months and opened the box and looked at it multiple times before actually starting it. I'm really liking it so far though. This is the first 1/12 kit I've done and the first that's had extras like screws, springs, hoses, and some PE parts so I'm learning as I go. A couple things I've found out: There are a lot of chromed parts that I found in my research should not be chromed. I stripped all of them except the two valve covers(?) on top of the engine, and then while wiping off a finger print I somehow wiped off some chrome, so now everything is X-11 Chrome Silver haha. If i did it again, I'd save the valve covers, wheel center caps, the fuel filler cap (on the hood, drivers side), and the steering wheel and de-chrome the rest and repaint an appropriate silver color. The woven fabric that comes with it to simulate braided lines seems hard to work with (easily unravels and seems too thick for the AN parts) so I got some Detail Master braided lines but there are trade offs. All the AN parts have nubs to insert into the woven fabric but the detail master lines are solid so I've had to cut off all the nubs and drill holes into the AN fitting parts. It's taken a lot of extra time. Probably should have bought new AN fittings as well. I've had OK luck with the .045" line. It's a tiny bit too thick in some cases so the next size down might be easier to work with for the thinner hoses but maybe not fully "to scale".
-
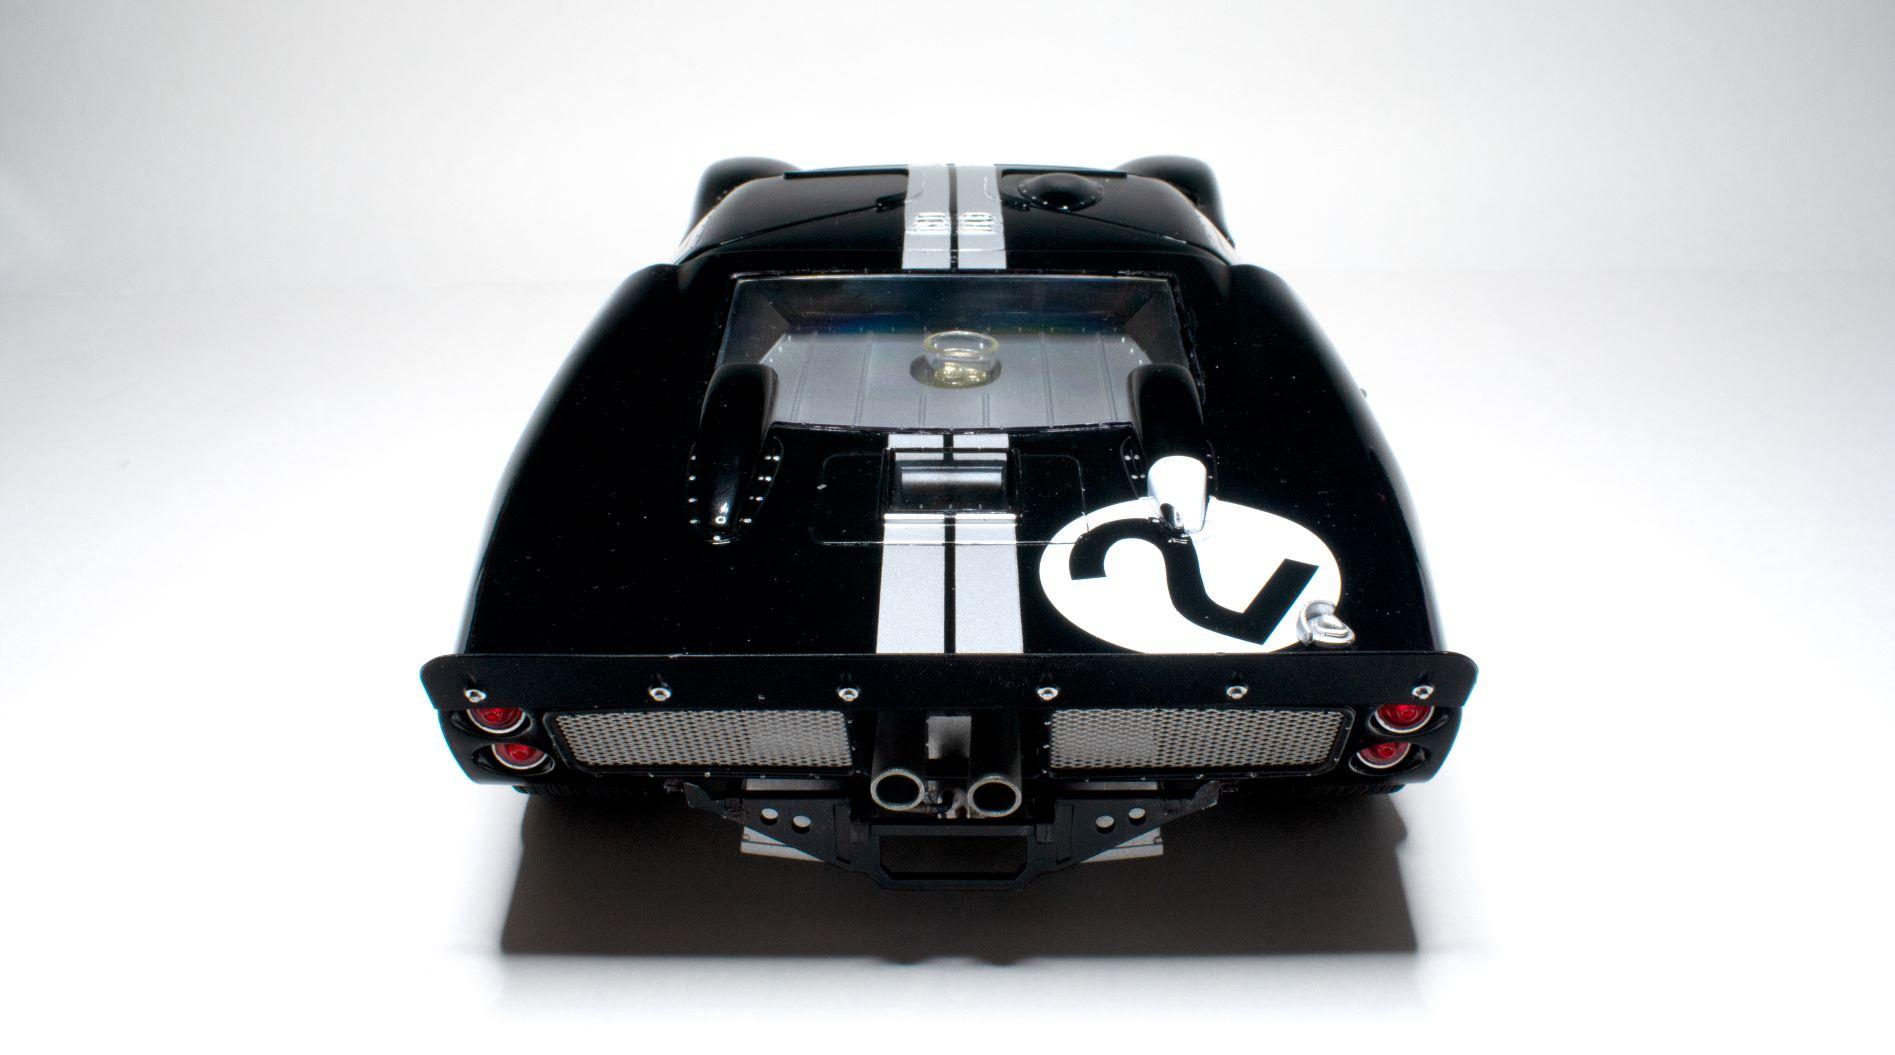
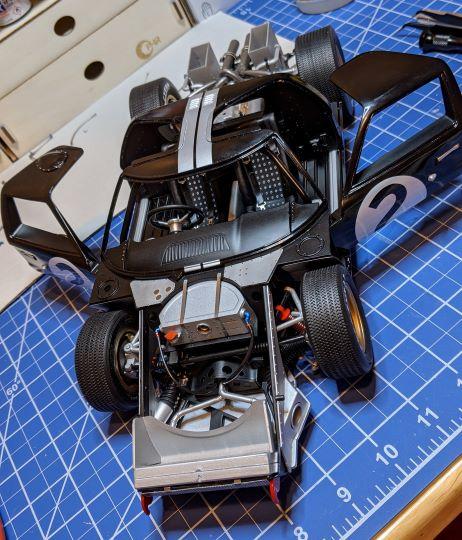
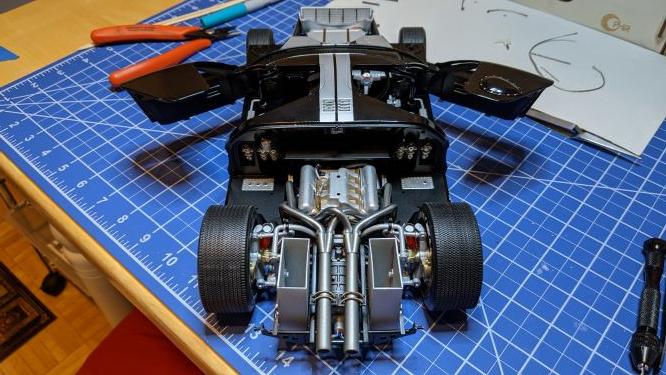
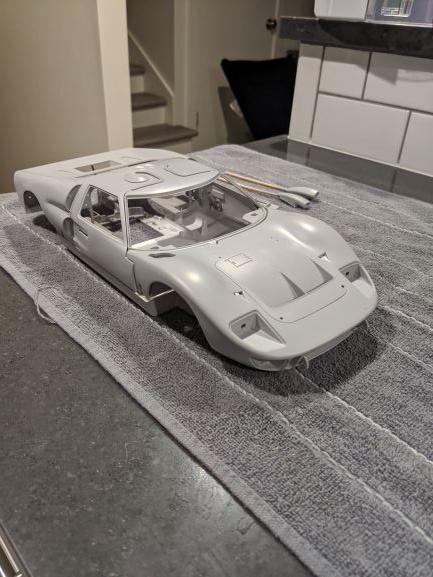
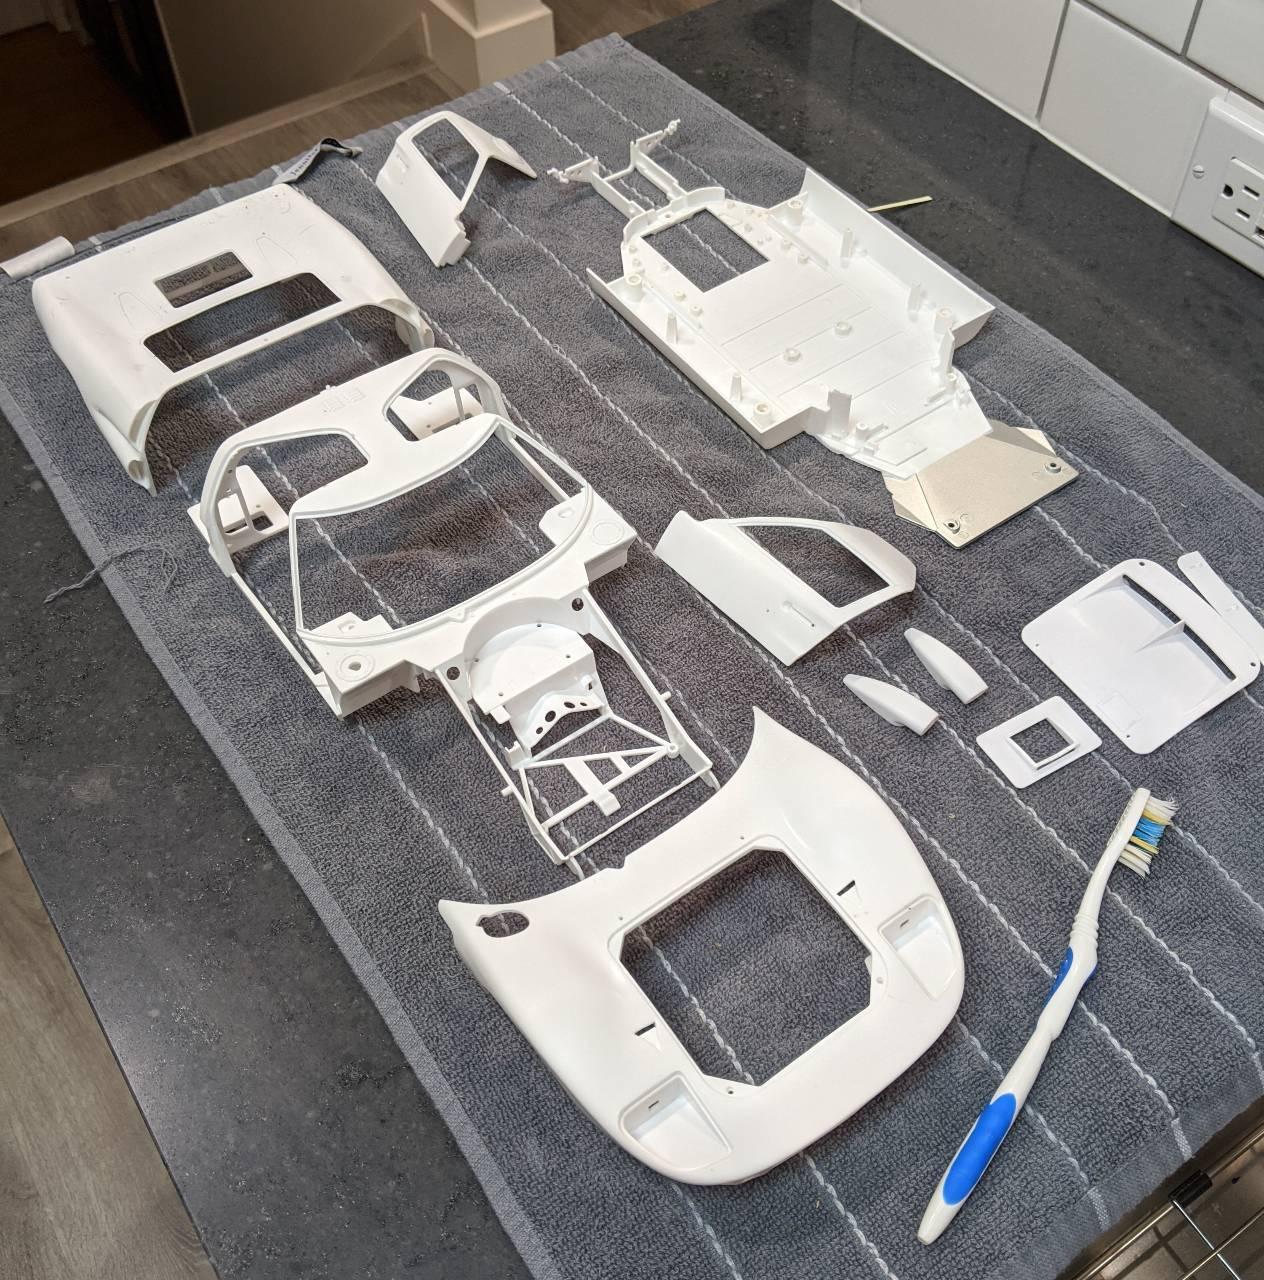
Hey guys! Been slowly working on this project for the last couples months. This is my 7th model and by far the toughest one yet. Let's get to it! Sanded Primed: Painted, decal'd, Cleared: Partial Engine: Interior: Interior and Engine attached to chassis: Roof/Dash: Frunk: Roof/Dash/Doors attached to chassis: This is where I'm at right now. As you can see, there is some empty space in the rear. I'm in the process of building fuel/other lines and then have the rest of the engine components to put on before moving back to the body/glass. I'm trying to wait as long as I can before putting in the windows and other glass. I somehow always get a nice super glue-y finger print somewhere. Trying to avoid that! Thanks for looking! Greg
-
Looks pretty similar to the Magnifier (Trumpeter) kit I'm in the middle of building right now. A few things I've noticed, my kit is missing the larger gurney flap and the strakes on the front hood. There's a small up turn, but nothing like the real car or the photos of the meng kit. Magnifier doesn't have the spare tire. The Meng seat texture looks much better with the leather ripples and criss-cross and depressed aluminum ducts. Dash looks very slightly more detailed with the swtches. The pedals and shifter also look different but I couldn't tell you if one is more accurate that the other. The Meng front fenders look a bit larger/taller/fuller. Almost too big compared to the original: And the rear looks a little flat, but this is a slightly different angle: Looks like all the hoses are black tube or plastic in the Meng kit. Mine came with AN fitting parts and "woven thread" that you're supposed to paint silver to look like braided line. I went with aftermarket braided line from detail master instead which you could easily substitute on the Meng kit too. I only see two of the gold reservoirs behind the firewall above, Magnifier has 5. Also, Meng looks like a lot of screws in the suspension which I don't think I like. The only screws in the Magnifier suspension are hidden behind the center caps and hold rear wheels to the hub. I'd post a few pics, but I don't want to thread-jack. Perhaps I'll post a WIP thread and link it here. *edit, here is the link:
-
Thanks all for the warm welcome! Thanks! I do the majority of the exterior and interior airbrushing. She likes to brush in the smaller details/accents, applying decals, and assembling.
-
Cool, looking forward to seeing progress! I would love to do a super detail kit soon but not sure this should be my first one. This kit has over 3x the part count as the other 6 models I've done haha. Might be a little in over my head but just gonna take my time and hope for the best.
-
I have the Magnifier kit as well. Been slowly getting into it this past week after sitting on it for a few months. I have looked at all the sprues and have gotten as far as priming the body. Haven't opened anything else up but so far so good in terms of quality. I've read that the original Trumpeter kits had some fitment issues with doors and engine covers needing slight re-alignments, but this one seems to line up pretty well out of the box.
-
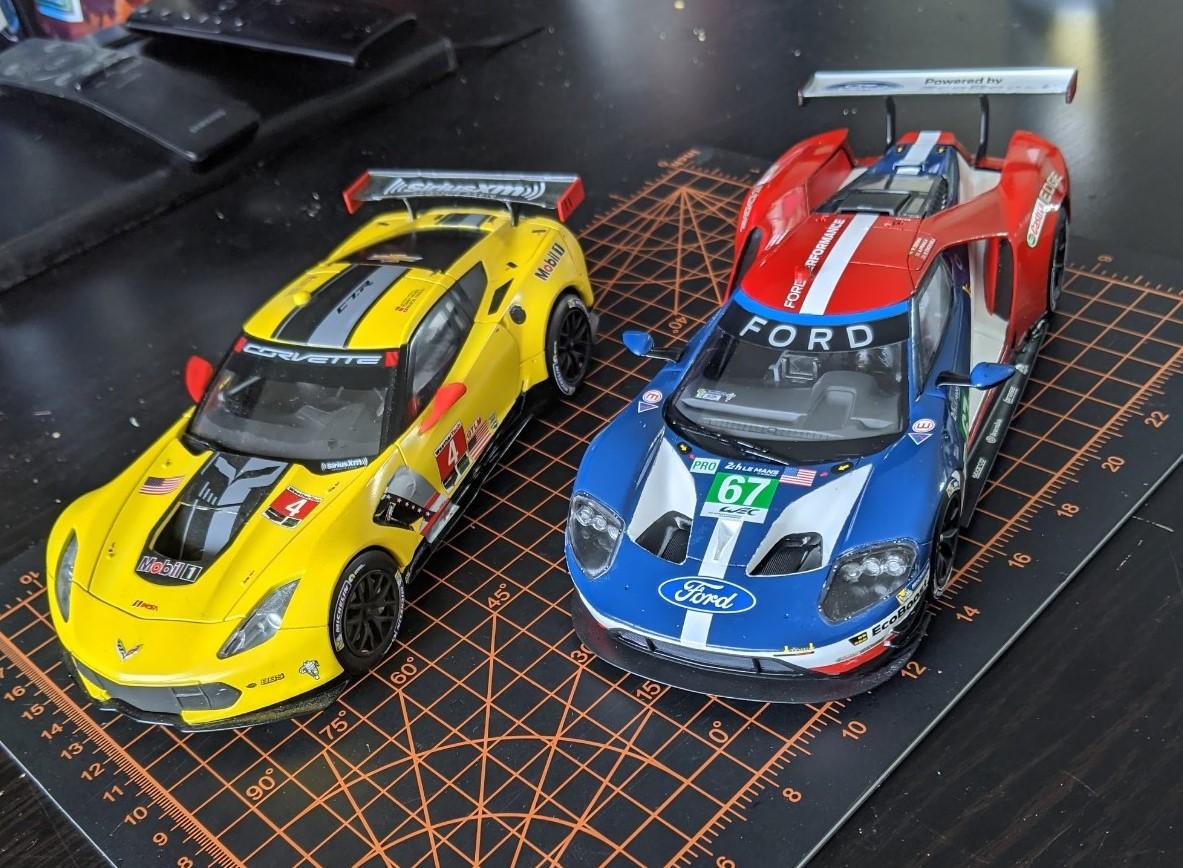
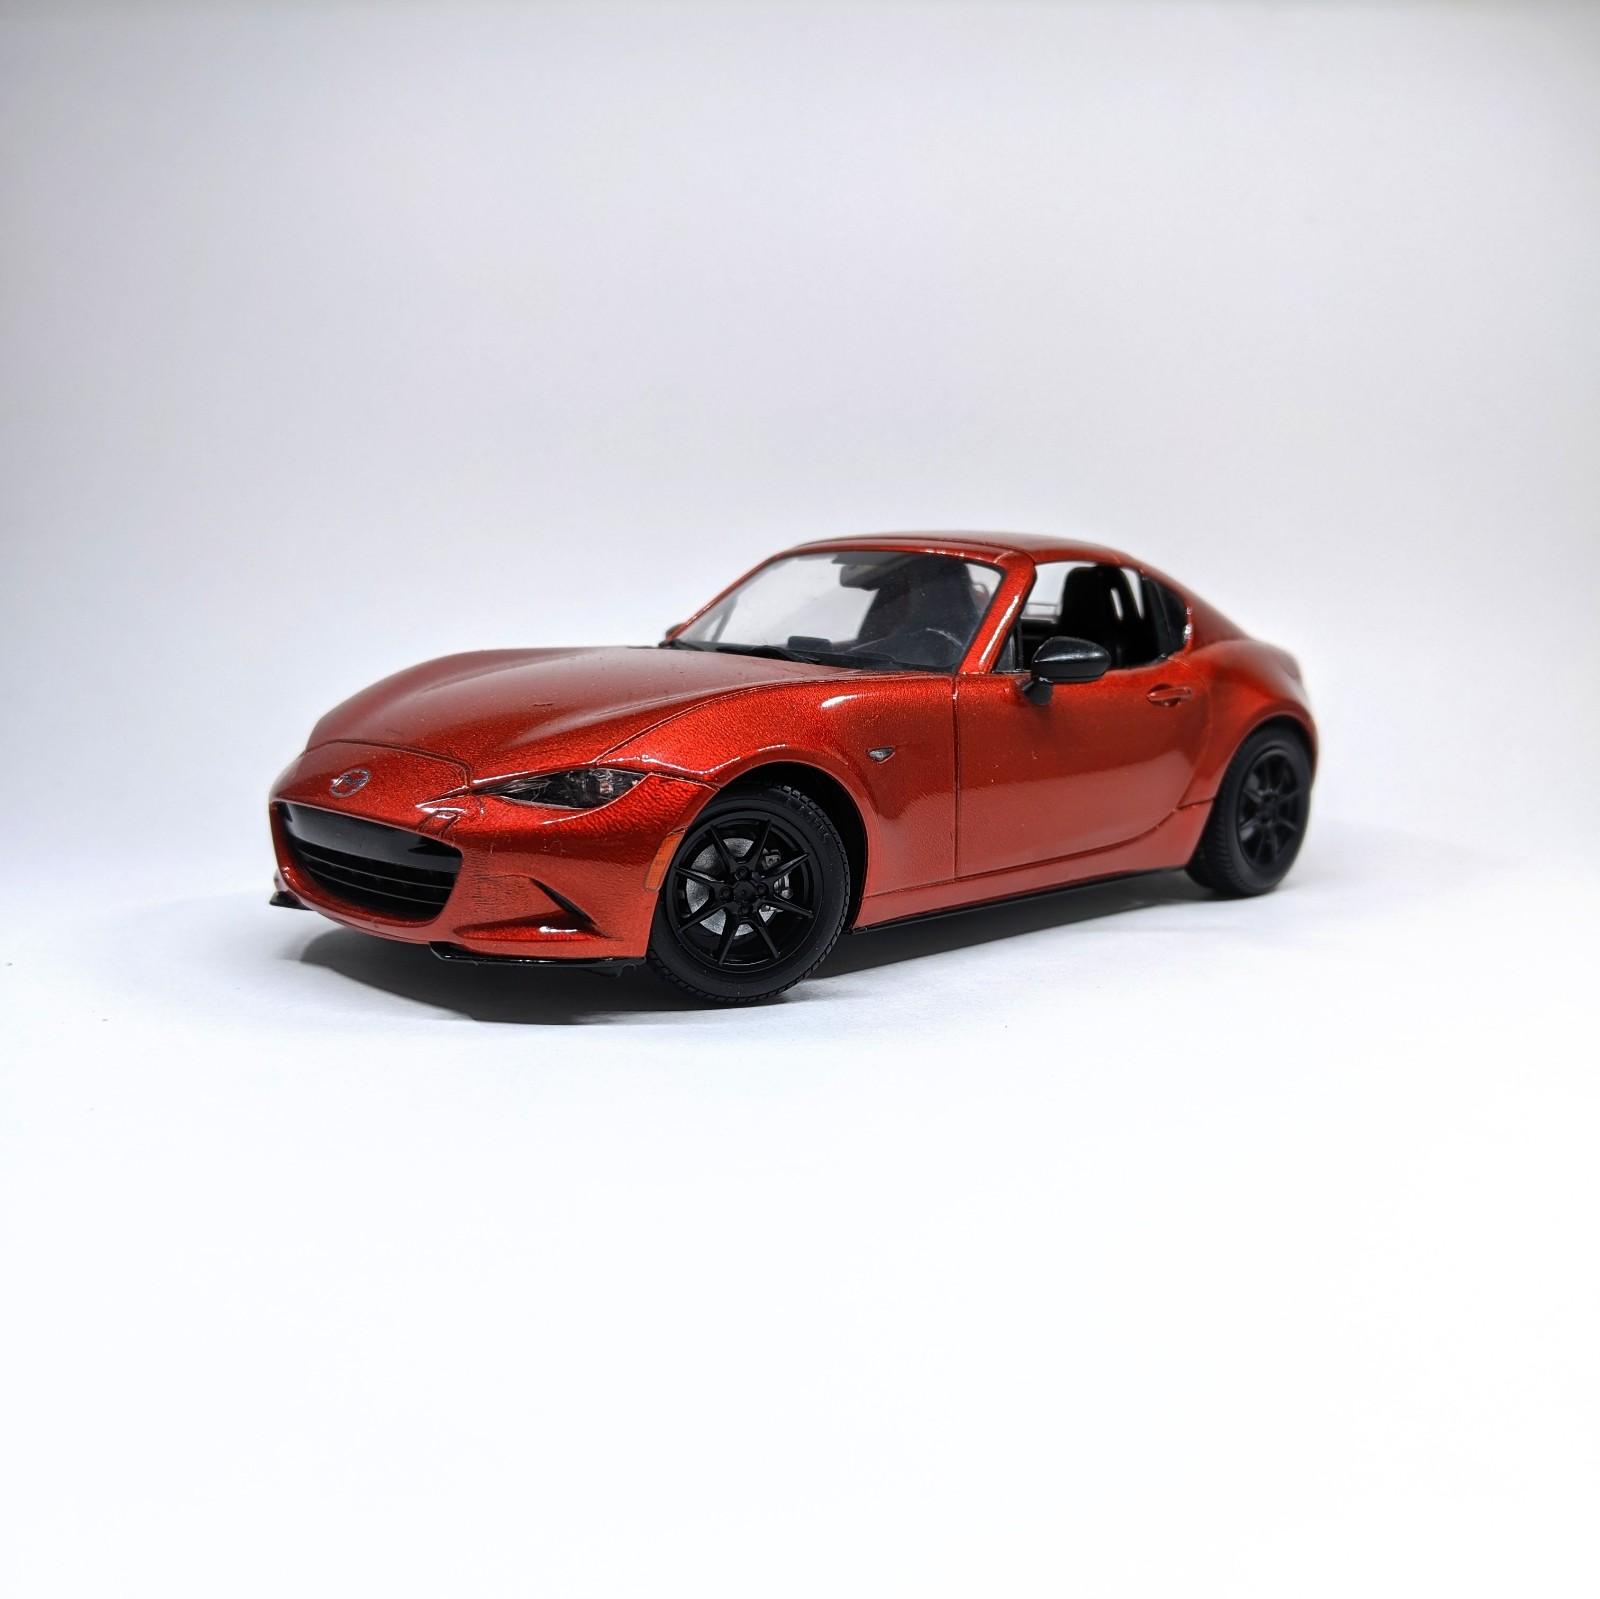
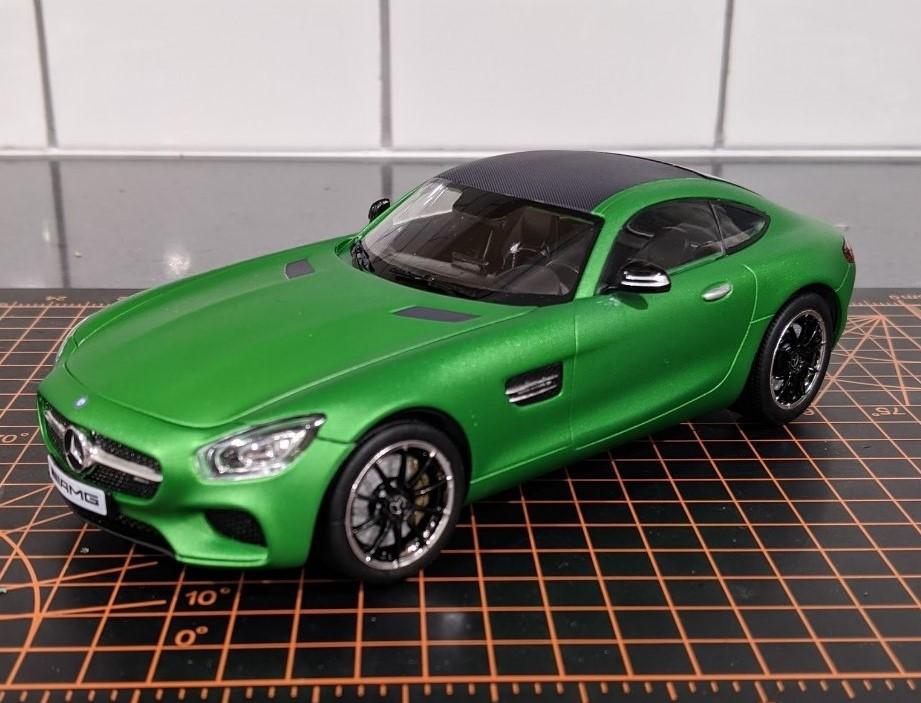
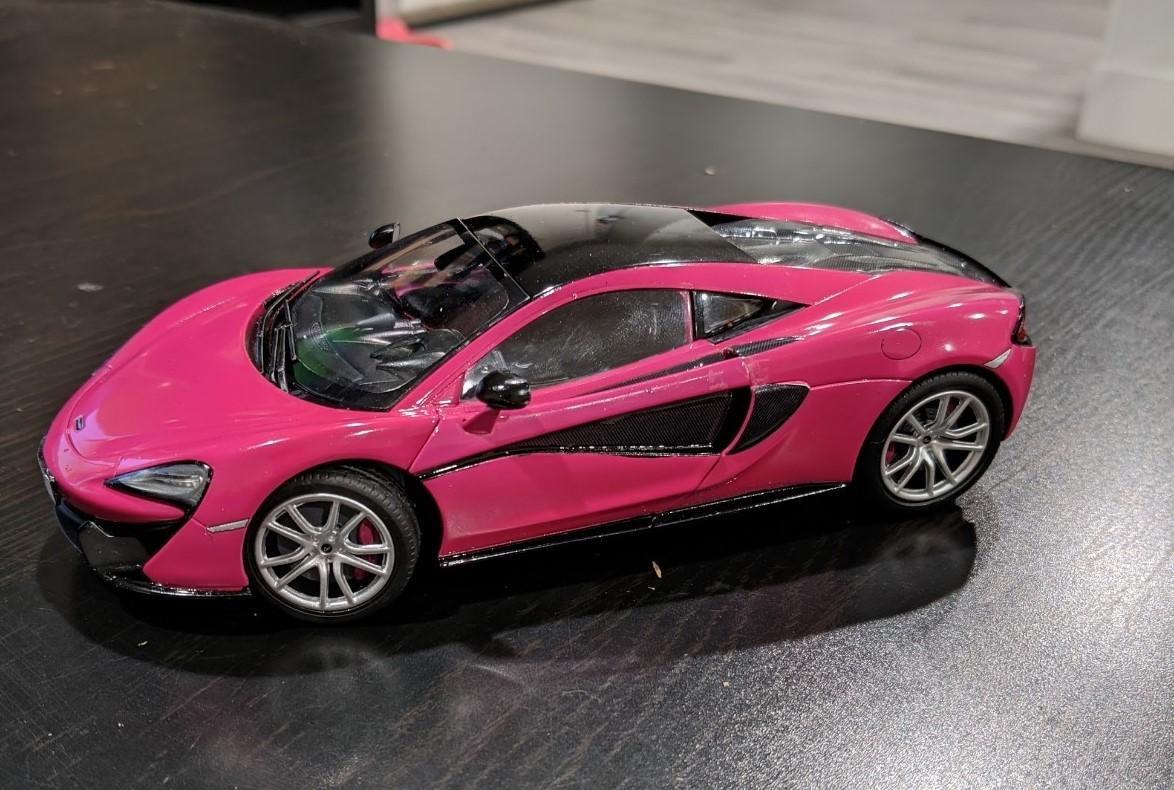
Hi, my name is Greg. My gf and I have been modelling for about 6 months now. What a hobby to get into right before a pandemic haha! Been watching lots of youtube vids and learning how to airbrush. We've tag-teamed six 1/24 scale models so far and I've decided to try and tackle the recent re-release of the 1/12 Trumpeter/Magnifier Ford GT40. Hoping to learn some new things here and see what else is going on in the world of models. We don't know anyone who does this sort of thing, so literally everything is new. We did four of these models before discovering brush on masking liquid? Anyway, my GF bought a new mx-5 miata last year so of course we had to pick up the new tamiya kit to match. But having never done this before, we wanted to practice first, so we got the Revell Corvette c7.r to "practice" on. None of these have had paint/clear sanded or polished so that's another thing I'm hoping to find some tips on and learn for future models. Thanks for looking! Any kind of comments/tips/criticisms are appreciated! Corvette pictured here with our third model, the Revell Ford Gt Le Mans .Mistakes were made, but forgetting to clear coat the body was one of the bigger ones. Here's the Miata: we used some gravity-colors two step paint and I don't think I waited long enough between coats so it got kind of a wrinkly texture ? And then a Merc and a Mclaren (gf wanted a pink car): And our most recent but probably best turn out, Acura NSX: This one also use a gravity-colors two step paint, but I waited longer between coats and it turned out much better. And the current state of the 1/12 Ford GT sanded and ready for primer: