

EngineerBob
-
Posts
140 -
Joined
-
Last visited
Content Type
Profiles
Forums
Events
Gallery
Posts posted by EngineerBob
-
-
charlie libby, are you sure that you didn't just photoshop real car parts onto your model pics? Incredible detail! I can't imagine the amount of work that went into creating that level of realism in 1/25 scale. Great job.
-
echo, thanks for the compliment but I'm no Tom Daniel in the artistic department but I'll settle for maybe being a little imaginative (and not necessarily true to life) in my builds.
") The creativity and being able to build whatever you can think up is why I like modeling (and I don't have the time and patience to build my ideas in 1:1).
The creativity and being able to build whatever you can think up is why I like modeling (and I don't have the time and patience to build my ideas in 1:1).
-
Papajohn97, nothing boring about that model, just looks authentic! I'm currently working on my own version of a Galaxie A/FX, a 63. Mine will have an altered wheelbase. Still trying to decide how 'fancy' to get with the paint.
-
bh1701, as others have mentioned, there can definitely be a reactivation/softening of the underlying materials when using lacquer paints. A couple of things that have worked for me is to give the putty you use some extra time (days) to dry and then lightly primer and again give the paint extra time to dry before recoating. If the low spot is in a relatively flat area then make sure to block sand with a very firm or even solid block to back the sand paper, no block or a soft block will still be able to contour to the surface and sand out fillers that are typically softer than the surrounding plastic. I have had good success using Evercoat Pro-Grade Glazing Putty for areas requiring major bodywork or where I need a filler which is almost a hard as the plastic. The Evercoat is a two-part catalysed glazing putty (important that it be a glazing putty and two-part, ie you need to add a hardener) that comes in a 3oz tube for $10 at any autoparts store and is enough to do many models. Bondo also has a pro-grade two-part glazing putty in a tube for a similar price.
-
NOBLNG, OMG with your whittling, carving and sanding skills you can chop a top anyway you like. I can't believe how well the shape of the posts look in primer! I'd really like to know how you got such crisp lines in such small spaces?
-
JollySipper, I also like the direction you're heading, very East Coast hot rod with the stock roof height and radical channel. Look at pics of hot rods that you like and nail the look most important and the accuracy less so.
-
89AKurt, thanks for noticing how the two sides give two different views. Since this was my first model build in over 30 years I wanted to top the models I built as a kid and add a lot of detail. Therefor, the hood and door had to be open with the tools laid out but I still wanted to be able to get an overall view of the car so closed door and uncluttered salt on the other side.
-
Paul, thanks for the comments about the roof. The original model had a closed roof which I cut open and beside looking more rat-like with the exposed wood bows now people could easily see the interior details, something that is difficult to see in most chopped models.
-
Maya, kudos for wanting to build a model for your boyfriend. Hobby stores, Ebay, Amazon, etc carry 'waterslide decal paper' in 'clear' background or 'white' background and for inkjet or for laser printers. It is not difficult to make the decals and there are plenty of tutorials on YouTube. As MrMiles mentioned, there are some limitations in the two types of backgrounds that you have to work around. For instance, the dark color No. 11 on a white background on your pictured Porsche would turn out very well using clear decal paper but if you printed the white Porsche logo on the red background using clear paper it would literally be clear and invisible since home printers don't print white ink. And, if you were to use white decal paper the white letters would not be visible because they would be on a white background. A work around would be to draw and print the white logo on a red background using clear paper that closely matches the cars red color. You would have to print a few tests to get the scale and color correct. I first printed homemade decals only a few months ago and they were ok but I'm still trying to improve my results.
-
 1
1
-
-
Cobraman, nice work. Good subject matter. I've always loved '60's gassers and A/FX cars in real life. I was inspired to build my own model of an A/FX dragster based on a '63 Galaxie I recently bought off Ebay. I've now finished major body, interior and chassis mods (hopefully I'll stick with it to the finish).
-
thatz4u, just knowing who Bob Hope is probably dates us.
-
Oldcarfan27, I'll definitely post some of my other models based on the nice comments that I've received. Refreshing Forum that doesn't have a lot of name calling and negative comments.
thatz4u, Funny!
-
Need those luxuries plus not to mention what it would do to my back trying to get into a radically chopped and lowered car!
-
Hi All. Thanks for the kind words about the other models that I've posted. I've built 7 models in the past year (in this, my second, phase of model building
) and I'll go ahead and post them since you've all been so welcoming.
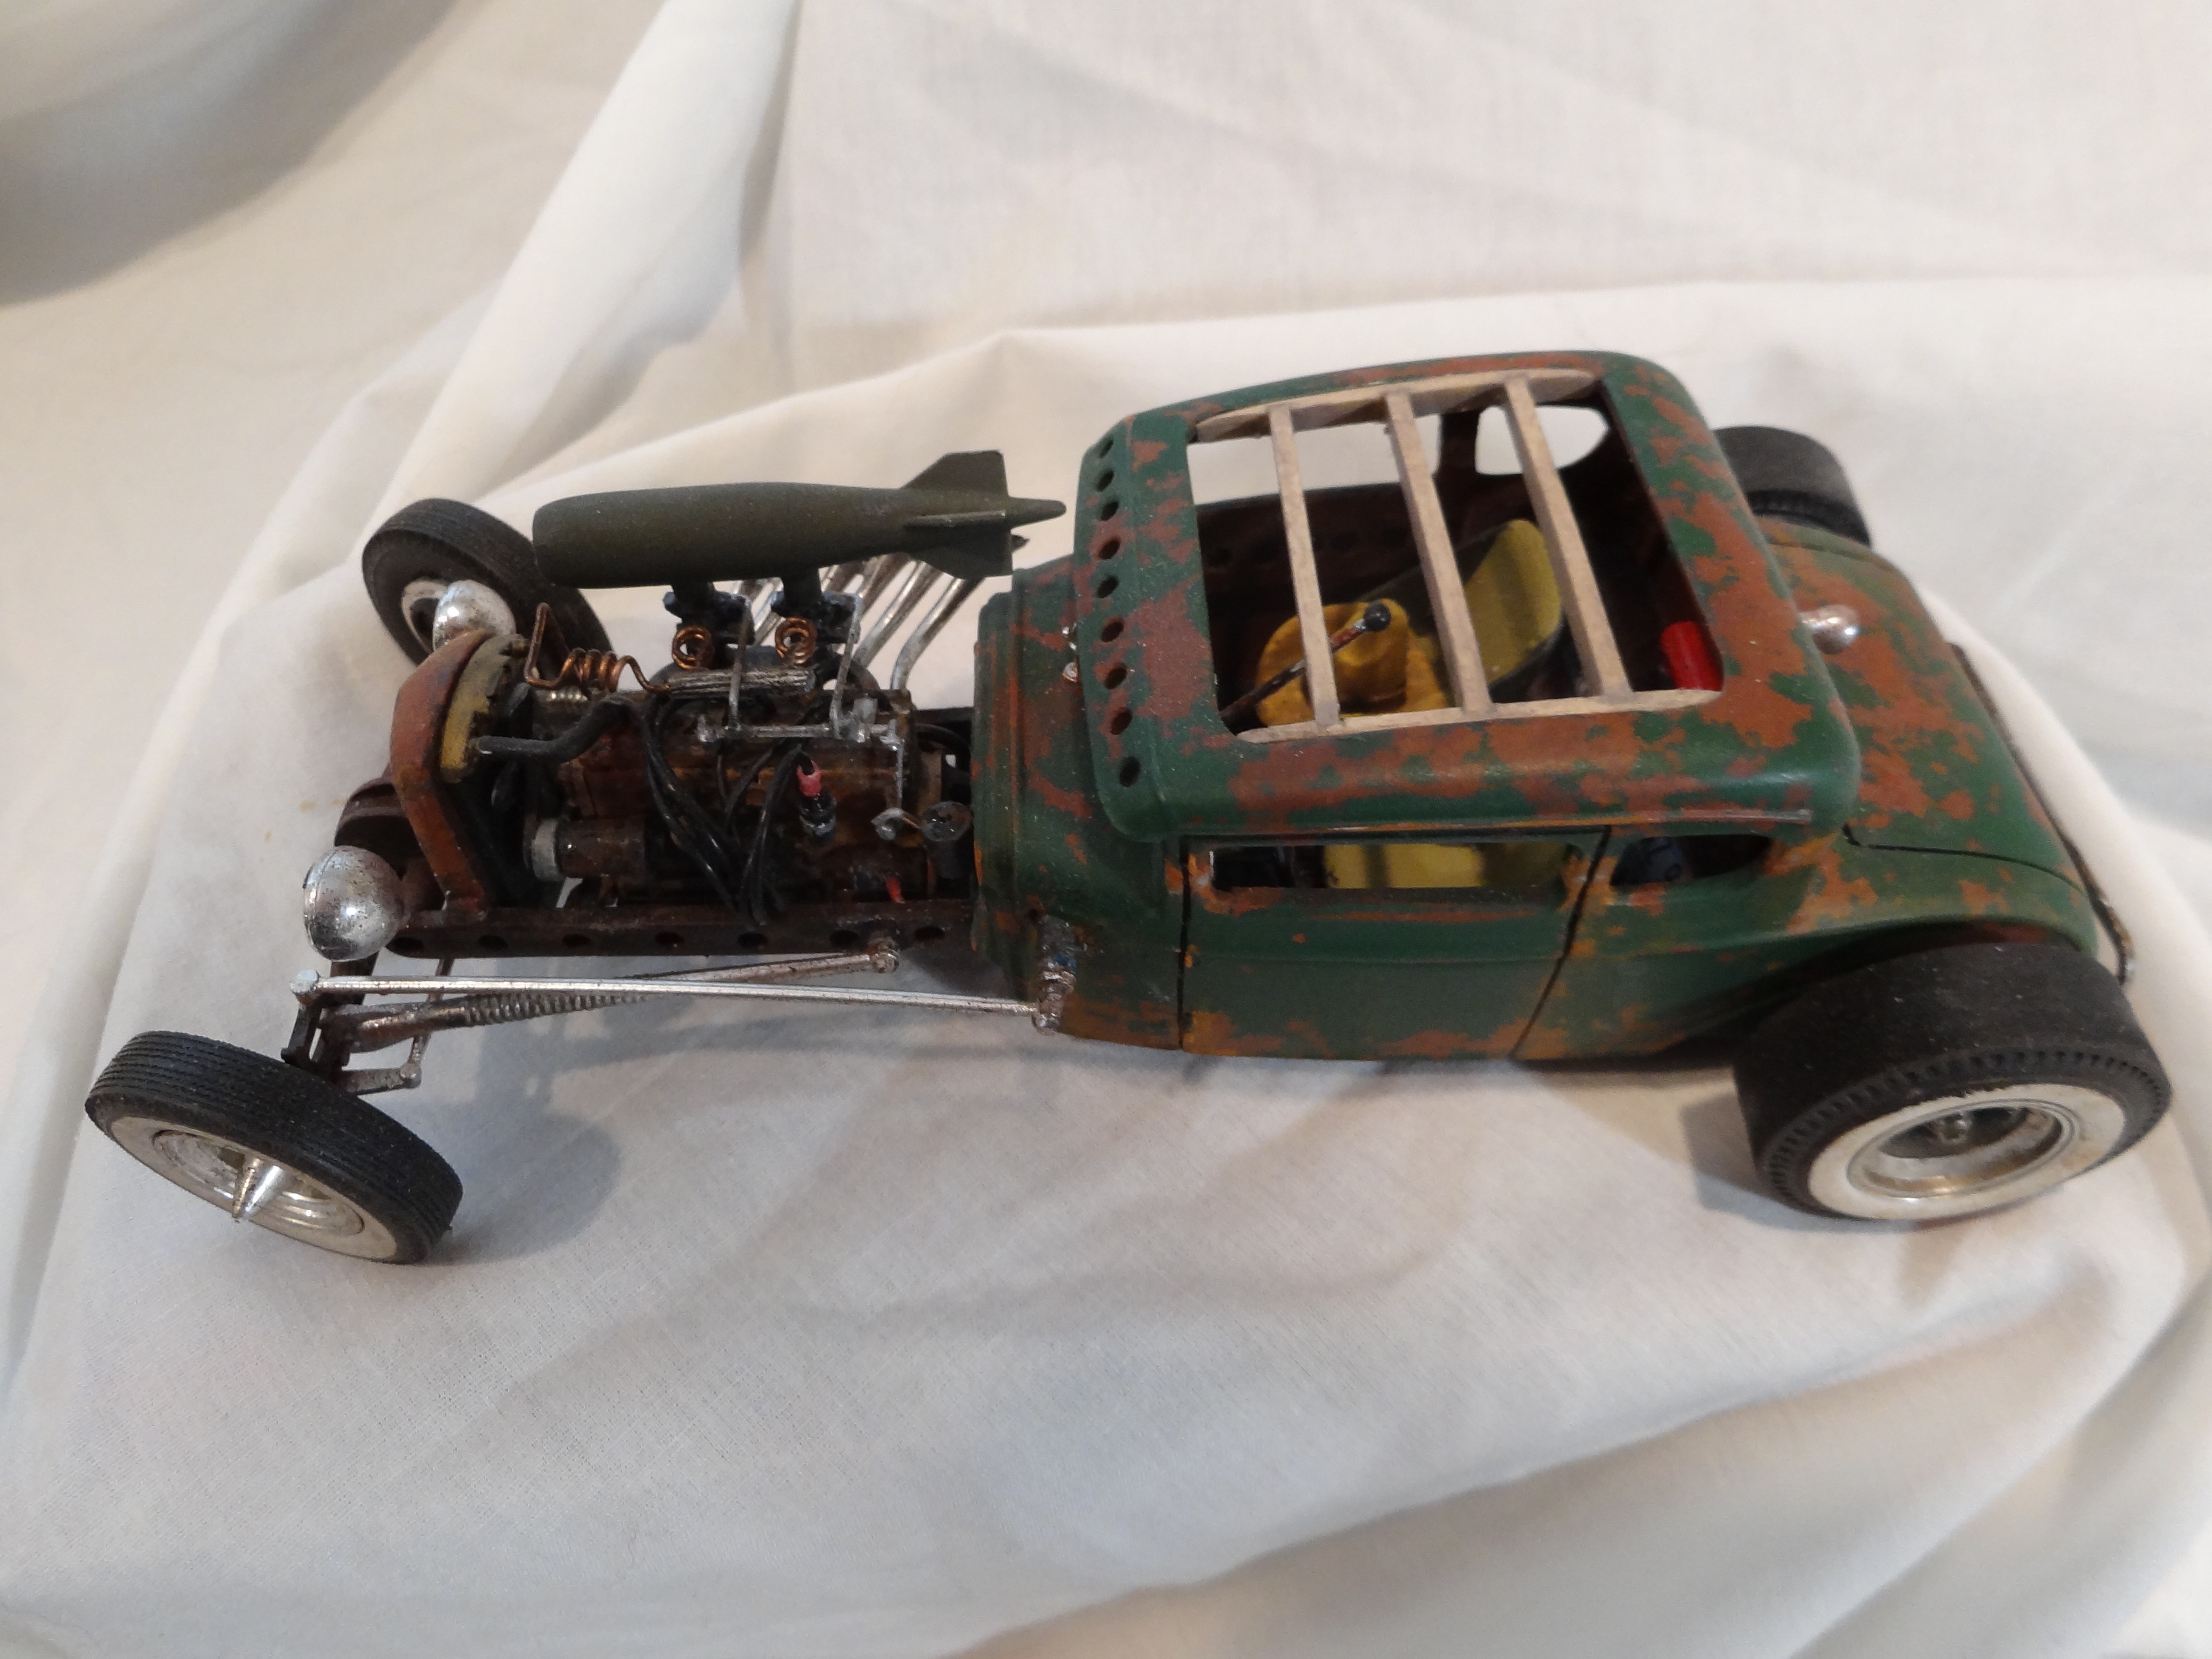
This model started out as a Monogram stock '30 Ford Coupe that I began as a chopped hot rod many, many years ago. Since I've gained an appreciation for rat rods and patina cars I went in a different direction to finish this ride (plus I don't think I could really live with a rat rod in 1:1 scale). I chopped the roof a little more. The 6-cyl came out of the Moebius '53 Hudson Hornet kit. The z-d frame was scratch-built from styrene. Thanks for looking. All of my models built during the past year have names appropriate for the times; this one is "Infectious".


-
Dave A, thanks for asking about the dragster. I've now posted photos and info in the Dragster section.
-
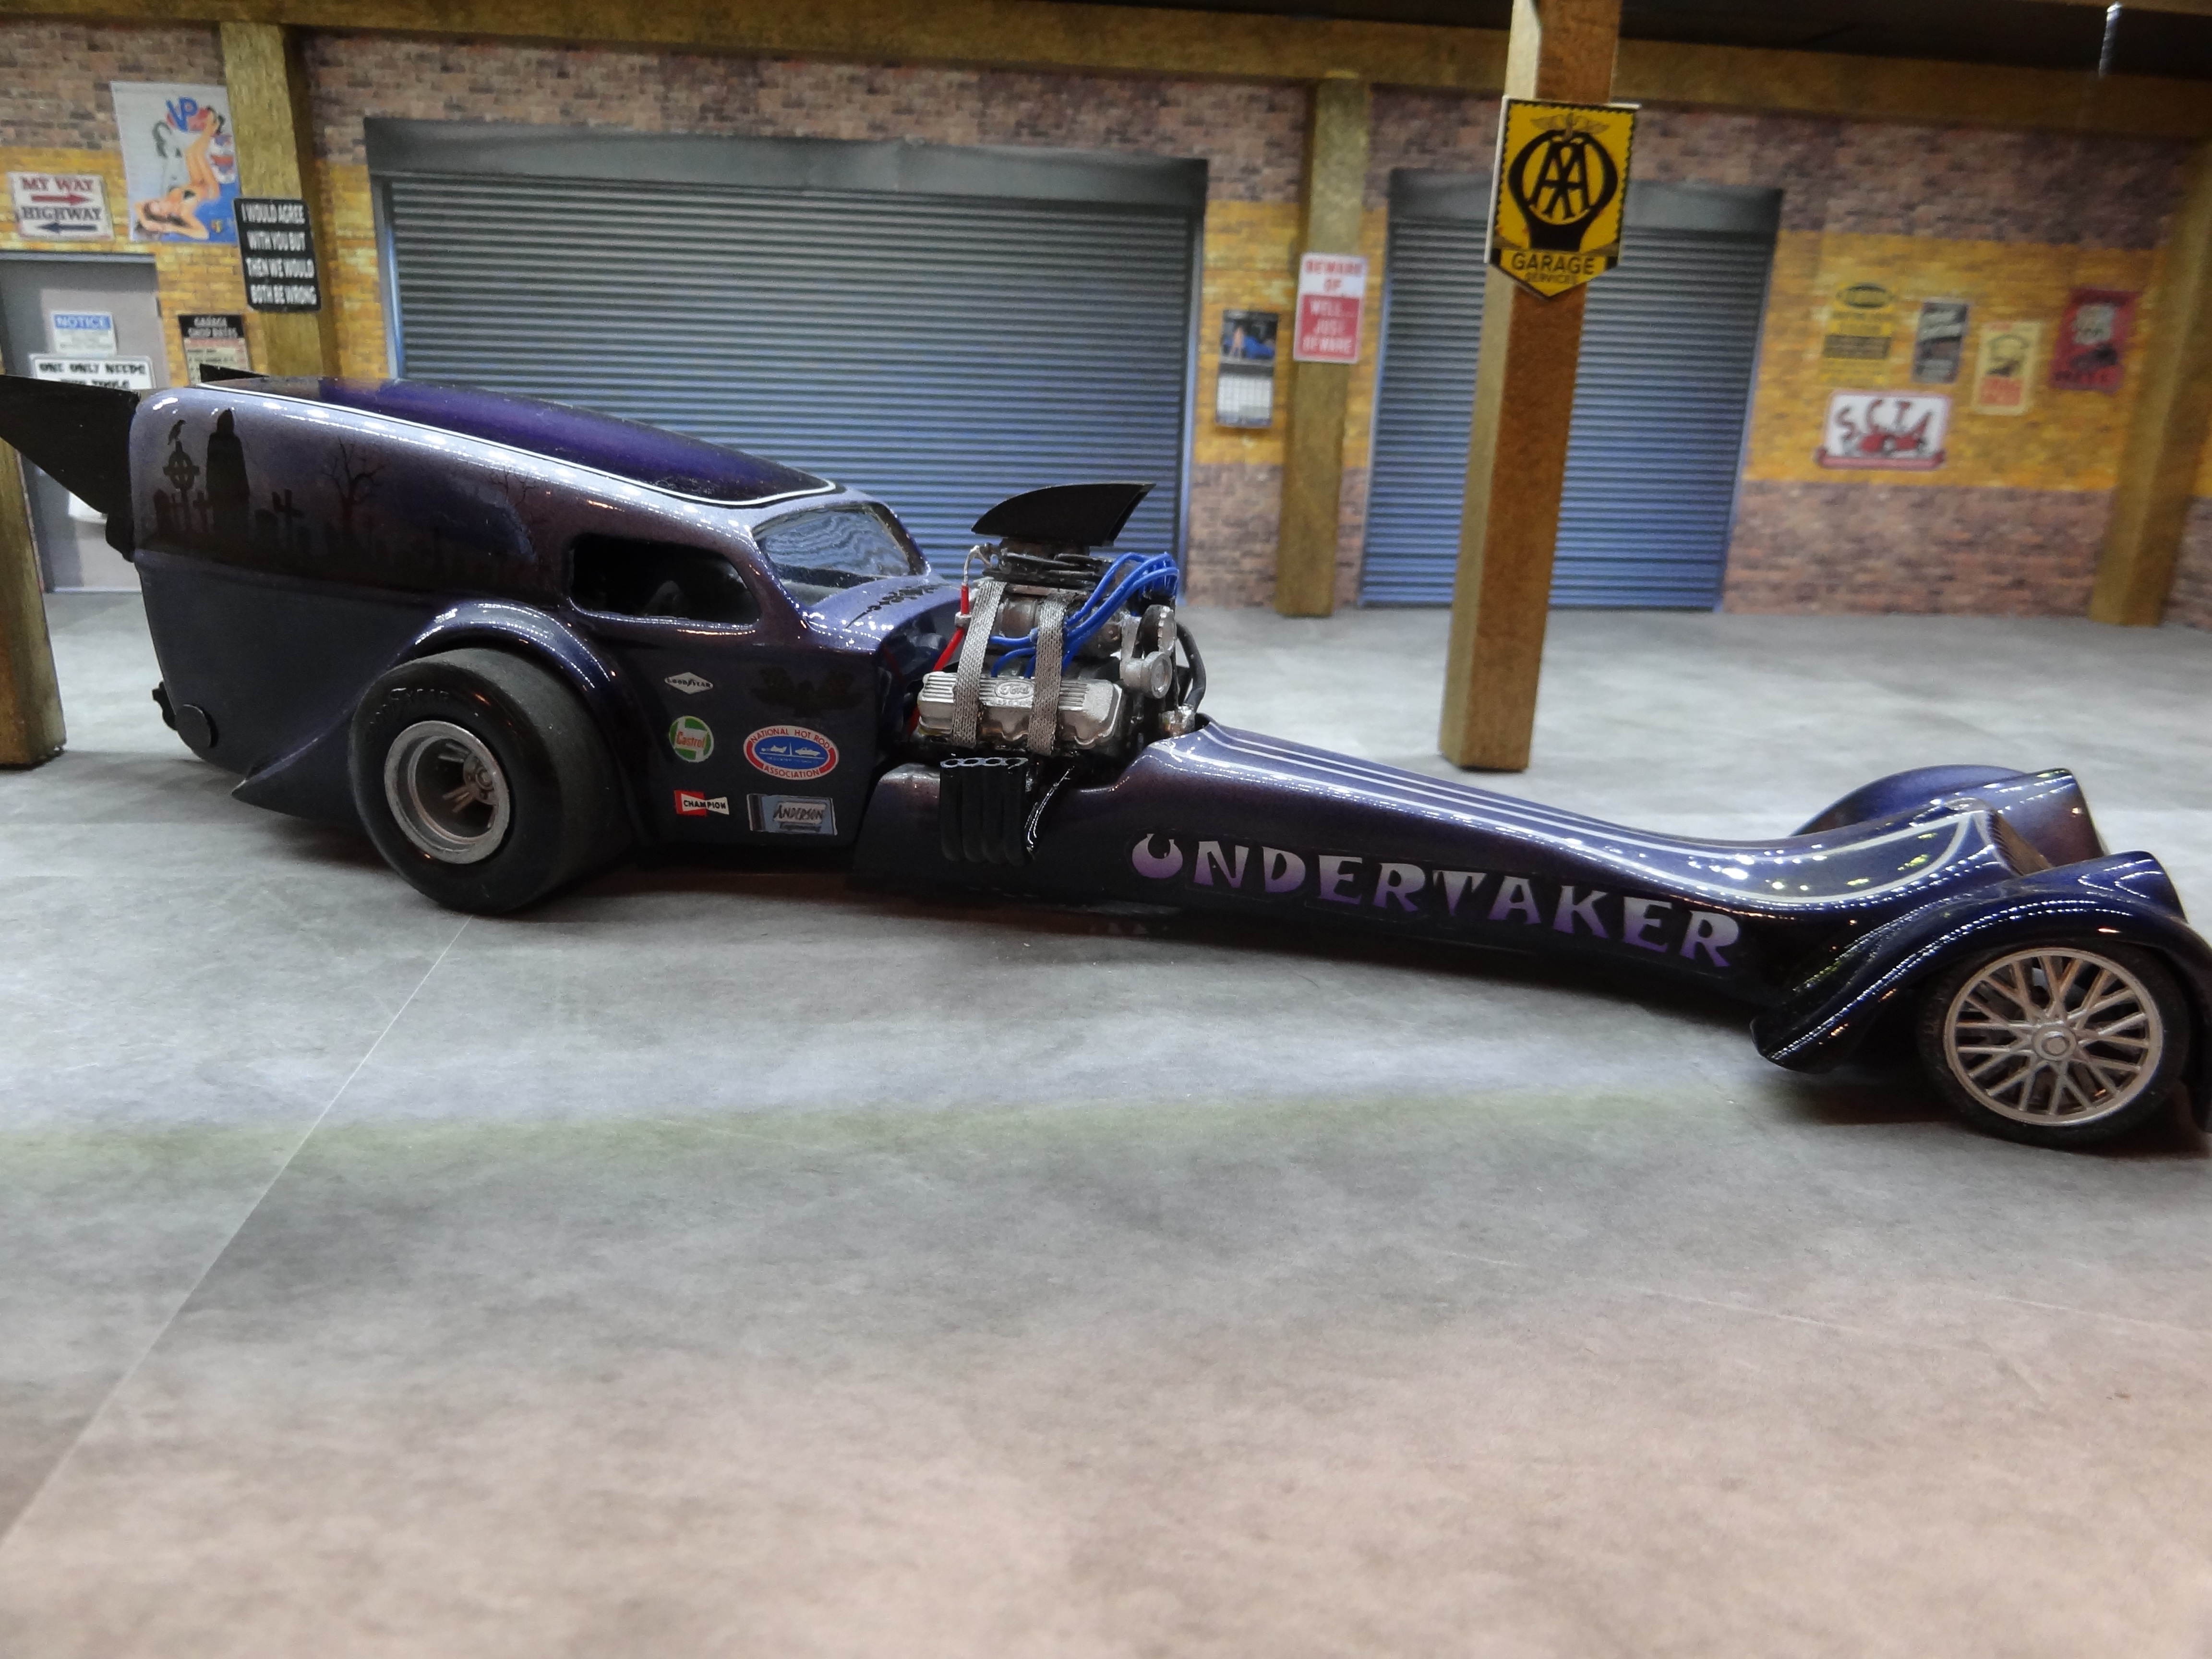
Hi All. I've spent a fair amount of time lurking around this forum admiring all of the great models and getting some fantastic tips and ideas and now I'm finally getting around to posting pics of my completed models to, maybe, inspire someone else. The enjoyment of modeling, for me, is 'kit bashing', taking whatever parts, kits or previously completed models that I have laying around, to make something new and different. My latest effort could best be described as a Competition Coupe dragster but since NHRA doesn't have that class anymore this model would now run in something like the Good-Guys Nostalgia Eliminator class.
I built this racecar by combining AMT's Willys Van with AMT's Tommy Ivo rear-engine fueler. I piecut chopped the body and layed the windshield back. I raised and moved forward the fenders. I also layed the grill back and then merged the Ivo rail body in between. Then I had to swap the roll cage and the engine location (remember, I'm trying to use what's available). After completing bodywork I made my own inkjet decals and tried doing an airbrush paintjob. All of my previous models were painted with spray cans. I definitely need more practice to get proficient with an airbrush and learning how to use the various kinds of paints. I'm looking forward to seeing other heavily modified/customized models by others.
-
1
-
-
Beans, great use of found materials. I've used sheet cork but then you still have to paint it skillfully to get the variation of colors that you got with just a shingle.
-
-
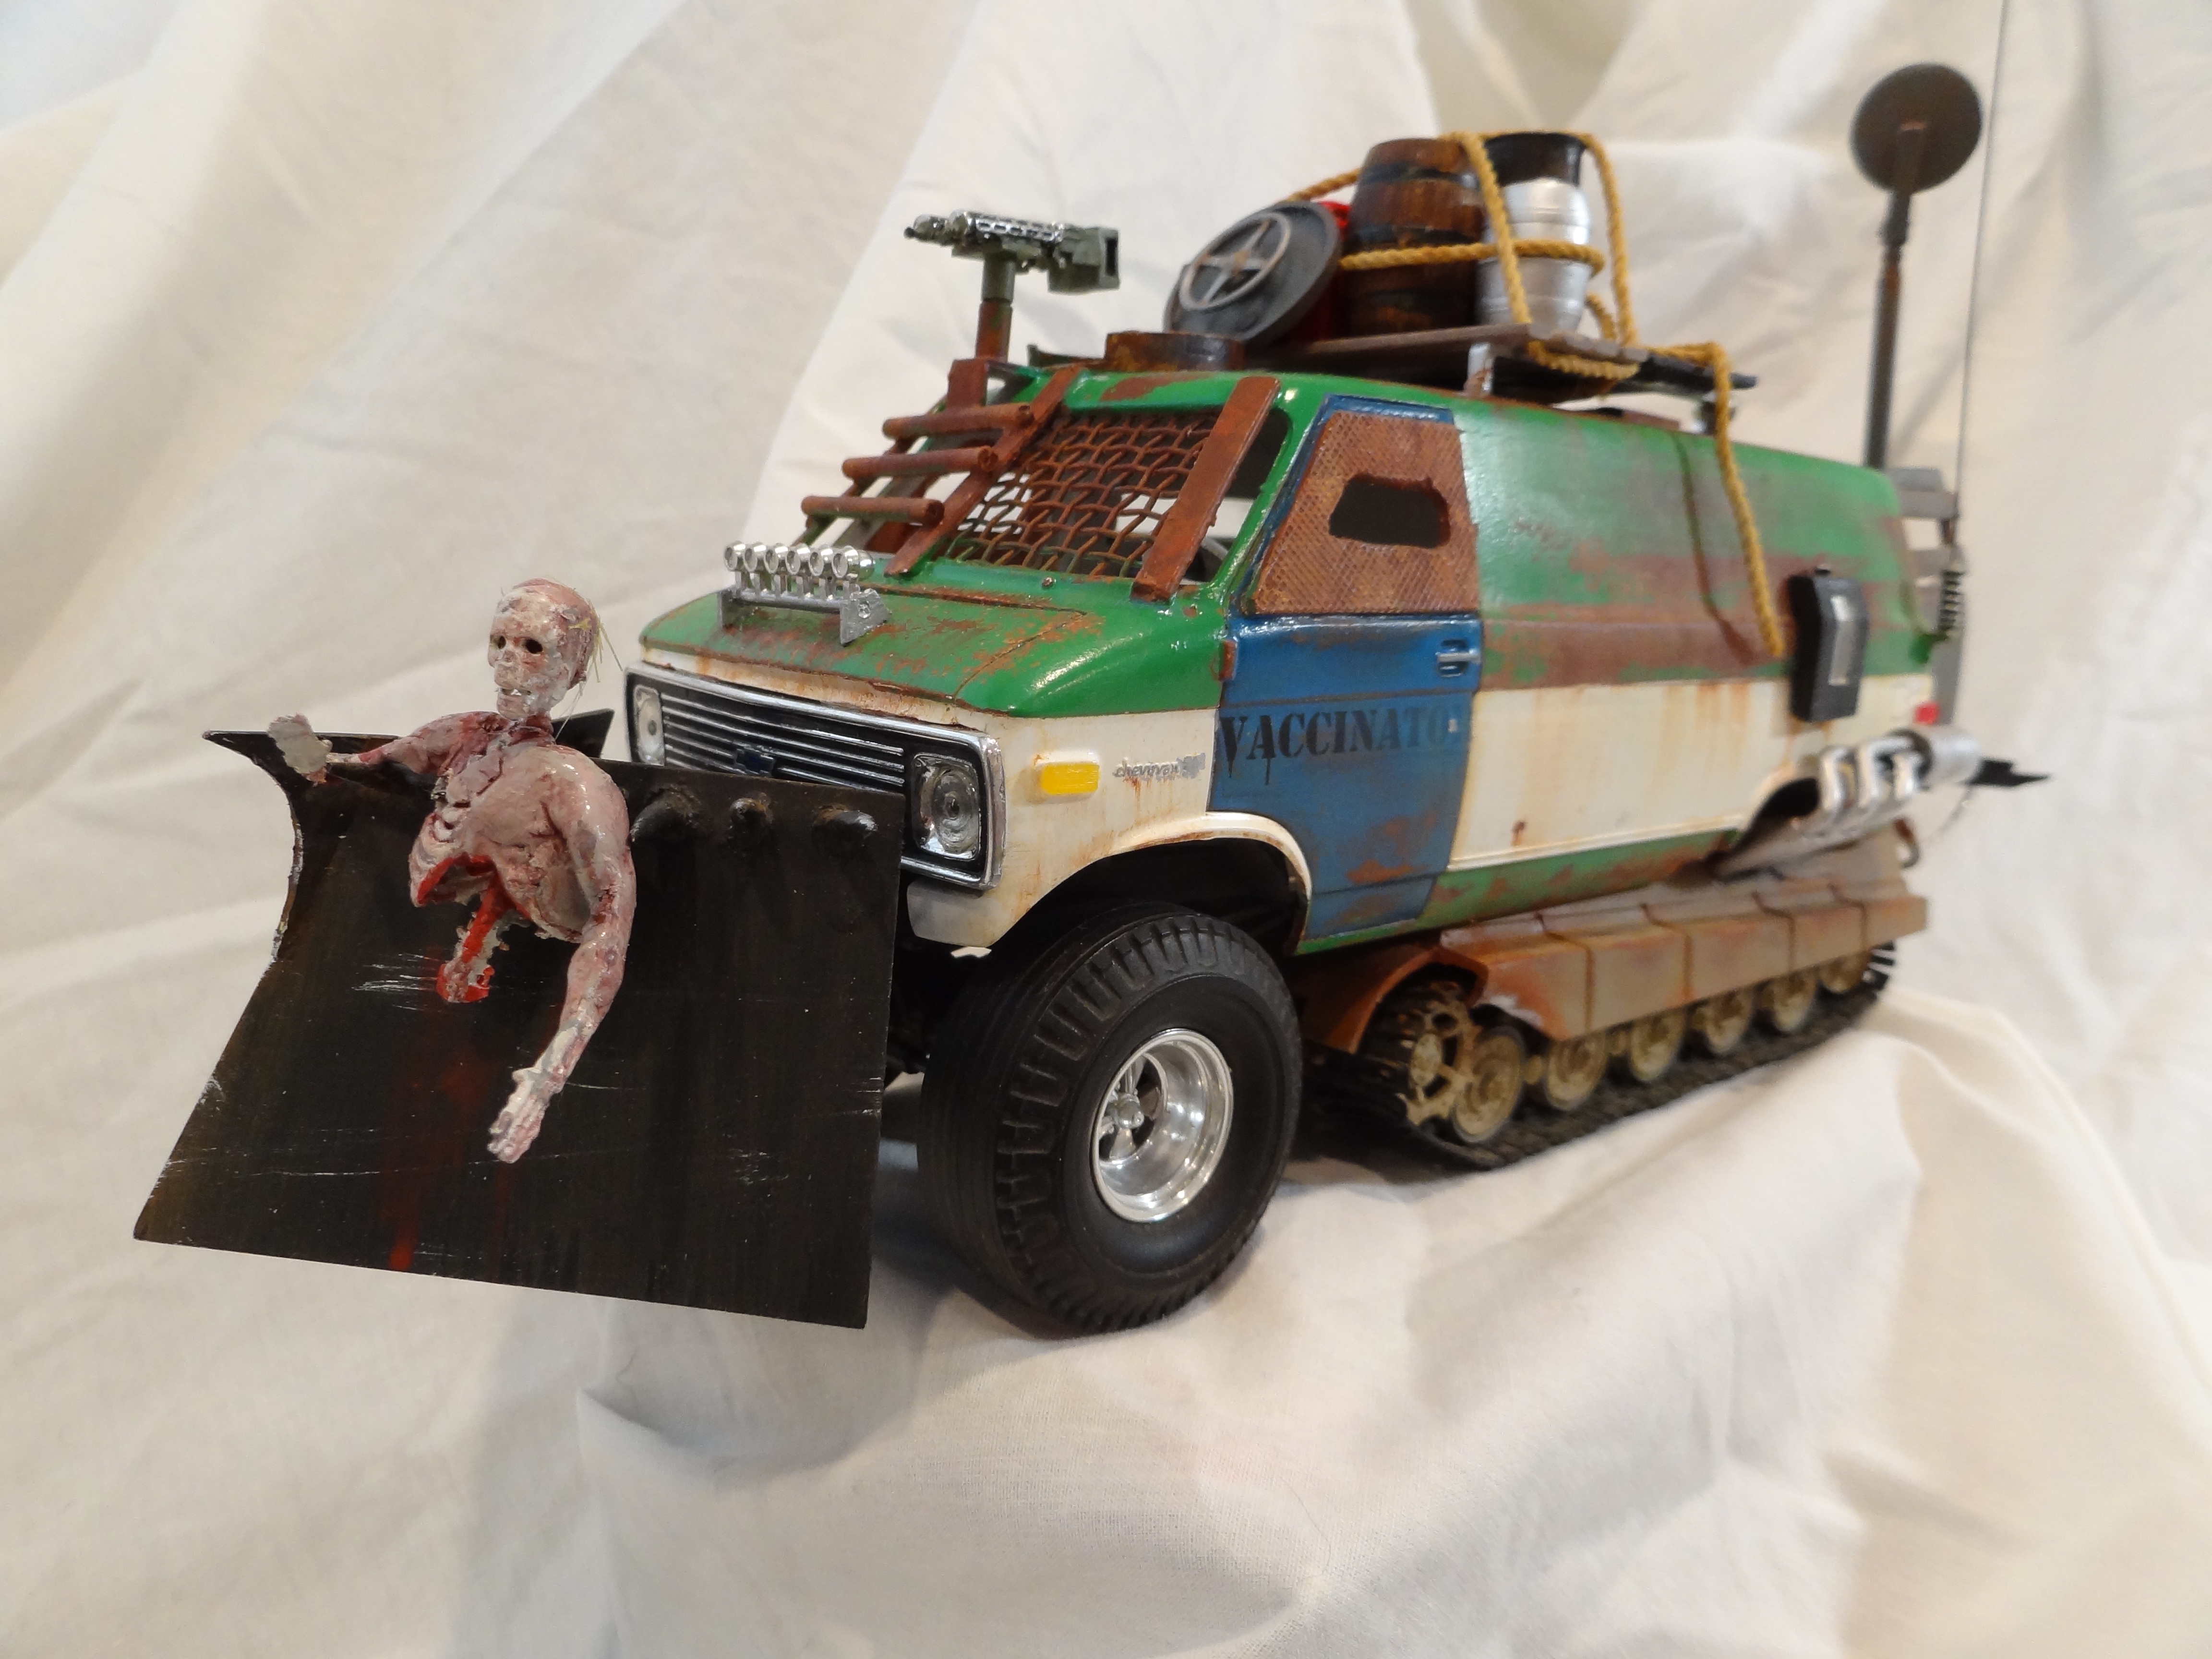
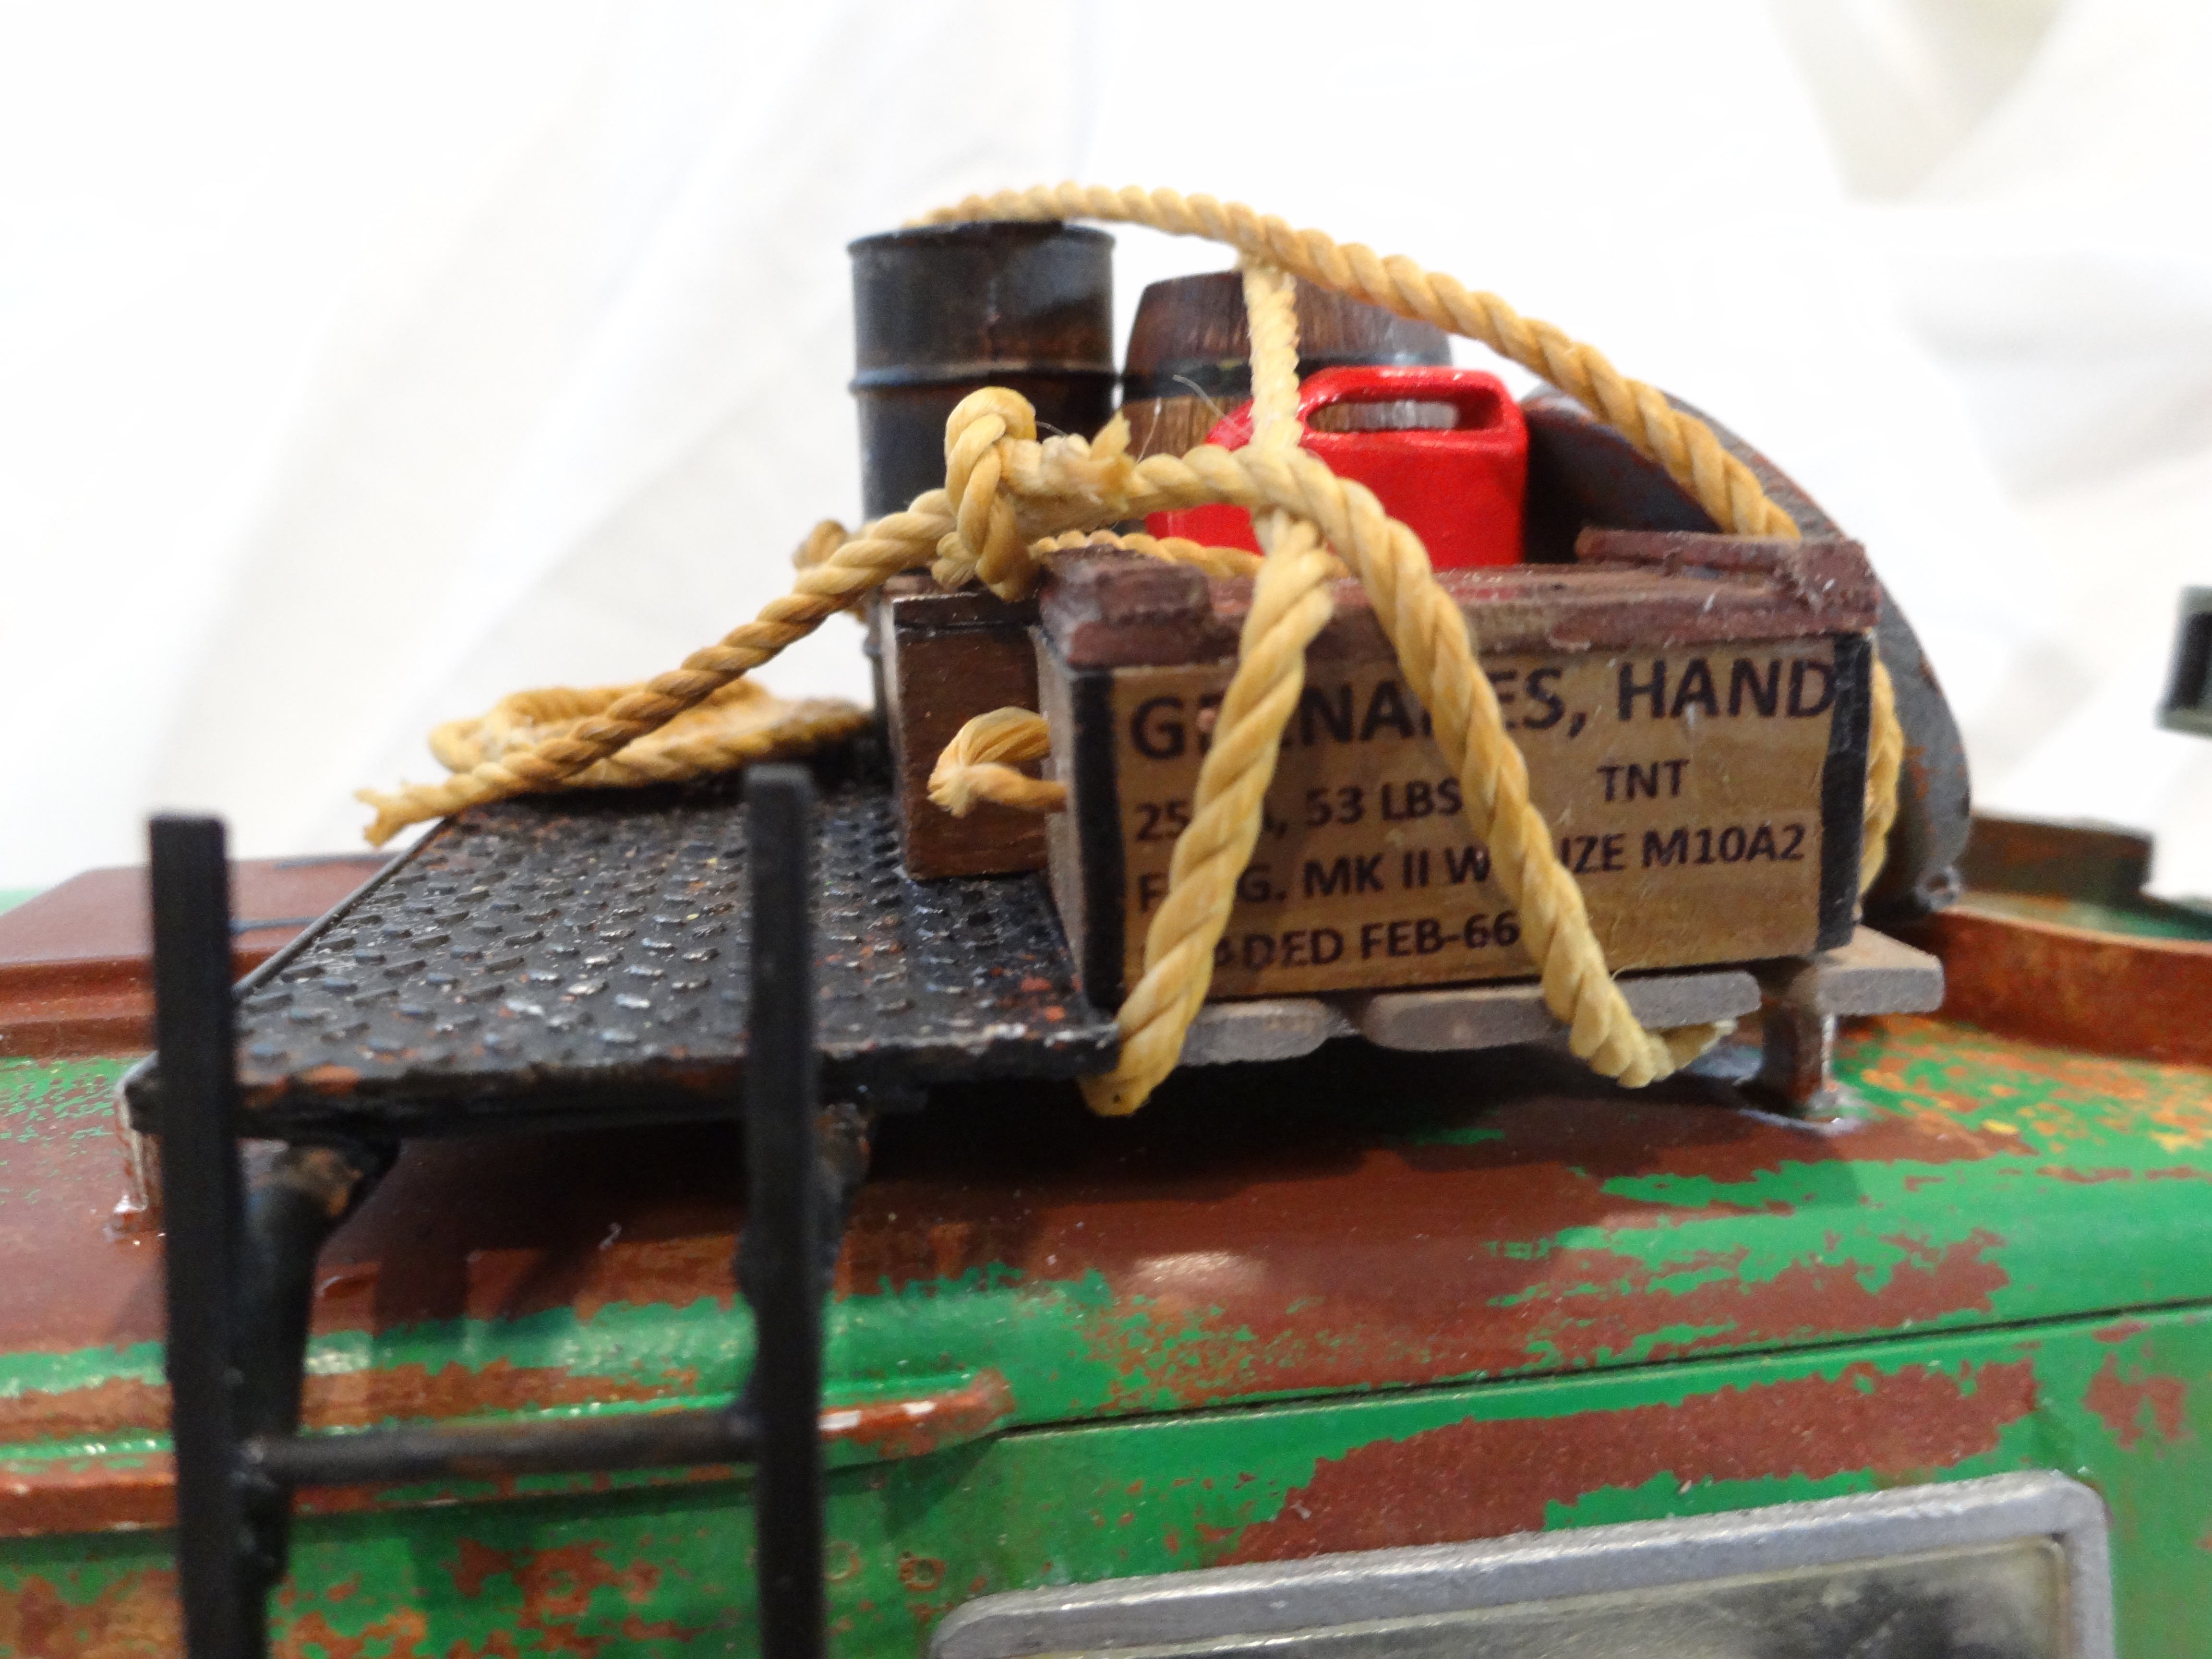
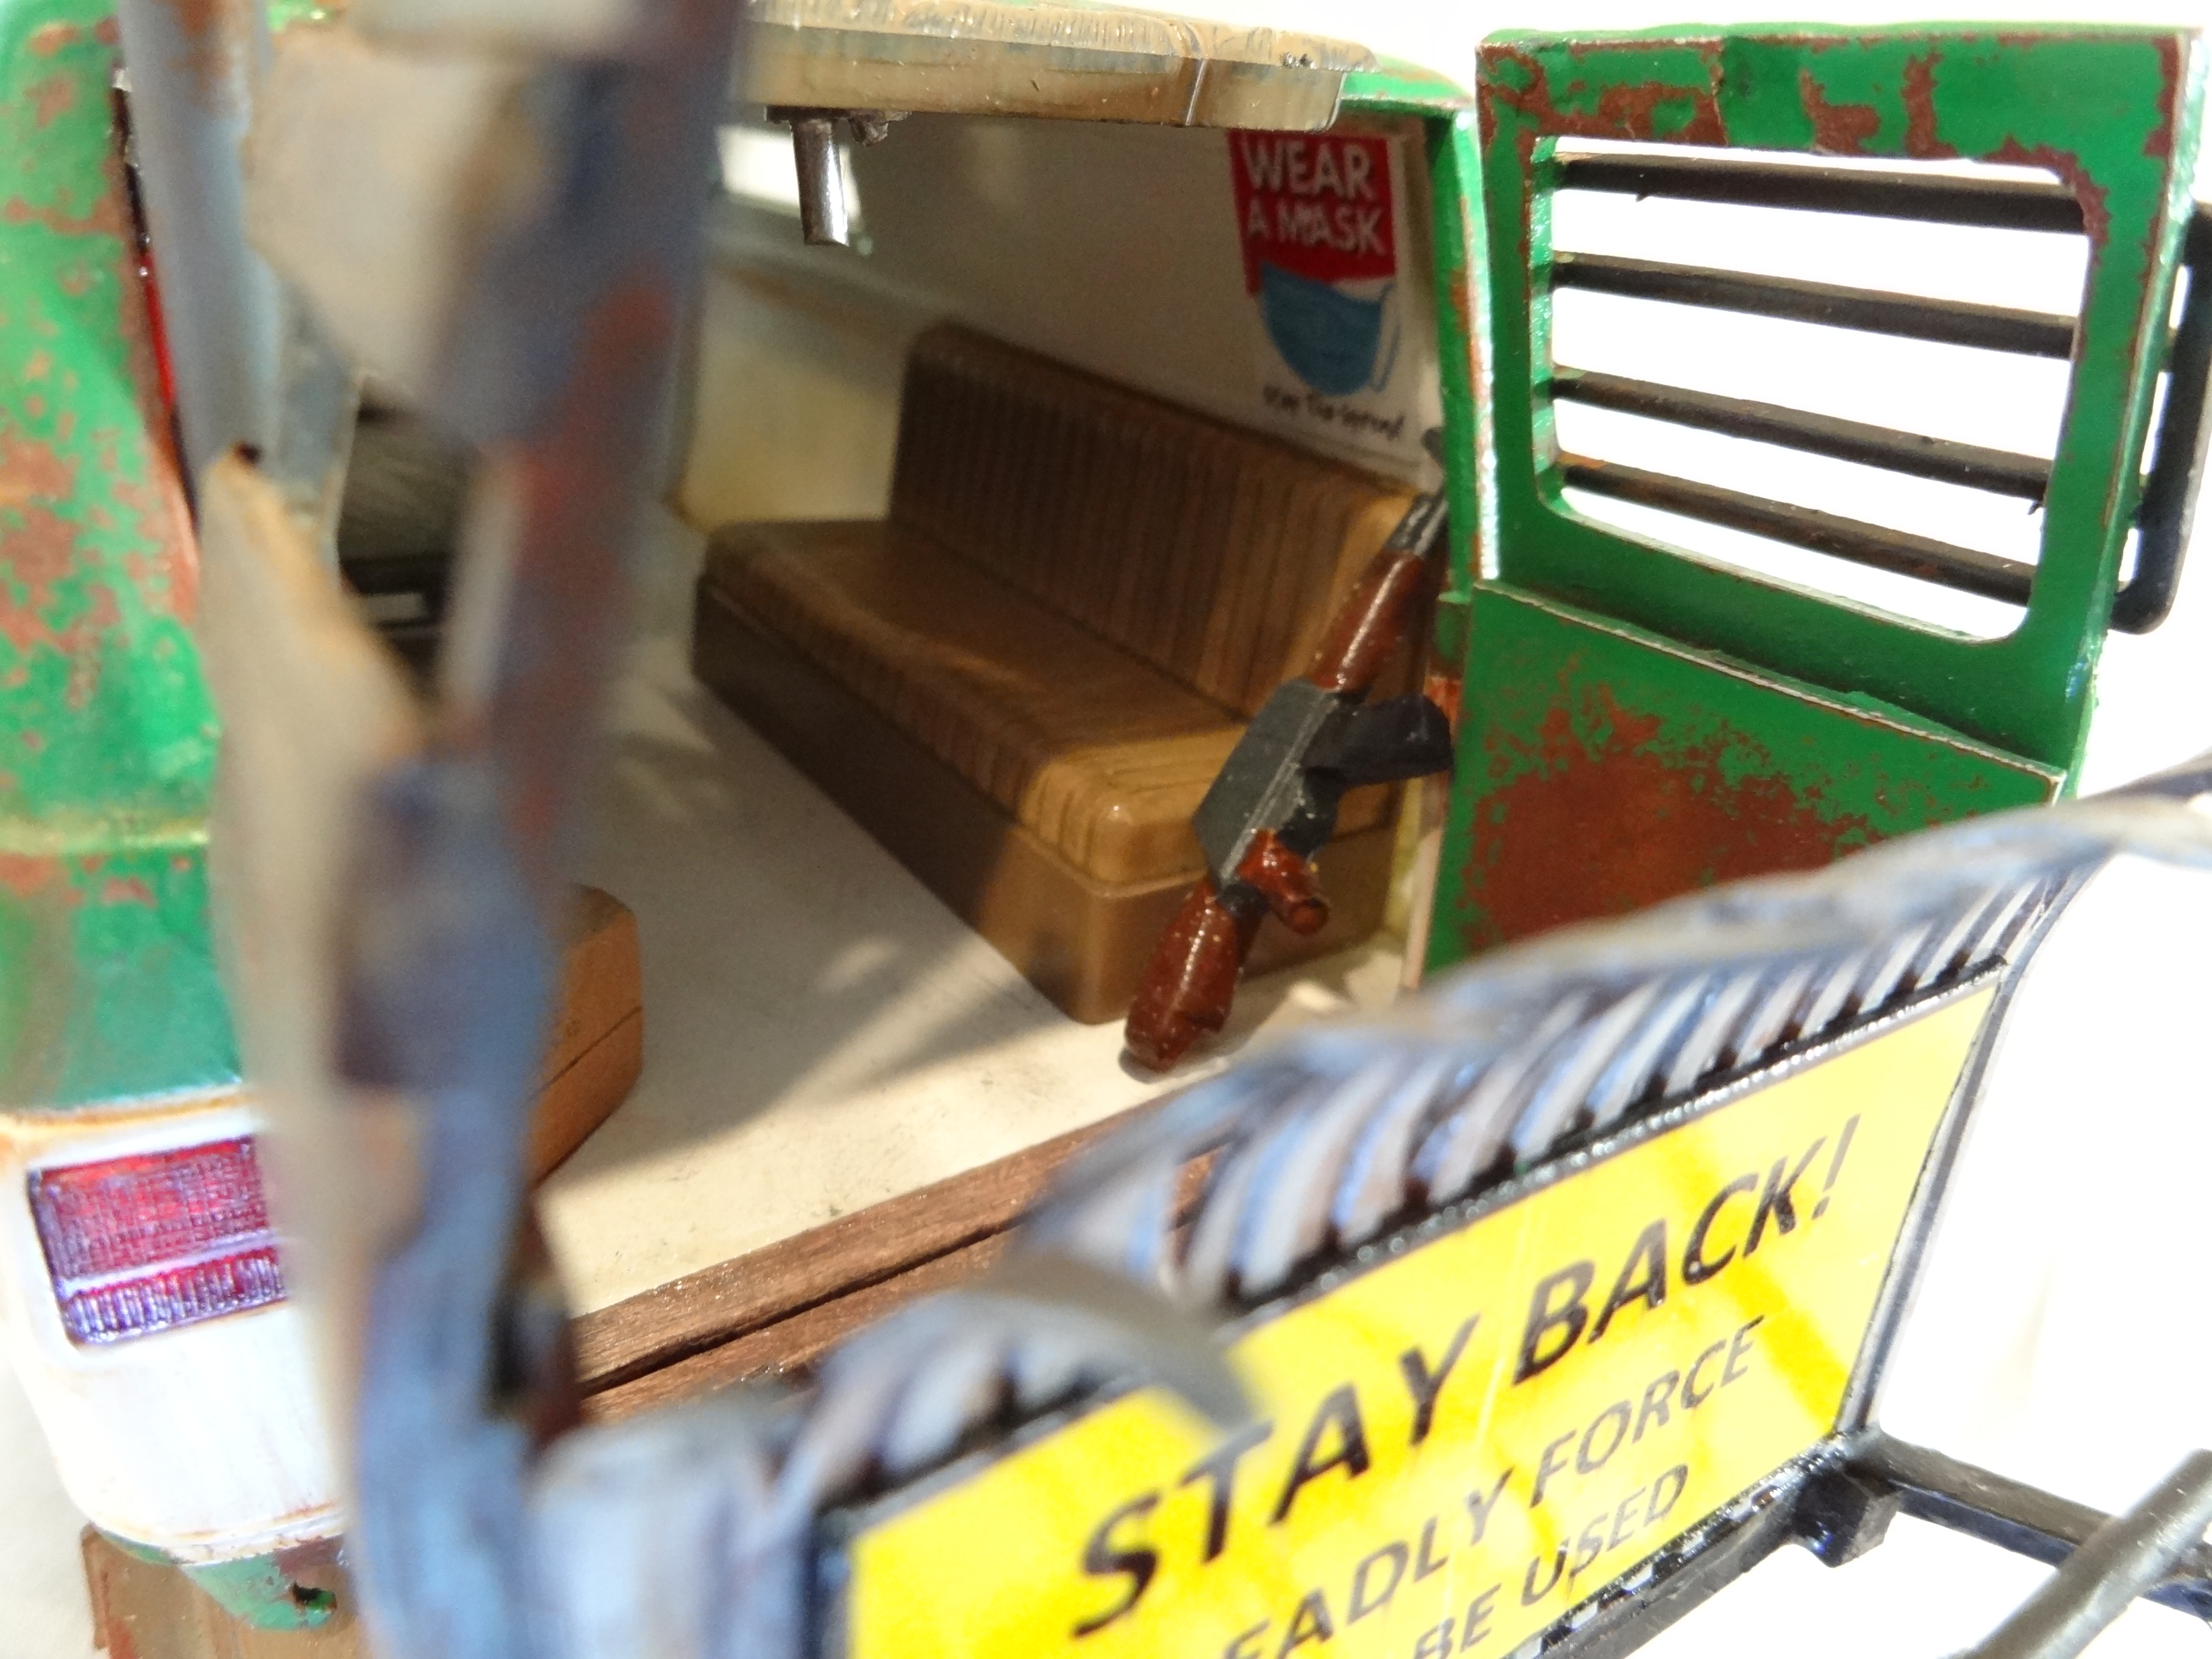
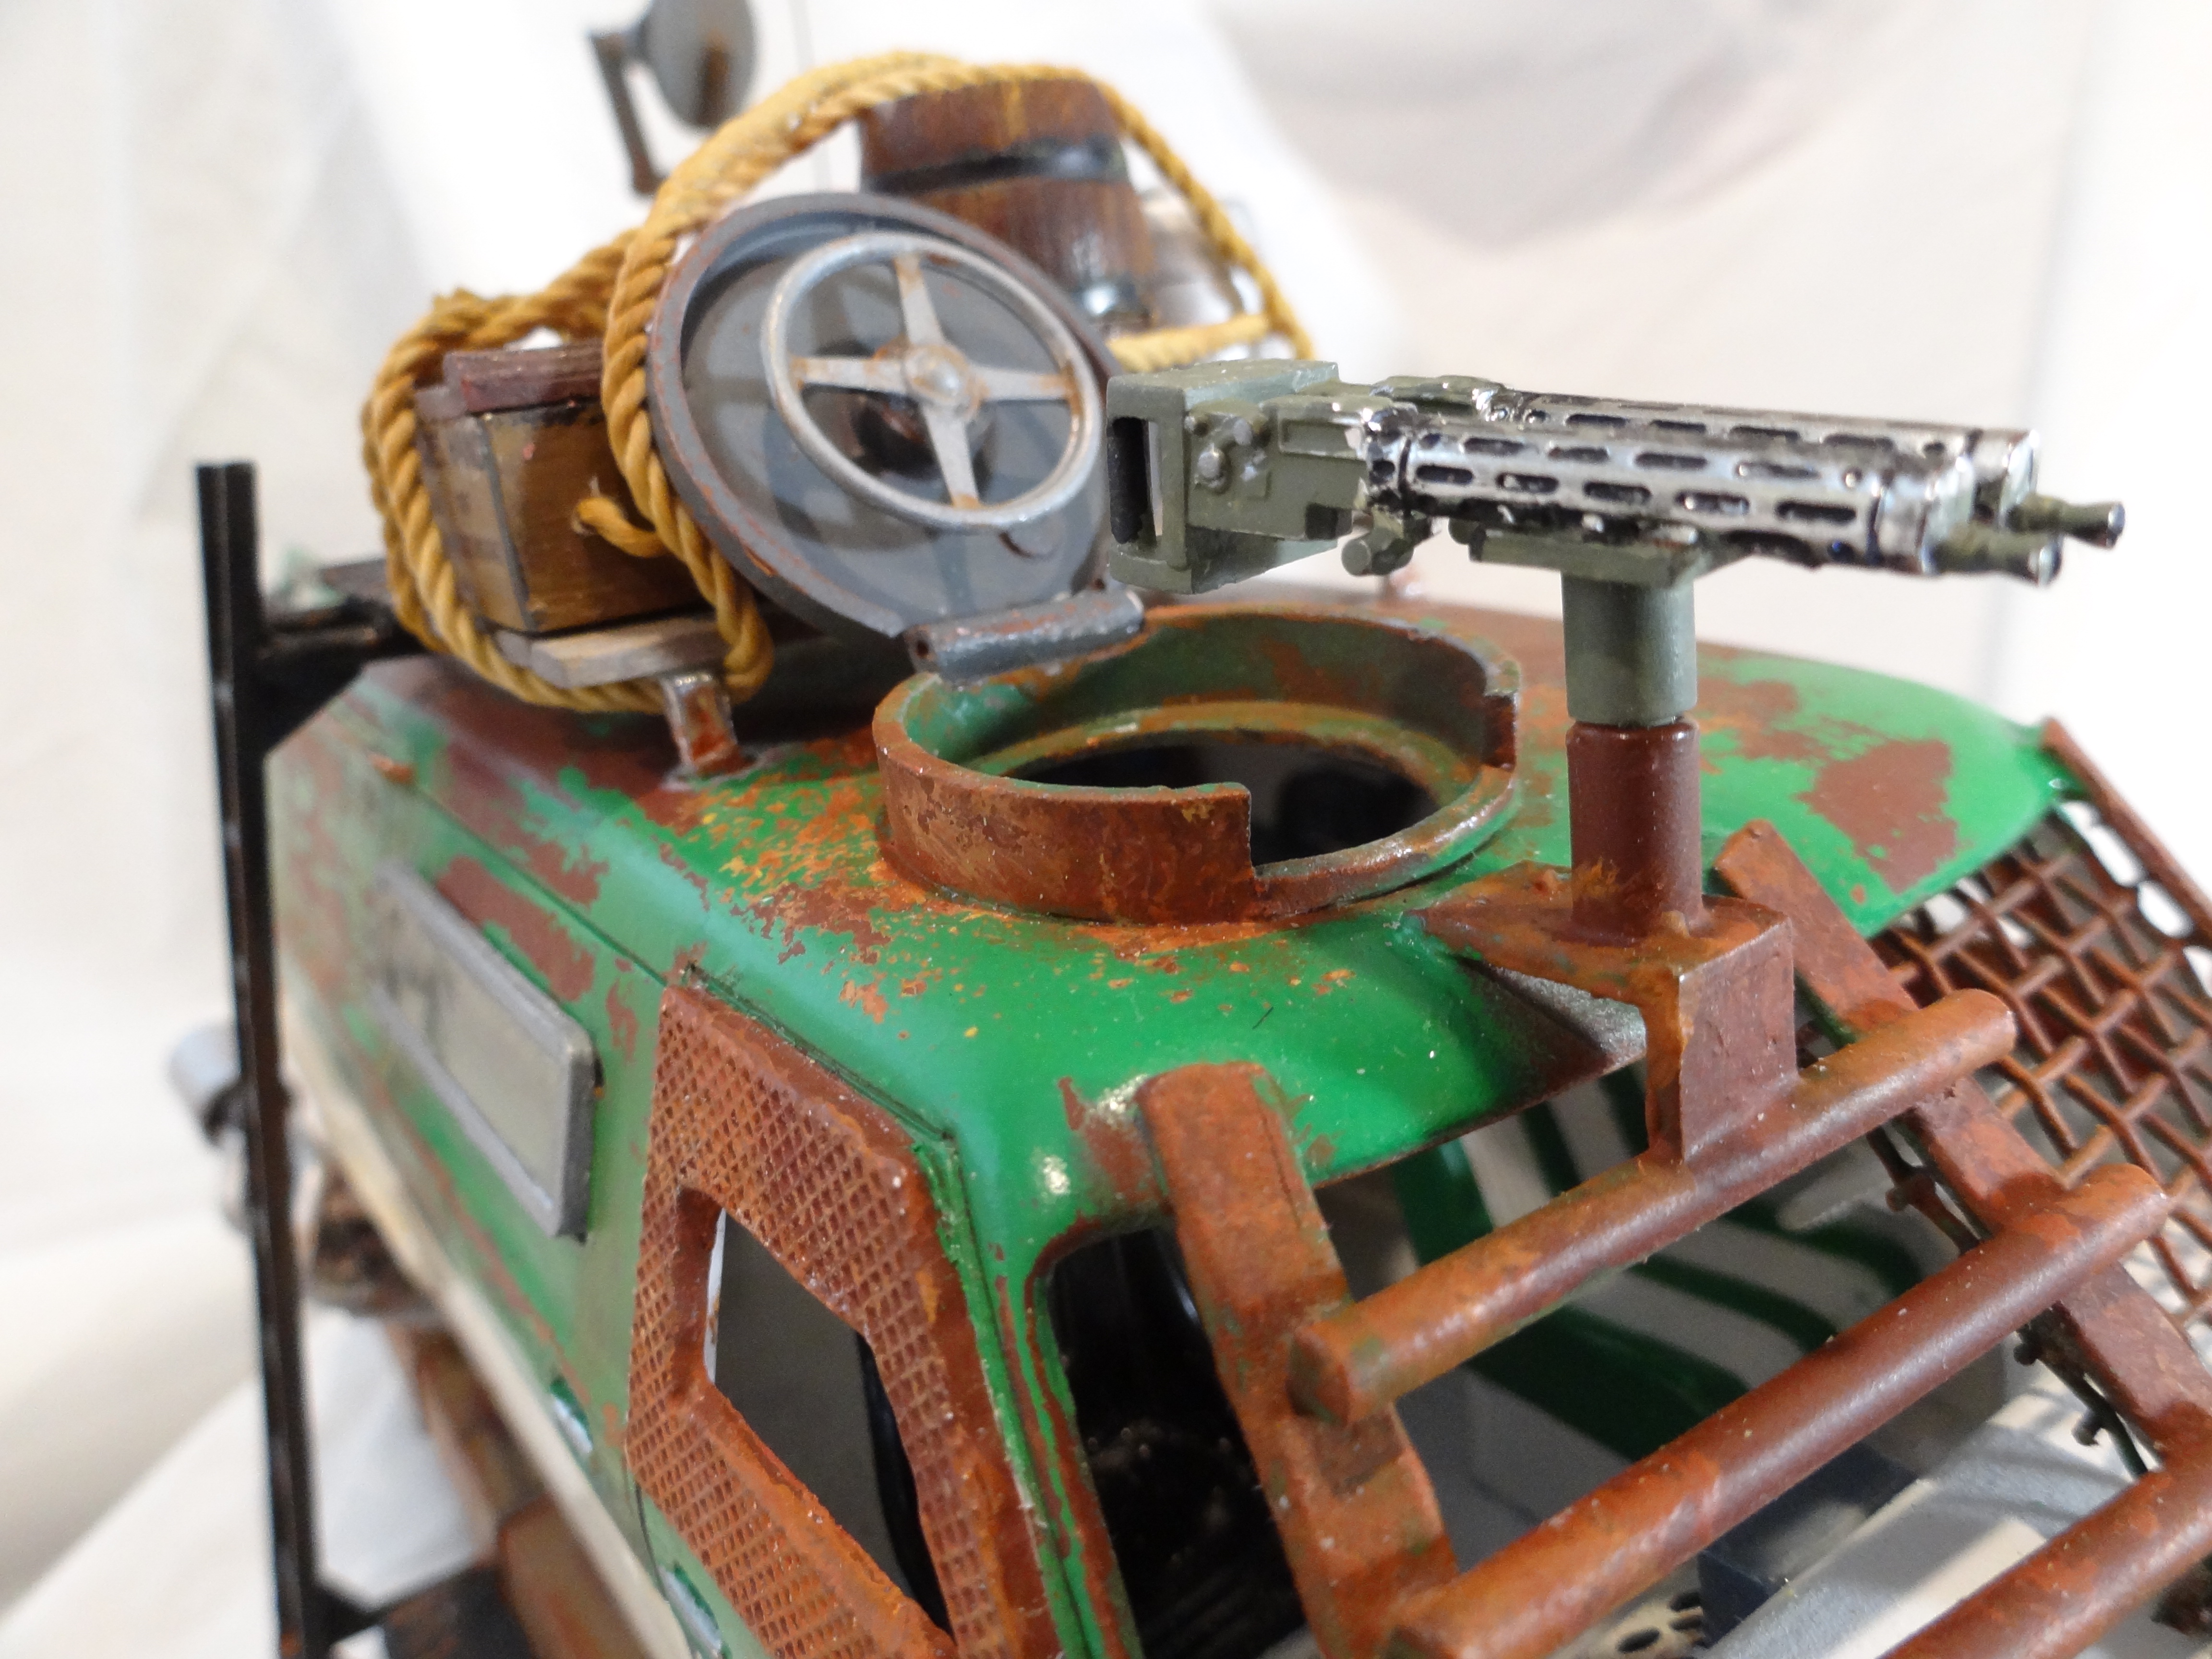
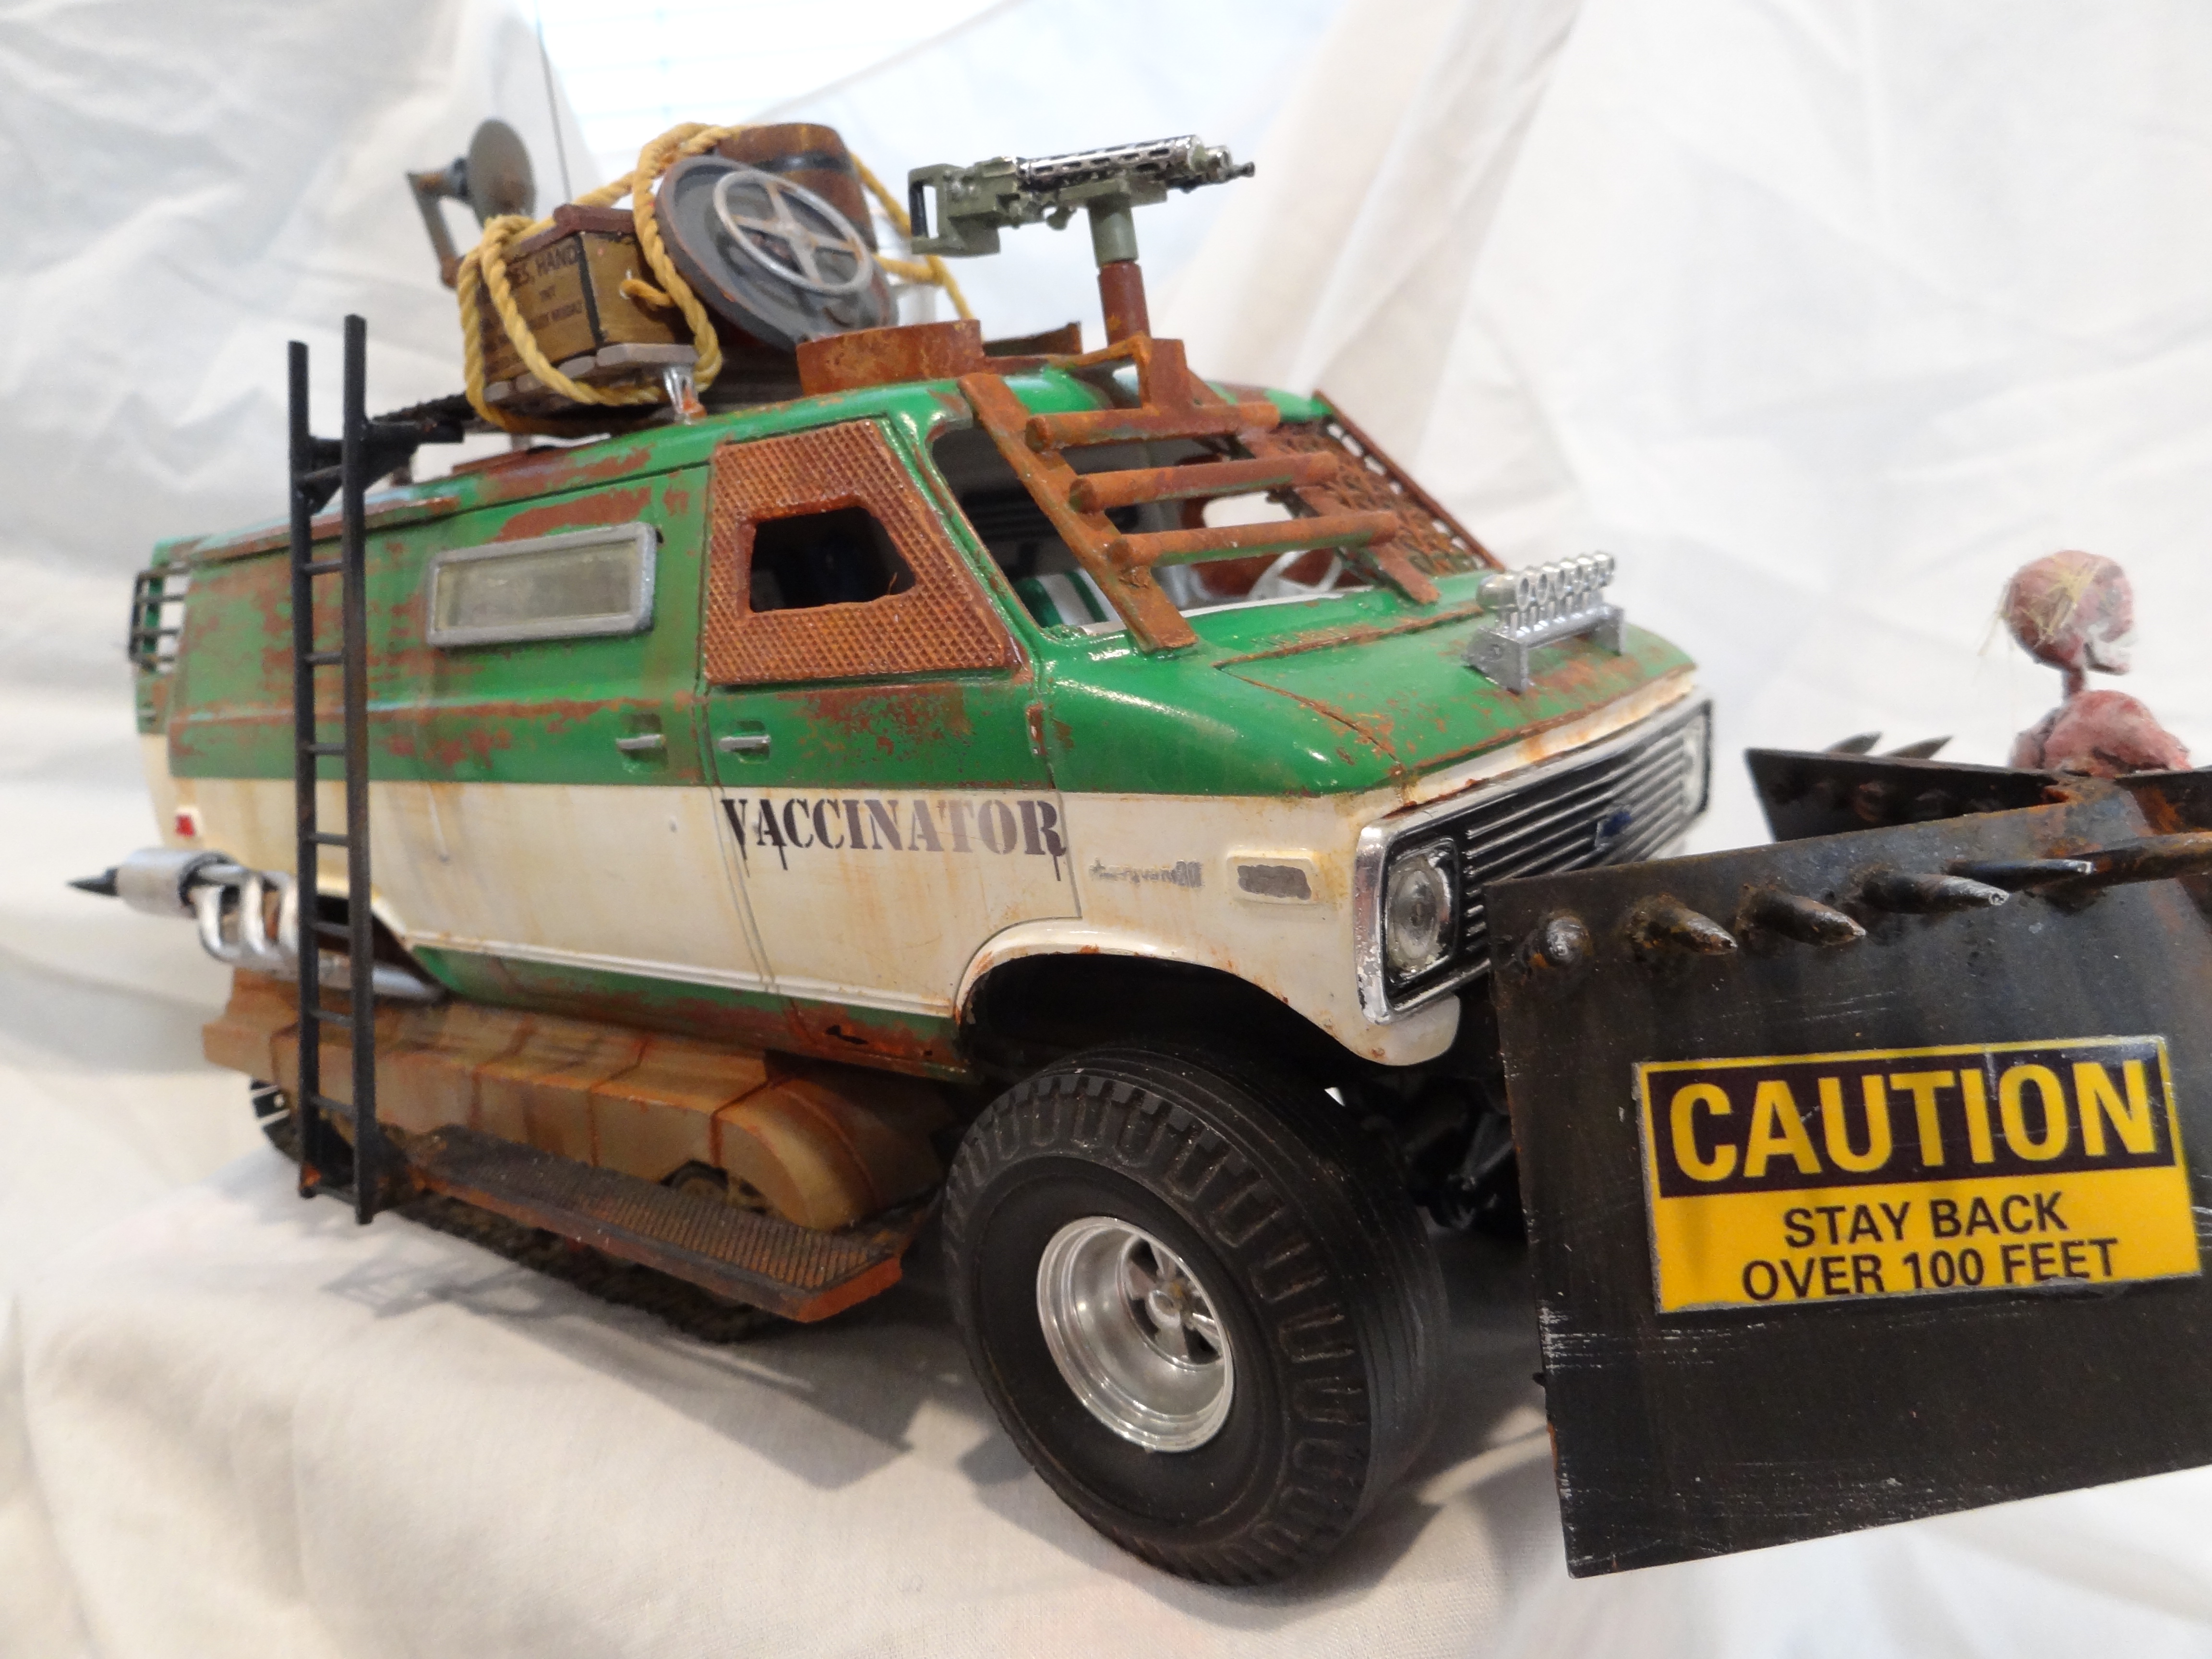
Thanks for the kind words. Adding all of the little details was the most fun part of this build. I wanted it to looked lived in and well used but it was hard to know when to stop adding things. Fun fact, anyone recognize the zombie from the 'Lil Coffin' model or the machine guns from the 'Red Baron' model?
-
Hi All. New member and new to posting.
As you will see as I post more pictures of the models that I have built during the Pandemic, I like all kinds of car models but I definitely lean more to vintage hot rods and race cars. But, since I'm cheap, I concentrate on what I can build with the models and parts that I already have from when I was a kid.
This van started out as an AMT Rescue Van that I had previously built as a hippie van (anyone remember the van craze from the '70s?). And, since I also had a built German tank model, what would make more since than to build a post-apocalypse, junk-yard built, zombie hunting van/machine/half-track? All of the components came from my parts stash, plus a little styrene and weathering and then we're ready to hit the road. Enjoy.
-
Oops, this should have been posted in finished models not WIP.
Hi All. As a kid, I made car models from about age 12 to age 20 and then mostly gave it up. During the Pandemic I decided to pick up modeling again and this 1934 Ford Coupe is my first finished car model in 30+ years (saying the actual number of years would really date me!). The model started out as a Revell Snap-Tite kit given as a gag gift since I had a real '34 Ford. After climbing up into the garage rafters and getting down all of my old car models and parts I figured I had enough parts to make a complete car except for a flat head engine which came form a new 48 Ford kit. The look I was going for was of a vintage racer that was pulled out of a barn for one last run on the salt. Wasn't built to be perfect or exact, just for fun; enjoy.
-
TonyK, getting the pictures printed to scale wasn't very difficult. I saved suitable pics from various internet sites to my computer and then copied them to a Word document. In Word there is a ruler across the top and side that you can use to expand or shrink the pictures to get the size that you need. Just need to convert real dimensions to the appropriate scale dimension (ie. for 1/25 scale, a 78" tall door divided by 25 would be a 3.12" tall door picture in the Word document). Test print in black and white if you want to save ink. Also make the margins virtually zero so you can get more on each sheet.
Thanks for the kind words about the display case. I've finished 7 car models since the start of the Pandemic and have a few more started but when/if I run out of room I'll do a different theme in the next shelf down (parking structure or warehouse?).
I definitely plan to show off a few more models on this site!
-
Thatz4U, you are correct! Definitely not Buick.
-
Thanks. The front door is wood framed with clear glass like the one below. Due to the glare from the camera it's photographed open (it tilts up and slides back).
.JPG.5fc41b65e0f4785f3632fdc64740c441.JPG)
.JPG.32b284f78c8b65ed665dc93a8e09e602.JPG)
.JPG.968c69d21fbb3f71473b78d7e74af666.JPG)


.JPG.52ba99d1367a9c0feed7d2e9aa1a4f02.JPG)
.JPG.4ce9e4990b6b8677623edb45ed6964d5.JPG)
.JPG.43ae8a587cac6c80205cd44b8593afe6.JPG)
.jpg.794a493b63e614aa30c58e8e943674ce.jpg)
AMT/Ertl 1963 Ford Galaxie 500 XL - "Prestige" kit
in Model Cars
Posted
plasticprime, very clean and well executed. I'm working on this exact same model and I hope it comes out half as nice as yours.