EngineerBob
-
Posts
138 -
Joined
-
Last visited
EngineerBob's Achievements
MCM Friend (4/6)
-
Very nicely detailed! I especially liked the fuel lines as well as the shifter.
-
I also use liquid glues such as Bondene or Tamiya. I use styrene strips on the backside to aid alignment and to reinforce the joint. Take extra care with your cuts and make the seam fit as well as possible to provide the best possible glue surface. Use small pieces of styrene to fill any gaps. I also use sprue-goo in any remaining gaps or holes.
-
 I'd try spraying the dash with clear paint (w/ appropriate gloss) and placing the vents on the dash when paint is tacky.
 -
The Mobeus '53 Hudson Hornet kit has a nice straight 6.
-
There are a lot of different putties available so, if you've had trouble sanding some, try a different putty that may be easier for you to work. A good product to use on a small divot such as yours is "sprue goo", liquid plastic cement mixed with small bits of chopped up plastic sprue. Being of the same material as your model body it will sand and finish the same once dry. Make sure you use sandpaper backed by a hard material so that you don't sand a bigger deppression into the roof.
-
I've got wheels from the Monogram '30 Ford Coupe.
-
I'd like to trade for the camper and/or the Testa Rosa when you decide what you need.
-
Perfect. So simple and effective!
-
Thanks. It was very easy (and cheap). Everything except the wood beams was printed from images found using Google Image Search. Some very basic enlarging and cropping was done with MS Photo or Paint. Pics were spray glued to foam core board.
-
Not exactly a "diorama" but I used internet images printed on standard computer paper to create a backdrop in my display case. The method works especially well for scale posters, calendars, signs, window backgrounds, etc.

-
I used 3D Louver decals by Archer Surface Details from Teds Modeling and was very happy with the results. Very simple installation and no body work required.
-
I look forward to seeing what it looks like after you've placed all of your tools and materials. Looks like a lot of specific sized holes.
-
Fantastic Kustom! The paint is perfection.
-
Iron Butterfly
EngineerBob replied to Terry Jessee's topic in Model Trucks: Big Rigs and Heavy Equipment
The "Iron Butterfly" title caught my attention 'cuz I like that band. I also happen to like Viet Nam era gun trucks so I really enjoy your model. Looks great and I'm sure it will look even better weathered. -
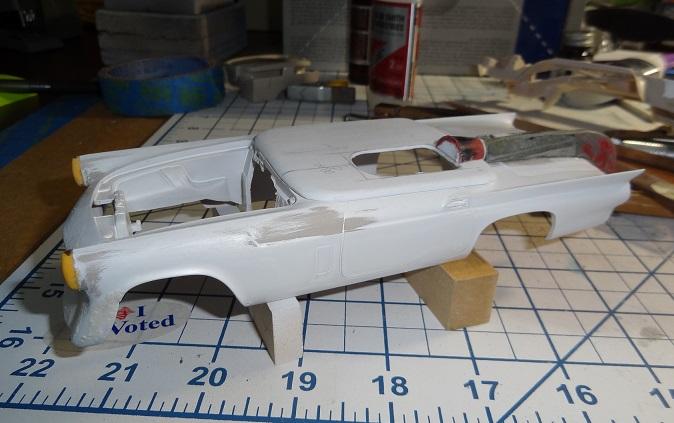
'57 Thunderbird Land Speed Racecar
EngineerBob replied to EngineerBob's topic in Other Racing: Road Racing, Salt Flat Racers
Thanks for the nice comments. Looking forward to seeing what someone else does with a Tbird kit. Here are a couple of W.I.P. pics to show some of the changes I made to this kit. Cut out the molded-in seat and added driveshaft tunnel and floor; used old airplane horizontal stabilizer as fairing/rudder; cut molded in exhaust.

.JPG.060a422ad68823e5443b0bdef6517ce6.JPG)