Ferbz
-
Posts
316 -
Joined
-
Last visited
4 Followers


Recent Profile Visitors
3,069 profile views


Ferbz's Achievements
MCM Avid Poster (5/6)
-
Nicely done! Super clean bodywork and modifications. Where did that rear window come from?
-
Ha! Thanks! I have a few builds that have made it into the magazines, but they will be older builds during the days I lived in CA and attended the many model shows out there 😃
-
Kustom pickup
Ferbz replied to Rocking Rodney Rat's topic in WIP: Model Trucks: Pickups, Vans, SUVs, Light Commercial
I absolutely love everything about this build! Simply bitchin'......! 😎 -
Phenomenal build! I've had have a soft spot for Ghias since my Cal Look VW days back in the late 80s. I'd like to someday build a scale Cal Look Ghia so I can get it out of my system 🙂 Very nice job!
-
Thanks! Yes indeed 🙂 That whole 'Larry Watson era' sparked custom painting trends that we still see today! Traditional custom paint and body modifications are my favorite model subjects. As a result, I've spent lots of time and energy studying and iterating on ideas I'd like to see in scale and in 1:1 😉
-
Here's another one of my favorite paint jobs that didnt blow up on me lol My customized AMT 57 Chrysler was built many years ago painted primarily with Plastikote nitrocellulose spray can lacquers. The basecoat is Plastikote's Metallic Gold. The panel pattern was masked off then Black fogging was airbrushed on. Plastikote's Candy Apple Red was sprayed next then the masking was removed. I then airbrushed a couple coats of decanted Plastikote Clear with some gold powder pearl mixed into it. Final clear coats were sprayed straight from the can then wet sanded/polished. As far as I can tell, Plastikote no longer makes their line of nitrocellulose spray can paints which I sorely miss!

-
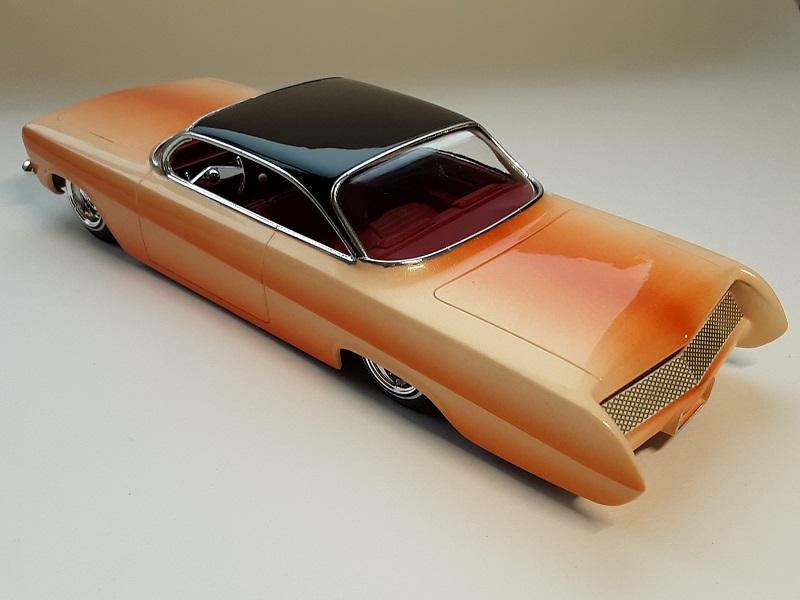
Here is one of the rare occasions that I'm actually happy with the way the paint scheme turned out on this personal project lol Chopped/customized 62 Belair bubbletop. Exterior paint is lacquer, gloss black on top and candy tangerine fades over slightly orange tinted white pearl:
- 820 replies
-
- 10
-

-
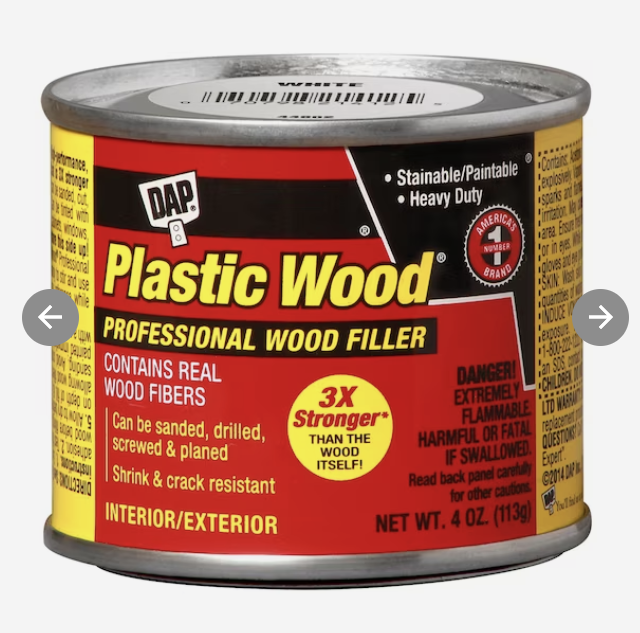
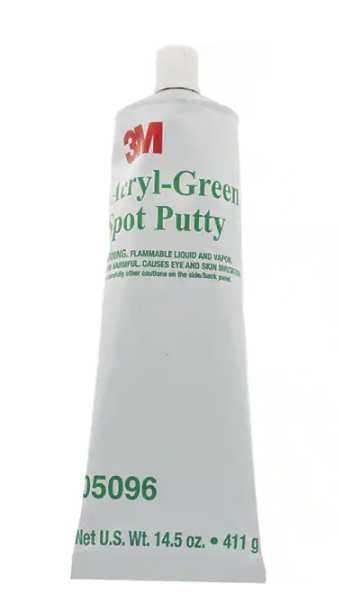
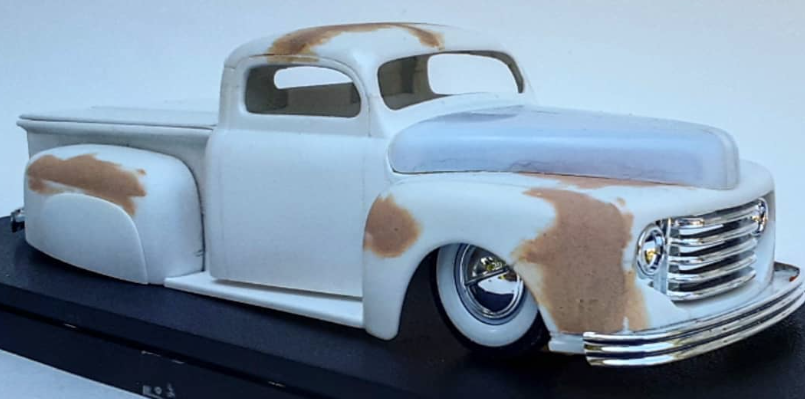
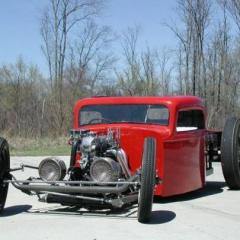
Is it ok that I show how I use these here? This 50 ford pickup custom had quite a few body mods where I first used Plastic Wood to fill things like fender lines and other low areas, or locations that need shaping. I sanded the Plastic Wood to shape then an initial coat of light primer revealed pinholes and sand scratches which were then filled with 3M spot putty. Another coat of primer and sanding shows any areas needing further putty/primer fine tuning so that final primer and wet sanding can begin. After final primer and wet sanding the final paintjob covers it all up. This may seem a bit painstaking and rigorous but after years of trial and error, this is how I use Plastic Wood and 3M spot putty to get the custom body work as straight as I can for the paintwork without it ever ghosting thru or cracking, etc. Hope this helps!
-
I do alot of custom body work and have used DAP brand Plastic Wood for relatively large areas and/or thicker shaping and molding. I've used it for MANY years without incidence. It does not shrink or swell under the most active types of paint(like automotive lacquer)with proper primering and final paint prepping. I use small amounts of acetone to thin it as needed. One caveat is that it often requires a spot glazing putty pass as part of primer/paint prep to fill any pinholes and/or fine sanding scratches, which you would often need to do anyway when doing any type of custom bodywork. For this I use the tube 3M Acryl-Green spot putty. Neither of these require figuring out how much hardener to use or long hardening/drying times, which I find super convenient. I also use CA glue/baking powder for filling small imperfections, cut lines, holes, etc. If you try Plastic Wood for yourself, do not buy the tube as it tends to dry out before you end up using the majority of it. Instead, buy the small 4oz. can for $10 or less. Available at most big hardware stores (like Home Depot, Lowe's, etc).
-
One tip that may help you get the paint to match as close as possible is to temporarily tape the skirts below the body nearby the rear wheel opening. This way, you'll be spraying the skirts AND body at the same time with the same amount of spray passes, and the same amount of paint material going on both the body and the skirts at the same time, etc.
-
Don, you may have to make them yourself. If you have decent Photoshop and/or Illustrator skills, maybe you can make the decals on the computer and print them out on inkjet waterslide decal material. I've done this very thing not too long ago on a build. I found clear decal print sheets at Hobby Lobby (cant recall the brand at the moment), made my design in Photoshop, printed it out, then applied the decal to my model. Obviously, there are a couple important points to keep in mind if you go this route: You'll want to make sure your image file(s) are the right scale for your model and at the correct resolution (highest is best, like 300dpi), follow the instructions for the printable decal sheet that you use. The sheets I bought called for lightly spraying the printed decal(s) with a clear fixative or clear matte spray (maybe all brands call for this?) If this is not done, the image on the decal will dissolve when placed in water. Luckily, I printed a couple copies of my image to test this first! Lastly, and this is not crucial, but I would recommend protecting the decals with a clear coat over them once you applied them to your model and have dried completely.
-
You should be able to find MEK in large hardware stores like Home Depot and/or Lowe's for $10 or less for a quart.
-
I mainly build customs which means using lots of liquid adhesive for body mods and scratch building. For many, many years I used Tenax7 which was a great liquid adhesive. Some years ago I discovered MEK for myself and have been using it exclusively. I switched over to it mostly because of how inexpensive it is compared to most all the popular liquid adhesives like Tenax7, Plastic Weld, WeldOn, etc. But I also discovered MEK's great drying time and welding properties. The one thing I would mention is that I found the fumes of MEK to be really strong, much stronger than the above mentioned glues! I use it in a well ventilated area, and cap it in between brush dips to minimize the fume's effects. I don't really do this (I probably should) but if you really want to protect yourself, you can always use a single cartridge respirator mask as well. I may be extra sensitive to it, but I've had dizziness, headaches, and even sinus pain when I wasn't careful enough. Lastly, I try to avoid getting it on my skin as it absorbs too quickly to wash off 🙂
-
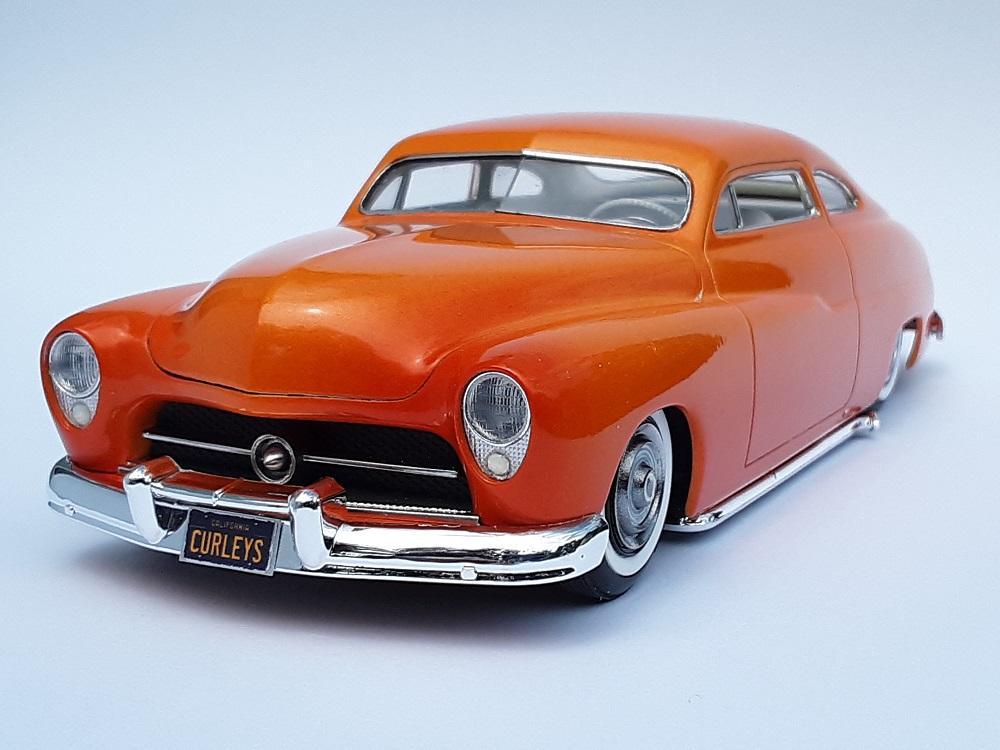
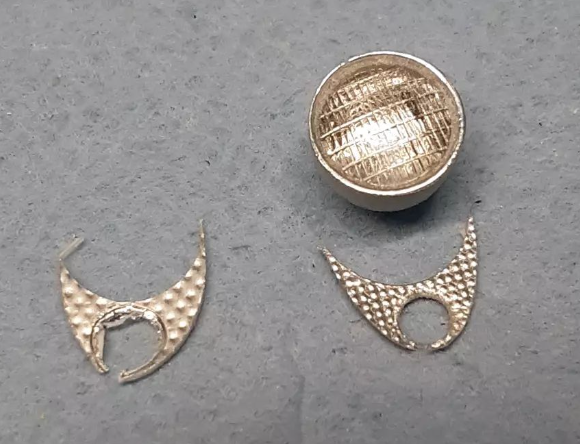
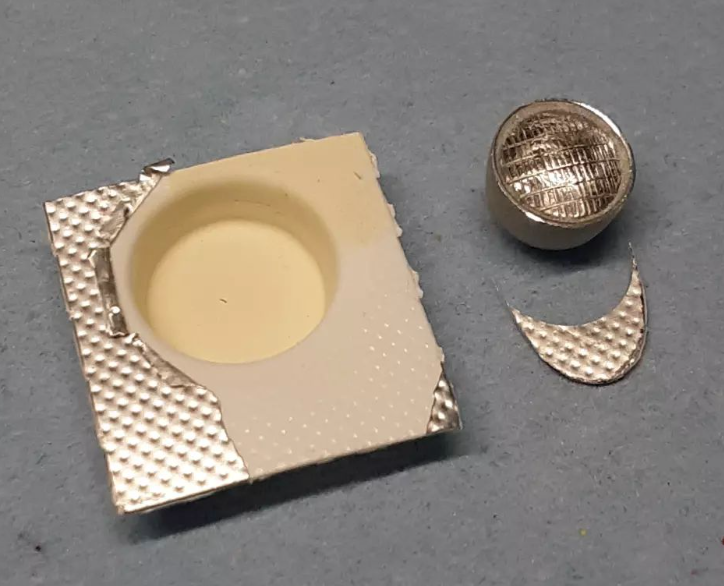
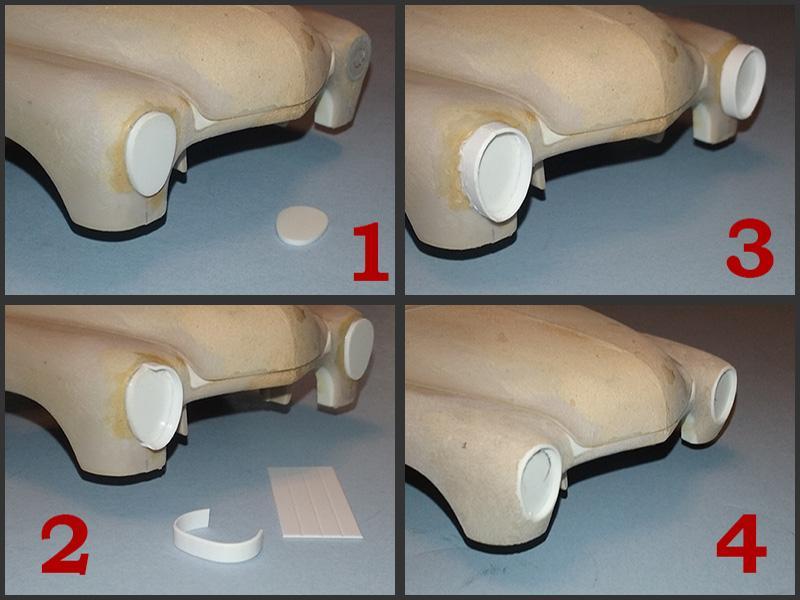
At the completion of my 1:25th scale replica of Curley Tremayne's 50 Mercury, some folks asked me how I made the frenched Buick headlights that the original 1:1 car had. I realize this may be a bit advanced for the average model car builder, but with patience, planning, and careful work, I believe any modeler with some scratch building skills could accomplish this. Step 1: Using the diameter of a standard headlight(and thinned bezel), I cut and sanded two face plates (temporarily stuck together using double sided scotch tape to help ensure I end up with identical pieces) of sheet styrene to the upside down 'egg' shape of the Buick headlight area. Once I was pleased with their shape, I glued them in place to the front of the fenders. Before gluing them, double check to make sure your egg shaped plates are large enough to accommodate a standard headlight bucket/bezel. I used the AMT 49 Merc round backed buckets with the bezel lip diameter sanded down a bit. Step 2: Wrap these face plates around the outside with strips of styrene, carefully bending them to shape, then gluing them into place. Step 3: I'm actually doing this as I go from the start, but it's a good idea to double check your measurements to make sure both sides are as identical as possible! Step 4: Using the putty of your choice (I personally use DAP Plastic Wood for thicker work like this) add putty around the outside of the headlights and sand/shape until the headlights are molded nicely to the front of the fenders. As you do this, use the lips of the strips as your guide and shape/sand away just enough to get the lip depth you like. Step 5: Sorry not shown here, but cut out the round holes for the headlight buckets in the now frenched face plates. Open up the round holes slowly and test fit the buckets until they fit comfortably in them. As I mentioned, I used the AMT Merc kit's round backed headlight bezels by gluing in the headlight lenses and sanding down the outside diameter of the bezel lips so that they fit inside the plates. These pics show the prepared headlight bucket and the face plate material I cut out of plastic pill holders that have textured foil. Cut them out larger than you need, then slowly sand them to the shape and routinely test fit them as you go until they fit comfortably inside the frenched opening. I used a hole punch to cut out the turn signal holes in them. Punch the holes first before cutting/sanding them to shape or you might risk damaging them like I did shown here! lol For final assembly, glue the foil textured plastic pieces into place, then glue the headlight buckets into their holes. Paint the turn signal holes white, then add a drop of two part 5min epoxy to represent the lenses. I've included a pic of the finished results. Hopefully this helps and that I haven't missed anything lol Feel free to hit me up if you have any questions and hopefully I can help!
- 1 reply
-
- 7
-
-

-
Monogram 1955 Ford F-100 Kustom
Ferbz replied to Dan Hay's topic in Model Trucks: Pickups, Vans, SUVs, Light Commercial
Great build! Very tasteful custom touches 😎 I painted my custom 50 Ford pickup the same color AND made similar exhaust pipes for it! Great minds think alike they say 😁