

Big John
-
Posts
536 -
Joined
-
Last visited
Content Type
Profiles
Forums
Events
Gallery
Posts posted by Big John
-
-
On 10/6/2020 at 6:11 PM, CabDriver said:
Yeah, I THINK there’s plenty of space over there - haven’t noticed anything hanging up on anything else yet...that’ll happen once I’m about to glue it together I’m sure ?
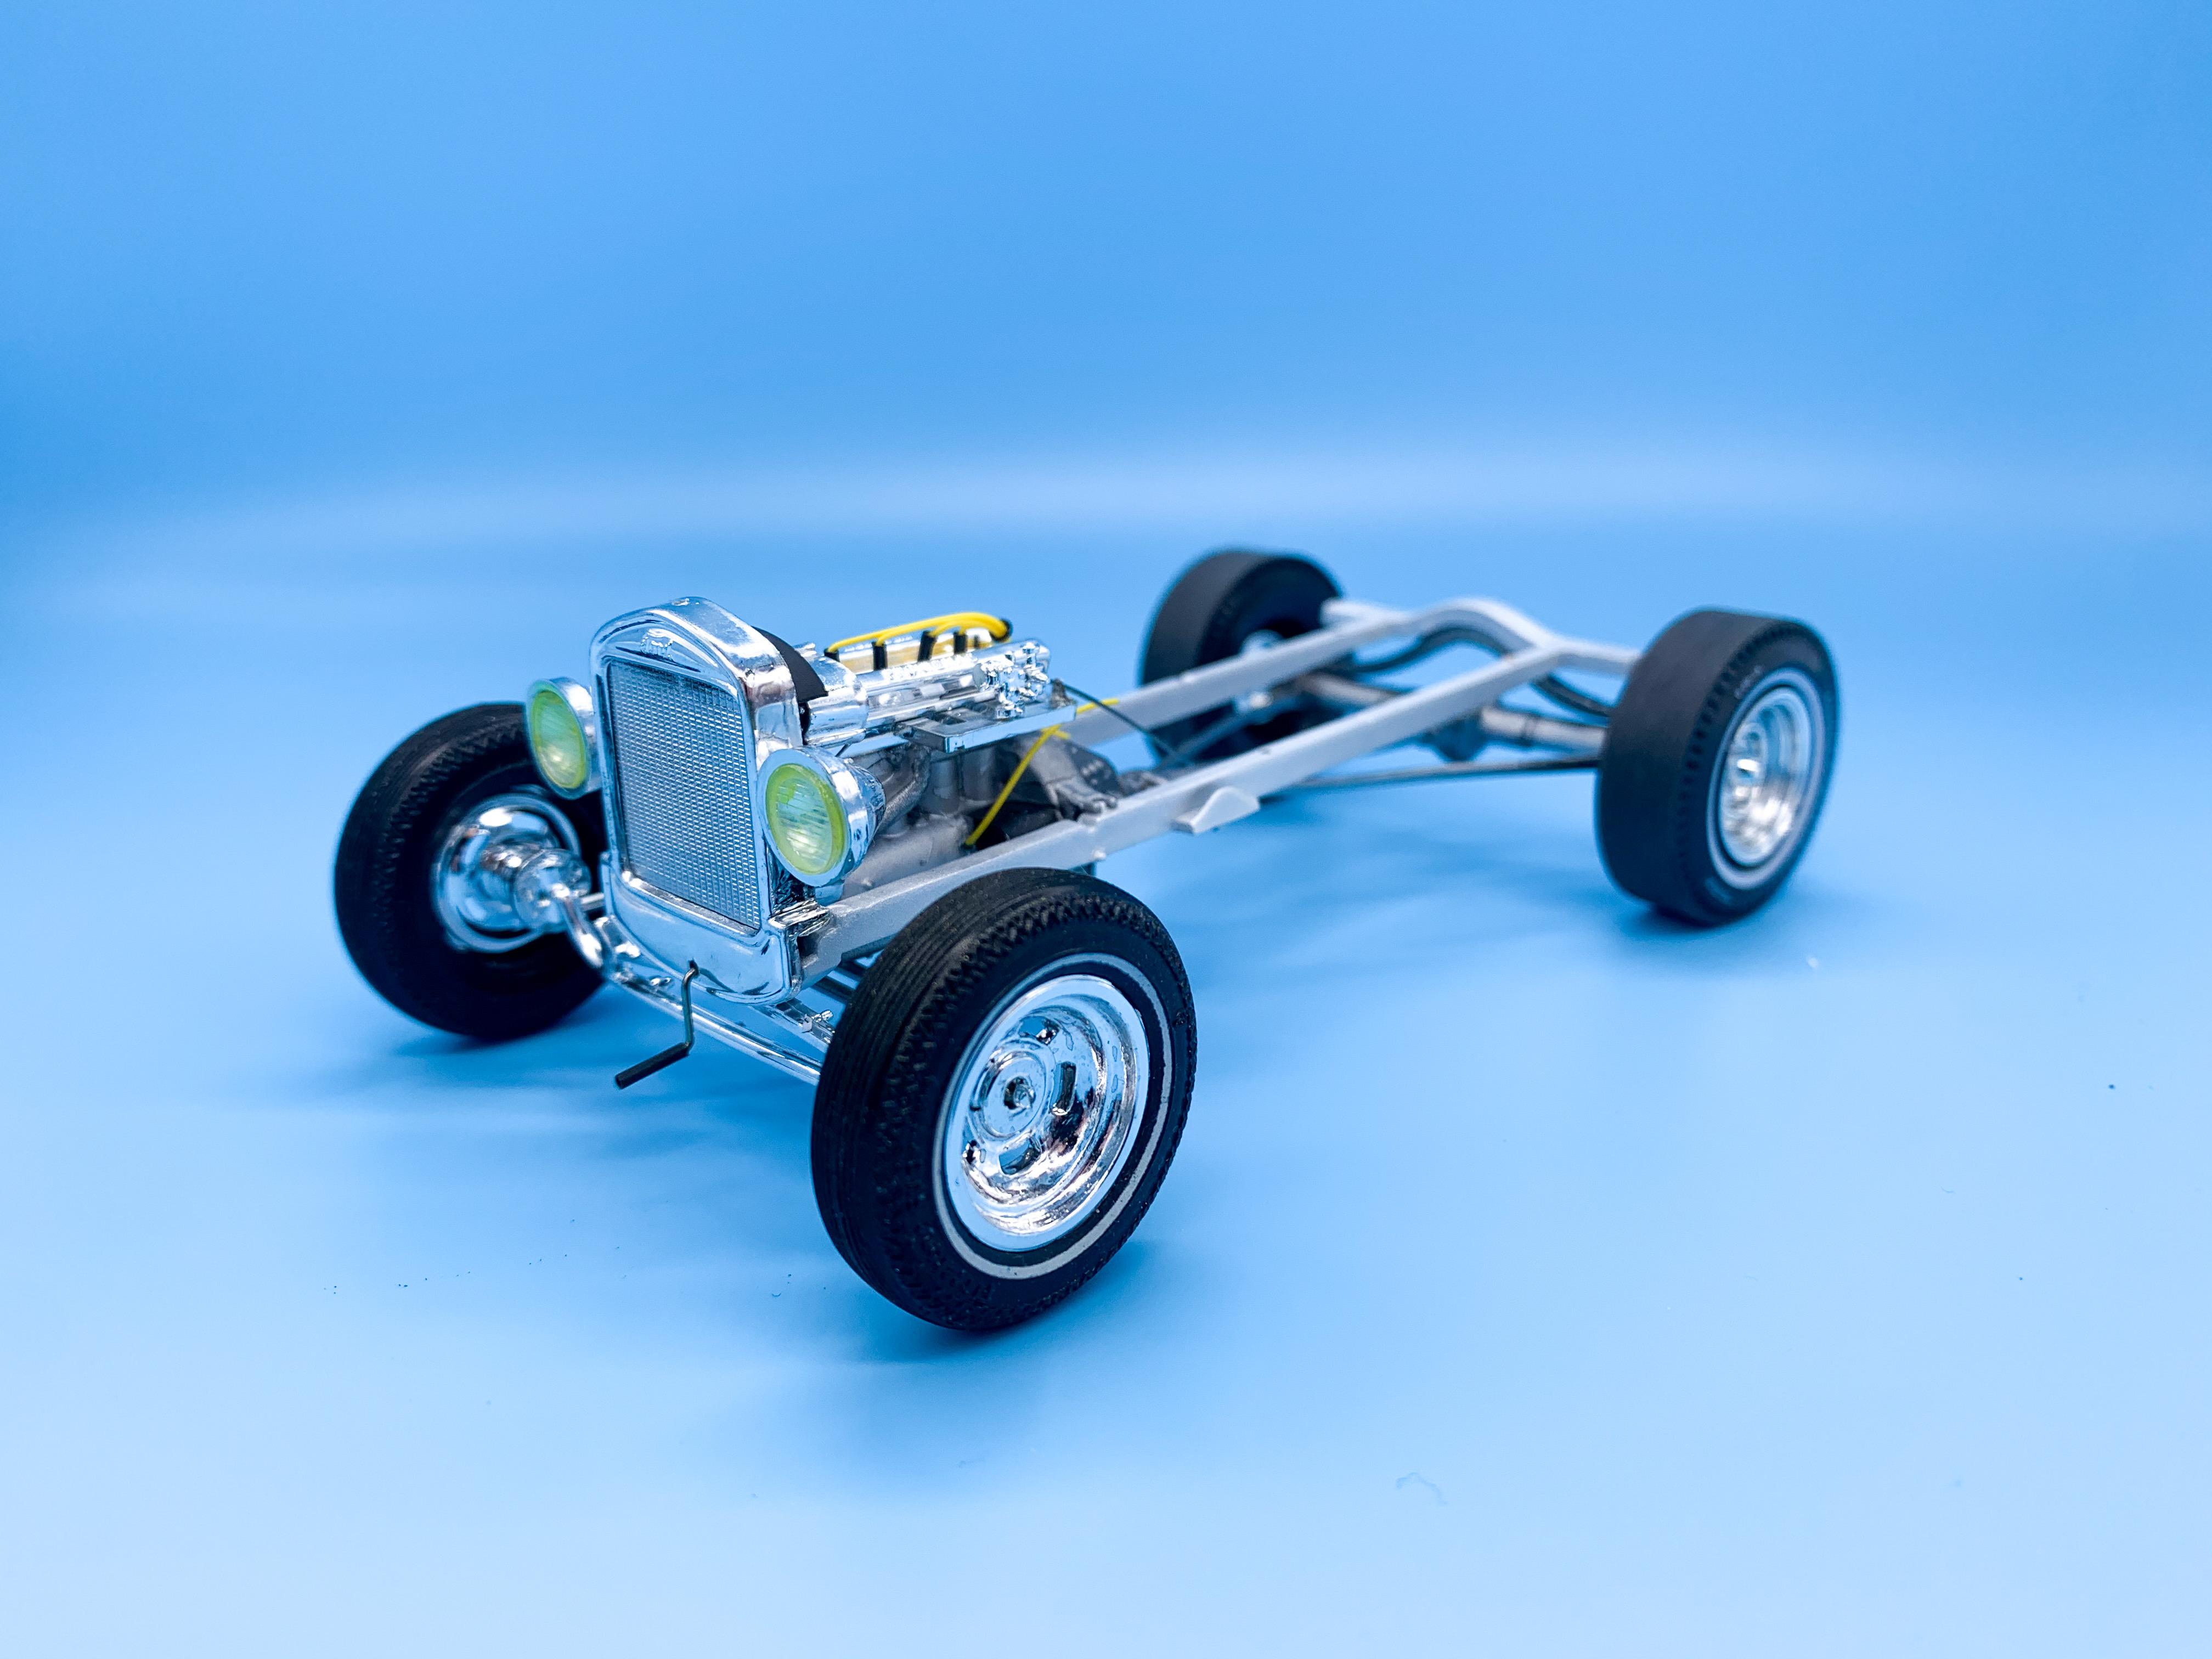
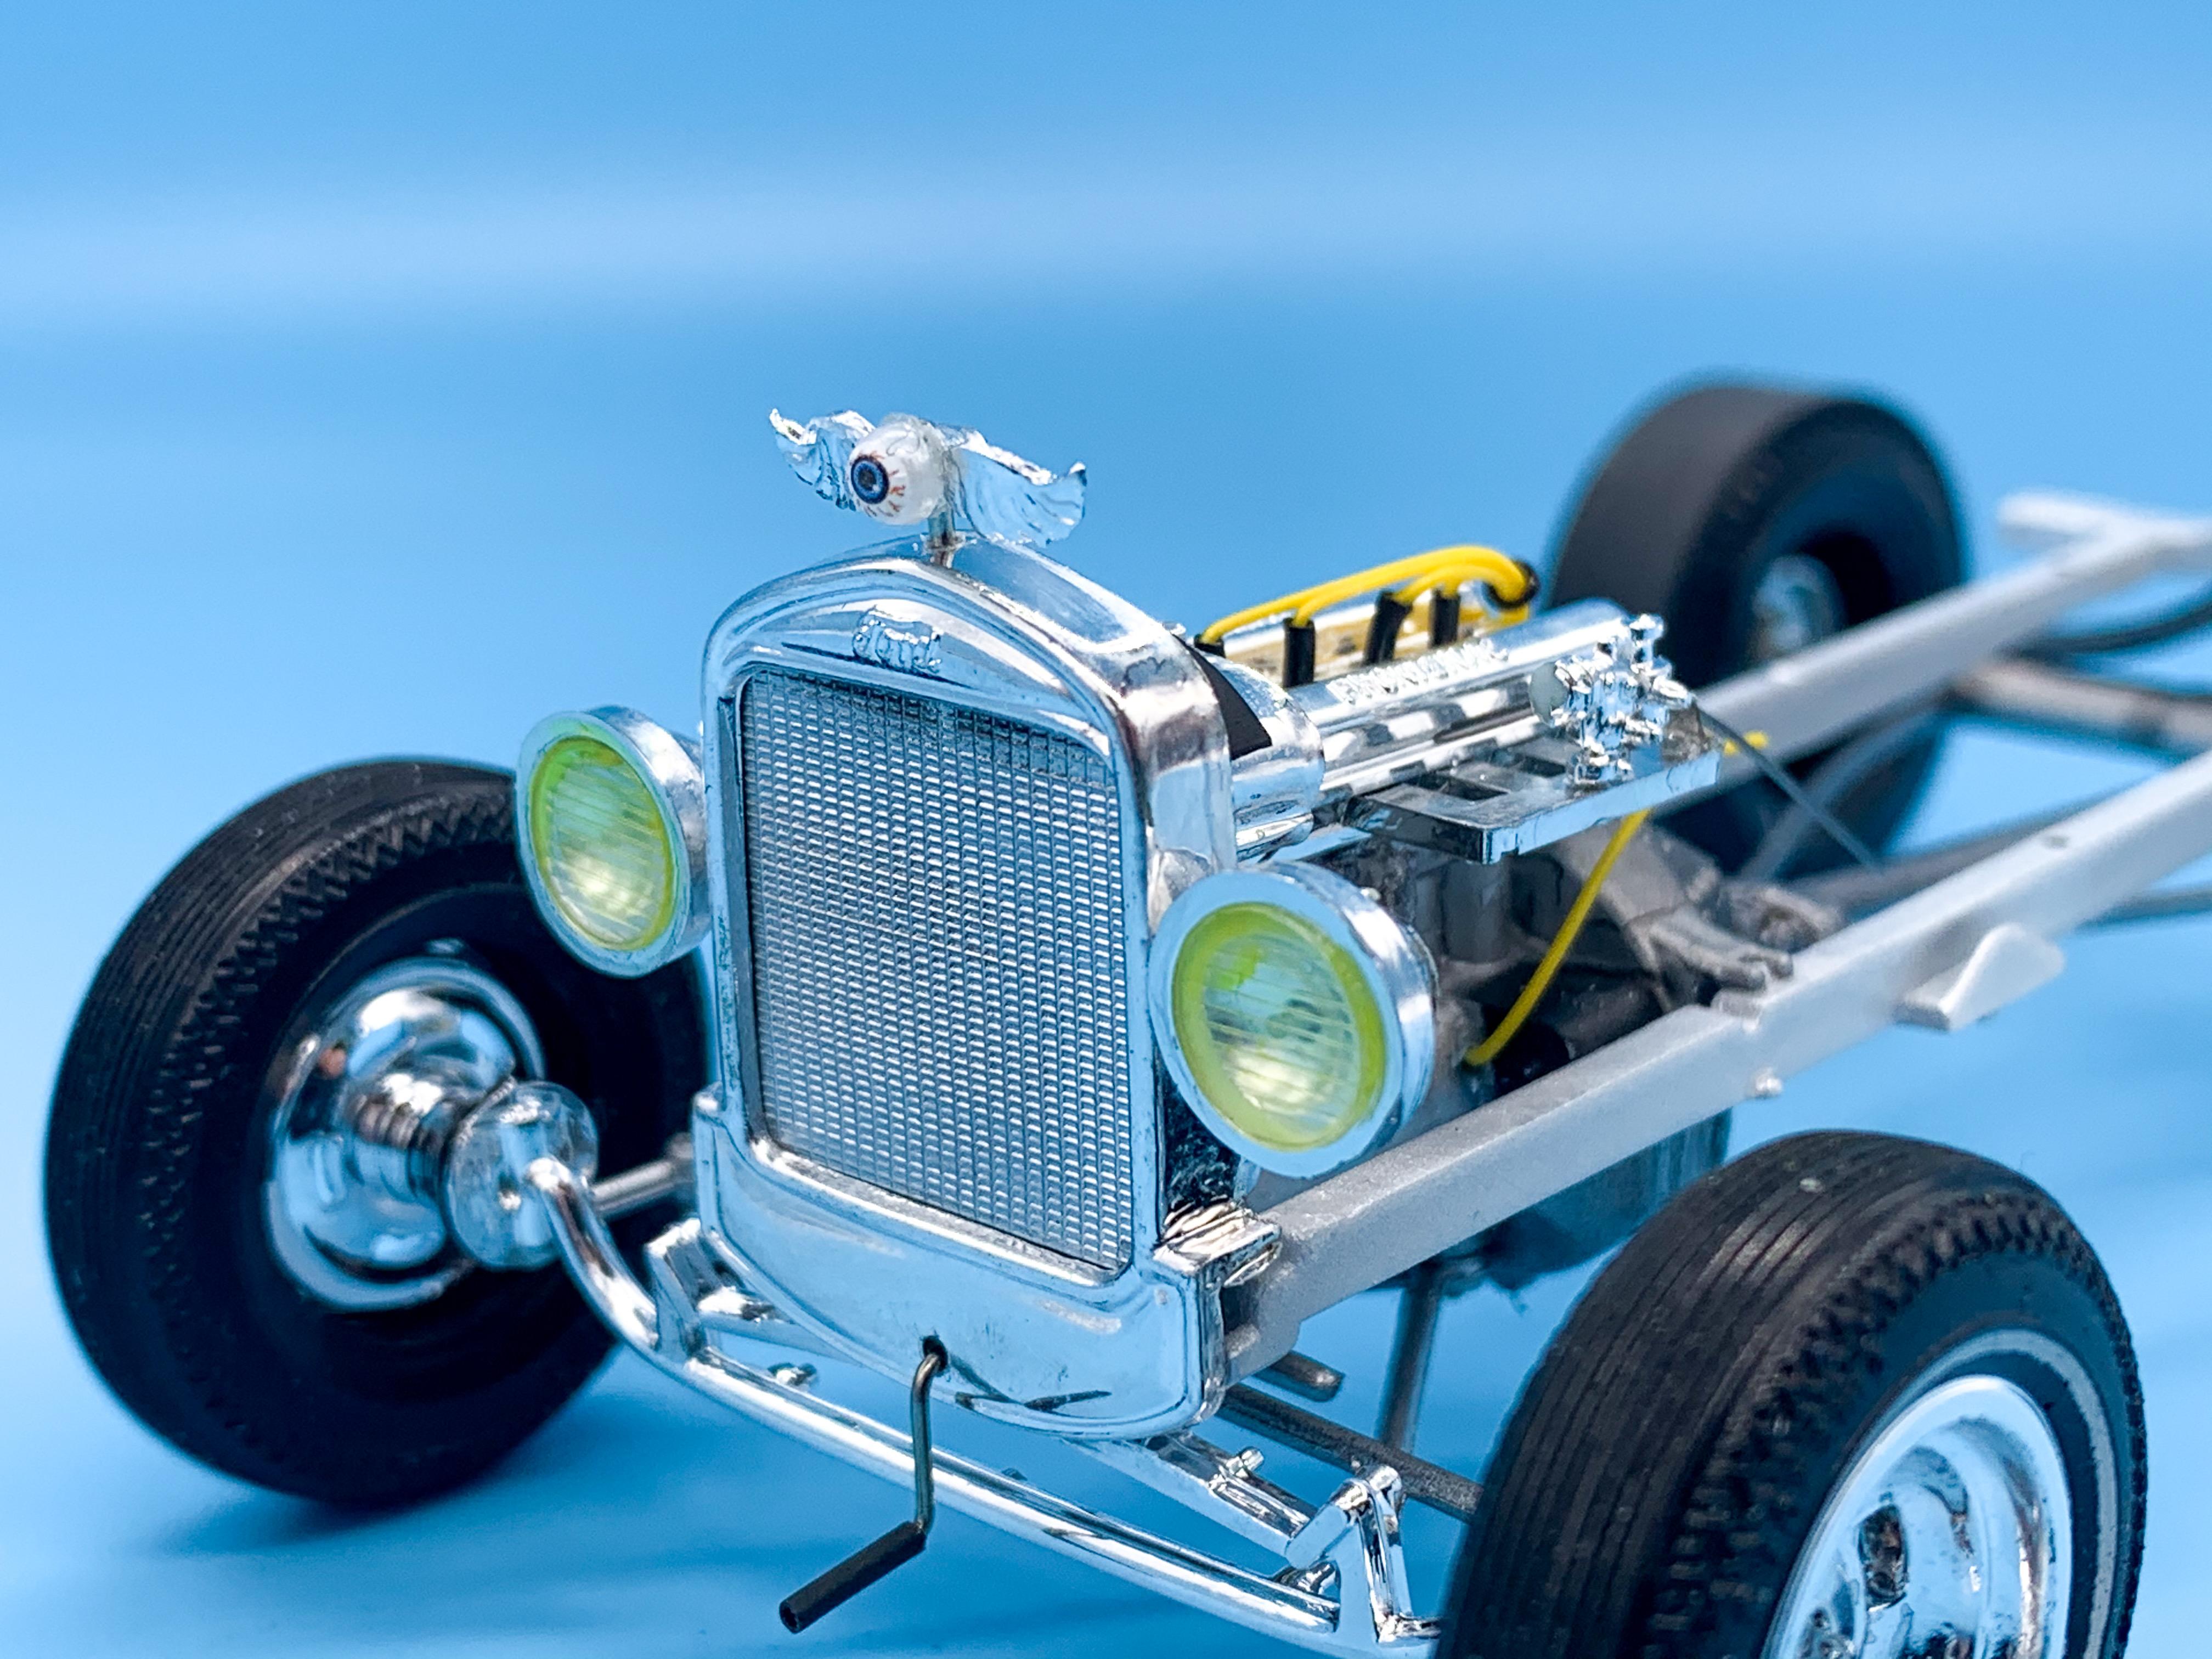
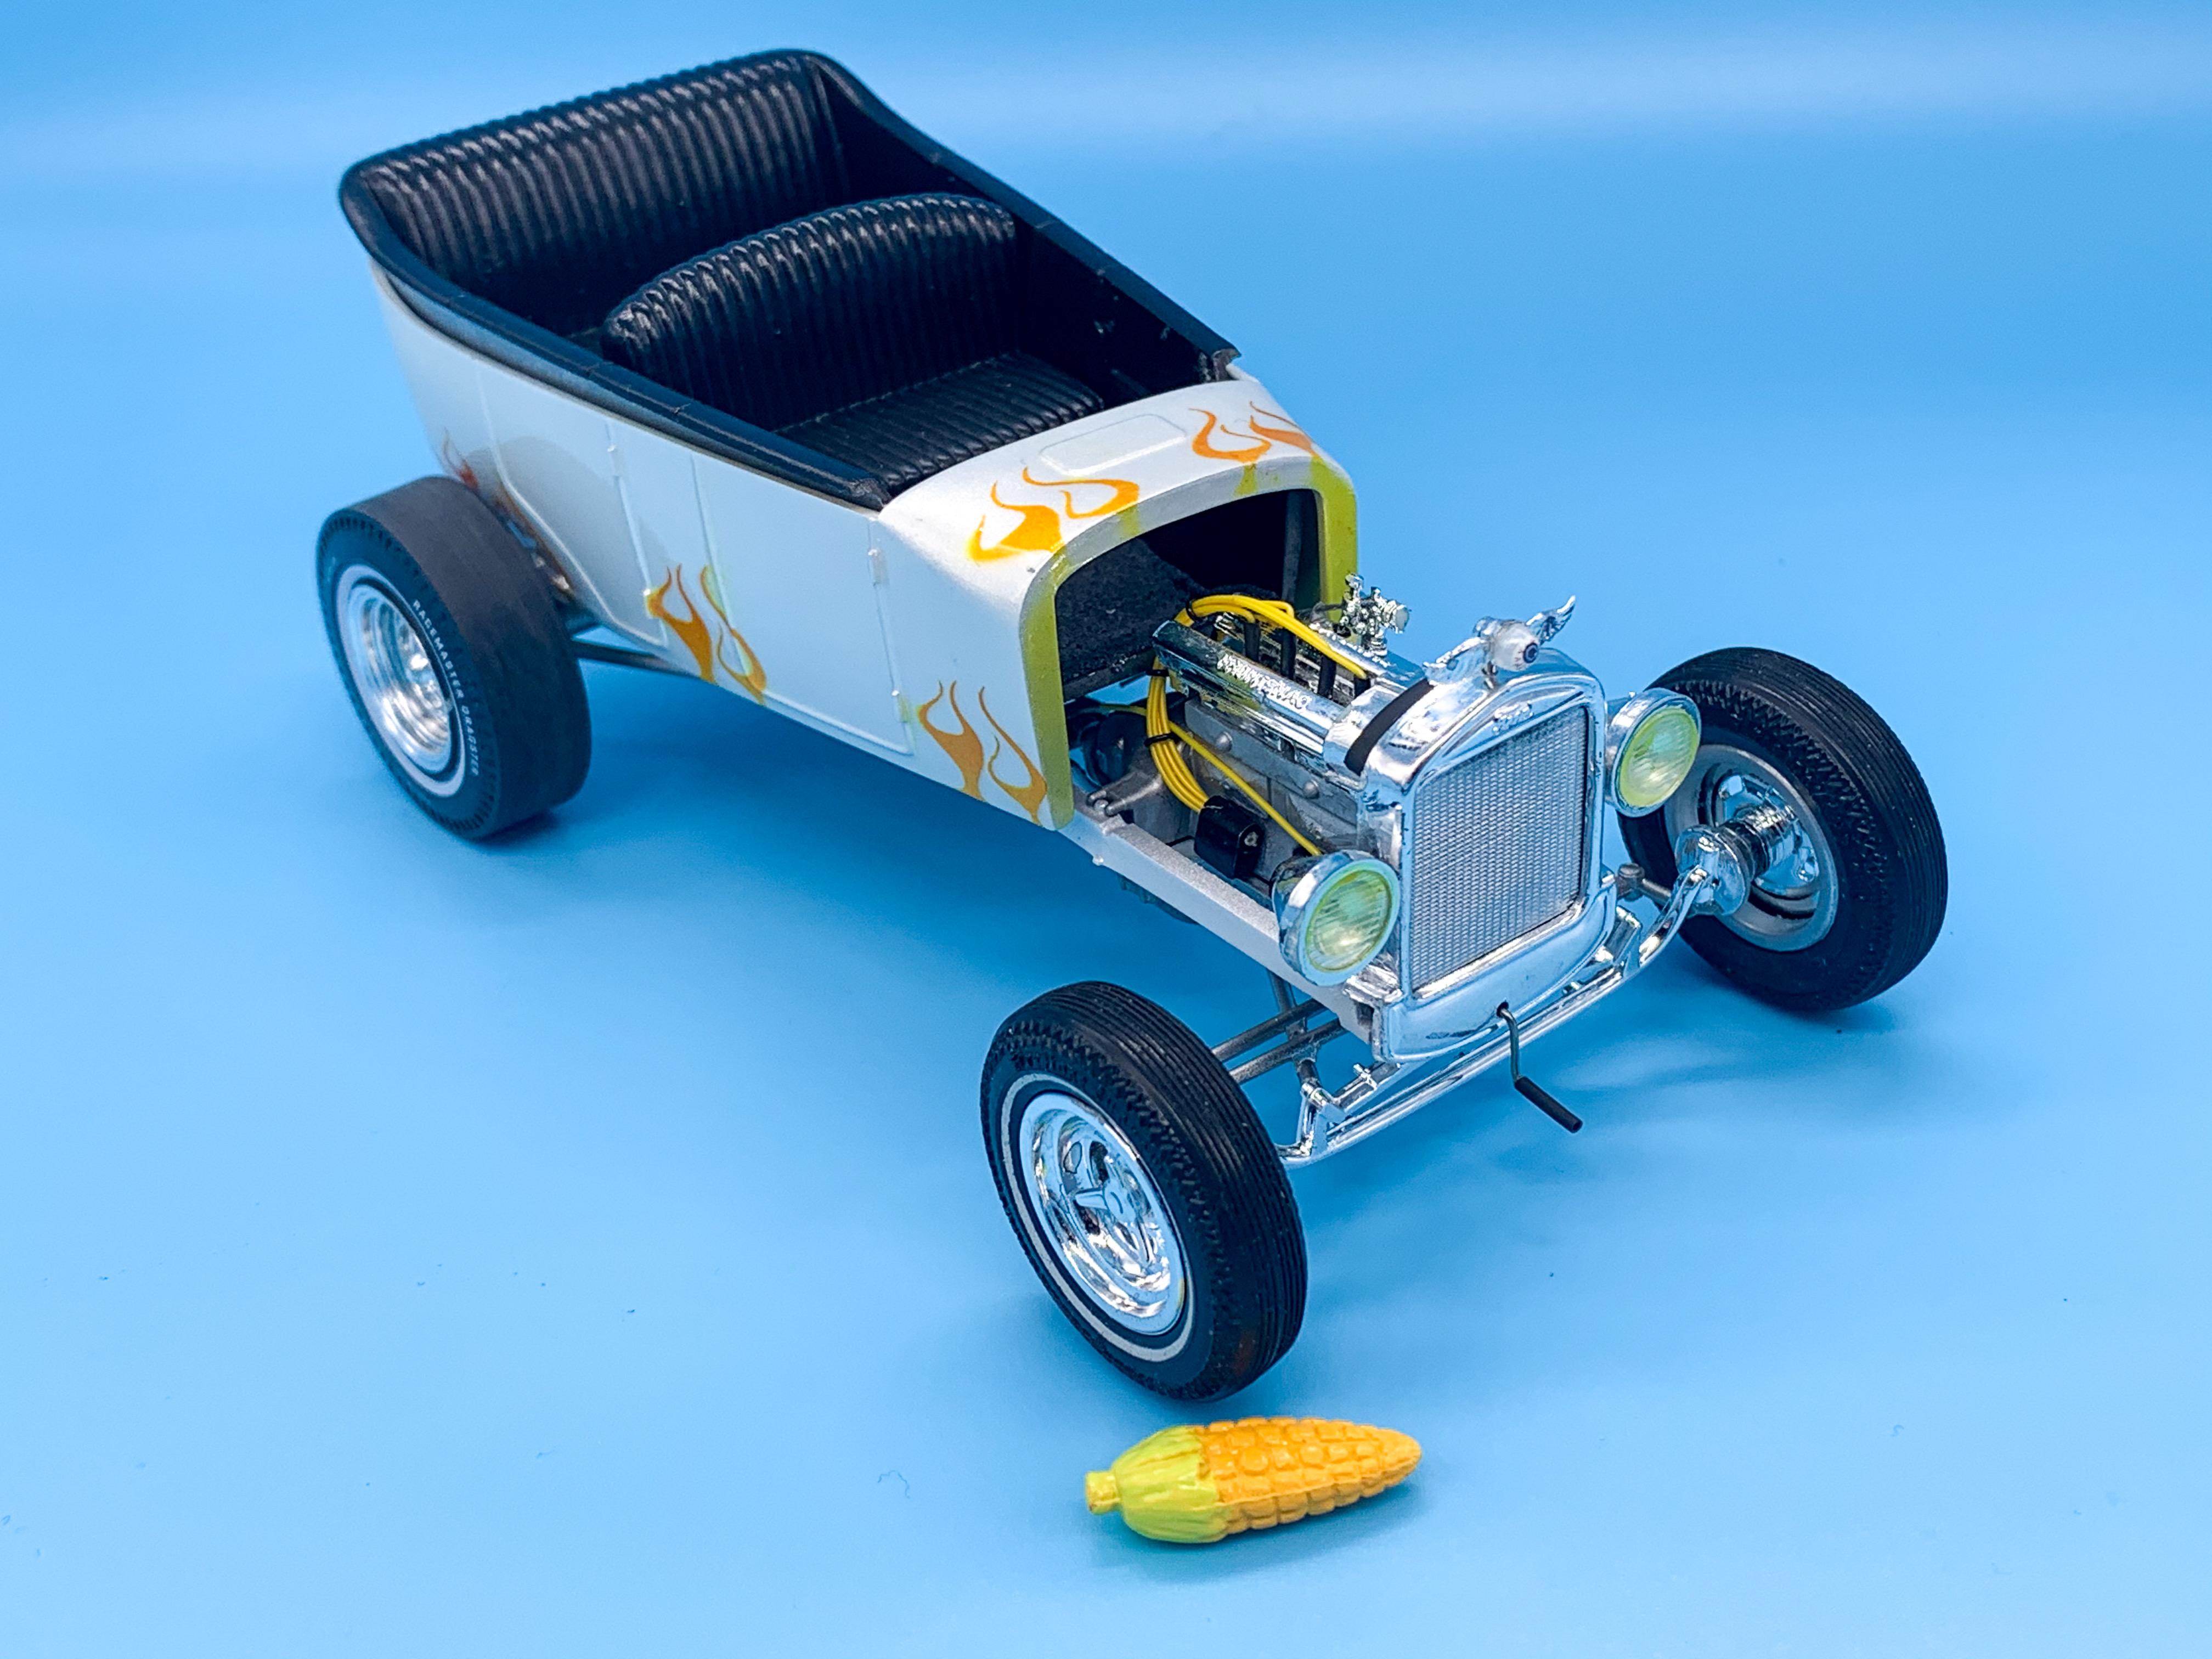
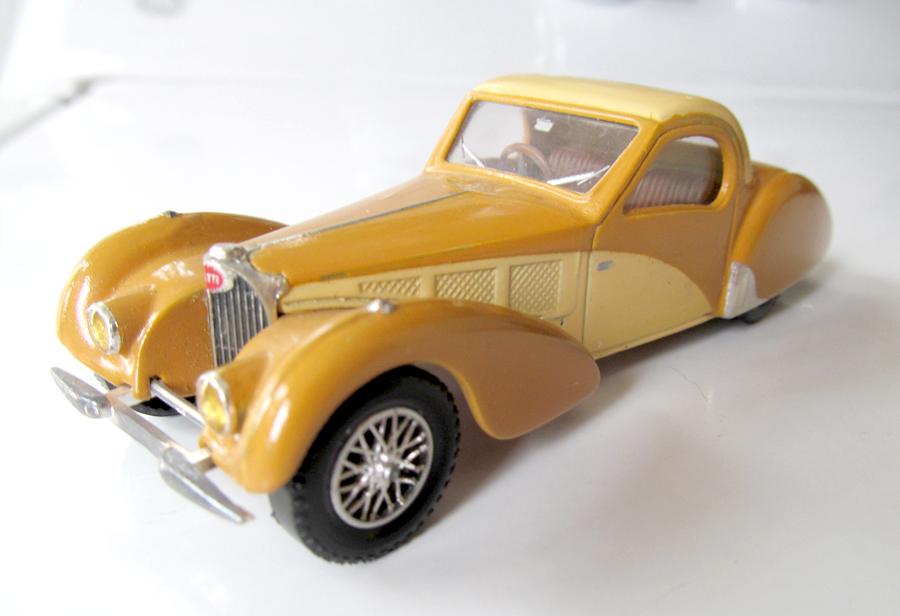
A little bit of progress today...shot the headlamp lenses with a little mist of candy yellow, just because, then got them mounted to the grill and rad and got them mounted to the frame:

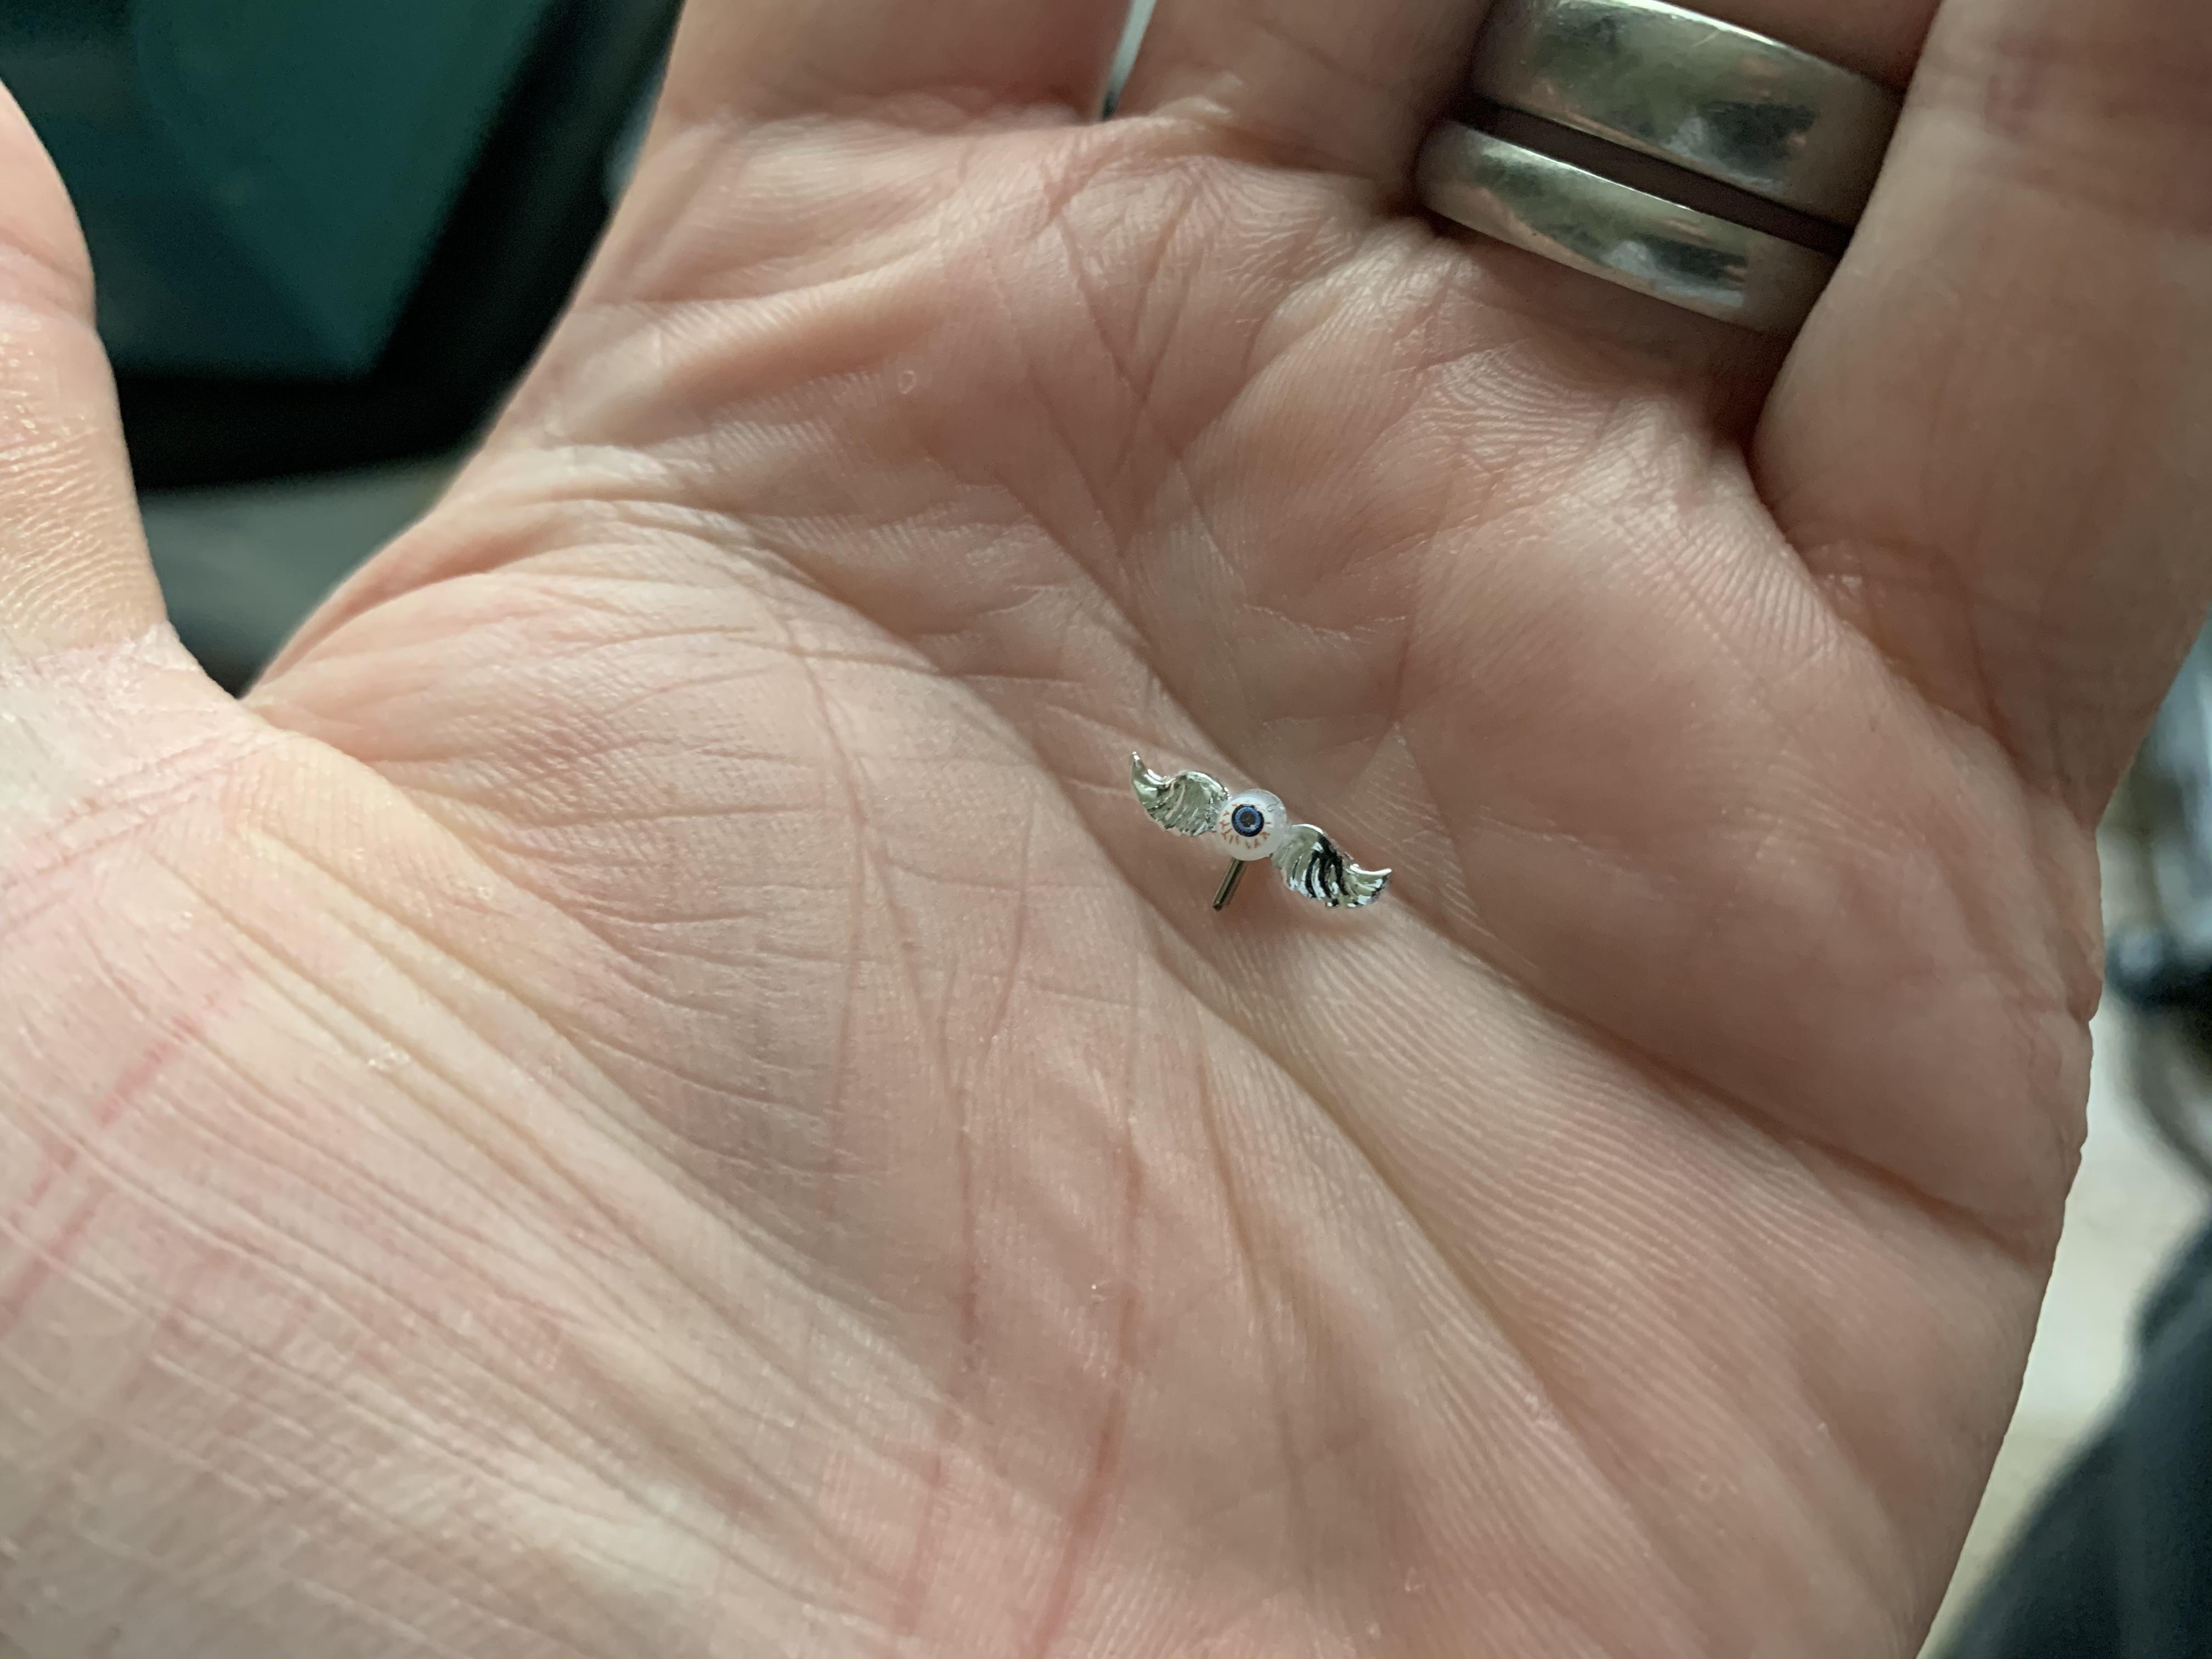
I had an idea to make a flying eyeball emblem for the top of the radiator shell and there’s almost all you need in the kit already with the temp gauge that they supply you with. Used a half-sphere bead for the eyeball, the eyeball decal from the new Revell 29 kit and after a little (lot) setting solution and a coat of clear ended up with this:
Looks cool on there I think - just a fun little detail:
If you look through the headlamp lenses you can see the bulbs I added too - drilled out the stock buckets and added a short length of clear plastic tube to add a little interest. Oh, and scratchbuilt a starter crank, for my own amusement.
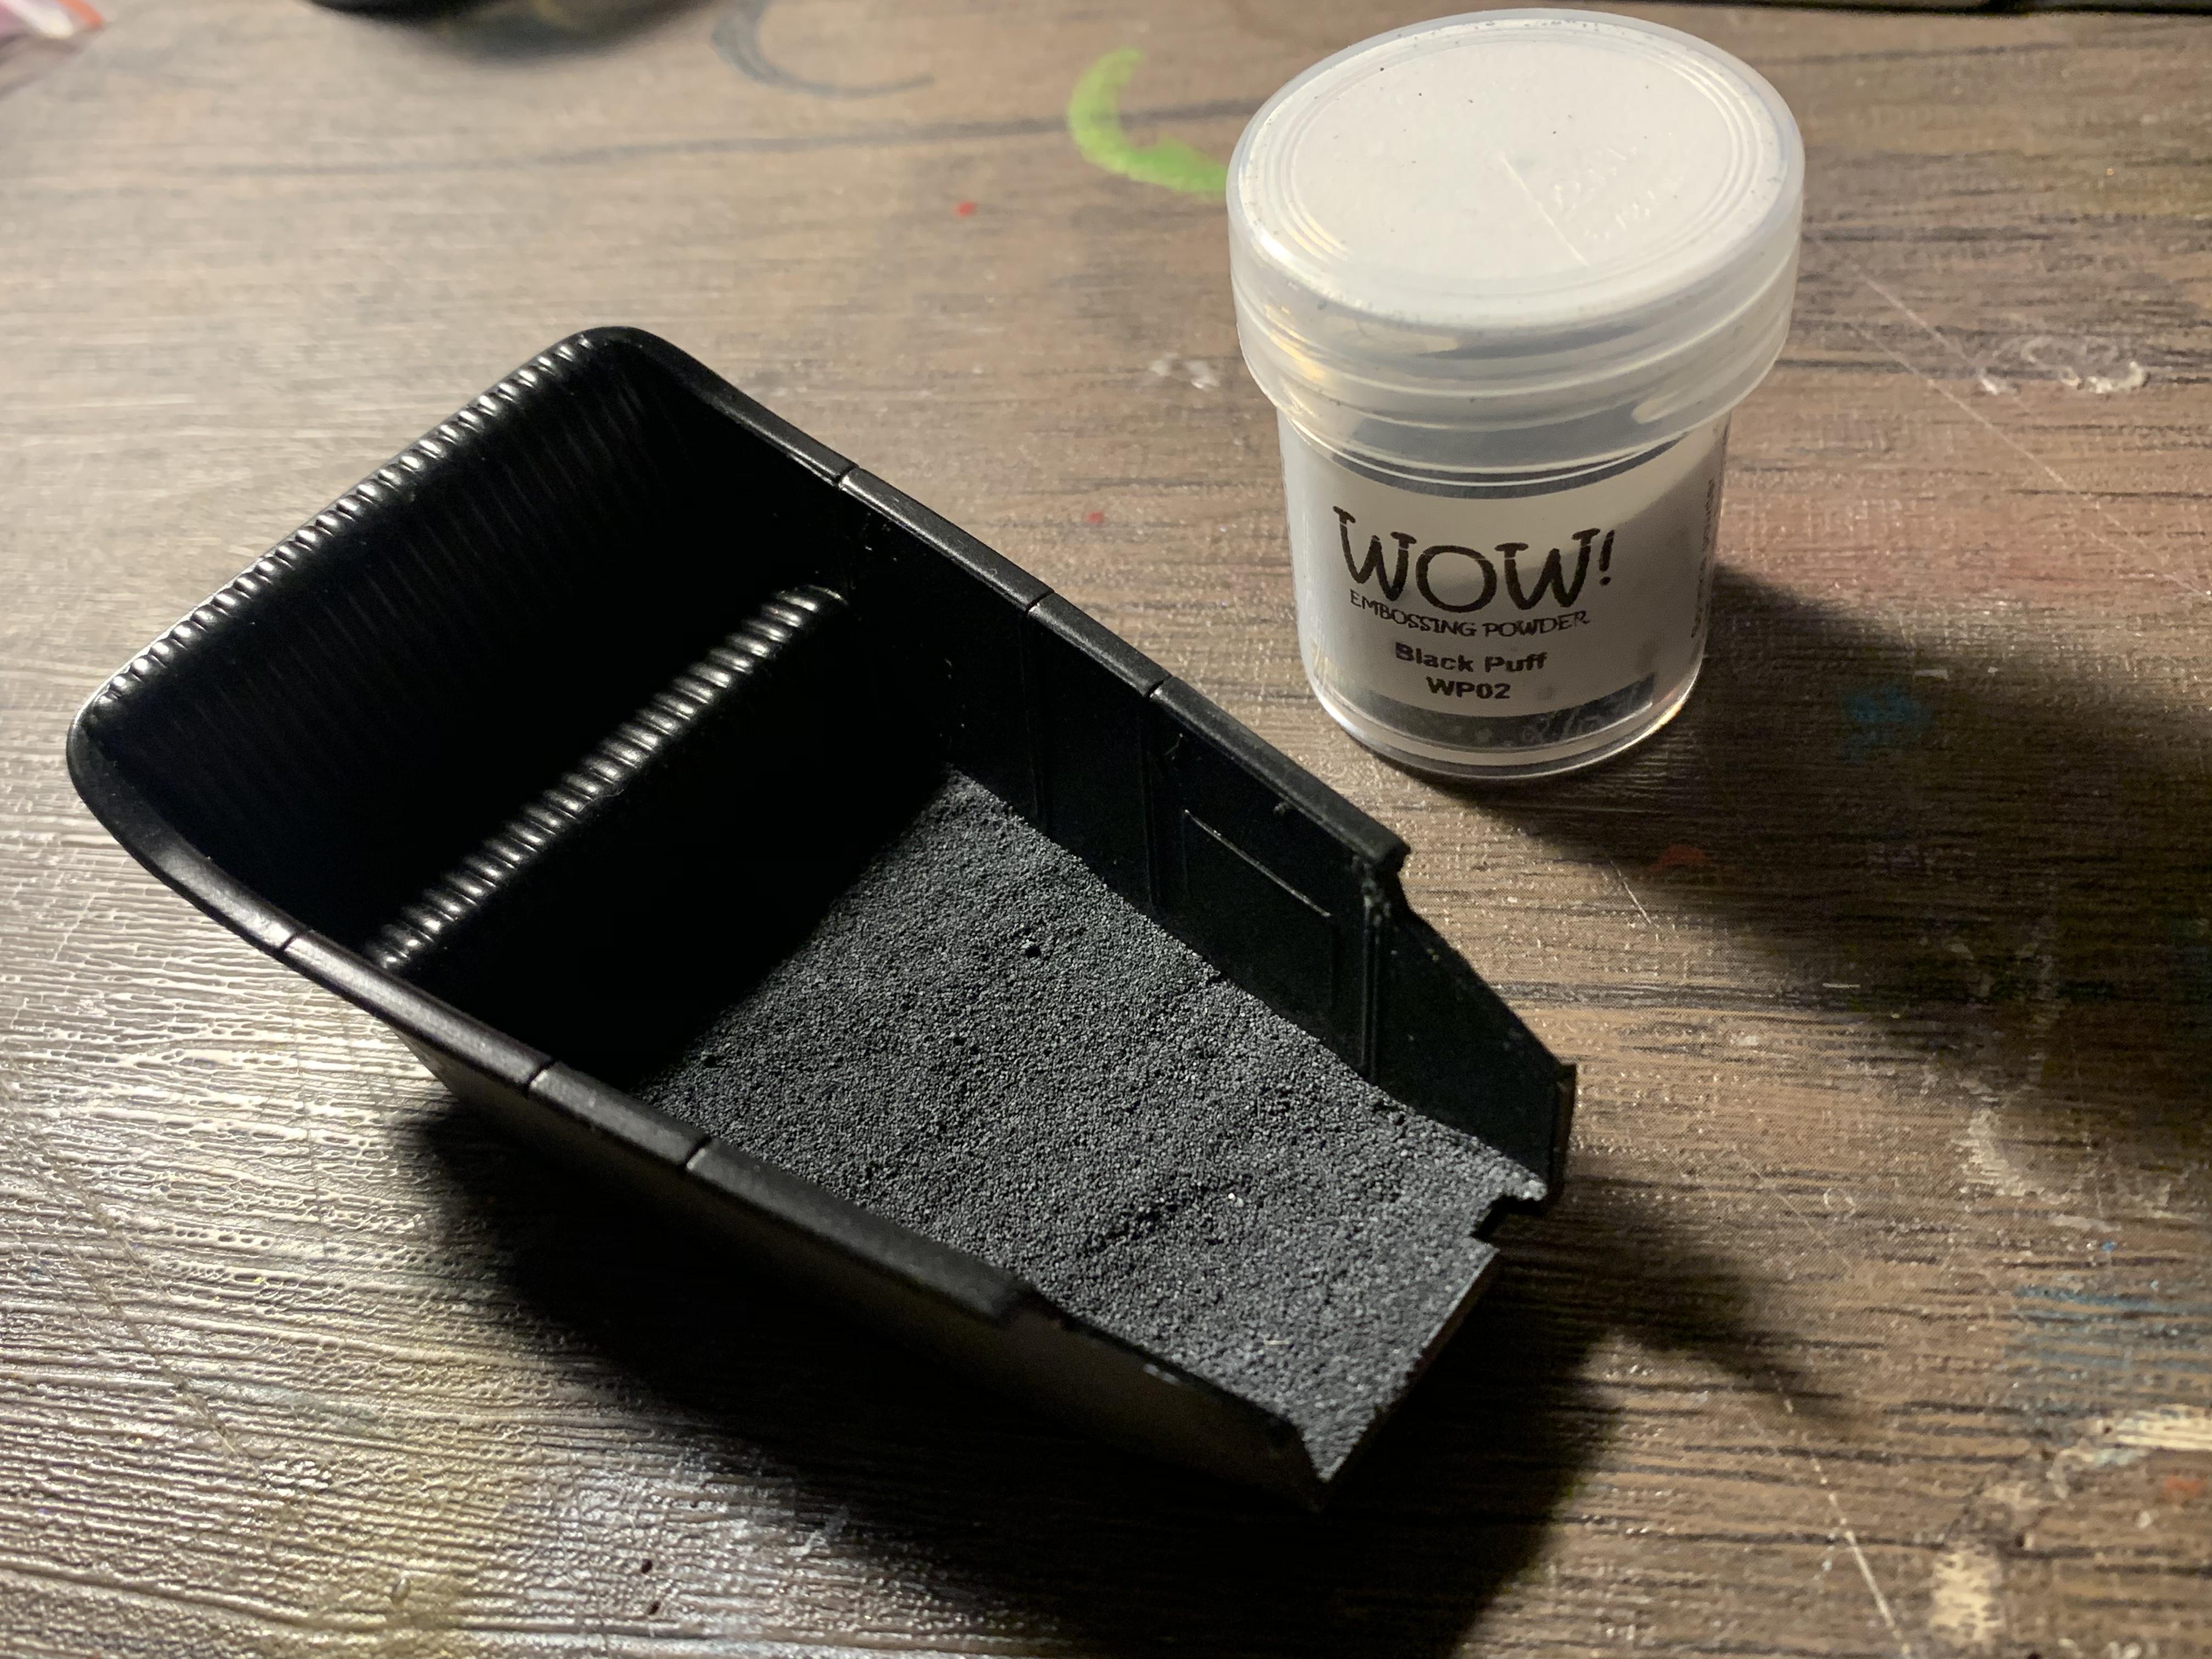
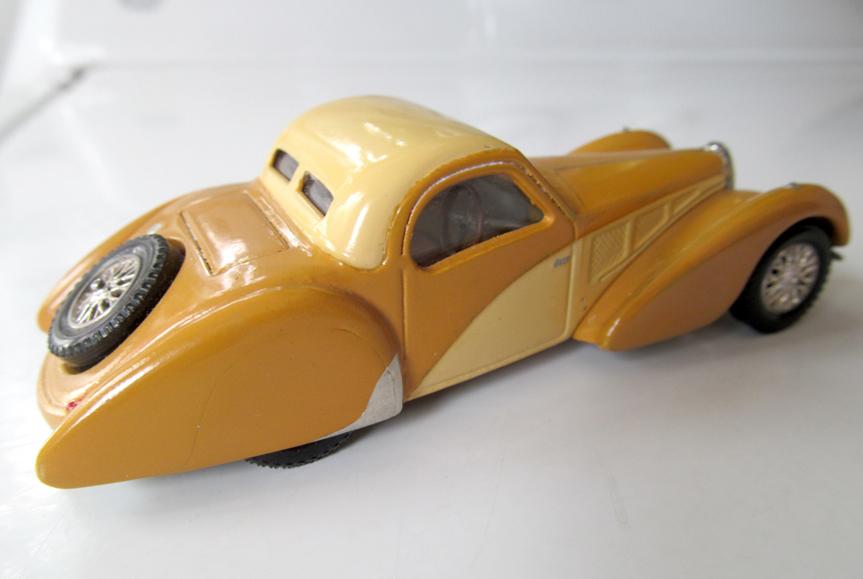
Tomorrow’s excitement will (probably) be the interior tub...soon as the glue dries on the embossing powder.
Today’s end-of-day mock-up:
More soon!
Shades of Von Dutch! Love the flying eye!
-
Dare I say yes? Locked in the vault are the 1920 Frontenac, 1959/60 Watson, and 2000 Gforce. Thanks for getting me looking bac at them Chris's workmanship and his instructions are amazing and a standard that has inspired me in the presentation of my own kits.
-
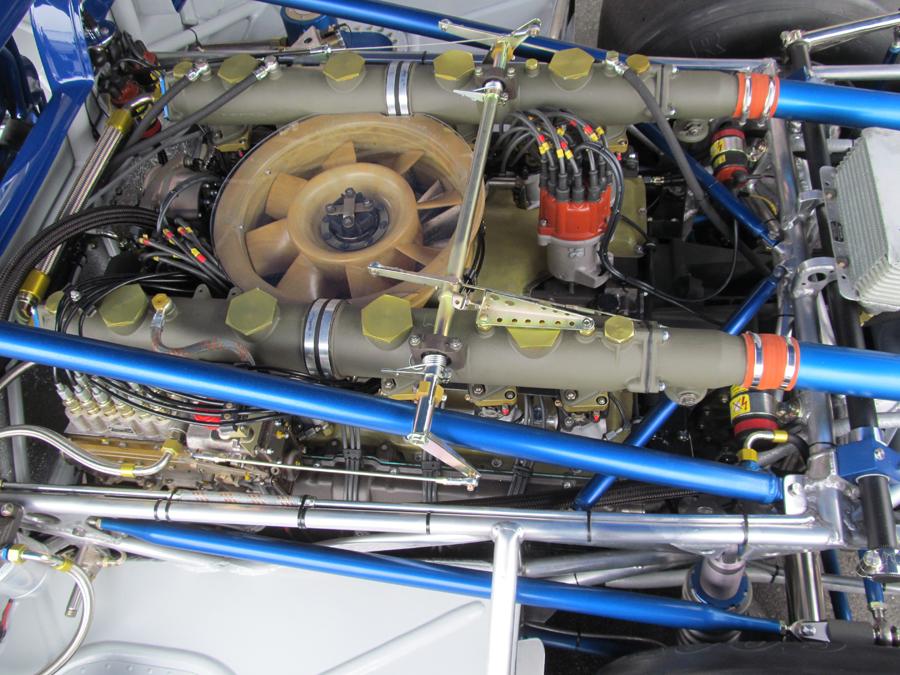
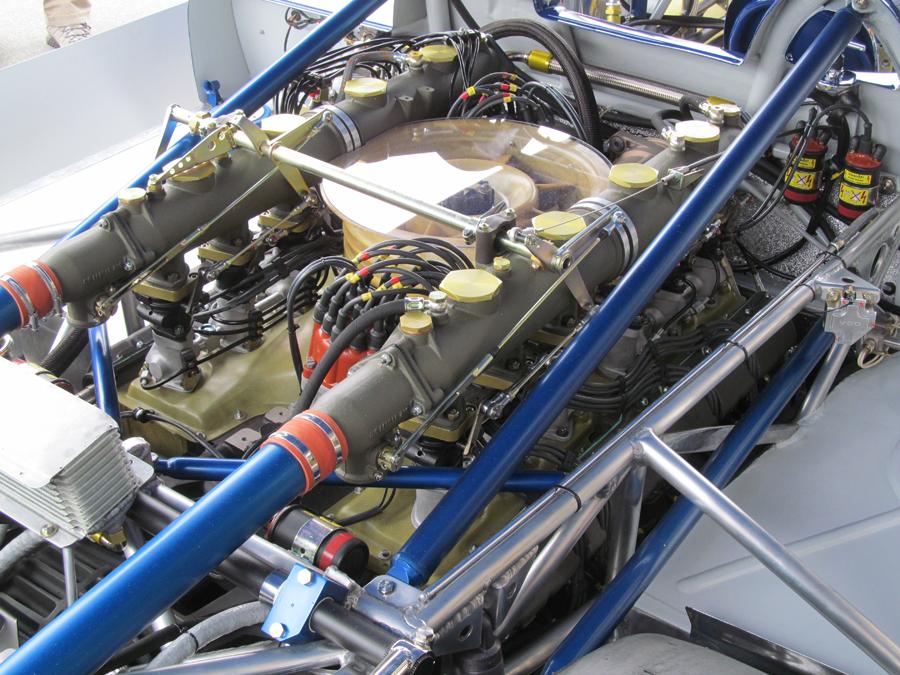
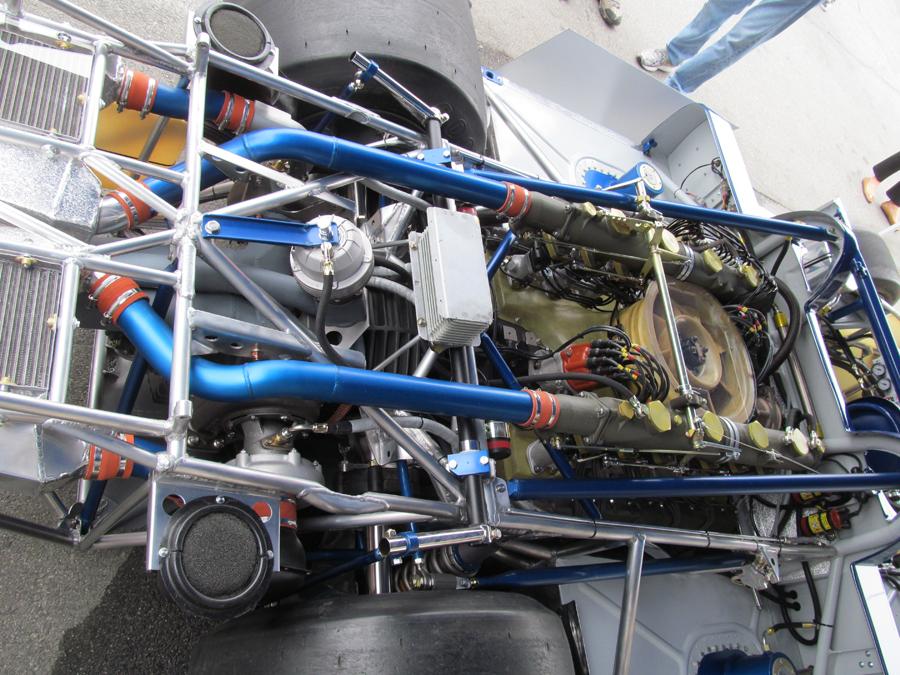
You've got a great start on a daunting build I can't wait to see more. You're a better man than I. I was fortunate enough to see this car with skin removed at the local historic races a few years back. I was so fascinated by the stunning motor that I neglected to take pics of the rest of the car. Hope these will be useful.

-
On 3/6/2021 at 5:04 PM, absmiami said:
Looked again - I think you are using the same density - and I too am a big fan of the late, great Chris Ethel ... got an idea ...
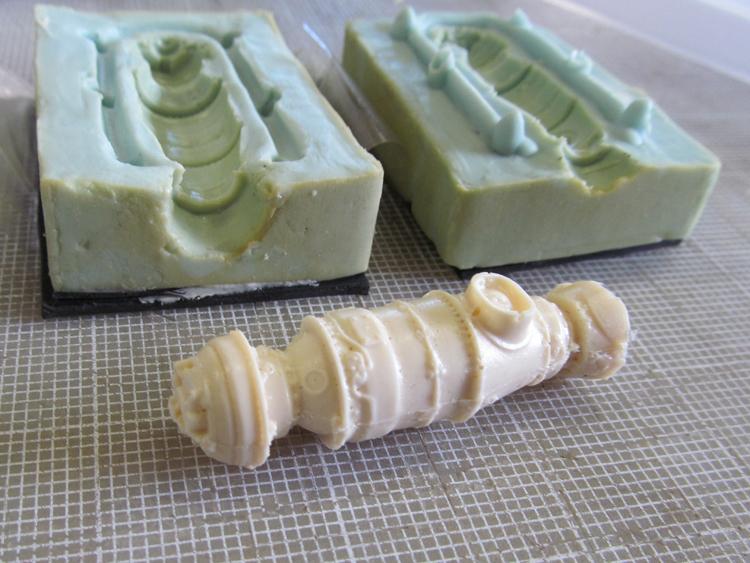
Thanks Andrew. i was wondering about your renshape since it appears to have a dark speckled texture whereas mine is the texture and density of bondo/filler. Mixing up a batch would work for anyone who doesn't have the resources to buy the real thing.
-
Coming along Very Nicely!Yes, the wheels on this kit pretty awful, I wonder how the shapeways would fit the kit tires.
The type 57 you picture is one of my favorite color schemes I even stripped down a Brumm diecast, added fender skirts and repainted it. I think that it could use a little black wash on the bonnet screens like I did with the radiator. Another long lost project is to do the same conversion with the Franklin mint tp.57.
-
Great Detailing! What is the brown product you use for filler blocks?
-
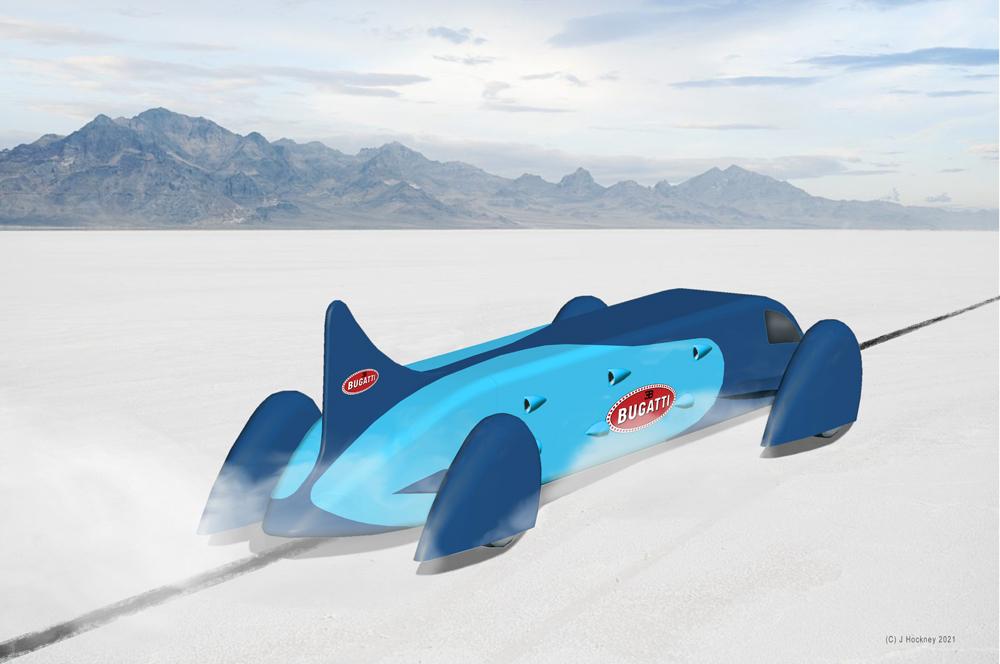
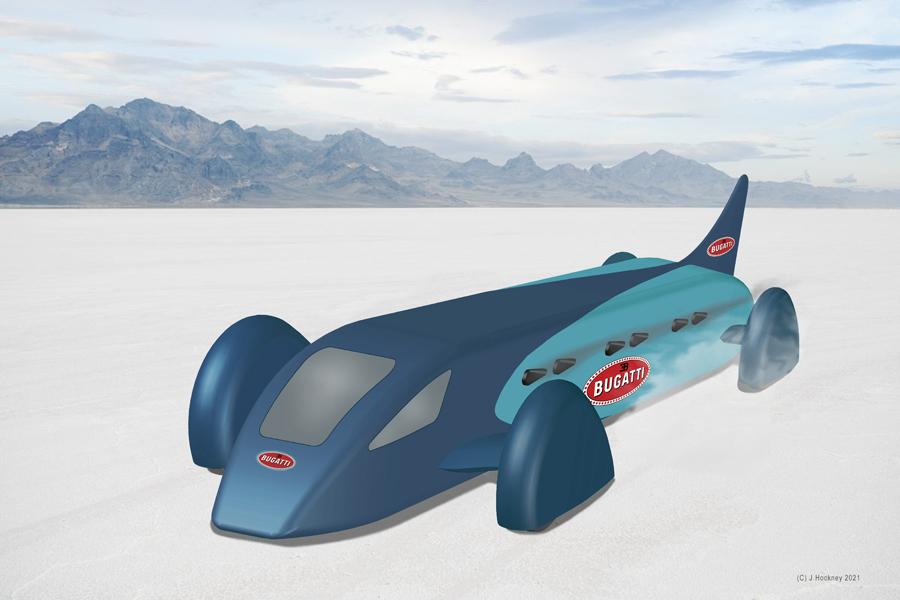
Thank you all for your encouraging comments. Latest rendering 'Going for the record'!
-
With the plethora of T kits out there there is a golden opportunity for a Ford assembly line diorama just crying out to be made.
-
The 1905 Premier racer is on my bucket list, 1911 Marmon Wasp definitely, though it looks like indycals had a limited production run a couple of years back. Spirit of America Sonci 1 in 1/24th though it looks like there was a dicast version but very inaccurate. Barney Oldfield's Golden Submarine. For starters
-
ICM appears to have some interesting 1/24th cars. The brass era guys will like the Paris cab Renault and the Benz Patent
Wagon is pretty delicate in this scale but very exciting kit. -
I believe the line elevations are from MFH site. The company seems to be pretty fanatic about detail. Did you scratch build the H?
-
Better late than never? When I was in search of a P&W turbine to stand alone with a curbside 67 Indy STP car I used the engine form the 68 Lotus, cast the bottom half and with a little 'slice and dice' action was able to get rid of that ugly motor mount.
-
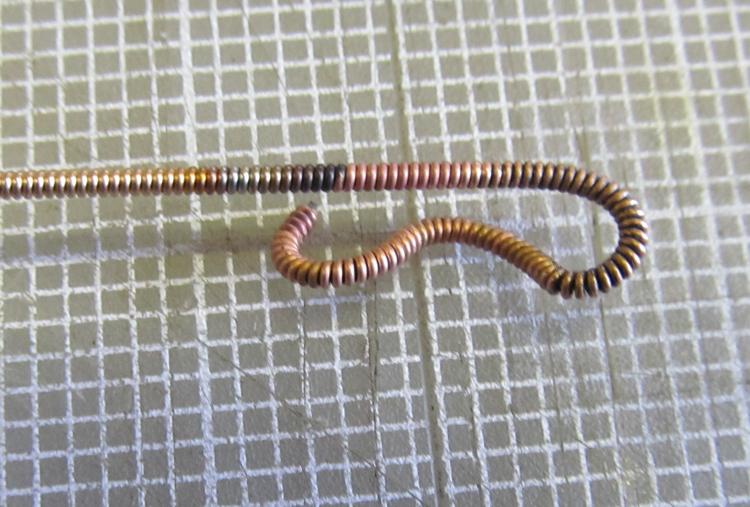
Quick update... I did an annealing test on a section of guitar string and found it quite flexible afterward. Heat the metal to a light orange color and cool it slowly and it will have the flexibility of copper wire. If you don't cool it slowly it gets very brittle. Spring steel does that if it cools rapidly. These are pretty tight bends so the coils open up if you're not careful.
-
That sounds like a daunting task, and not just with the models from what I've seen of your 1:1 shop in the background. At least the models are light weight unlike the acres of books in the old research library. All the best on the move too may it go smoothly and a joyous setup in the new place.
John!
-
WOW! Engines Engines Engines... and an amazing shop! Just like the bosses to be standing around with their hands in their pockets. I am in Awe of the heavy machining equipment. Great work with MDF and balsa. Maybe I missed it but you have an English wheel but I didn't see a sheet metal box break, or tube bender for your headers. I've moved a few shops and it is always nostalgic when the old ones are empty and we reflect on all the great work that went out the door.
Thanks for a very entertaining morning! BJ
-
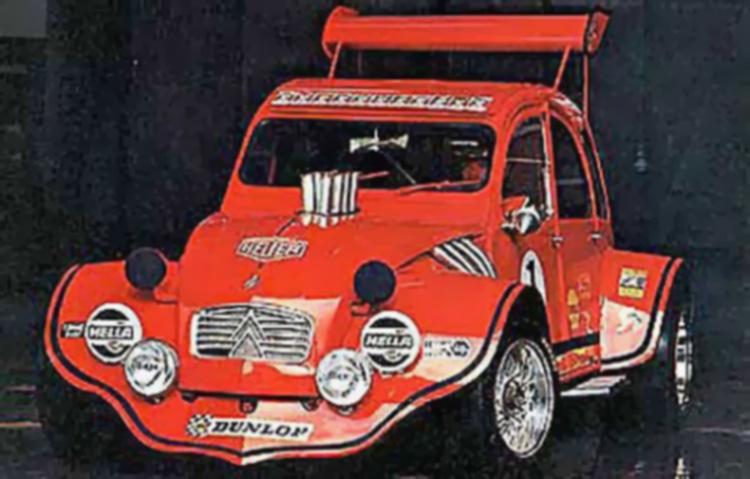
That is totally out there! My other favorite was this V8 version from an old R&T P.S. page. They said it was a Maserati engine in keeping with the Citron norm.
-
 2
2
-
-
And the Roadster has a full frame and tanks. Great jumping off point for a body off project.
-
There are still a quite a few of the Lotus turbine kits for sale on thee bay. Granted they aren't cheep but run between $20 > $45. What would a new issue run you these days?
-
No, sad to say this is going to be a 'curbside' version no engine bays no cockpit. However an engine on frame mock up stand could be done. I was planning a plenum box arrangement built into the frame rail to feed the carbs. The engine is already drawn in 1/24 just need to do the projections... Oh, and build the thing.
At one time I was thinking 1/8 which would come out 7.7" long 4" tall, the 1/24 is only 2.56 x 1.44.
-
Thank you Matt for your beautiful work. One of the most beautiful designs in auto history an one I always look forward to at the historic races. Who's wheels did you use?
-
I was able to get hold of the AMT triple kit with Lotus, Watson, and McClaren. They unfortunately chose to include 2 part plastic tires that are a travesty to Firestone. As I recall the original vinyl weren't much better.
-
Fantastic job Andrew, It has been a delight and learning experience following this build. Did you do one for the Lotus 11 shown in the last shot?
It was always an privilege to get to see Sterling Moss driving his old C types and GP cars at the Laguna Seca Historics over the past 20 yr. that I've attended.
-
I think I've settled on a color scheme...
-
Nah, he has a Delorean man.


Because I don’t have enough Lotus kits. ...
in WIP: Other Racing: Road Racing, Land Speed Racers
Posted · Edited by Big John
And that is why they are in the 'vault'. My focus keeps shifting but I am still adding to my early Indy car kit collection. I've built three of Cris's kits, the Duesenberg, Miller and Frank Lockhart's Stuz Blackhawk. The Miller was the more satisfying build but you cant fault the lines and Chris's work on the Blackhawk. That kit along with the Challenger 1 and Flintstone's Goldenrod set me on the LSR path. I think if I were to build one it would be the Monroe Frontenac.