

bluestringer
-
Posts
2,210 -
Joined
-
Last visited
Content Type
Profiles
Forums
Events
Gallery
Posts posted by bluestringer
-
-
5 hours ago, TransAmMike said:
Very nice job James on a not so great and accurate kit. Great job!!
Thanks Mike.
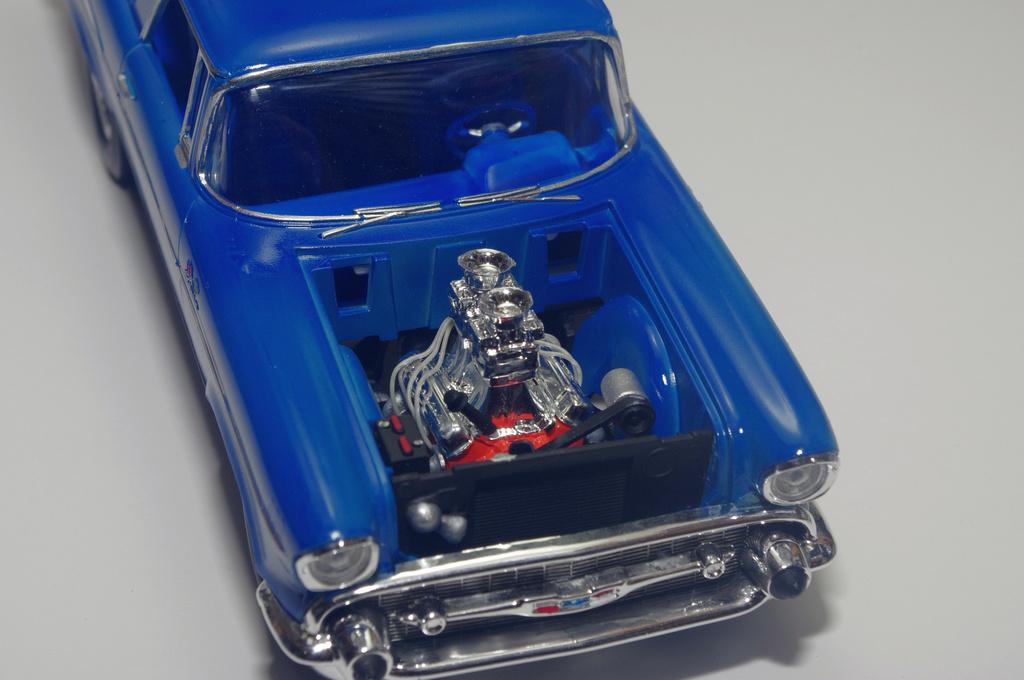
3 hours ago, Zippi said:Pretty kewl looking 57 Nomad James.
Thanks Bob.
2 hours ago, bisc63 said:Nice. As stated, not the easiest kit to deal with, but built to a good standard looks very presentable, as yours is! Love that blue, but do chrome foil the hood's "V' emblem for realism. (please?!)
Thank you. The realism I was going for was since the hood is in primer, the emblem would not be there. What I should have done was sand off the emblem, but the primer covered it pretty well anyway.
-
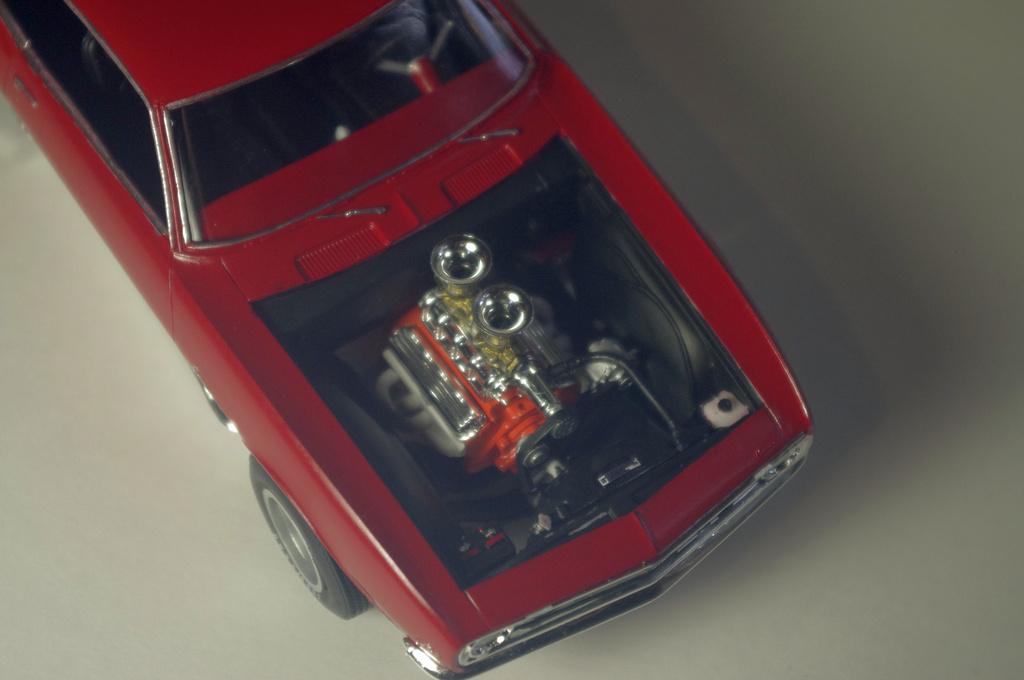
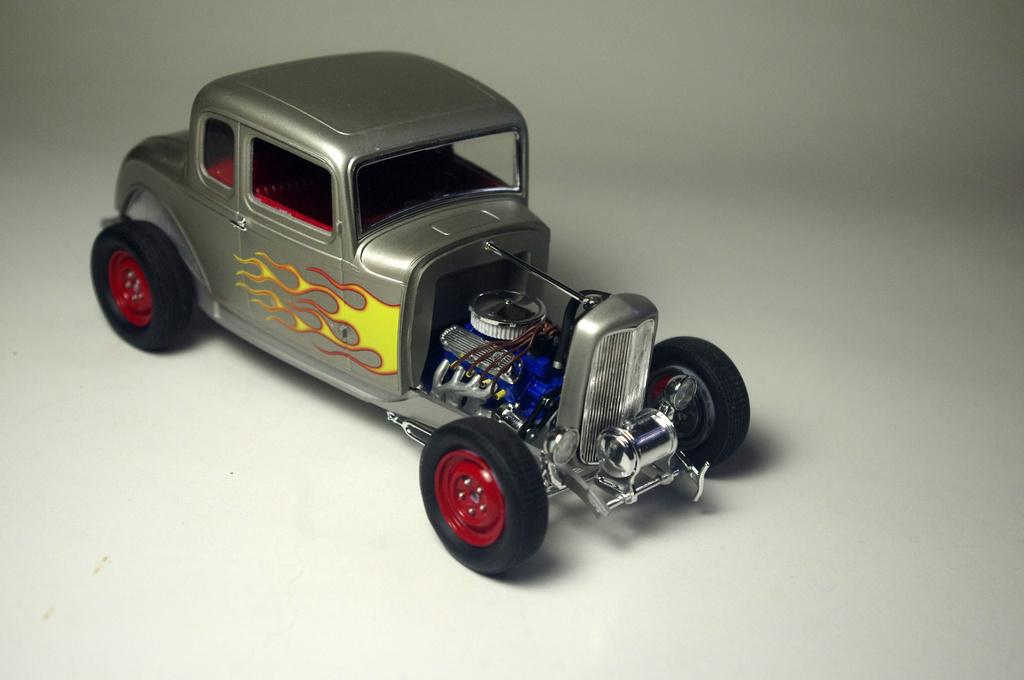
Wasn't sure where to put this. I built it as a street/strip car. Got the slicks on it, ( set of redlines I found in my parts box) but the street tires are in the back so they can be changed out when it's ready to head back on the street. The exhaust is molded into the frame on this kit, and the engine has headers installed. So for the strip I installed some old school cutouts (which I forgot to take a photo of), uncap them by hand at the track, then cap them back up when headed back home. We don't need no stinking electrics. Paint is Tamiya Sky Blue inside and out. I painted the hood separate from the body and could not get the paint to match up with it. So I just stripped it and put the hood in primer only. The chrome side panels I did with BMF, but ran out of it so did the rest of the trim with a molotow pen, so there are some shaky hands warts all over. All comments welcome, thanks for looking.

-
 2
2
-
-
If y'all don't shut up I'm gonna go out of my mind. I might just bust a spring, I'm already off balance.
-
1
-
-
Picked up at HL today.

-
4
-
-
After filming American Graffiti, transportation manager Henry Travers sold Steve’s '58 Impala via a classified ad in the San Francisco Chronicle. A local teenager bought it for $285, and on the way home, the brakes failed, and one of the taillights fell off. The owner kept the car until 2015, when it went to auction and was purchased by NASCAR personality and racing commentator Ray Evernham. Evernham had the car restored to its as-filmed appearance, and the renewed Impala made its public debut at the 2016 SEMA show.
The character Bob Falfa, played by Harrison Ford, drove a '55 Chevy in the film, challenging reigning drag racer Milner. Three black ’55 Chevys were used, including a junkyard find for the crash scene and two others. These cars had previously appeared in the film Two Lane Blacktop. One had a 454-cu.in. V-8 and a Turbo Hydra-Matic 400, while the other was powered by a 427 cu.in. V-8 paired with a Muncie M-22 transmission. During the race scene, the car’s axle broke, and in a second take, the replacement axle broke as well. Only one of the ’55 Chevys remains, and for a time was owned by the same Kansas collector who had the ’32 Deuce coupe. It later went to an owner in Maryland, who restored the car to show condition, though it was extensively changed from its appearance in the film.
In total, some 300 cars were used in filming American Graffiti. Local vintage-car owners were paid $20 to $25 per night (reports vary), plus food, to lend their vehicles to the production.
-
 1
1
-
-
3 hours ago, mikemodeler said:
Says right on the can....up to 4 times faster than other spray primers and 10 inch wide spray. That alone should tell you it is not for plastic models.
15 ounce can of Rustoleum primer from Wal Mart $16
5 ounce can of Mr Surfacer primer from Hobby Lobby $10
One is designed for model cars and works well and the other doesn't. Don't make it hard on yourself.
16 dollars? Dang what walmart is that. Get it at my local walmart for 8 dollars.
-
1
-
-
I've used Rustoleum primer in the past and didn't have problems with it. I've had more problems with the Rustoleum colors, except the Ultra Matte Black and Flat Black which seem to work well. But looking at the primer in question, I would not even try using it because of the fan spray nozzle, that is just too much paint coming out for a small kit body. I tried a couple of Duplicolor primers and had more problems with them than the Rustoleum. But after trying Mr. Hobby Surfacer 1000 primer it is all I use now. Get it at HL, kinda pricey for a small can but can do several bodies with it. I use Tamiya Acrylic colors and really like them.
-
1
-
 1
1
-
-
On 8/5/2024 at 8:54 AM, ChrisR said:
Nice!
Thanks.
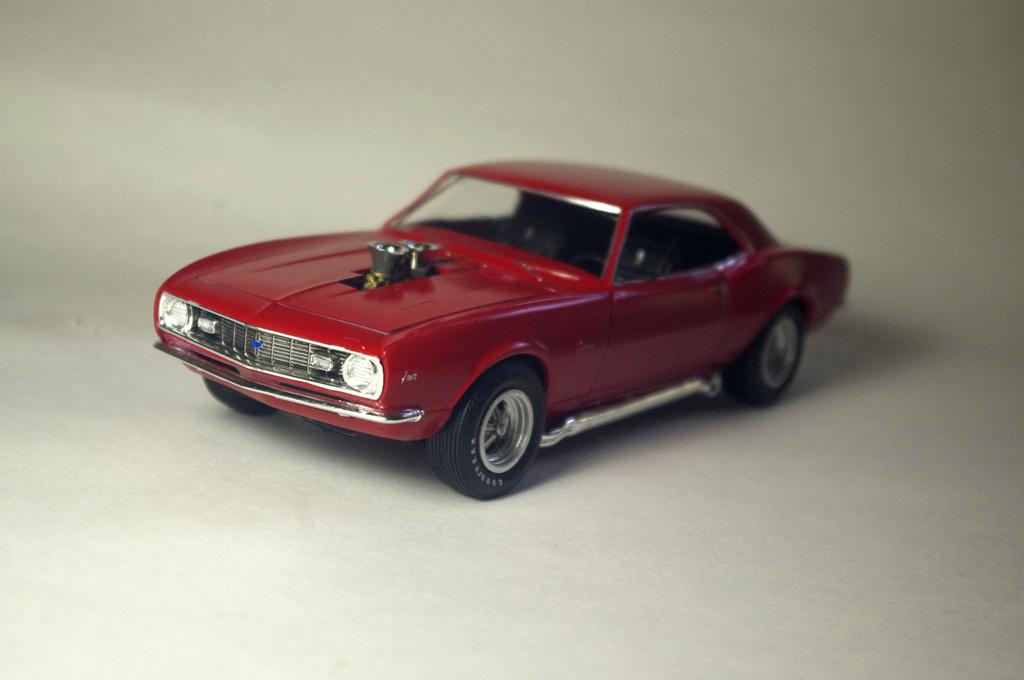
On 8/5/2024 at 9:19 AM, mrm said:Nicely done! I actually like it better without the stripes.
Thanks.
On 8/5/2024 at 9:03 PM, Hodrodz said:Looks great
Thank you.
On 8/6/2024 at 7:58 PM, PappyD340 said:Very nice Camaro!
Thank you.
On 8/7/2024 at 1:50 AM, slusher said:Great looking Camaro, James!
Thanks Carl.
On 8/7/2024 at 1:52 AM, Rattlecan Dan said:Good-looking build. Great little street rod.
Thanks.
-
It's all well and good to take the parts off and take care of the mold lines, etc. I would like to do that and make my models look better, but for some of us holding on to a small part trying to sand on it is very difficult. Not only is it hard to hold on to, my eyesight is not good and even with magnifiers it's hard to see. I paint a lot of the small parts on the tree, and then paint the blemish it leaves when taking it off after I have installed it. My biggest problem is the chrome parts, can't seem to find anything that will match the chrome to cover the mark where it's cut from the tree.
-
1
-
1
-
-
19 hours ago, KWT said:
Very nicely done. The red suits it well
Thanks.
16 hours ago, espo said:Great looking OOB build. The paint looks great and clean looking trim.
Thanks David.
13 hours ago, TransAmMike said:Very cool James, great job👍
Thanks Mike.
11 hours ago, Zippi said:That's a rock solid build right there James. Nicely done.
Thanks Bob.
3 hours ago, XYHARRY said:Very nice Camaro there James, the stripe delete looks right on this as it's more a street machine anyway. Well done and the smoke on the wheels works well.
Cheers,
David. 😎👍
Thanks David.
-
Ok kit. Had my usual problems, but mostly my fault. Tamiya Red Acrylic on the body, with Createx Gloss. Rustoleum spray can black on the interior. The chrome wheels were toned down a bit with Tamiya Smoke. Out of box build, not much detailing expect for a little paint added here and there. Trim was done with Molotow pen. I messed up the stripe decals, so just decided to go without the stripes that are seen on these, but I think it looks ok. All comments welcome, thanks for looking.
-
6
-
-
I have a used Paasche H I've had for over a year and still works fine. It's a simple rugged airbrush, (single action). They are several on ebay at reasonable prices, and parts are available for them.
-
Sweet looking GTO carl. Love the color.
-
Nice work Michelle. Looks good.
-
Fine looking Chevelle carl. Nice work.
-
That is a fine looking 55 Mike.
-
Several ways to do it. If I take the photos with my phone I just use the same cord I charge the phone with to transfer the photos to my desktop. Most desktops and laptops have a USB port on the front or side. Just plug in your phone there, it will ask you if you want to access files, choose it. Transfer the files from the camera folder onto the computer, it may ask you where you want to put them, I place them on the desktop for easy access when I add them to a post. If I use my digital camera I take the SD card out and put in a USB card reader, (can be purchased for wally world) you can use the same USB port on the front or side of your computer. A box will pop up showing your files, transfer them to the computer. Once you have them on the computer, make your post, click choose files at the bottom. Your file explorer will pop up, choose where you put the files, (mine are on the desktop) choose the files you want to upload and they will be put in the post.
-
Radretireddad.............those are some good looking builds. And don't take this wrong, but you should start your own thread for your builds, you will get more looks and comments that way as it will not get confused with the other builds.
-
21 hours ago, Zippi said:
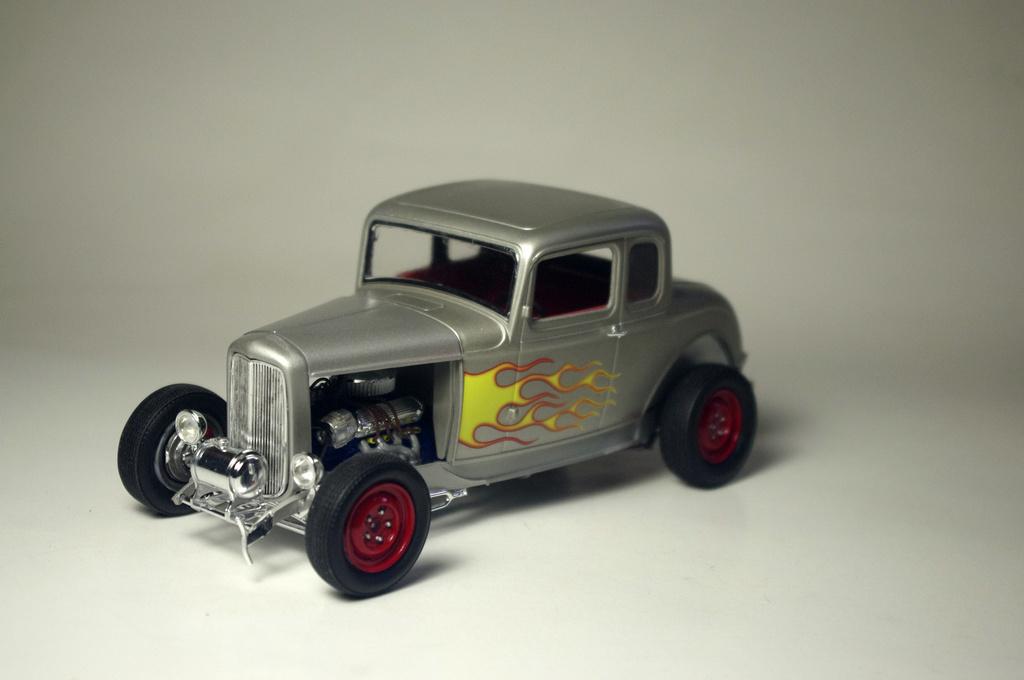
Got looking Hot Rod James. That nerf bar will show up when you least expect it.
Thanks Bob.
20 hours ago, jdhog said:Love the color scheme. Looks like a hot rod.
Thanks
20 hours ago, espo said:Great looking paint color and finish, the flames add to the look as well. Like how you detailed the chassis and interior. The open painted wheels look good here.
Thanks David.
17 hours ago, PappyD340 said:Awesome hot rod there James, well done!
Thanks.
4 hours ago, XYHARRY said:Cool hotrod there James, well done.
Cheers,
David. 😎👍
Thanks David.
3 hours ago, ChrisR said:NICE!
Thank you.
55 minutes ago, ncbuckeye67 said:Nice looking build there, sir! I especially love to see a Ford engine in it.
Thank you.
44 minutes ago, Phildaupho said:Great looking Deuce builds.
Thanks.
43 minutes ago, thatz4u said:reminds me of Hot Rods I saw in my mis-spent youth, well done
Thank you.
-
2 hours ago, rrb124@sbcglobal.net said:
Liking the color and details in the engine bay. Red wheels make it look fast.
Thanks.
1 hour ago, Jim B said:Cool looking hot rod.
Thanks.
59 minutes ago, Ulf said:Nice, can I be a little curious and ask if you use any primer before Tamiya's acrylic colors?
Thanks. Yes I use Mr. Hobby Surfacer 1000, buy it at Hobby Lobby. I thin the Tamiya Acrylic with generic lacquer thinner.
-
Calling it done.
-
Revell 32 Ford 5 window kit. Paint is Tamiya Titanium Silver and Tamiya Red. Floor polish clear coat. I think the combo looks pretty good. No problems with the kit except for my fumbling fingers messing up stuff. I was missing some parts from the kit, so I got some from ebay and some others from the parts box. I noticed while taking the photos I had lost one of the front nerf bars, I'll need to look for it, but probably will not find it. All comments welcome, thanks for looking.
-
7
-
-
2 hours ago, TNT said:
Looking good. Did not get a garden out this year, i am going to miss fried green tomatoes.
Thanks. It was good with a plate of white acre peas, cornbread, and cucumbers.
10 minutes ago, Zippi said:The 32 is coming together and looking pretty nice James.
Thanks Bob.
-
I used the Elmers white glue method on this 56 Chevy. Painted it first with a brown, then dabbed on the glue and painted over it with the green. Then wash the Elmers off with a toothbrush and water.
-
3
-


Buyer beware
in Tips, Tricks, and Tutorials
Posted
I've taken the little bottles of Testors gloss enamel, poured the contents into a 1oz. bottle, then filled the testors with walmart lacquer thinner, shake well, pour that into the 1oz. bottle with the paint, shake well. It produces a nice gloss finish.