70 Sting
-
Posts
1,369 -
Joined
-
Last visited
Content Type
Profiles
Forums
Events
Gallery
Everything posted by 70 Sting
-
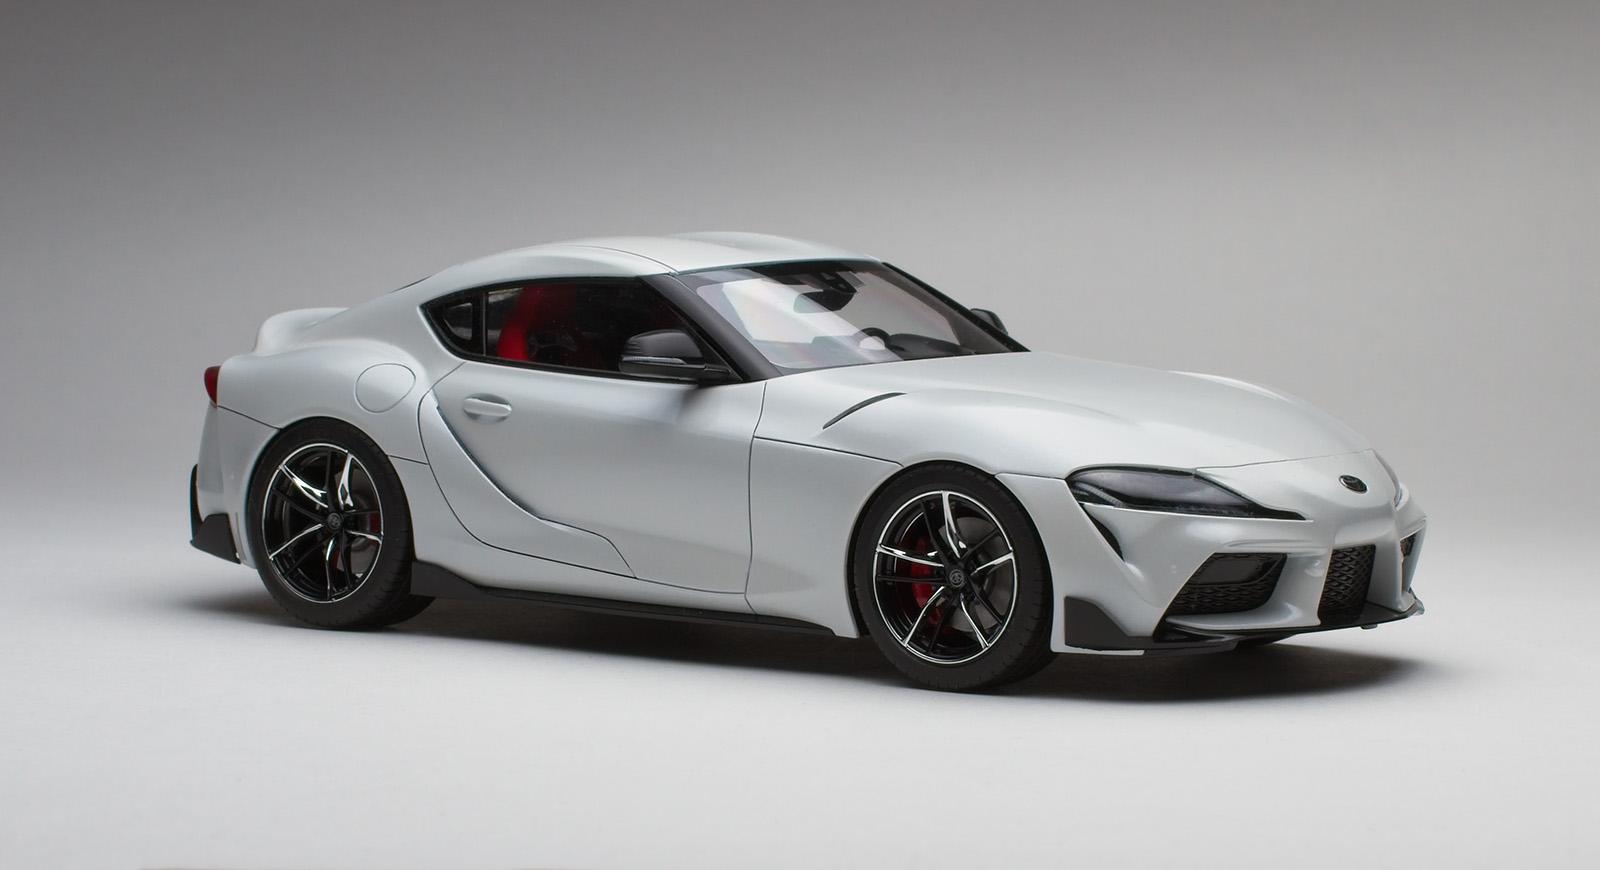
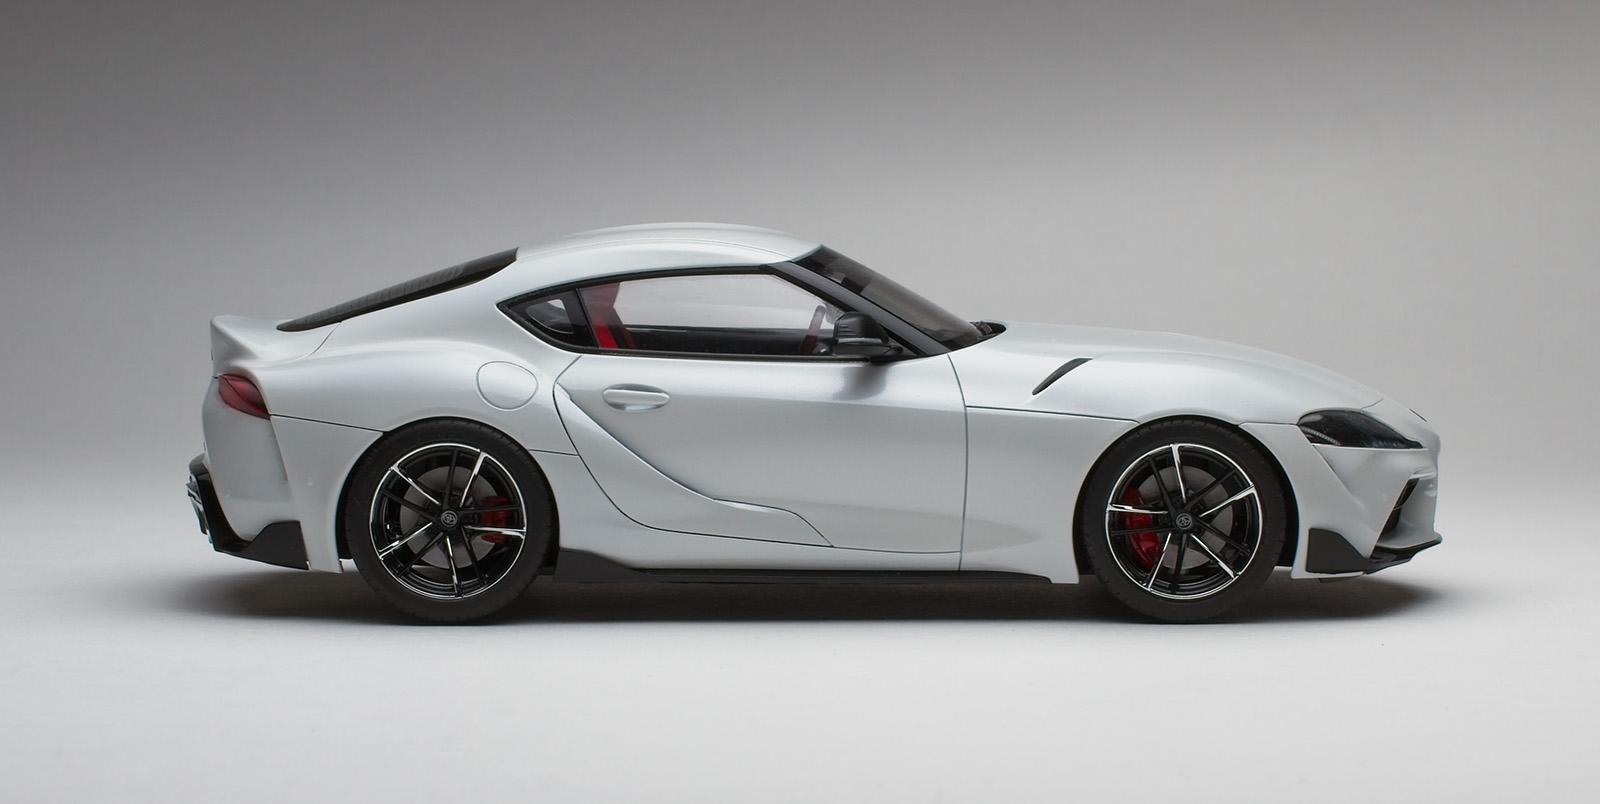
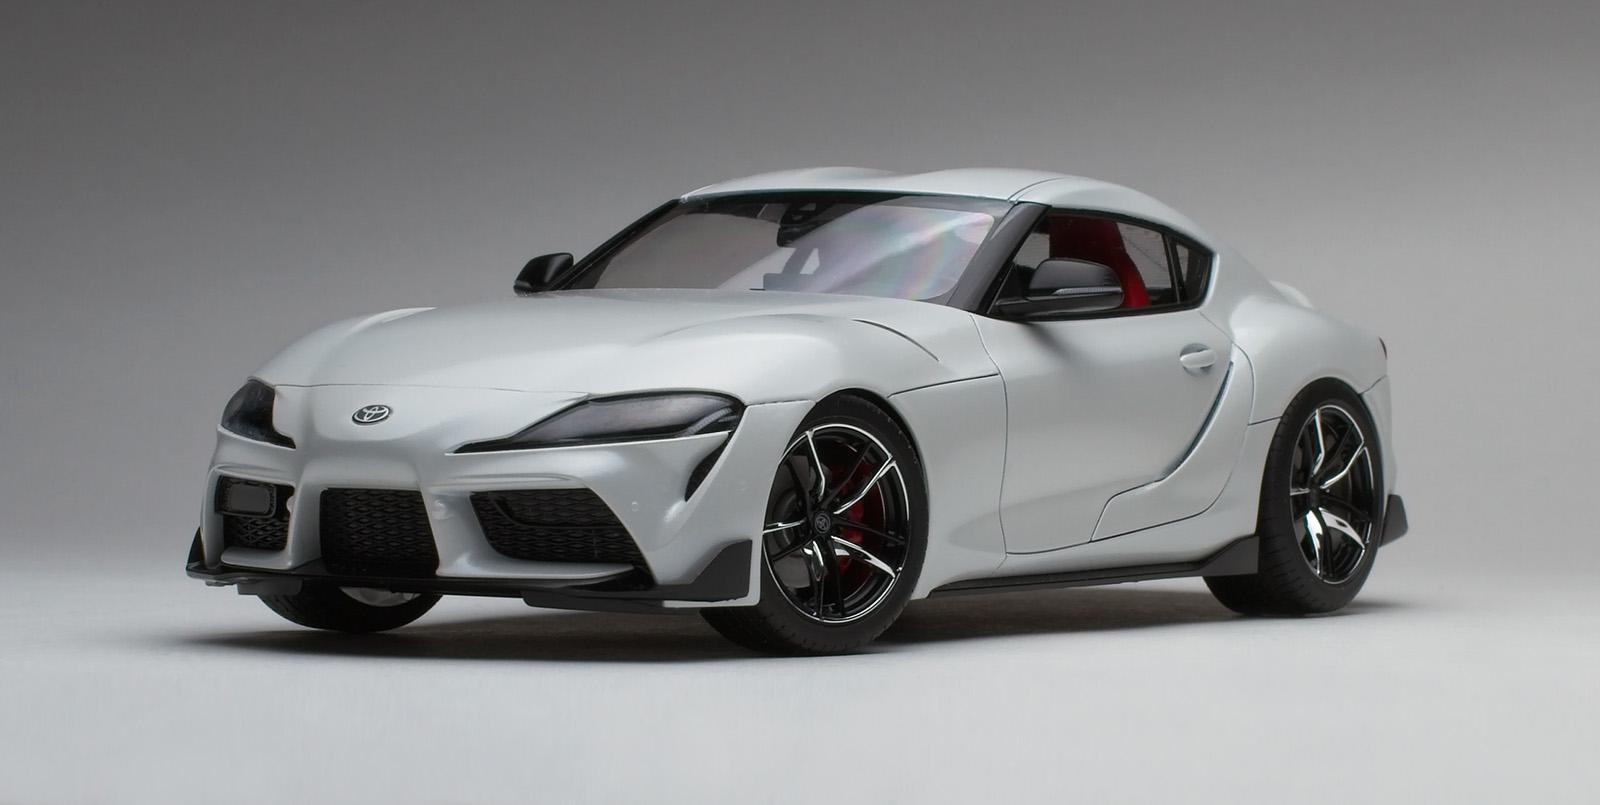
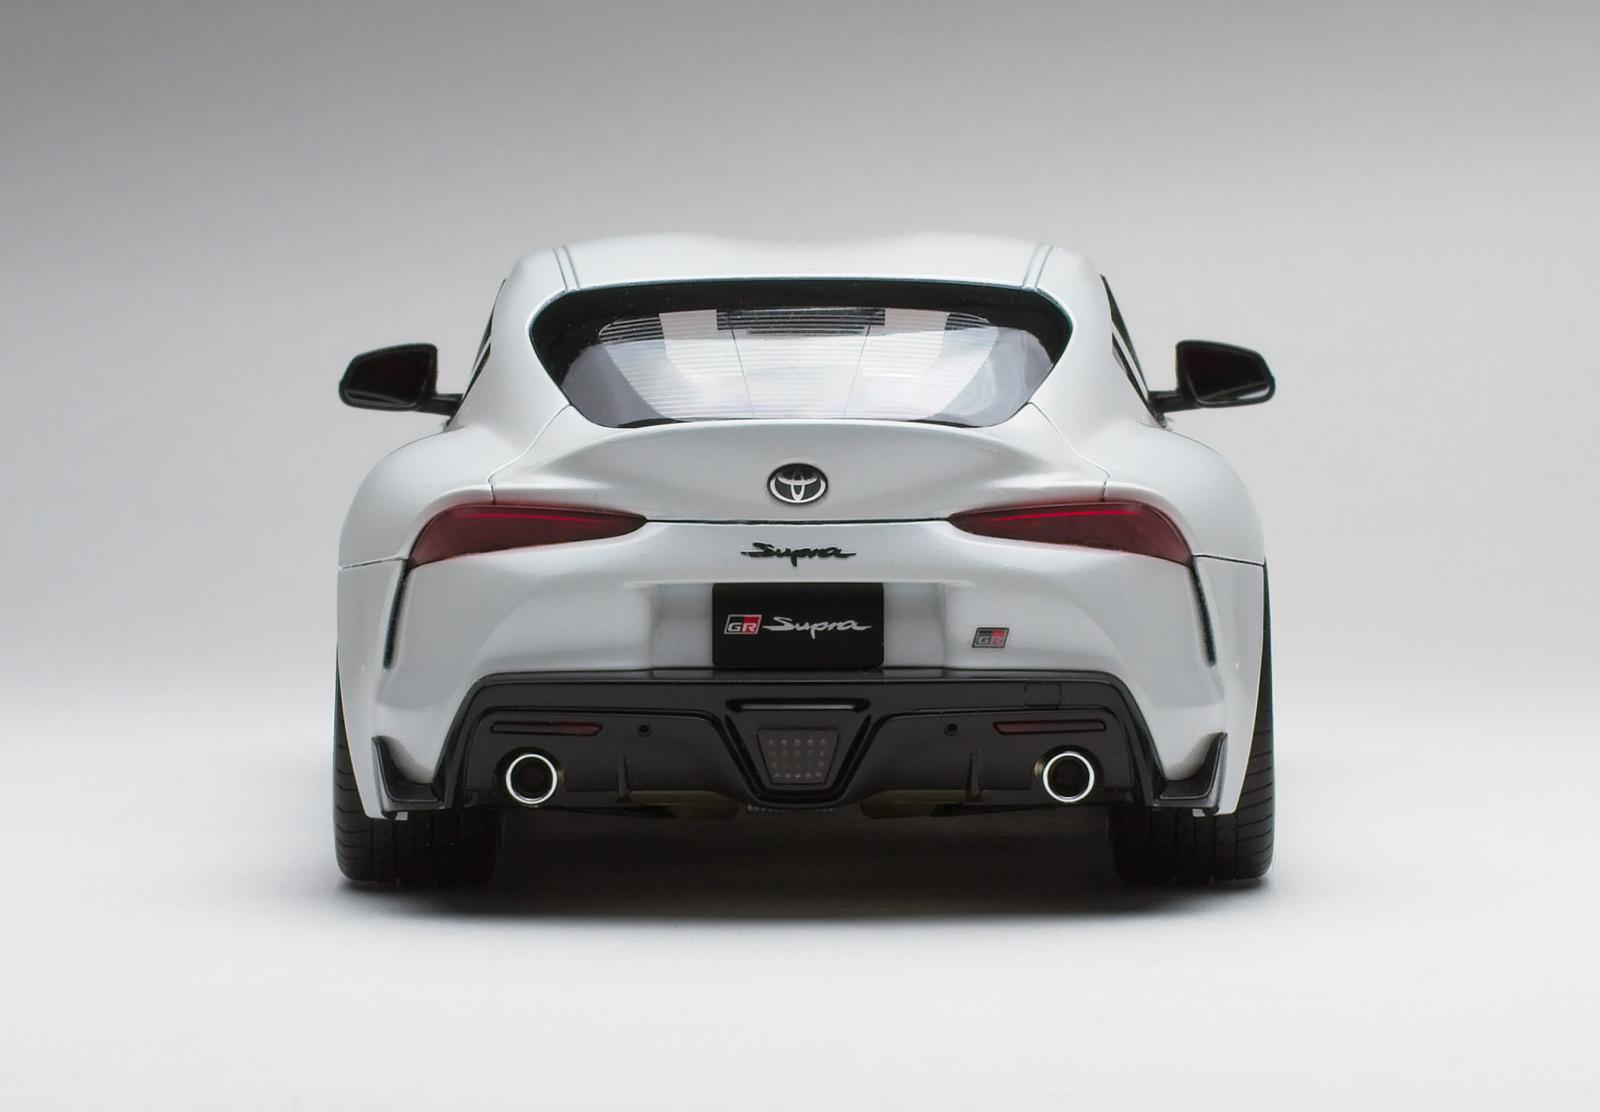
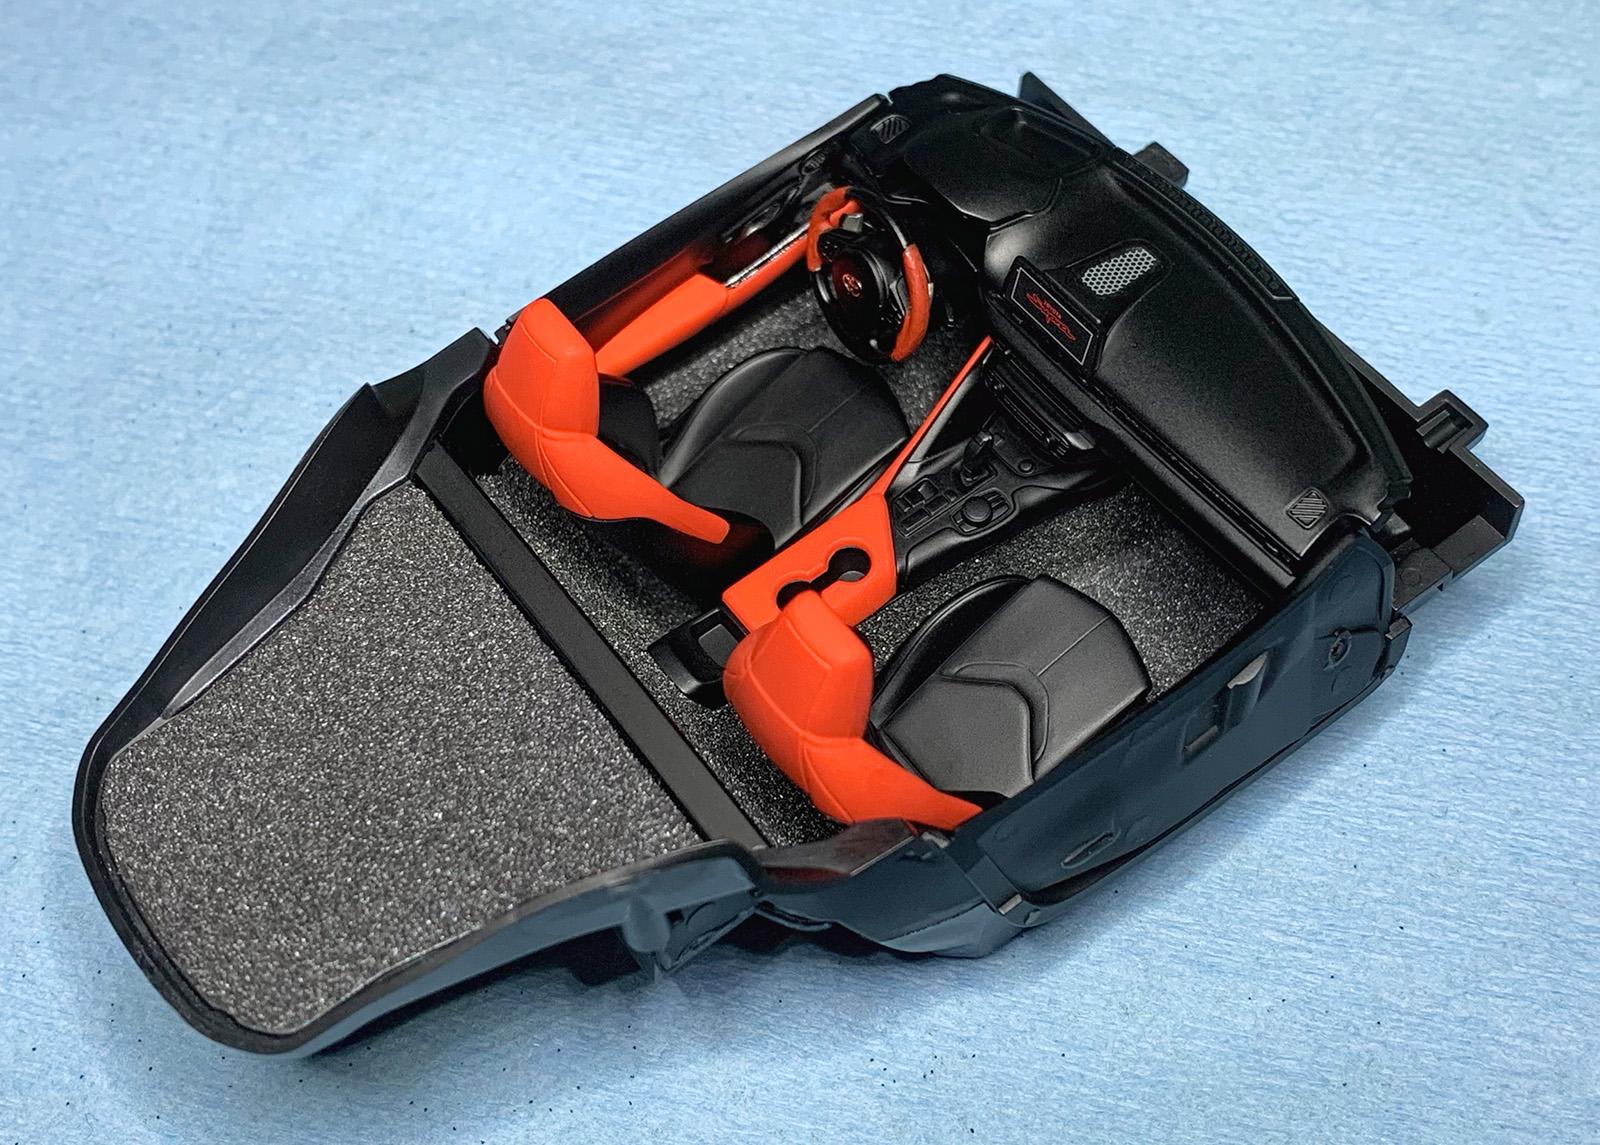
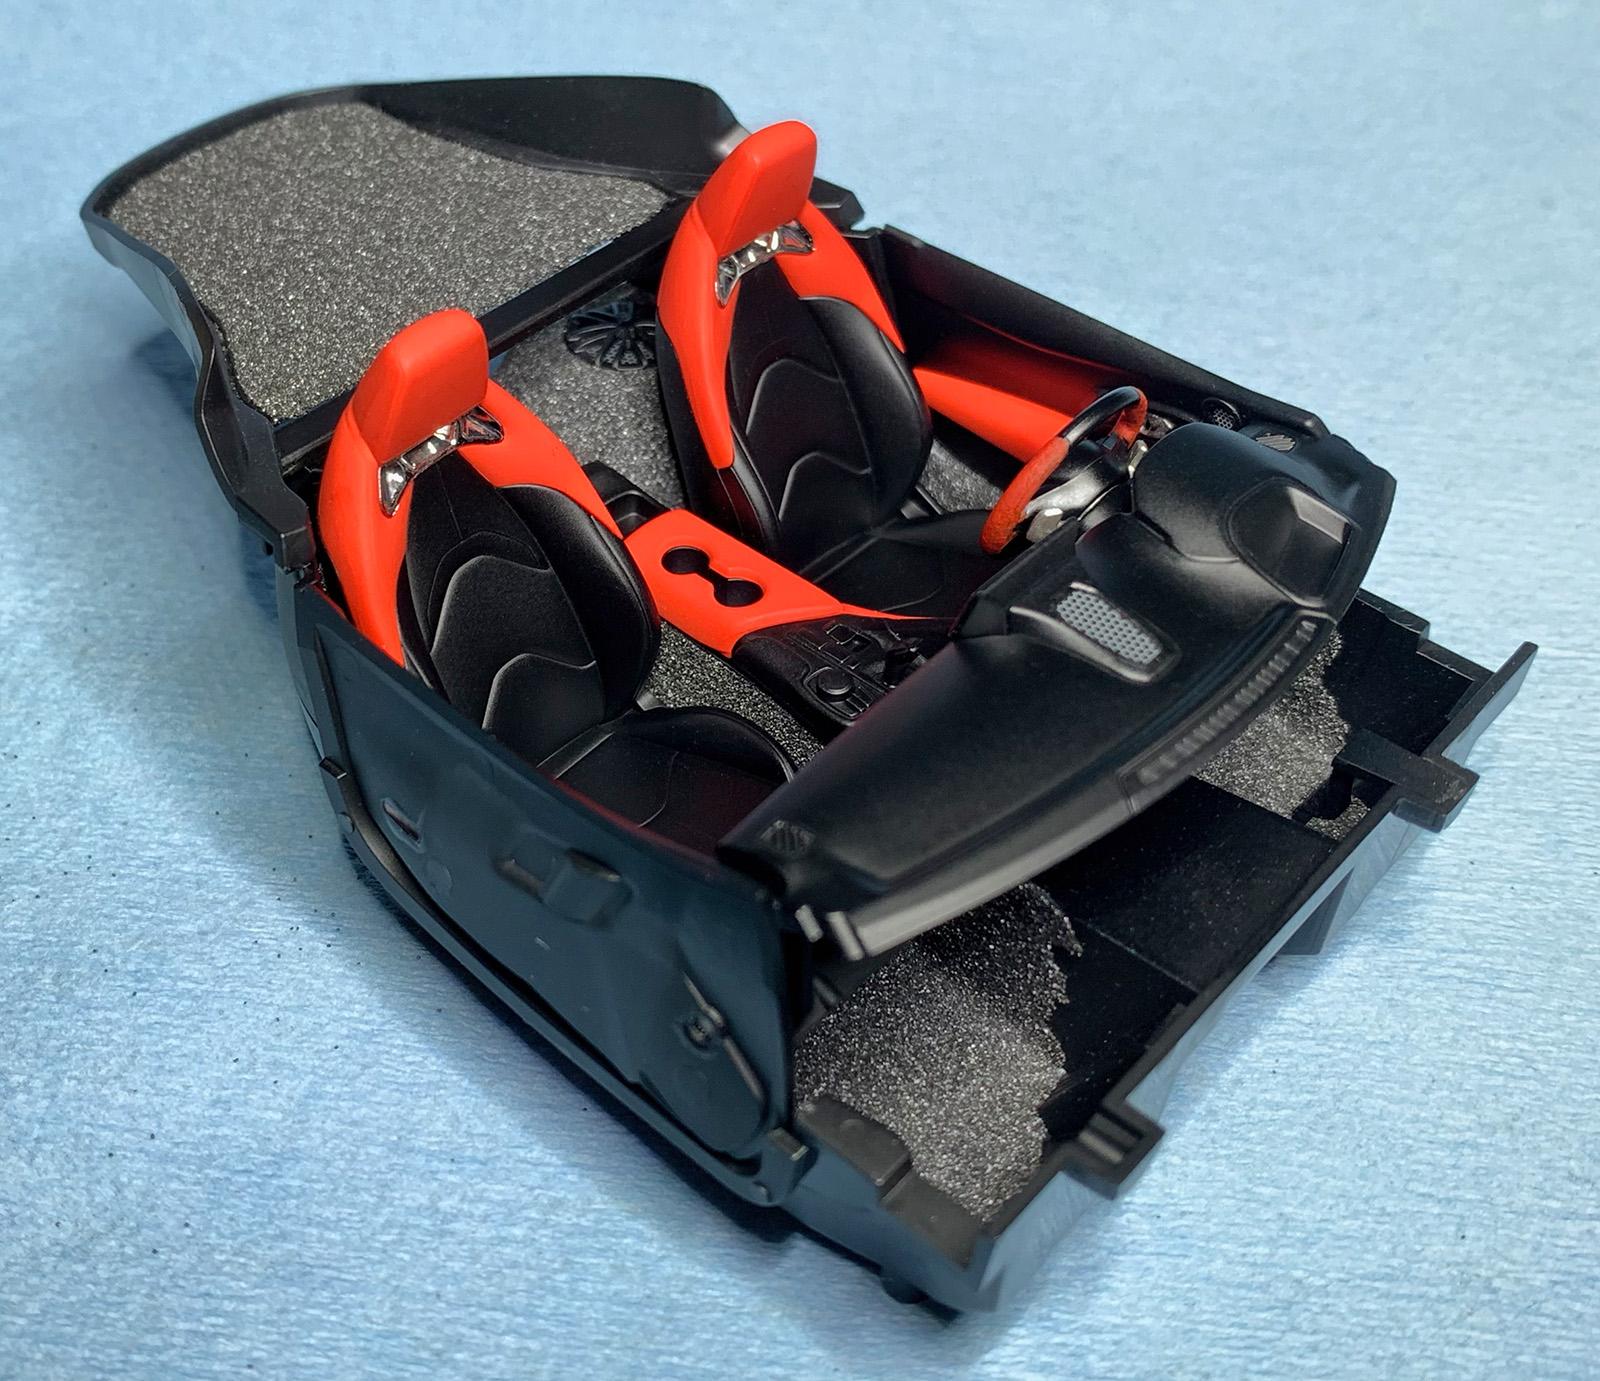
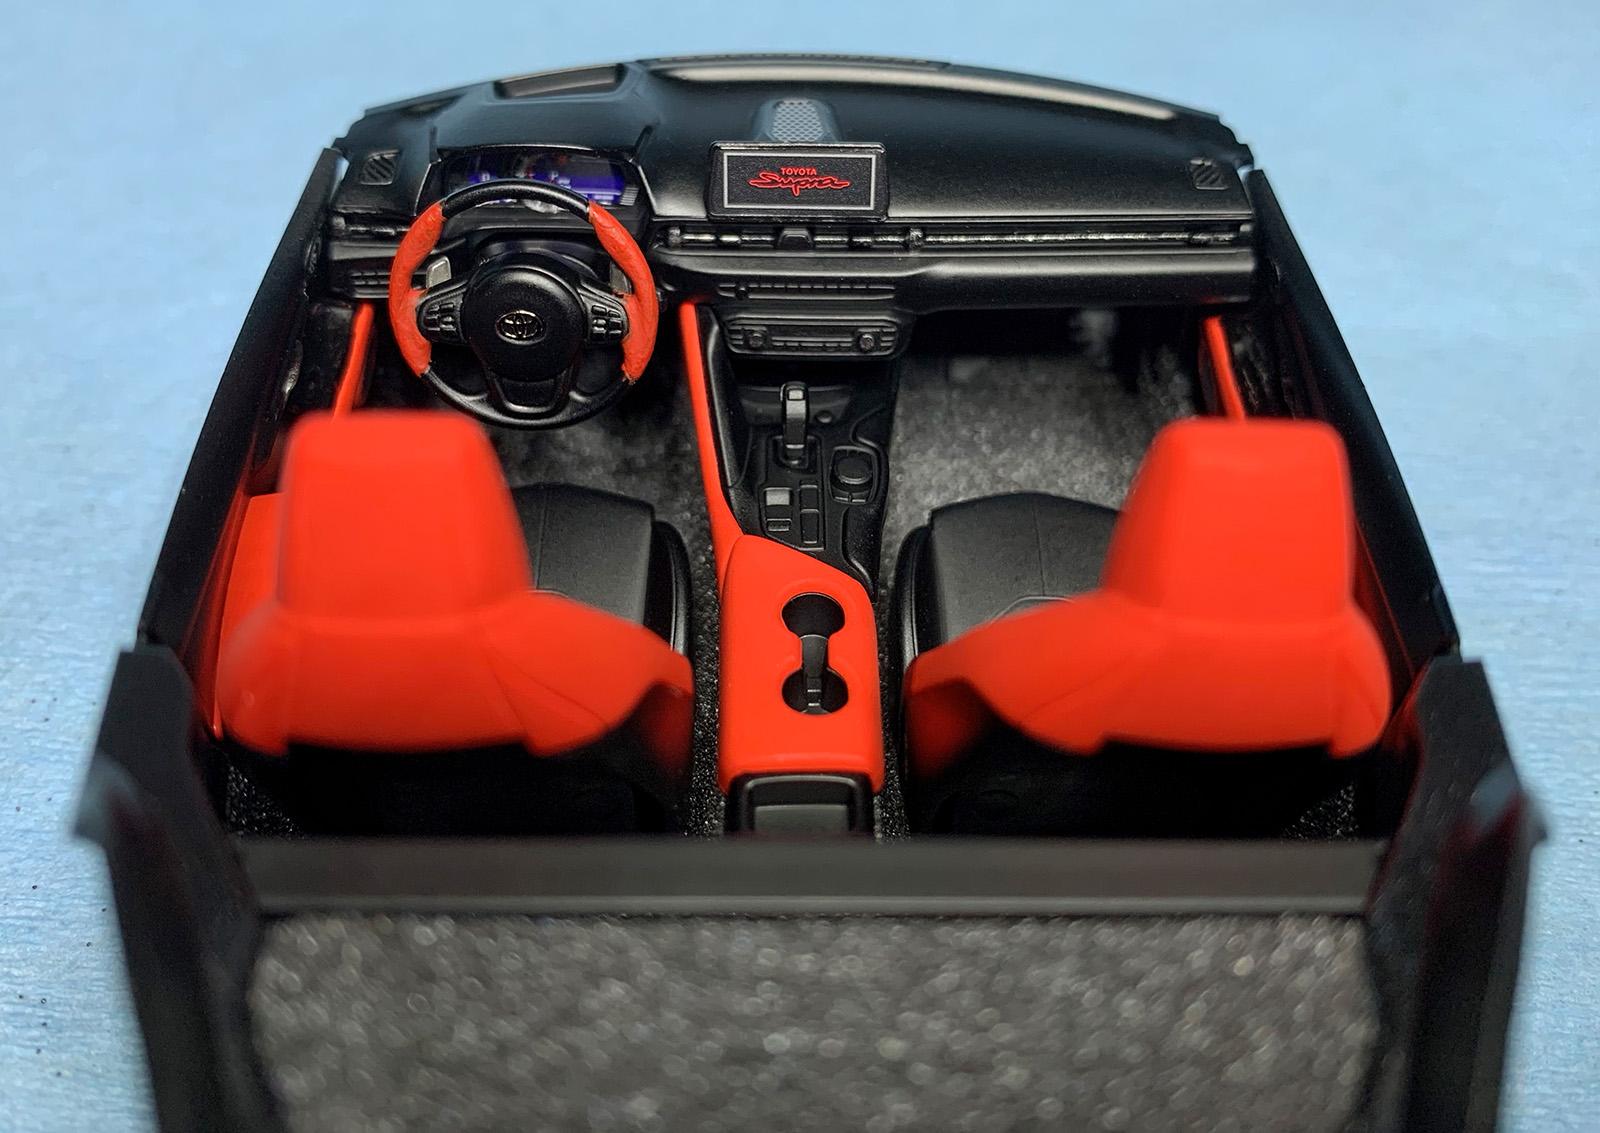
Good Evening, This was my first Tamiya kit... I now know why people rave about the quality of their kits. Pretty sure you could toss the kit into a bag and the parts would fall together. There was no engine and some tiny parts that could probably have been moulded as one but overall a pleasure to build. Great window masks were included - a first for me. The body was primed with decanted Mr. Finishing Surfacer 1500 Black and painted with decanted Tamiya TS-45 Pearl White. The TS-45 took several coats but never really covered that well so I decided to apply 2 coats of Tamiya LP-43 Pearl White and sealed it with decanted Tamiya TS-65 Pearl Clear. I did not use primer on the interior. The colours are Tamiya X-18 Semi Gloss Black and XF-7 Flat Red. I used Ranger gun metal embossing powder for the carpeting. Of course it wouldn't be a build if I didn't make a couple mistakes along the way. What I learned from this build: 1. I turned a tiny dust speck into a bigger boo-boo and had to strip the paint. Oven cleaner worked okay but brake fluid seemed to work better. Thanks for the tips I read here on the forum. ? 2. This was my first time using Tamiya's LP lacquer paint. It sprayed nicely thinned 1:1 with Mr. Levelling Thinner and I would choose their LP over acrylic for car bodies every time. 3. Not sure about colour similarity between their TS and LP line. Tamiya's Lacquer Compatibility Chart says TS-45 and LP-43 are the same but the LP-43 looked warmer to me. 4. I used a heavier application of white glue with the embossing powder which worked well. 5. The decals seemed a little thicker and less sticky. Had to use multiple applications of decal solution to make them stick and conform. Merry Christmas & Happy New Year! ?

-
Love 'em all. ?
-
Love 'em all. ?
-
Well worth the 365 days!
-
@Bills72sj That’s very kind of you. ? Agreed, the box art does nothing to sell the kit. I only became aware of it through a prolific YouTube builder. With regards to the front wheels, I’m wondering if the trademark front wheel humps of the C3 Corvette make them look smaller?
-
Totally worth the wait and effort (manicure)?.
-
Wow! She’s a beauty. Awesome interior and great outside finish. ?
-
Excellent techniques!
-
Huge C3 fan. Your ‘69 looks great!
-
Me likes! I've thought about purchasing this kit a few times but haven't pulled the trigger on it yet. Seeing your build is making me rethink that decision.
-
@magicmustang Hey that's cool ?. Please keep me posted, I'd love to know how you find the build and see the final result. @Ace-Garageguy I've heard good things about something called Milliput but have not looked into it.
-
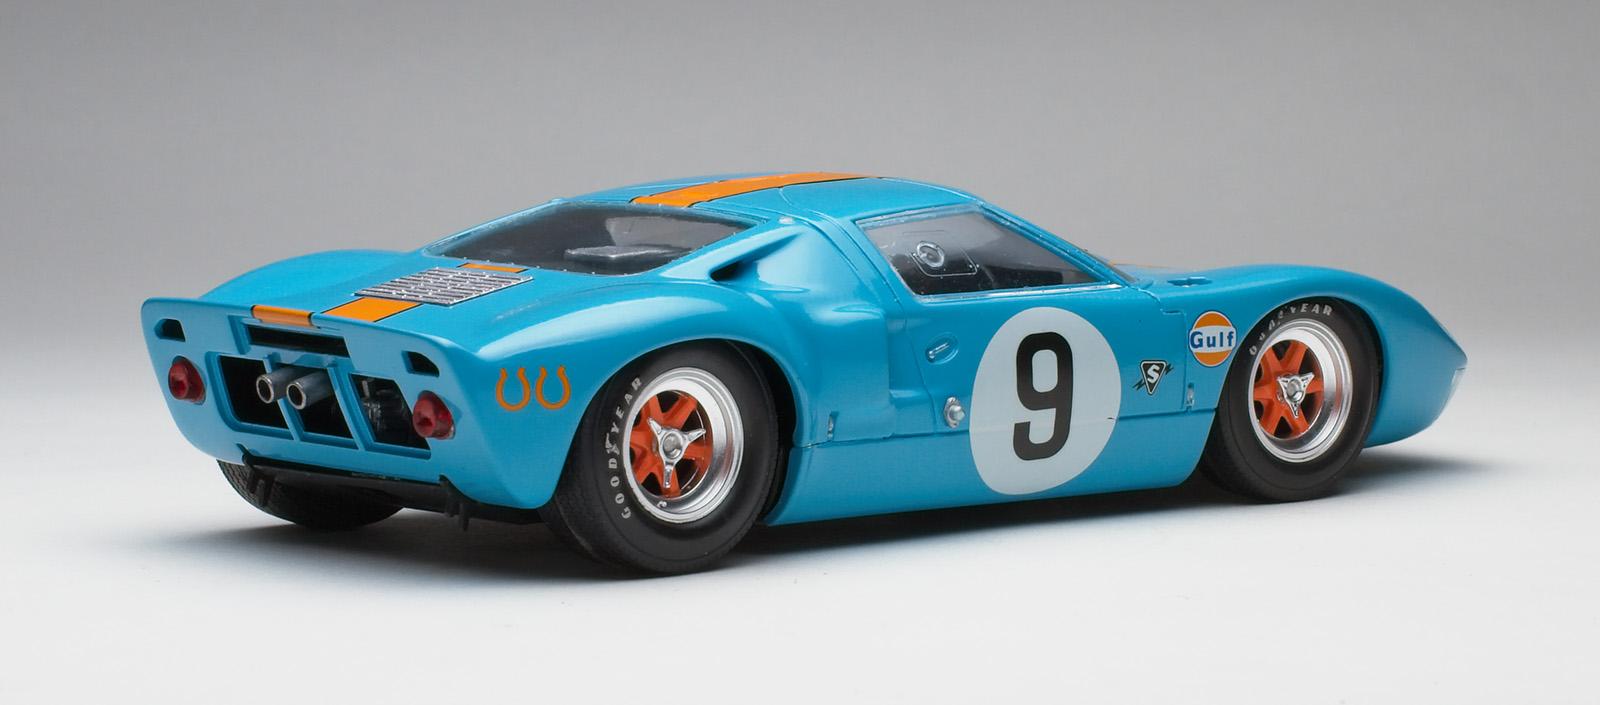
Hey @Claude Thibodeau I'm a recent returnee to the hobby where so much is new to me now, that I can't speak comparatively about its use and quality vs other brands. What I can say about Tamiya Putty is that it seems to shrink a bit when it dries, however it hasn't been an issue after a second application. I treat it like using drywall mud/compound: apply just enough to fill the gap plus a little extra to compensate for shrinkage - but not too much to avoid a lot of extra sanding. I find that putting the part in a dehydrator really helps as well. For bigger gaps I would use Tamiya 'Epoxy' Putty and finish it with the regular putty. As for long term shrinkage, I built this Ford GT40 several months ago where I had to fill in the entire rear seam like on the Stingaree and there are no signs of cracks or shrinking.
-
Thanks for the comments, fellas. The box art is pretty weak. The frame was kinda finicky and difficult to keep aligned. Not sure I'd build one again, but it was certainly a good learning experience. I'm going to build my first Tamiya kit next. I hear they practically build themselves. ?
-
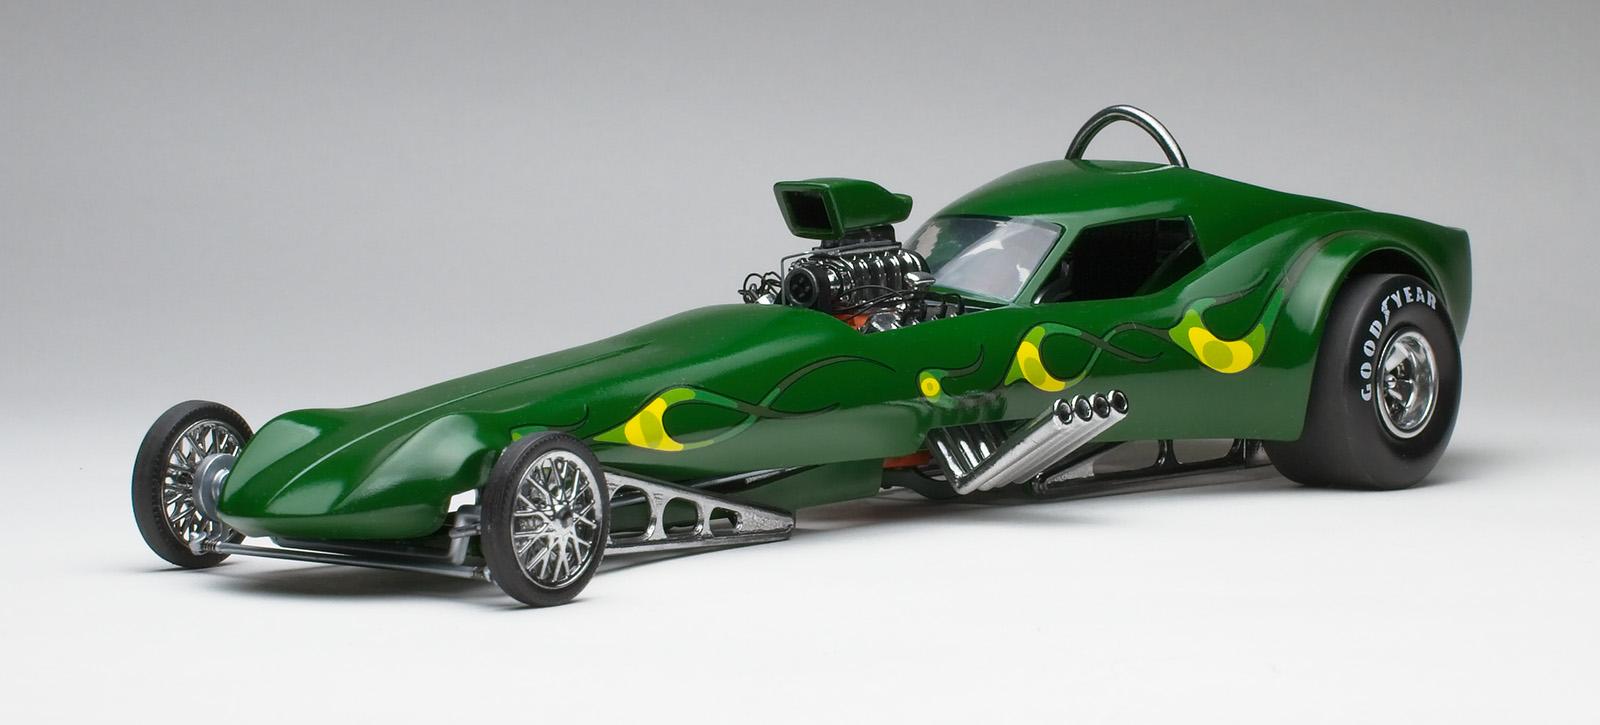
Good Evening, Not my normal cup of tea, however, being a Corvette fan I thought why not? I photographed the completed Stingaree this evening and thought I'd share my thoughts. The body was painted with decanted Tamiya FS Primer White, decanted Tamiya TS-43 Racing Green and clear coated with decanted Tamiya X-13. Some of the chassis was painted with AK Xtreme Metal White Aluminum and the chrome parts were stripped and painted with AK Xtreme Metal Chrome. All aluminum and chrome parts were base coated with AK's Black Base (yucky). What I learned from this build: 1. The body comes in 7 parts which fit together with obvious seams. Got lots of practice using Tamiya Putty. 2. There's some sort of warp in the frame. I've seen alignment issues with other builds. 3. I think I have been thinning the primer too much (1:1 with lacquer thinner) as it doesn't fill little scratches like it does straight from the can. 4. First time I decanted TS colour paint - I think I need to change the ratio (4:1 with Tamiya Lacquer Thinner Retarder type) or be more patient and apply multiple light coats and slowly build the colour. 5. First time using TS-13 Clear - also thinned 4:1. It did not burn the decals (I've read horror stories on the forums). Applied a couple mist coats first then 2 wet coats. 6. Decals were very brittle and broke in multiple places. Lined them up as best I could but the seams can definitely be seen. 7. Must remember to wipe off excess decal setting solution. It left spots that would not come off with water and or isopropyl and a cotton swab. Luckily the clear covered most of it. 8. Tried making my own fuel line with heated and stretched sprue. 9. Used a commercially available distributor and battery wires. So tiny... need the patience of a saint. Thanks for reading ?
-
I appreciate that MikeyB08. I've made a return to the hobby after 35 years due to covid. Back then, I never painted a kit for fear of ruining it and only used Testors tube glue - didn't know anything else existed. Internet Forums and Youtube have opened my eyes to all the possibilities. I'm determined to try new techniques every time because I have many years of catching up to do. ?
-
I actually used Tamiya glue to set a stubborn dashboard decal on a Miura because I didn't have decal solution with me at the time... it worked, you just can't touch it. Good spot on the callipers, I hadn't notice that. Wondering if that was a manufacturing mistake as the wheels attach to the axel with half circle connections i.e. they can only be rotated in 180˚ positions. I suppose I could have drilled out the other half circle and oriented it correctly (or pretend I didn't read your comment ?). The biggest drawback with X-22 seems to be the drying time from what I've read on the net. Had a problem with the Miura but it dried nicely on this one.
-
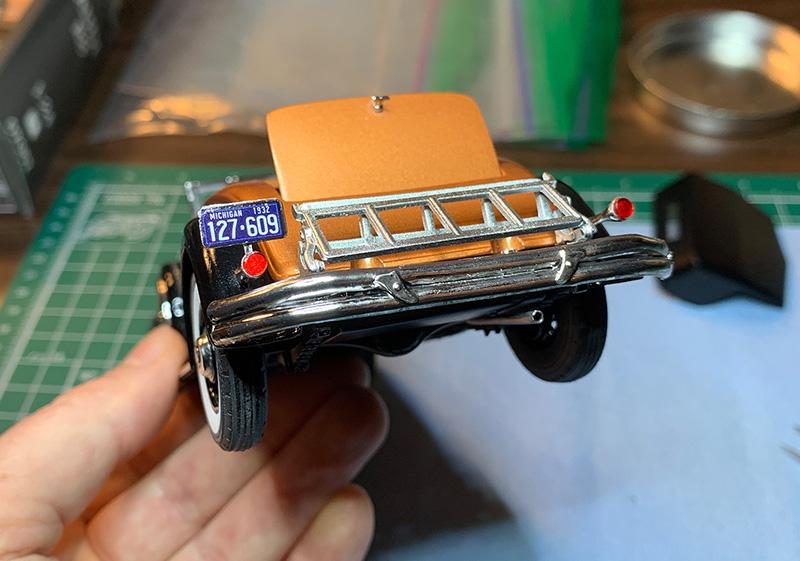
Thanks espo. I did use paper towel to wick the excess off - I guess it just took a little longer for gravity to do its thing. I know the airplane guys use this method religiously on their canopies. I also airbrushed Pledge on the body of a previous build, the same thing happened - very minor pooling along a bottom edge. Kinda hard to see in the photos, perhaps I applied it a little heavy with the airbrush in this case. 1932 Chrysler Imperial 8
-
That's a good one, too. ?
-
I used regular hardware store lacquer thinner. It removed the enamel paint, base coat and primer quickly... unfortunately it then proceeded to melt the plastic. I have soaked other parts in LA's Totally Awesome and it removed acrylic paint without stripping Tamiya's primer. ? Works on chrome as well, though it doesn't really remove the adhesive. I agree with your assessment of Tamiya Fine Surface Primer, it goes on super smooth. So much so that I switched to sanding the body with finer grit paper to avoid deeper scratches.
-
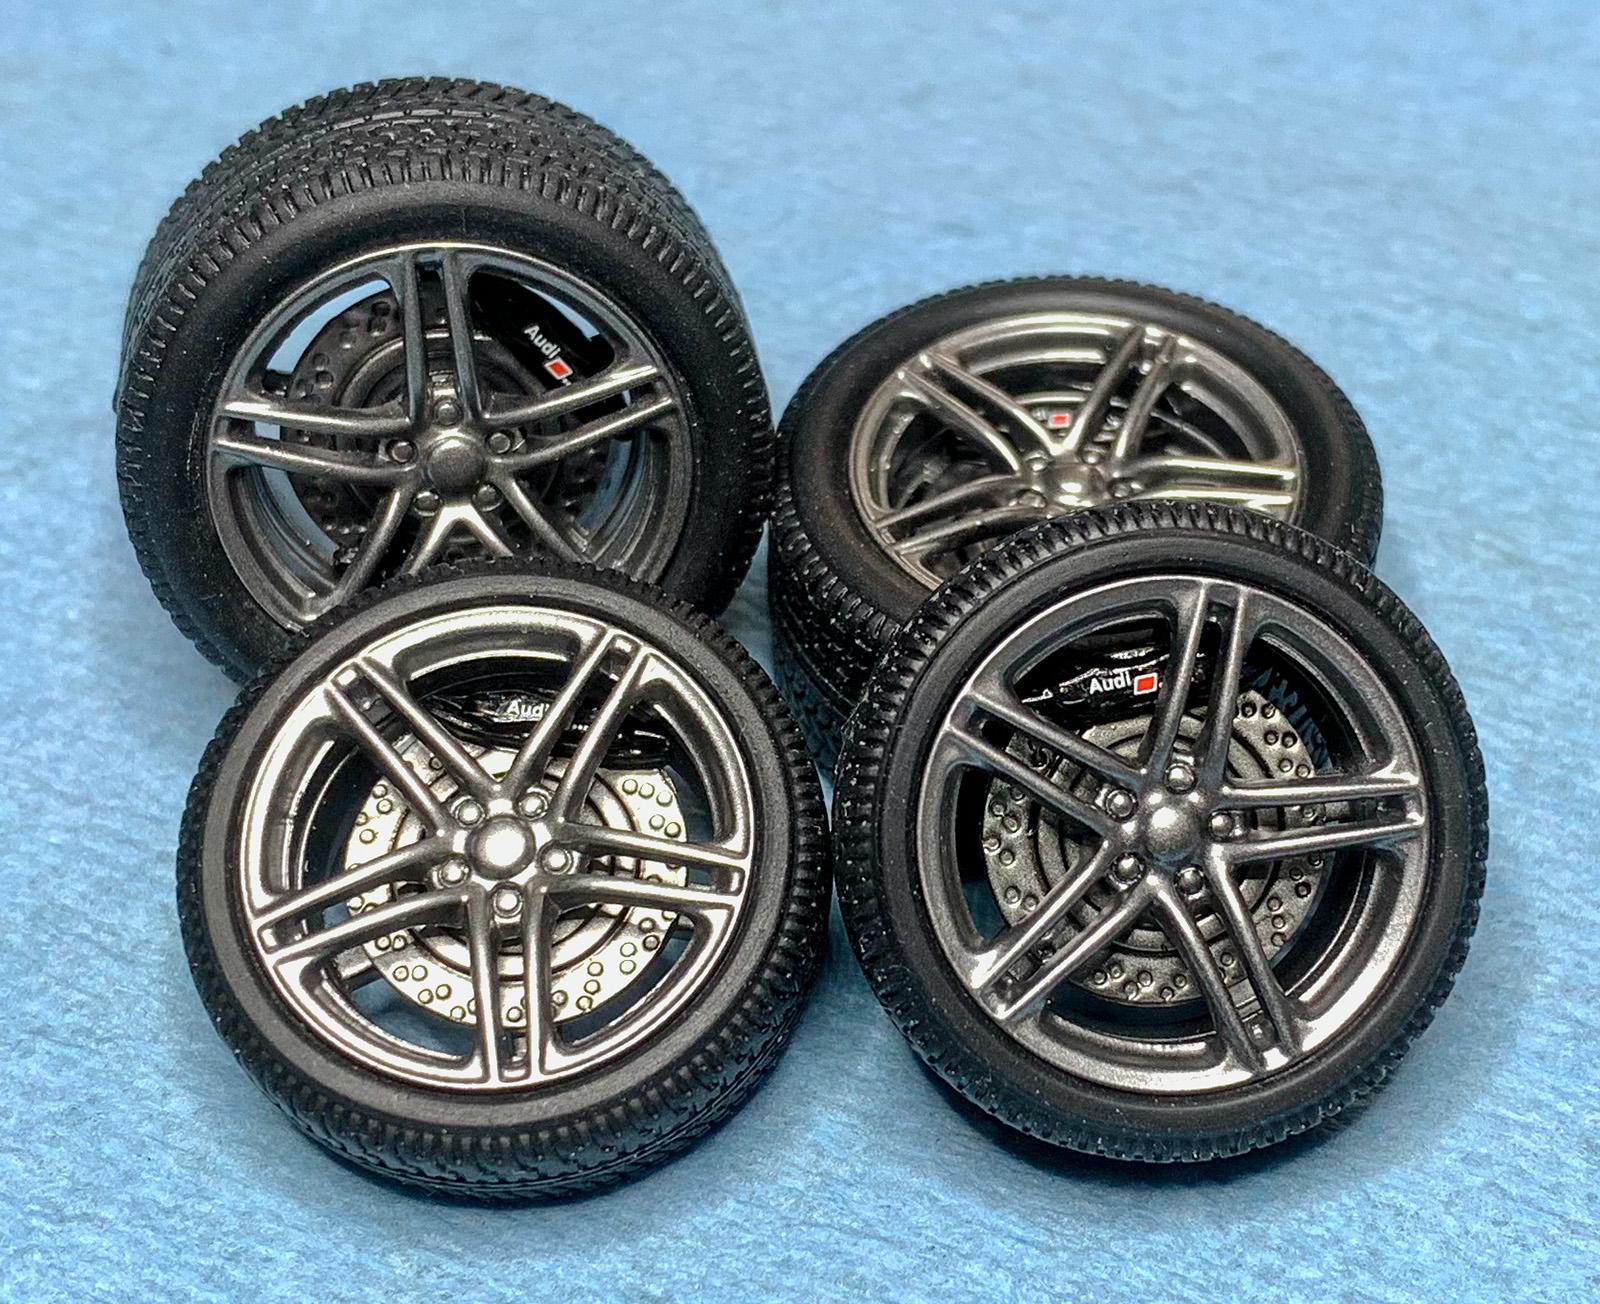
Good Afternoon, I photographed the completed Audi R8 this weekend. It was painted with Tamiya FS Primer Light Grey, AK Black Base, AK Xtreme Metal Copper and clear coated with Tamiya X-22 Clear. The rims were primed and base coated the same as the body and painted with AK Xtreme Gun Metal. Interior is Tamiya Flat Black and a custom mixed saddle (homemade brown + Tamiya XF-3 Flat Yellow). The flat black was very flat so I coated it with Tamiya X-35 Semi Gloss Clear. The embossing powder is Ranger Marigold purchased from Amazon. What I learned from this build: 1. Plastic does not like lacquer thinner (probably obvious to many, but I'm still figuring things out). I wasn't happy with the way the hatch/rear engine cover turned out because I sprayed it independently from the body. My usual paint stripper (LA's Totally Awesome) wouldn't remove the AK Copper so I upped the hotness... bad idea. I tried to scratch build a new one with less than great results. I avoided photographing the car from angles that show the poor fit. I may try again. 2. Not sure I like dipping glass parts in Pledge - it looks great at first but tends to pool just a little due to gravity and doesn't like to be handled afterward as fingers leave faint, cloudy smudges (maybe it's just me). 3. Make sure to paint the interior floor pan the same colour as the embossing powder. 4. Double check bottle labels!! I tried Tamiya's Mark Fit Strong for the first time. I had a little air/dust bubble under the carbon fibre decal (behind the gas cap) so I poked a little hole in it and applied what I thought was the decal solution... Tamiya Extra Thin Cement is pretty tough on decals. ? 5. Regular Elmer's white glue does a pretty nice job on clear parts... just have to apply a little more. 6. This was the first time I painted rims and I think I will continue going forward. 7. I still don't like AK's Black Base... it just doesn't cover very well or lay super flat (in my novice opinion). If you've made it this far, thanks for reading. ?
-
@Steve H Yeah, you're right. Brakes would have be a nice detail and I agree on the colour, too. I still have to get a better handle on aftermarket parts. I ordered a couple other wheel sets from Pegasus to see which would look better with on the car. However, the rim/rubber combination was so low profile I don't see how they would suit any 1/24 model... except maybe on those low rider bouncy cars.
-
@carbuilder1950 I did use Novus #1 to remove a blemish in the Tamiya X22 Clear. Is Novus #2 a fine scratch remover? Do you ever use Novus #3?
-
@slusher @carbuilder1950 @ewetwo Thanks fellas, appreciate it. @carbuilder1950 I have coated 2 models since the Vette build - one with Tamiya X-22 and one with Pledge (Future) Lamborghini Miura and Chrysler Imperial respectively. Polishing is something I still need to get a handle on. I've tried fixing a botched windshield with various grades of sandpaper and polish but could never the scratches out or restore the clear finish. This has led to trepidation when it comes to polishing a clear coat. Regarding the magnifying lamp... I can't build without it. ?
-
@Phirewriter 2 of my local hobby shops have them in stock. I chose not to build the motorcycle and gangsters from mine at this time.
-
@alexis They certainly didn't have the crazy range of colours we have today. Brown/bronze was the one that stood out to me and X-34 was the closest match I could find. I forgot the brake lights as they weren't in the instructions, just added them this morning.