the60falcon
-
Posts
94 -
Joined
-
Last visited
Content Type
Profiles
Forums
Events
Gallery
Everything posted by the60falcon
-

Almost finished with my chopped Revell '32
the60falcon replied to the60falcon's topic in WIP: Model Cars
Thank you! They're actually from a set of parts I got from "Replicas and Miniatures" -
Almost finished with my chopped Revell '32
the60falcon replied to the60falcon's topic in WIP: Model Cars
I have a couple others, I definitely want to do a full fender one too! -
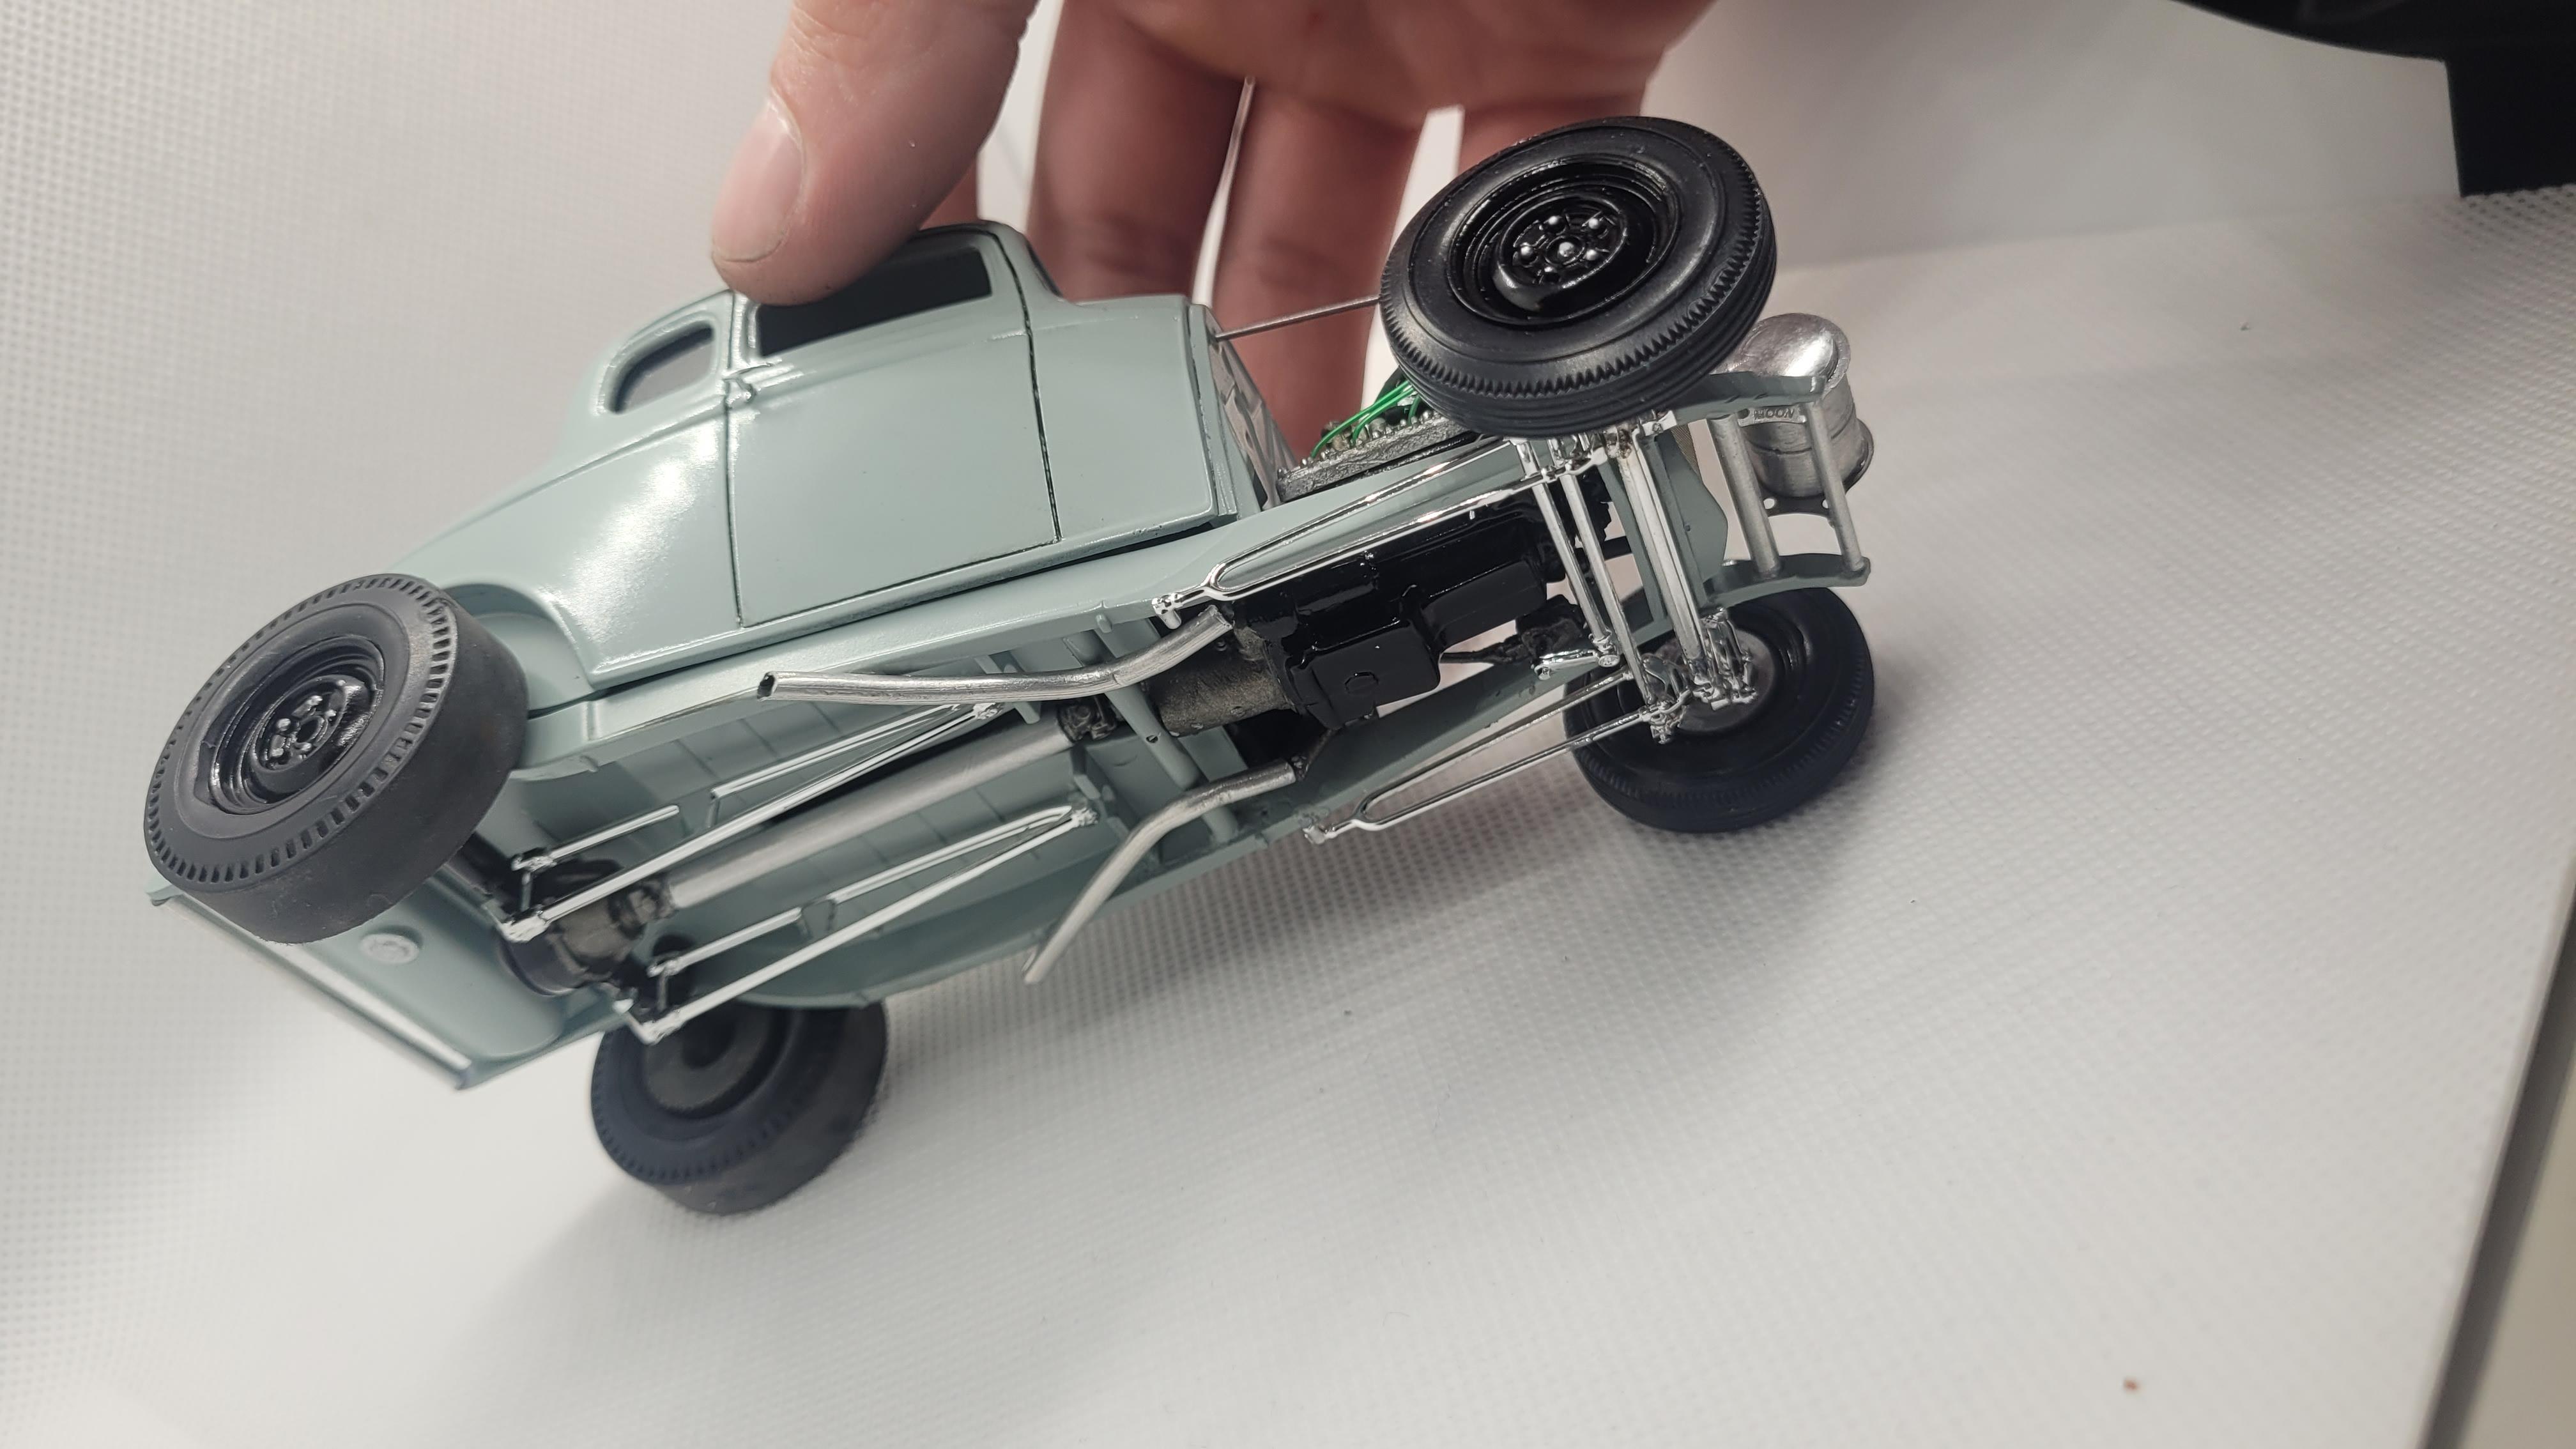
Body from Drag City Casting, lots of details. For some reason the small detail of the soot on the frame is one of my favorite things I did to it. I need to add headlights, the generator and a couple small things and it's wrapped up! Lots of non kit parts and or modified parts. Revell 37 Ford truck engine, modified grille and radiator, custom cross member, exhaust etc

- 15 replies
-
- 12
-

-
Thanks! I'm in Whitehall about an hour and a half north of Philly
-
New member here, Revell '69 Nova i just finished
the60falcon replied to the60falcon's topic in Model Cars
Edit -
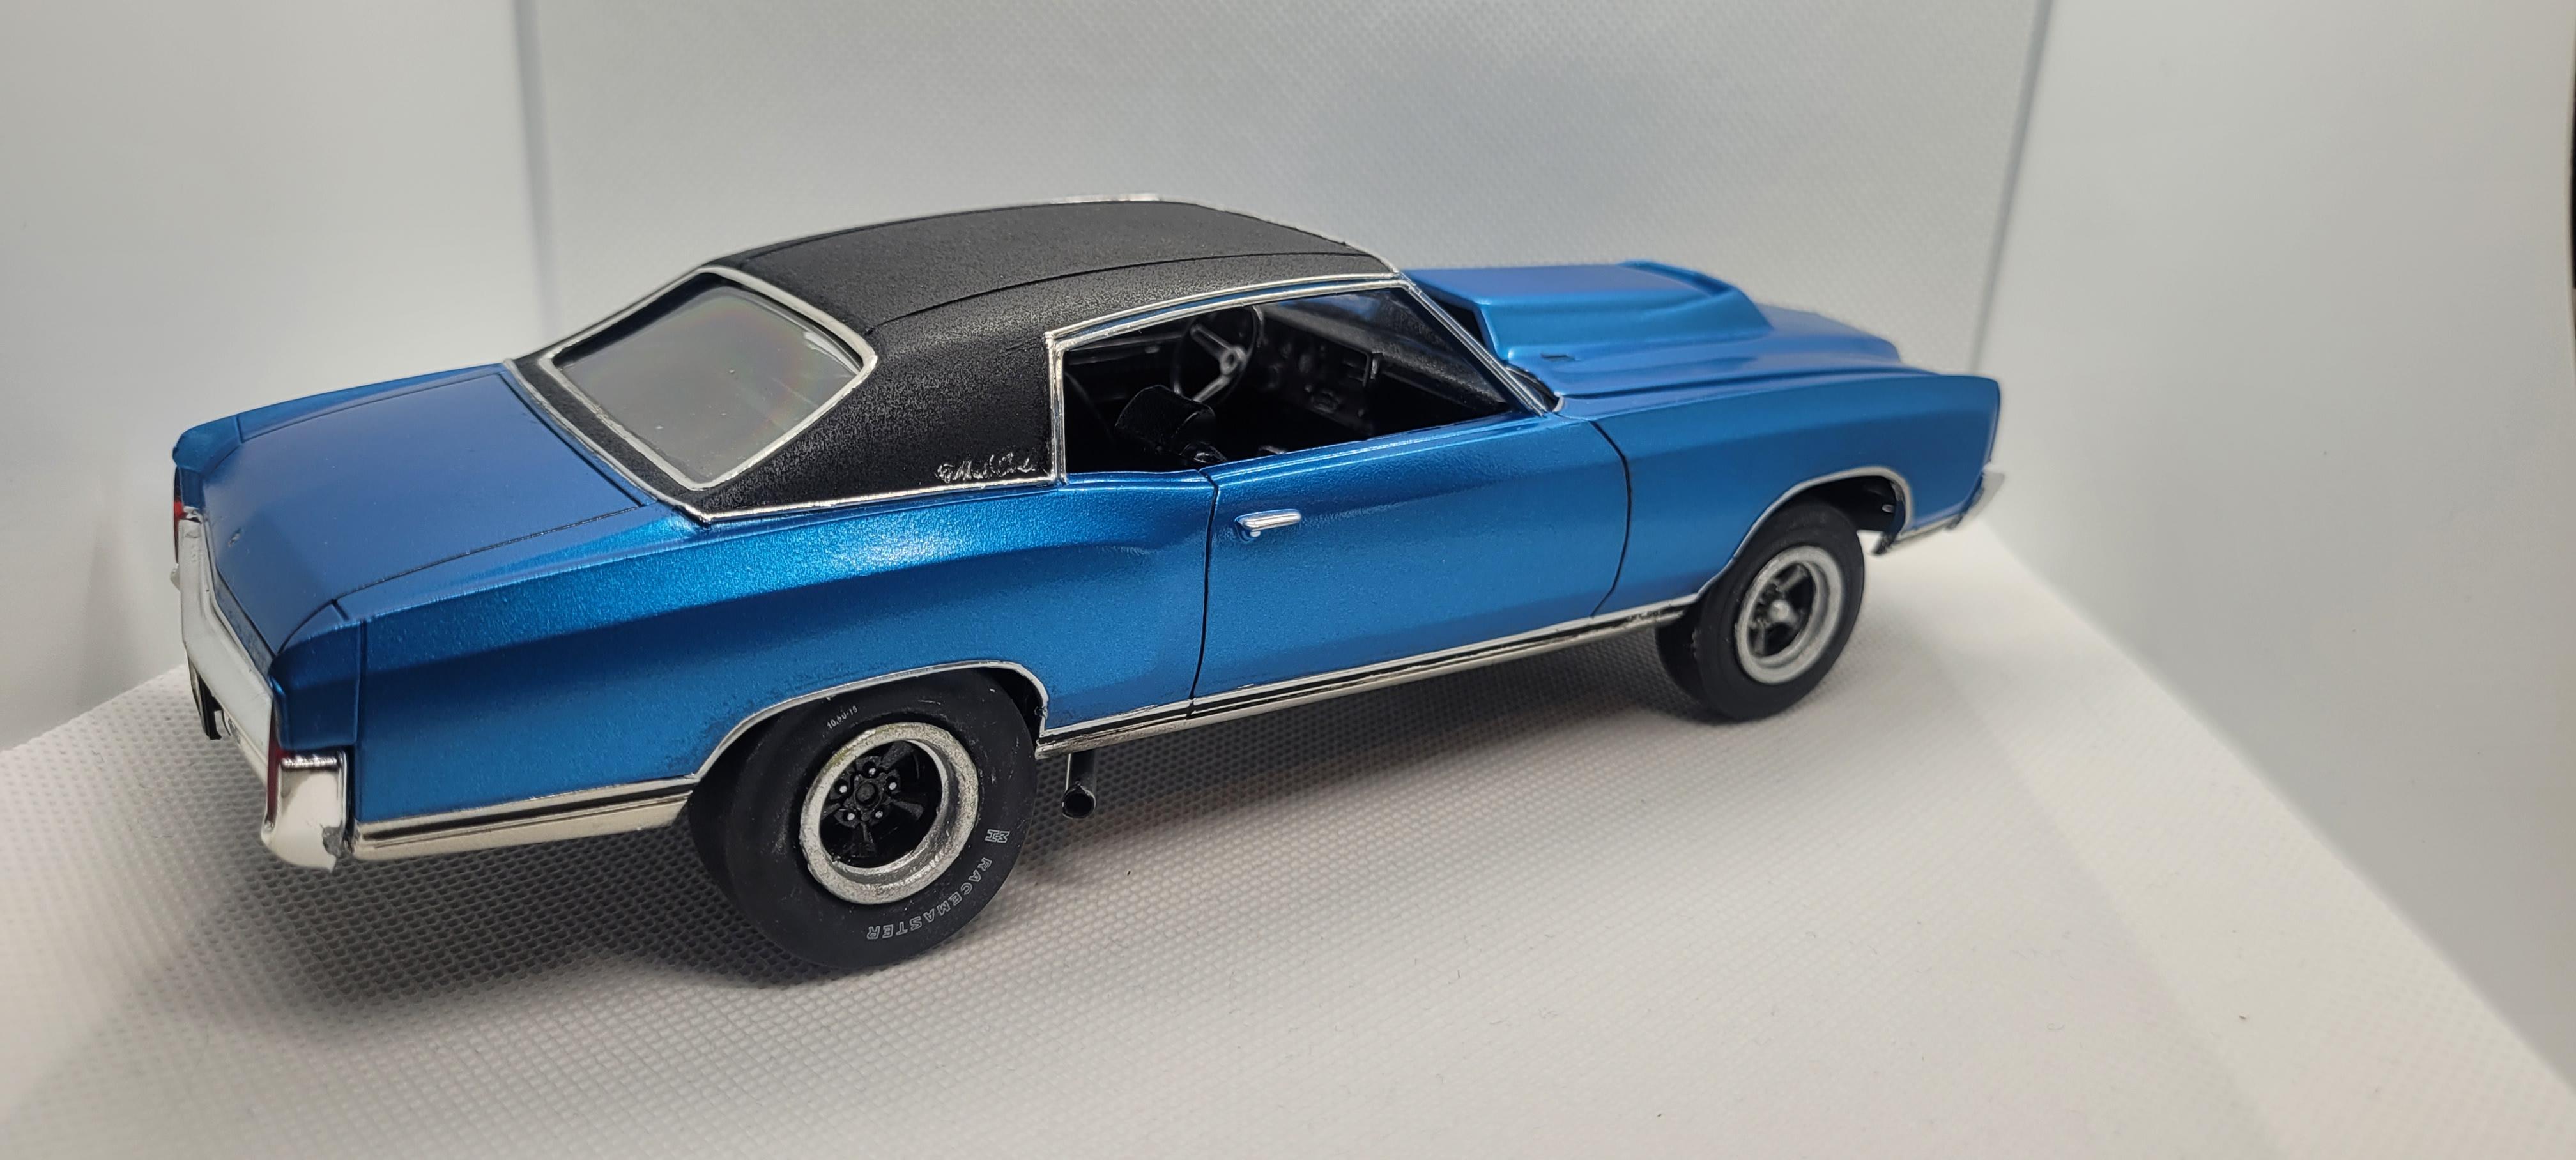
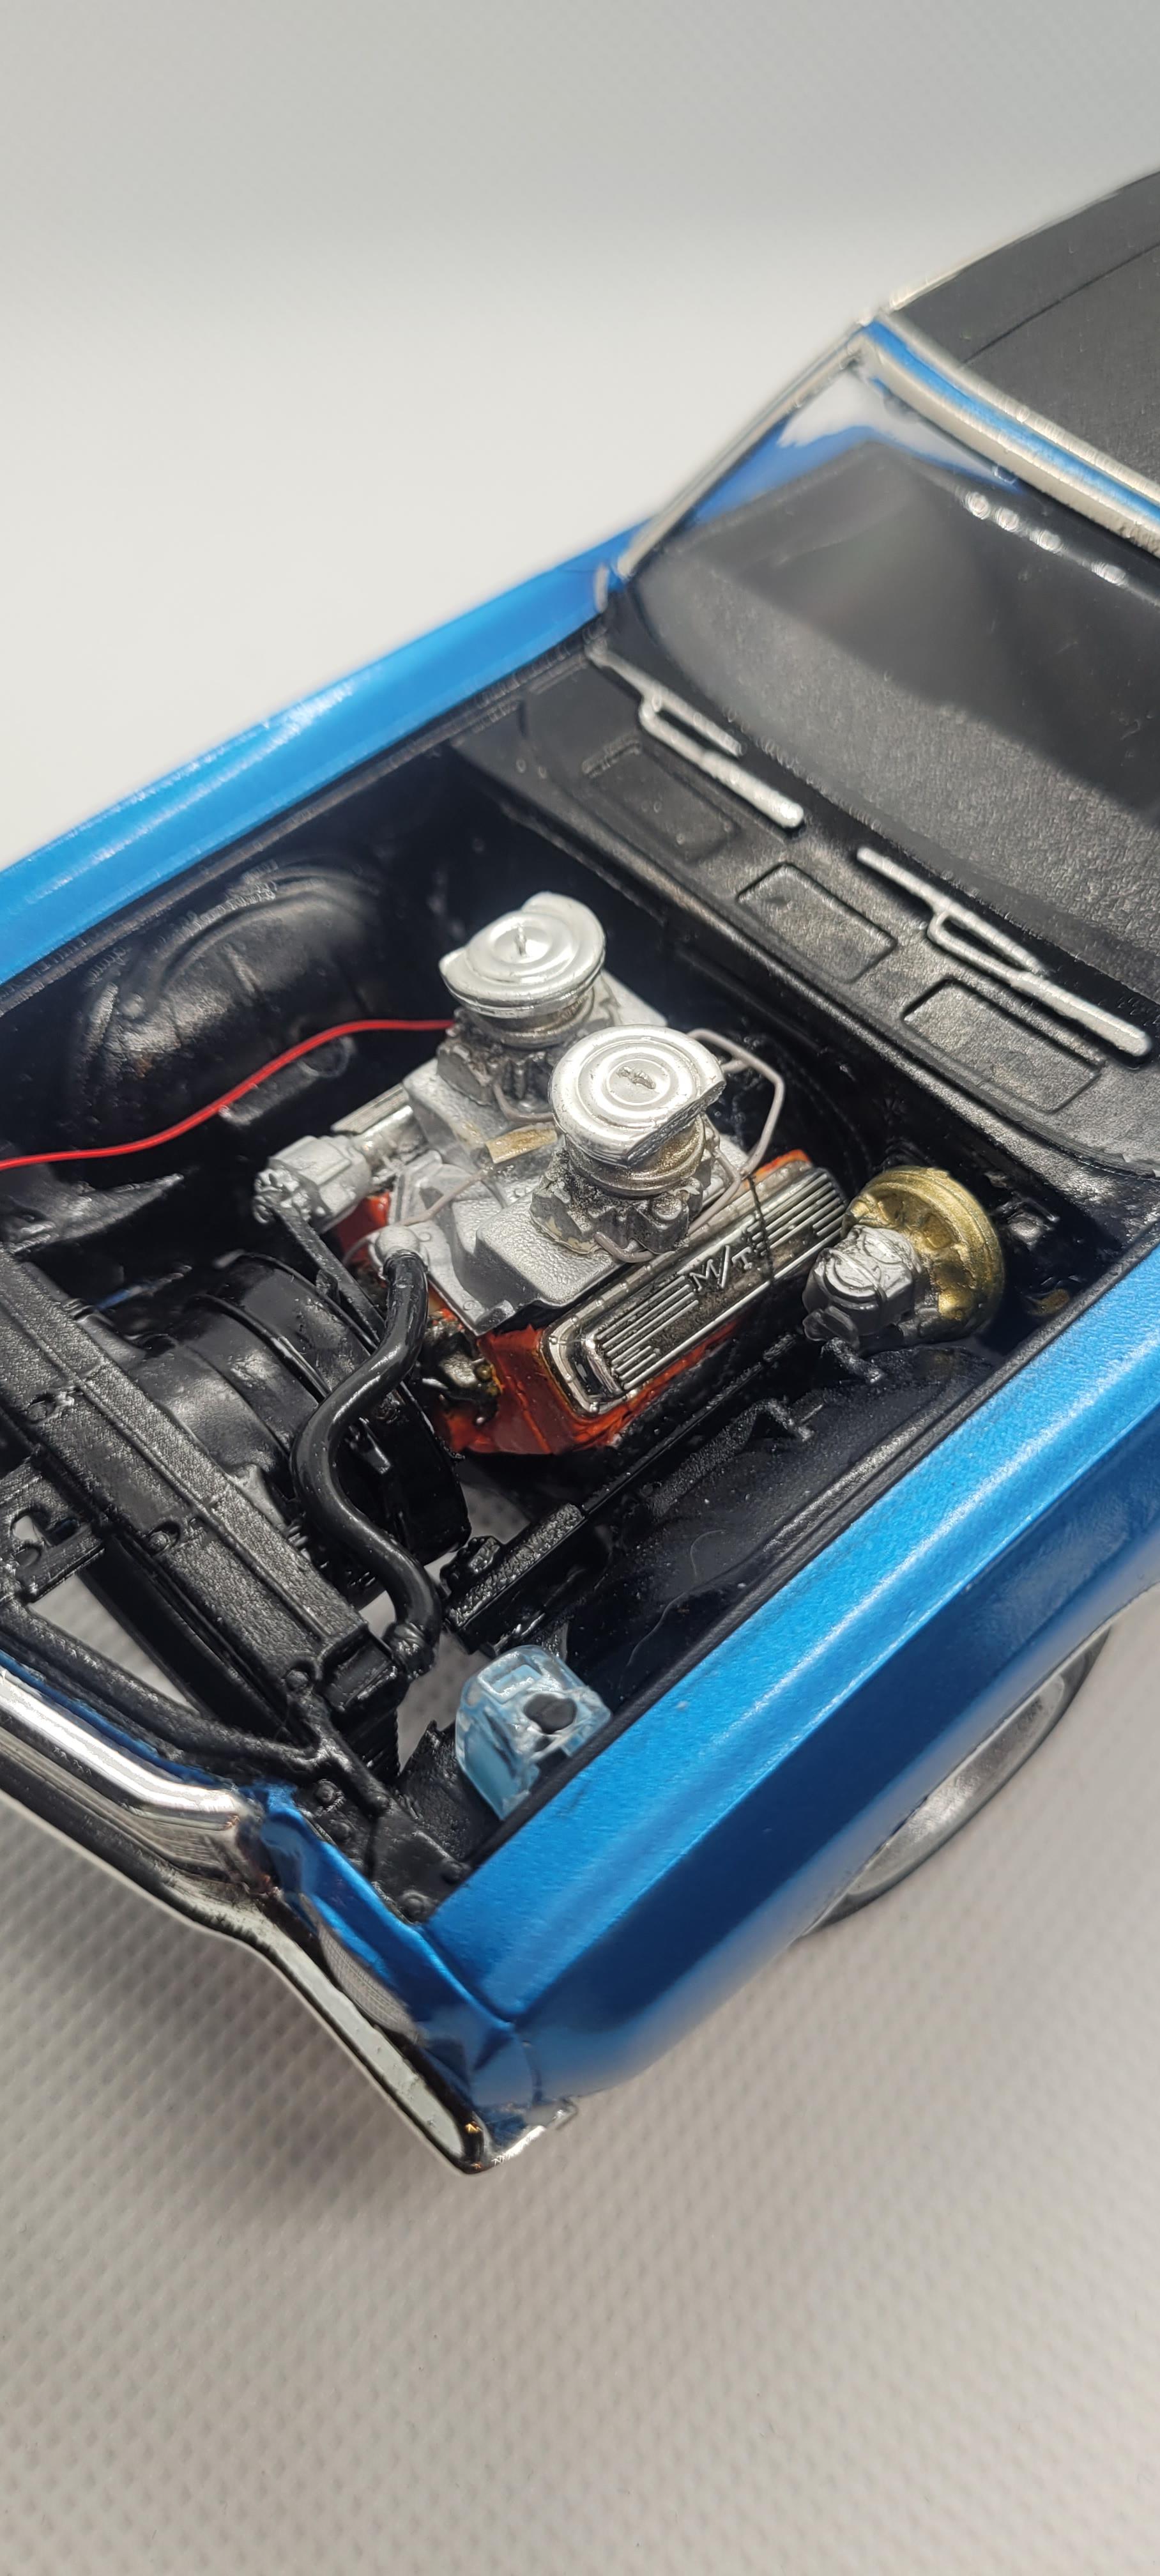
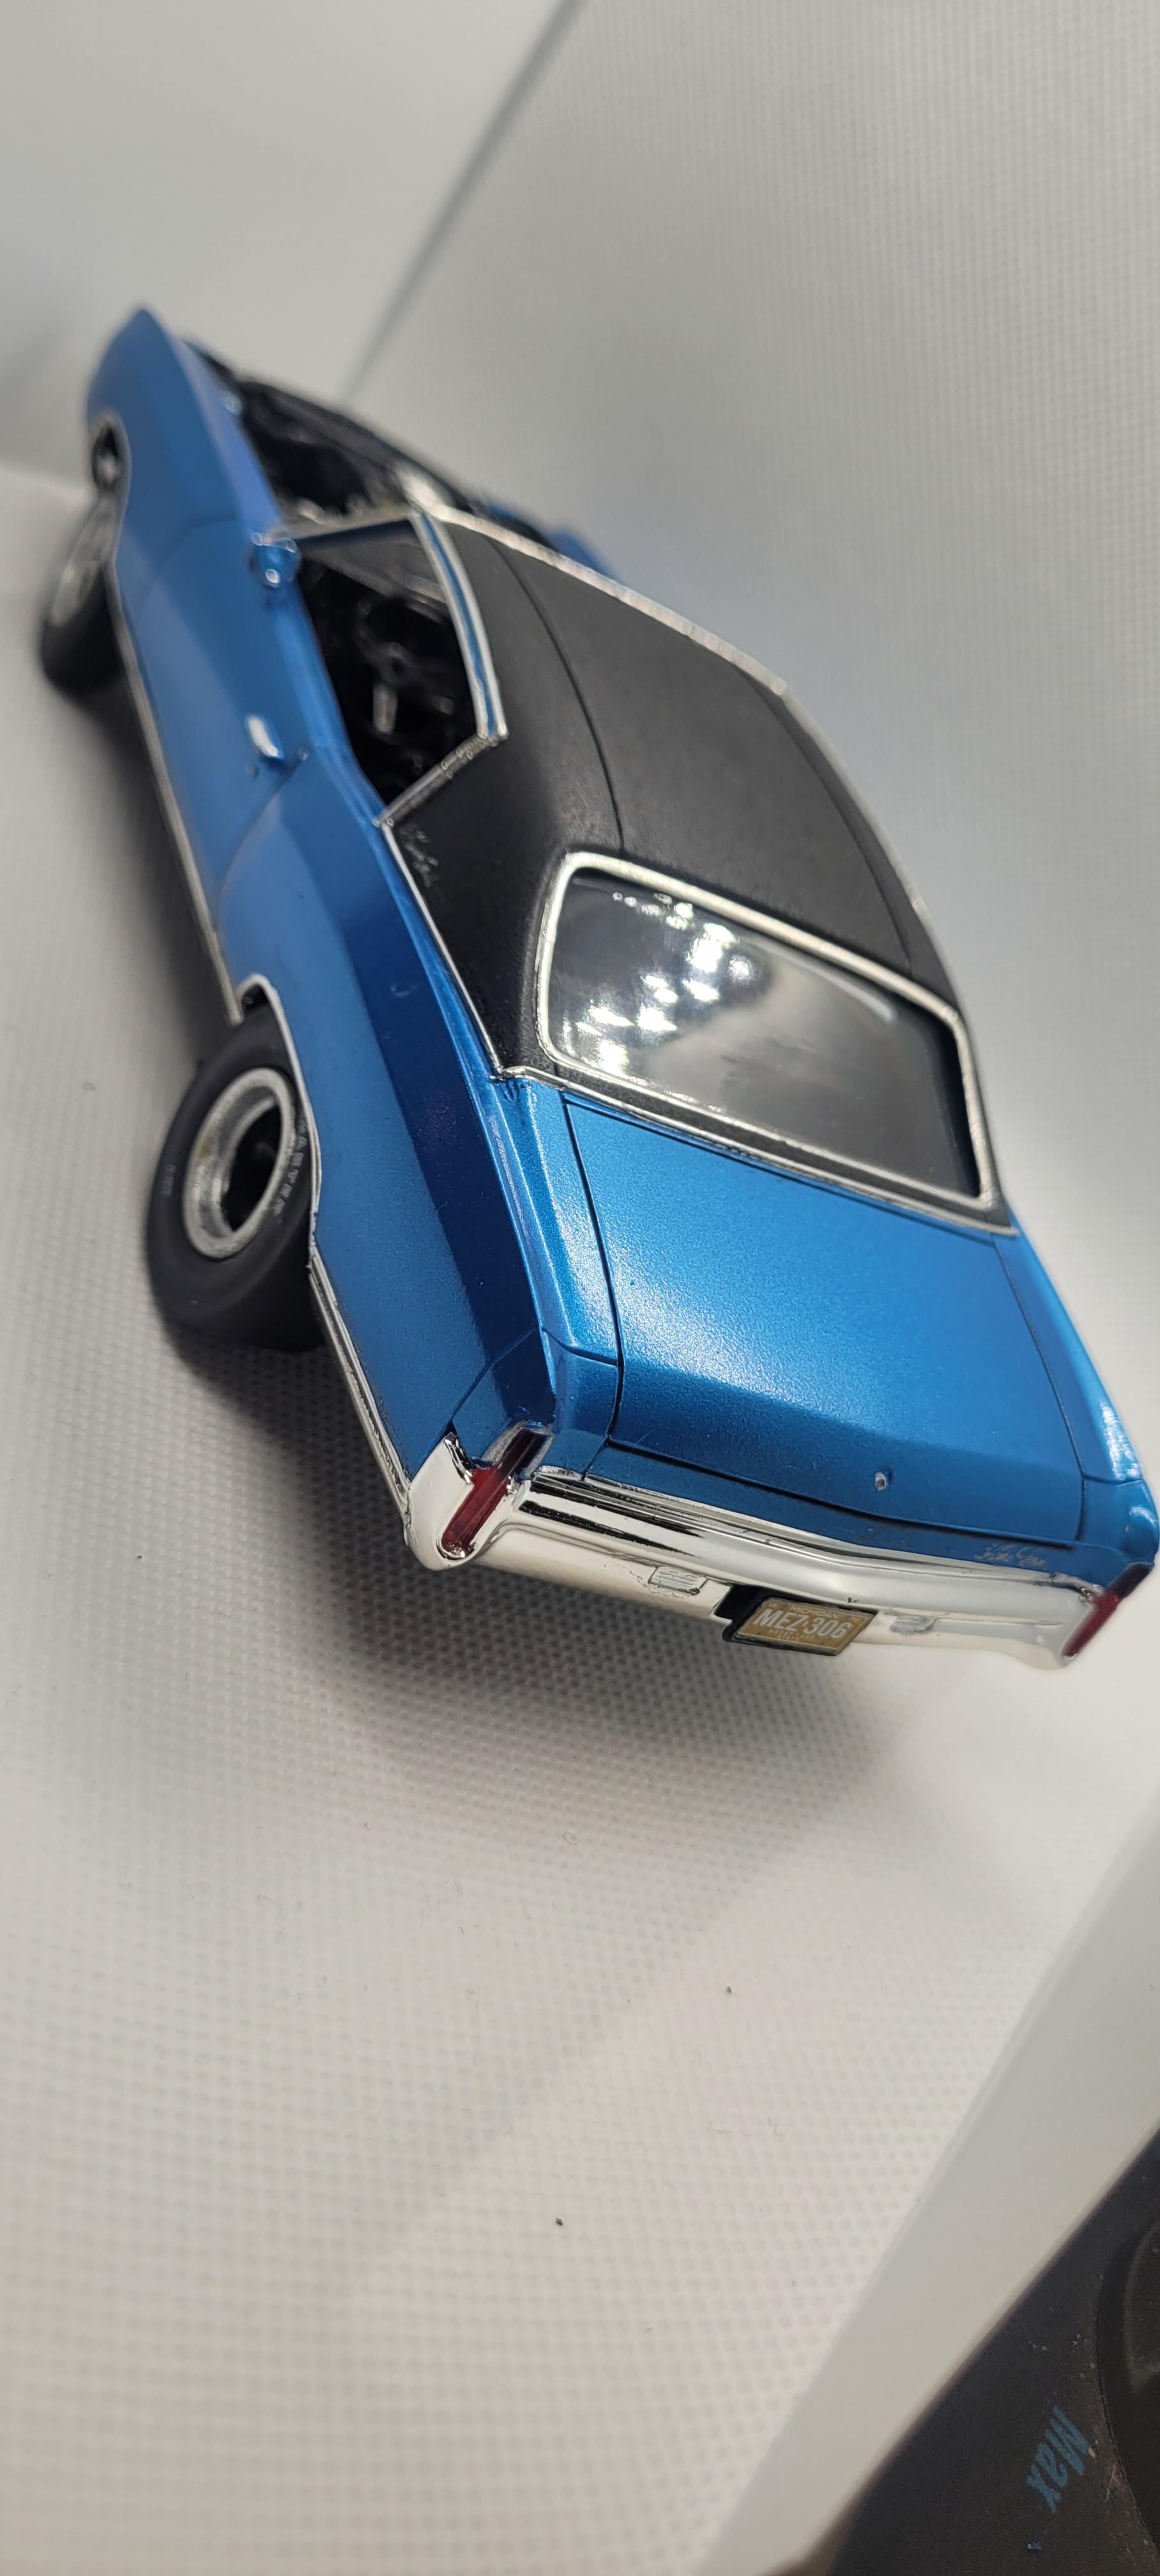
Older build from a year or two ago, this was my first vinyl top, not easy with the "halo" roof. Custom made the L88 hood, plumbed and wired. Custom exhaust, valve stems etc. This sat in a local hobby shop for a while until I brought it home a couple months ago. Needs some touch up, looks like my thread plug wires came loose and some paint wear from the hood being on and off. But it still looks okay.
- 14 replies
-
- 10
-
-
Loose tutorial on how I do my vinyl tops.
the60falcon replied to the60falcon's topic in Tips, Tricks, and Tutorials
it is! I'll have to get some pics of it in the "under glass" section
-
Loose tutorial on how I do my vinyl tops.
the60falcon replied to the60falcon's topic in Tips, Tricks, and Tutorials
I haven't tried them yet, but rustoleum does have at least white and a brownish color too. I'm sure the white could be painted to do a blue, green or any other wild color some of the cars back then had. Good idea, I didn't even think of it. -
Johan '69 Eldorado done Redline era Hot Wheels style!
the60falcon replied to the60falcon's topic in Model Cars
Thanks everyone, there was no wetsanding, polishing or anything on this one. Just sprayed and done. -
Wow! Crazy nice build!
-
Loose tutorial on how I do my vinyl tops.
the60falcon replied to the60falcon's topic in Tips, Tricks, and Tutorials
I think if you did a couple passes, with one or two a little further away and heavy at the end to "roughen" it up it would be great for that! -
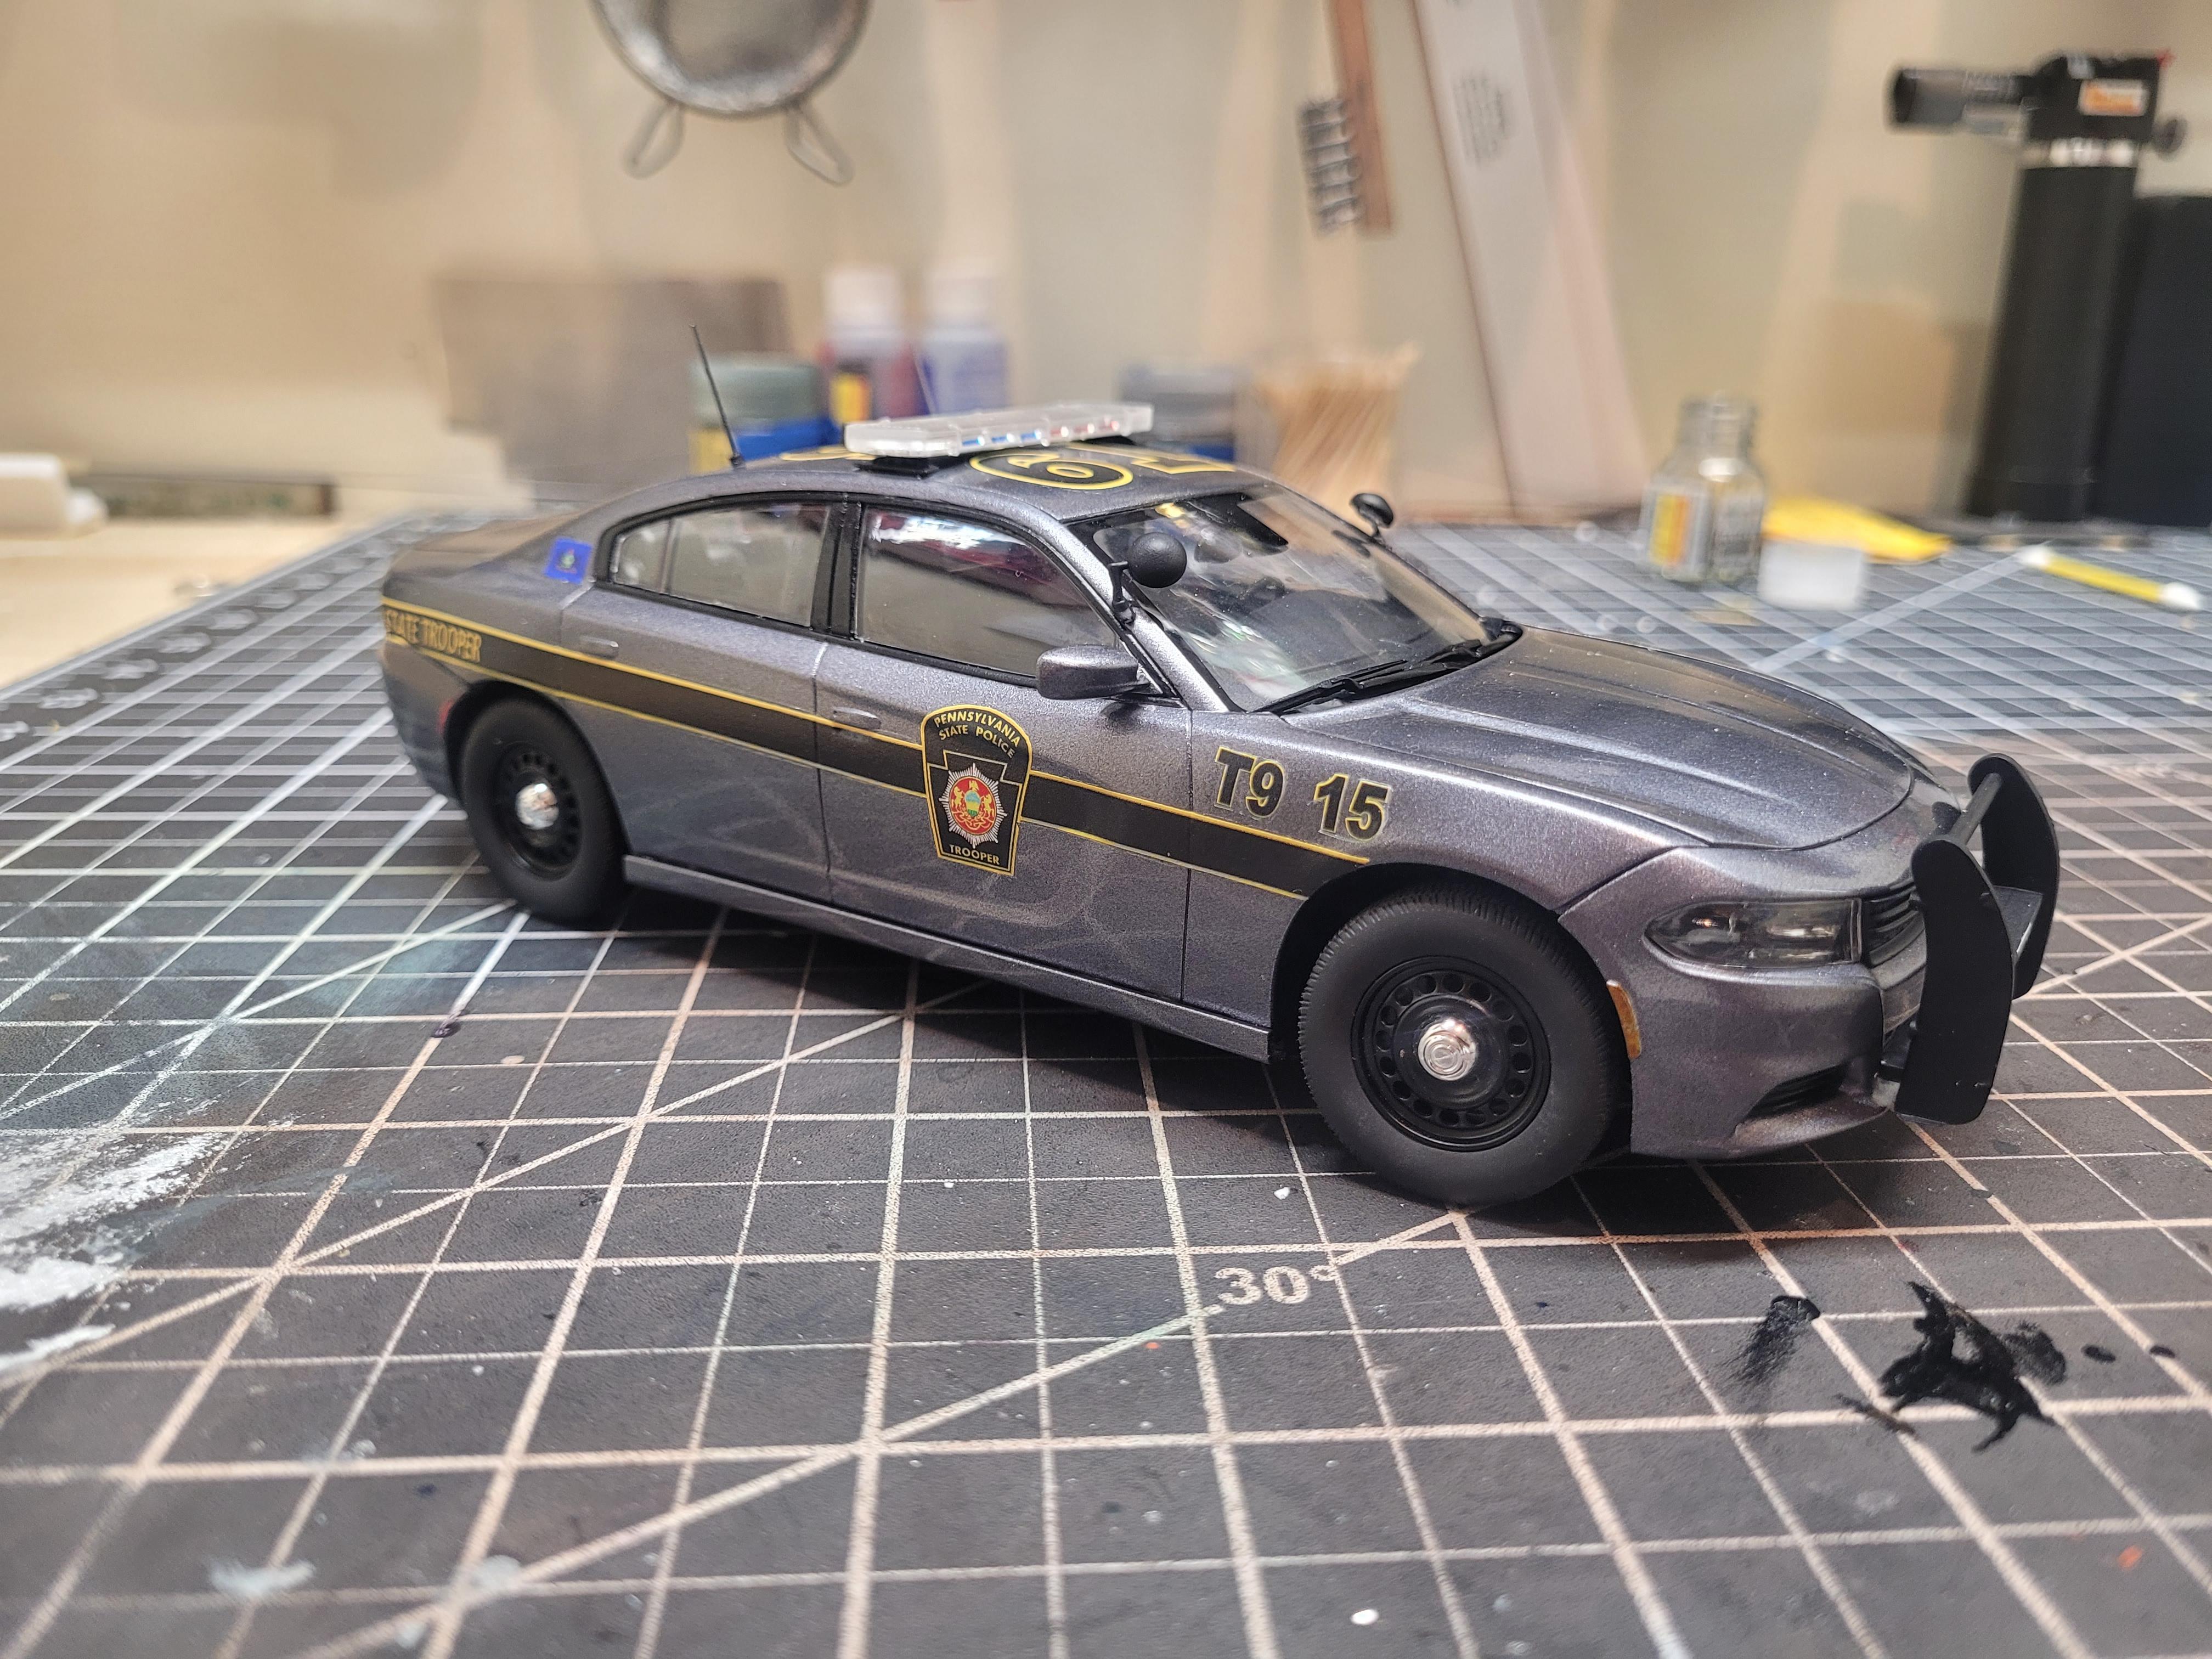
This is one of my favorite builds of this year believe it or not. Relatively box stock minus the ebay decals and the antennas I added to the roof. Color is Tamiya light gun metal rattle can. A great kit from AMT!
- 13 replies
-
- 10
-
-
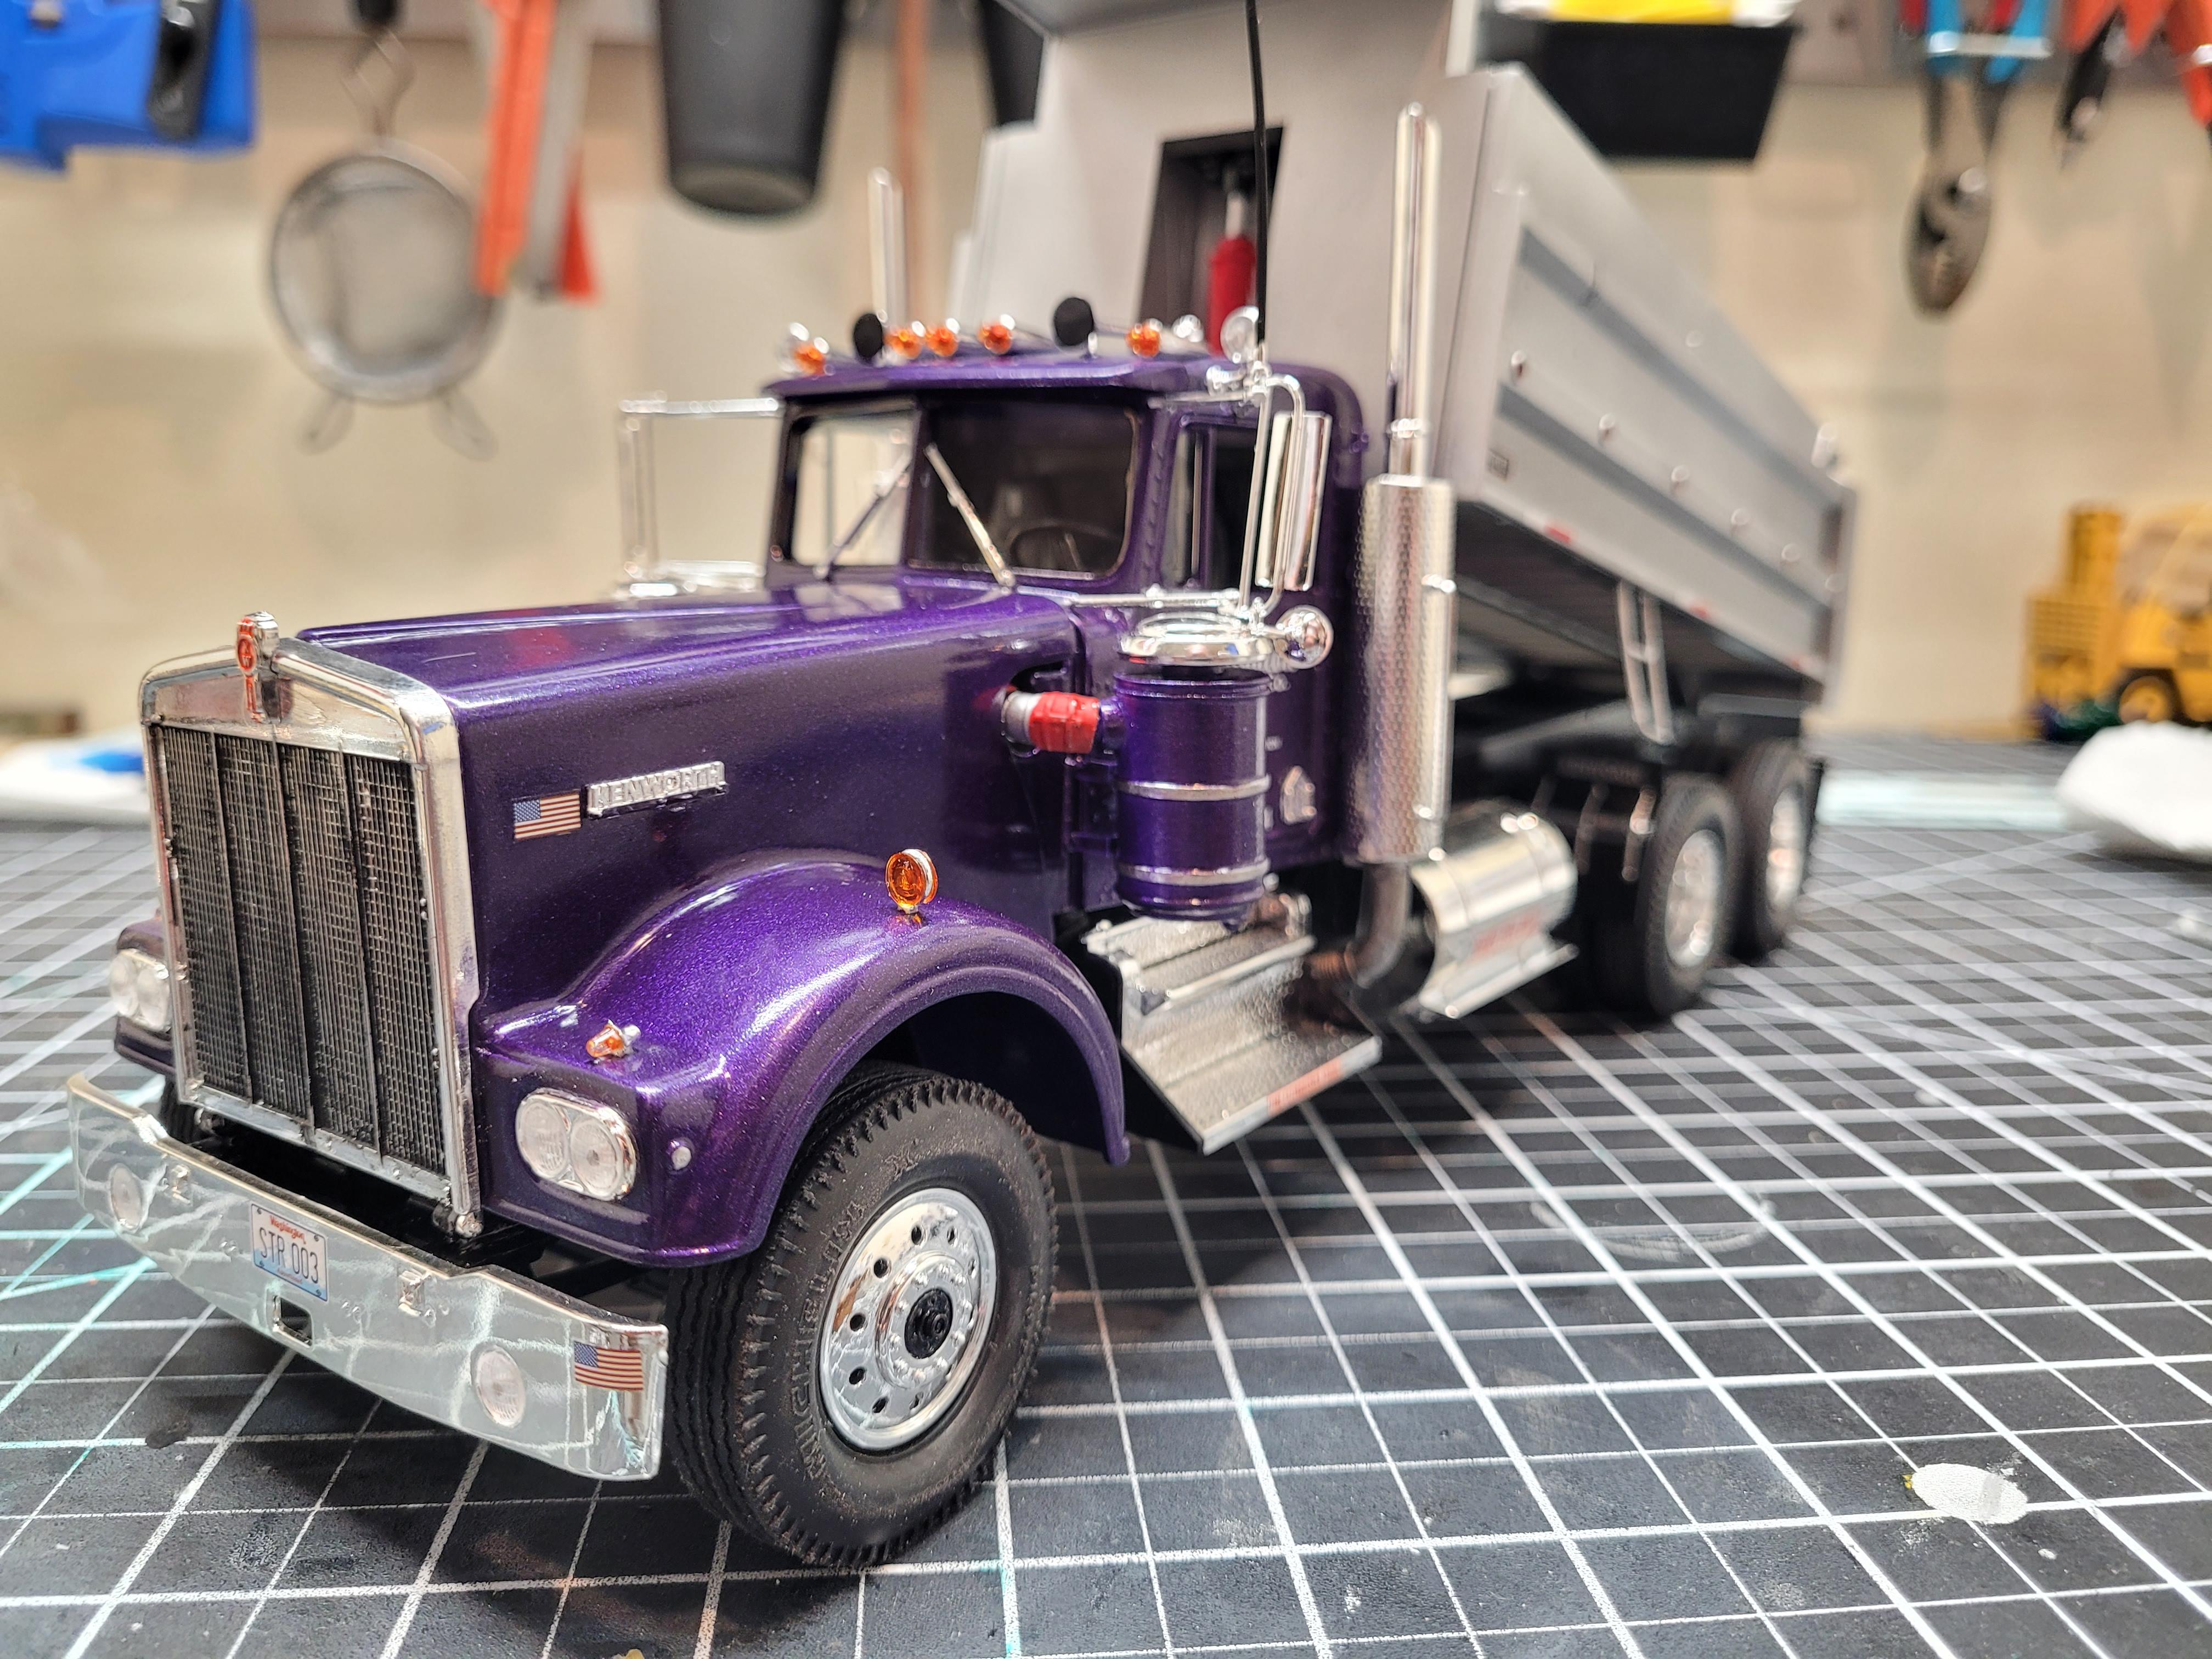
Finished this up a little while ago, I had numerous paint issues but the fitment was really nice. I'd like to build another one. I made a insert to put in the dump bed so I could use some gravel and stuff from work to put in there without it being "too much" weight wise. Photo etch dash details, otherwise a simple build.
-
Johan '69 Eldorado done Redline era Hot Wheels style!
the60falcon replied to the60falcon's topic in Model Cars
I did a 3 hour round trip to get this on marketplace for $40 I couldn't pass it up. Good thing my daily driver gets good fuel mileage lol! -
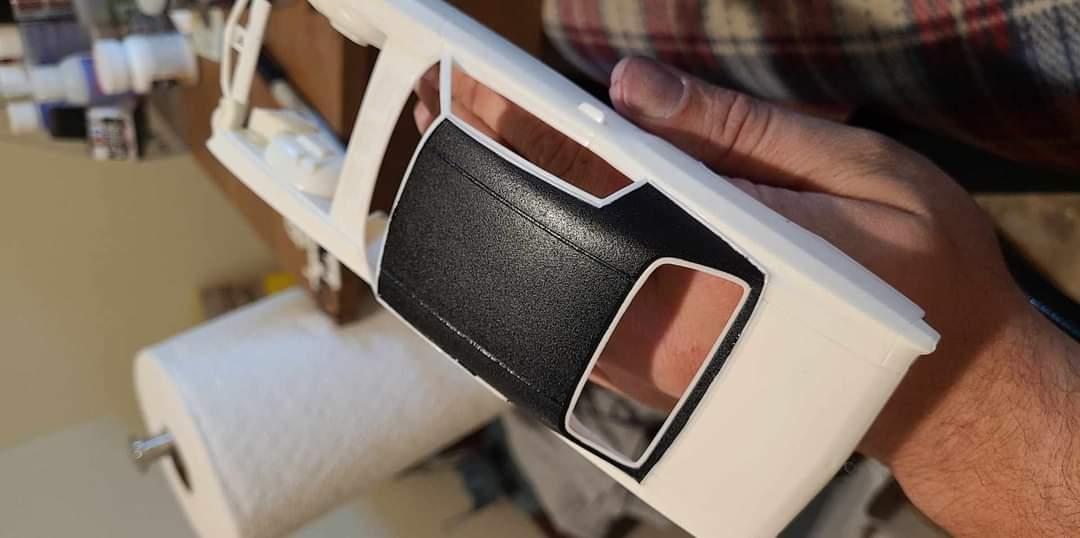
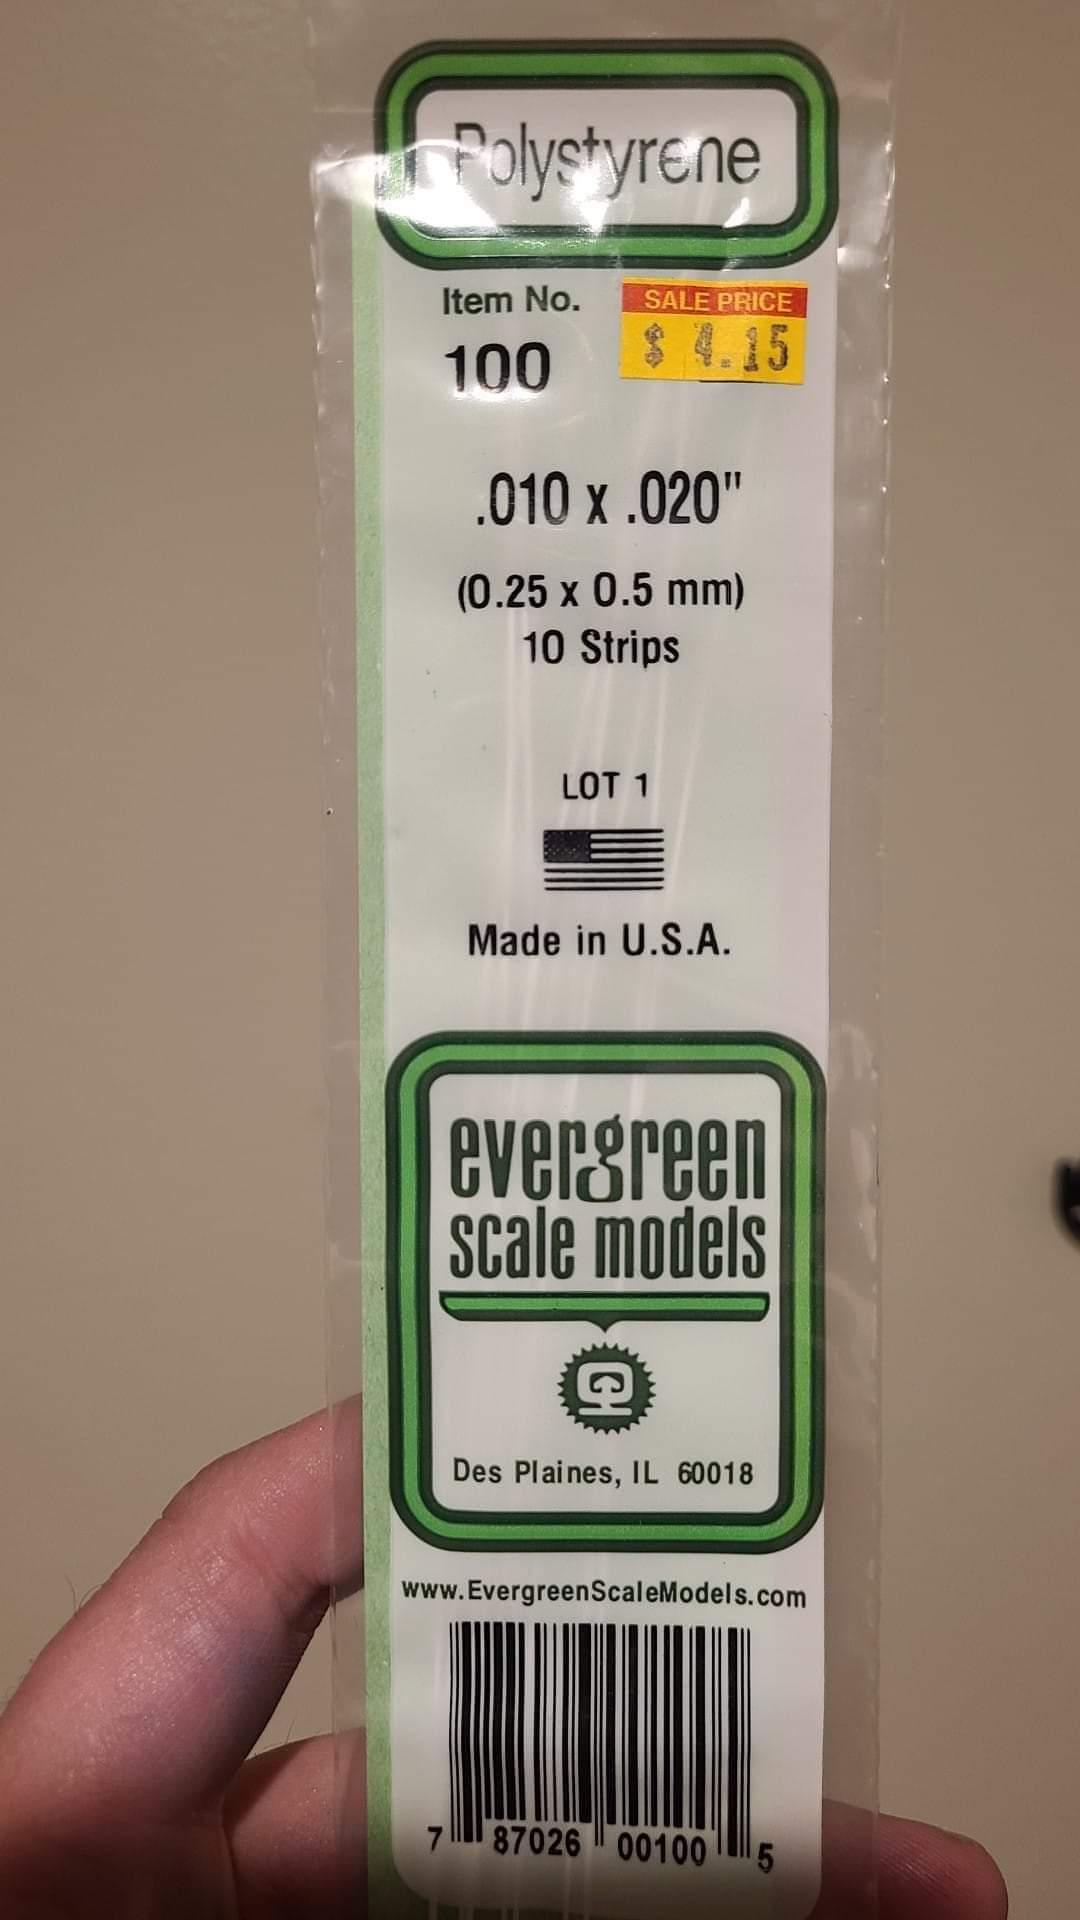
Here's my post I put on a popular model page on Facebook a while back. This was my first one I did and I've gotten a little better since but the concept remains. I genuinely hope this encourages people to get out and do some vinyl tops of their own. I believe this to be far better looking than the tape method. But to each their own! I've since switched to mostly airbrush for my body color painting. I've gotten asked a LOT in the post I made last night how I did my vinyl top, please understand, this was my first one, I either got very lucky or it's not as bad as expected! I'm not going to do a full tutorial as there's guys leaps and bounds better than me at that. But I will loosely explain how I did it and what I used. My first step was to make sure I had the right supplies! My local shop didn't have all my stuff so I took a couple days to gather everything, including the styrene from Evergreen, and the Rustoleum paint shown below. After that your next step will be to research! You can F this up fast if your trim, or seams aren't in the right place. Take your time, look at the internet, look at cars at car shows. I've had weeks of research into this, even deciding on which car model I wanted to try it on. Thirdly, you'll want to start laying out your chrome trim, for this I used the rounded styrene rod. Luckily my monte is pretty square, I found it easiest to do the front windshield, rear windshield ,and then one side around the door windows first, thus leaving me somewhere to make the rest meet up to. After that I found the center of the car, and made 4 marks, 2 front, 2 rear where I wanted my "seams" to be, this is where I used the flat styrene strips. By this point you should have a nice idea of what's going to be "vinyl" and what's going to be body color. The next and final step before spraying your roof(if going in the order I did) will be to carefully tape the car off I use Tamiya tape for EVERYTHING. It sticks nice and flat. I rarely have bleed issues. Be careful to get the edges very tight to your trim, leaving less areas you'll have to touch up later on. Now you're ready to spray your vinyl top, I warm ALL of my paint in the sink with some warm water before spraying, shaking it every so often. I then sprayed the roof, let it cure a couple hours, peeled the tape and bare metal foiled the rear window trim. I had plenty of time to do other stuff to this model while it dried, so I gave it a full coue days to cure, then shot the main body color, again checking to make sure the tape was nice and tight everywhere.. I did get a little blue overspray on the rear trim but that's easy enough to re-foil. I hope this helps you guys build up the courage to go try it yourself.
-
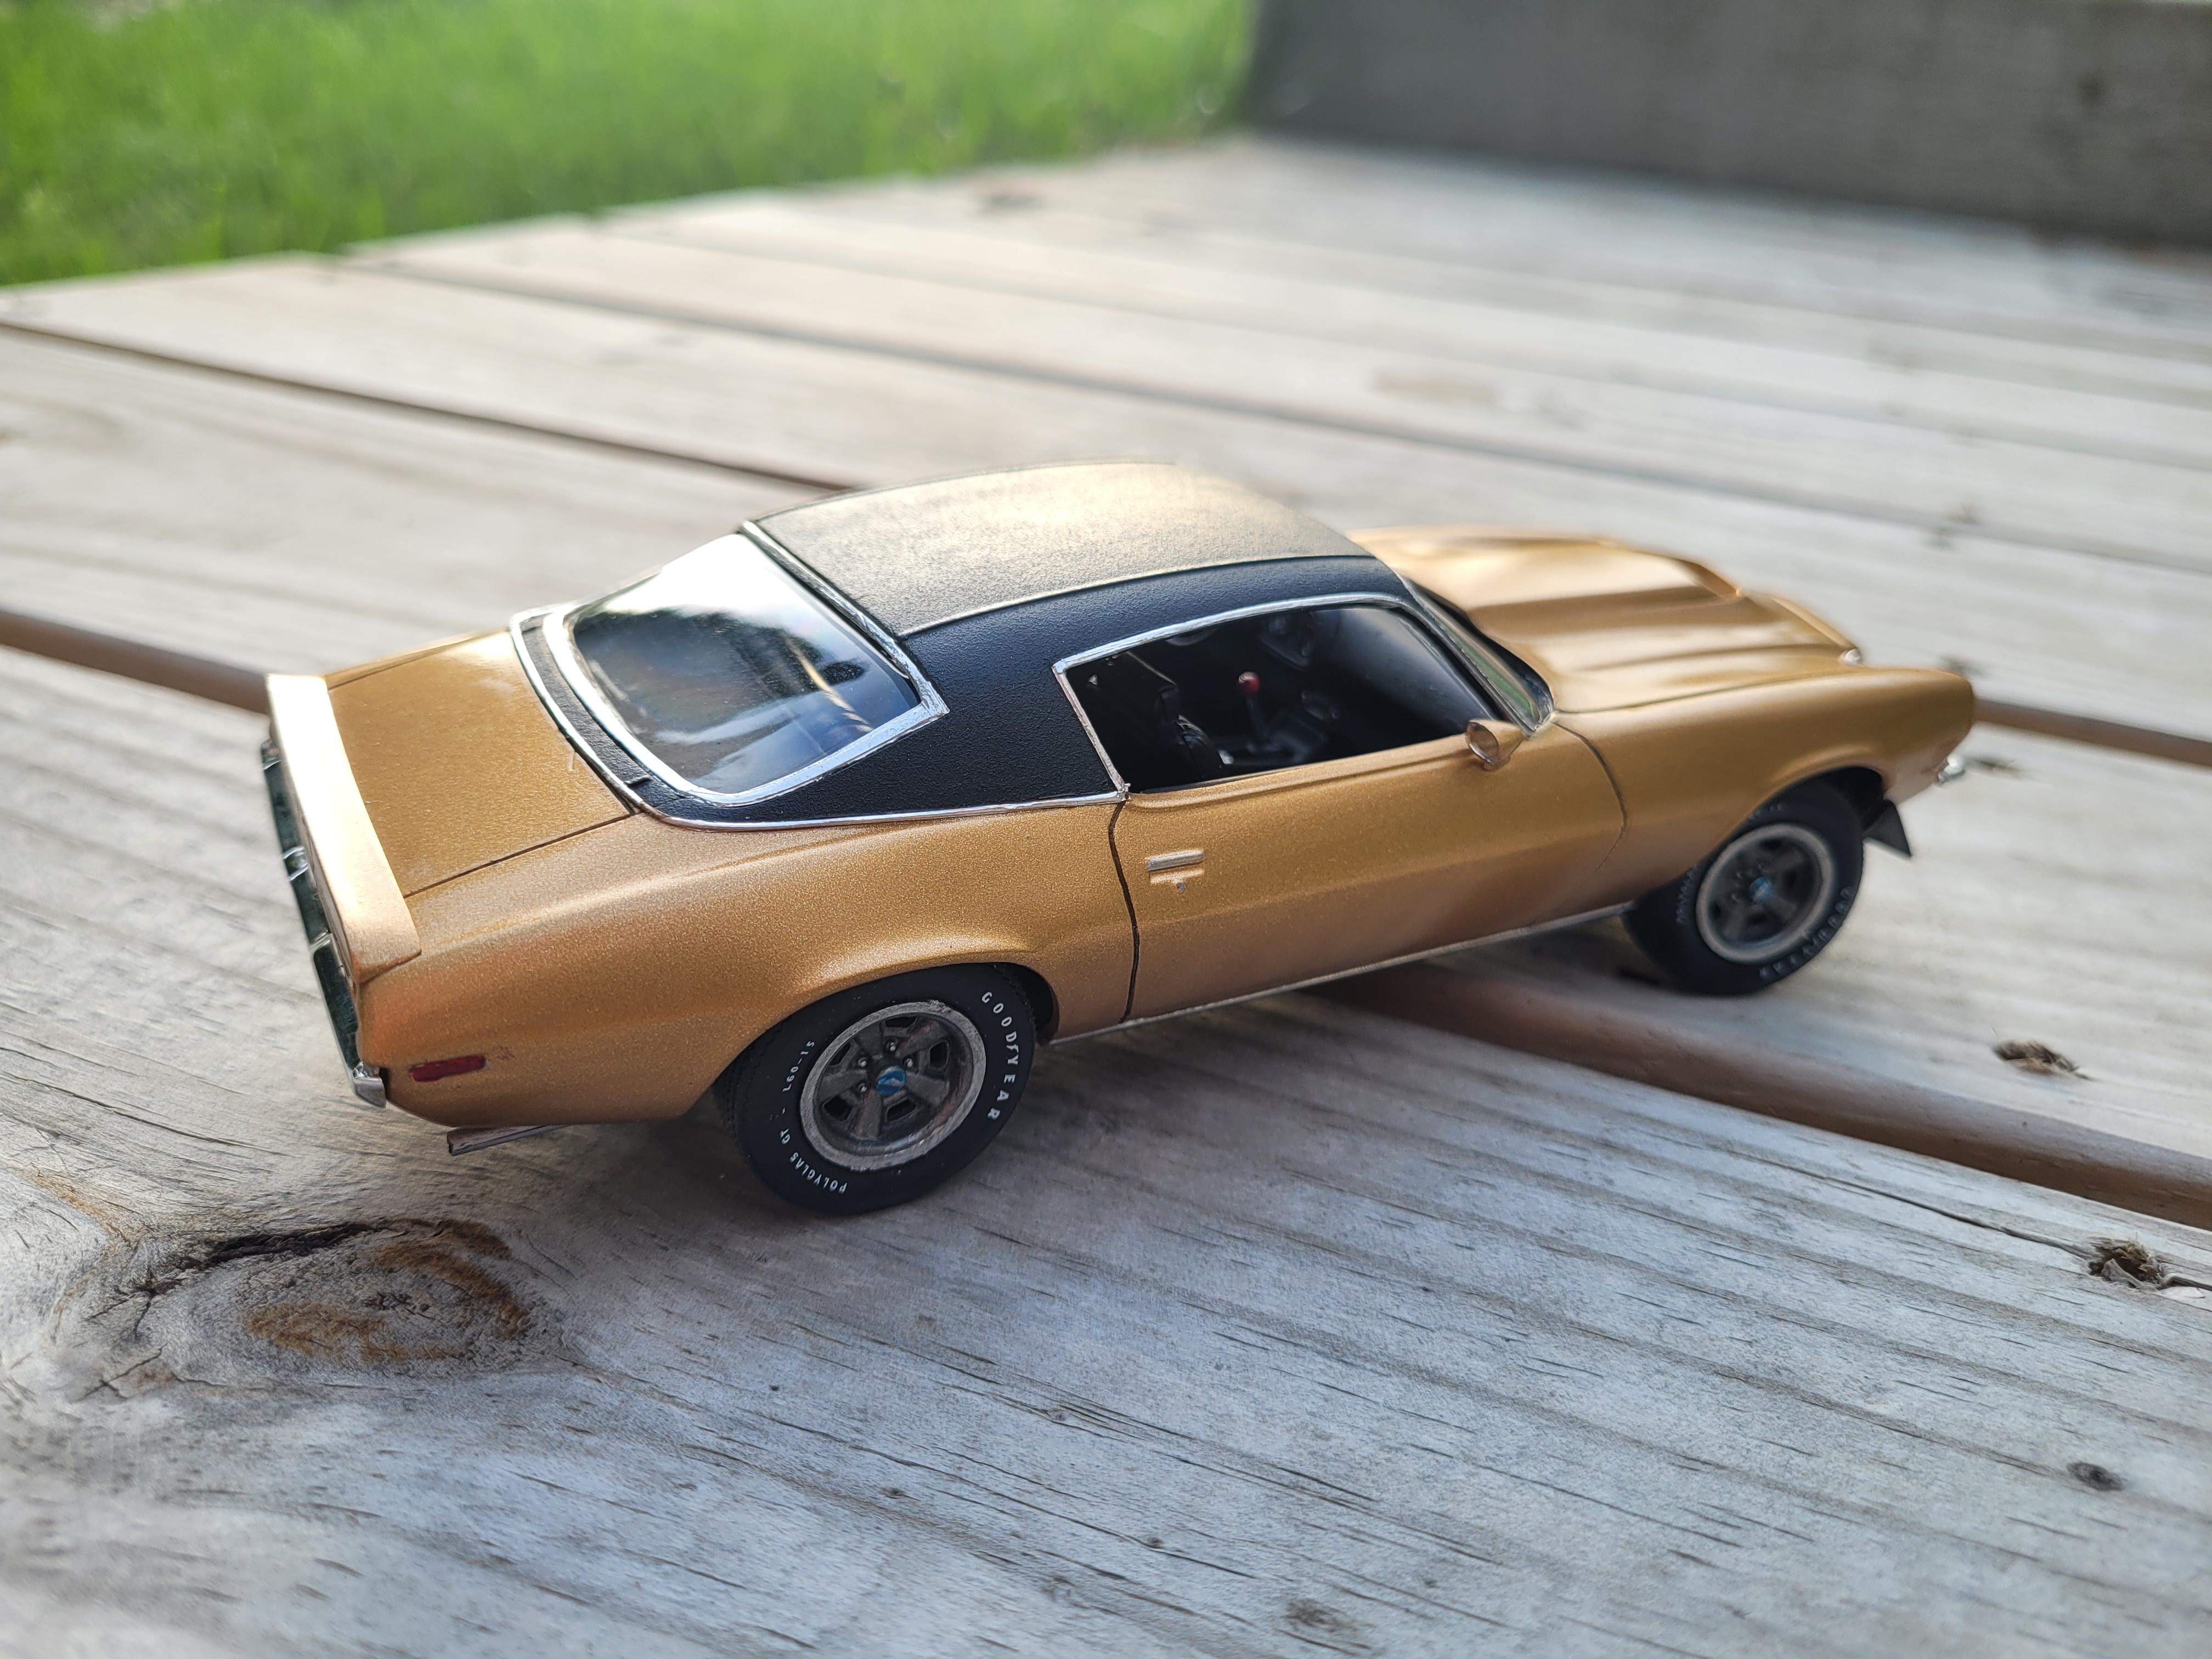
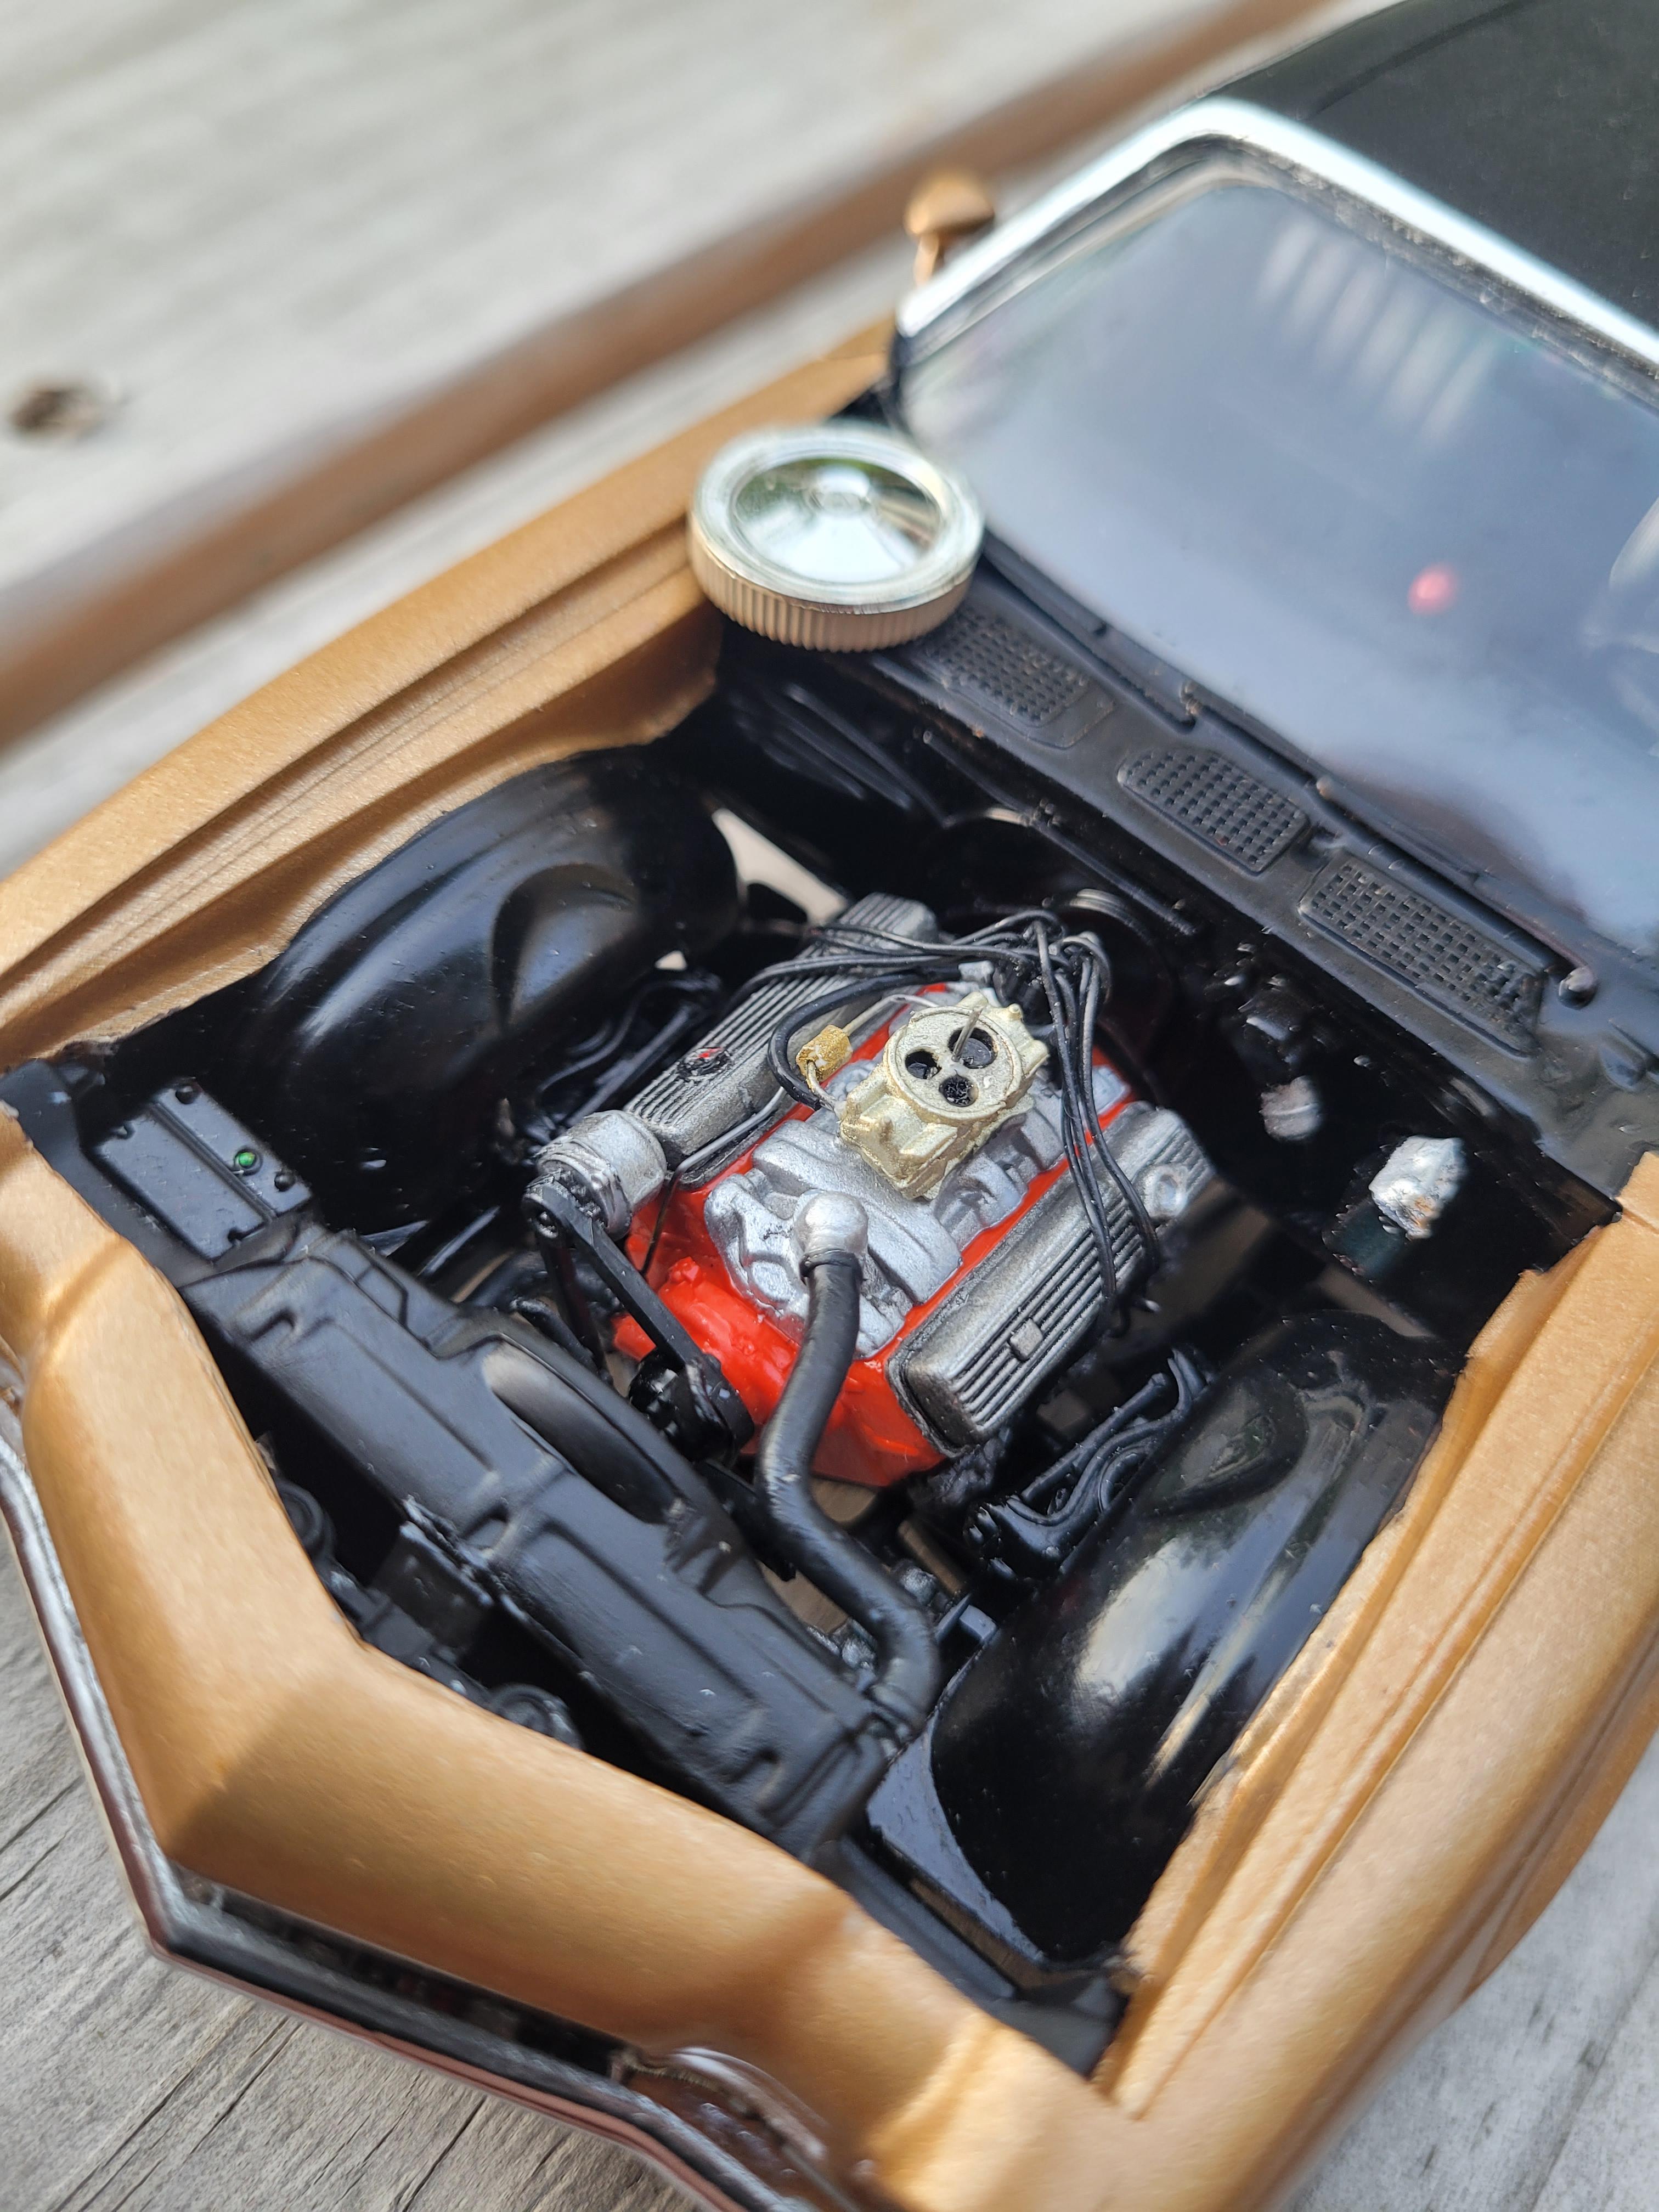
Gold with black vinyl top '70.5 Camaro full bumper car.
the60falcon replied to the60falcon's topic in Model Cars
Hey Monty! Please don't quote me but it was one of the testors xtreme lacquer golds. I'd have to check when I get home,as they make 2 different ones. And if I remember correctly I just glued the spindles in a position I liked them in. I think it adds some visual interest! Appreciate the kind words. -
Johan '69 Eldorado done Redline era Hot Wheels style!
the60falcon replied to the60falcon's topic in Model Cars
Thank you, yes I use rustoleum textured paint on my vinyl tops. -
Quarter mile trips only ??
-
Johan '69 Eldorado done Redline era Hot Wheels style!
the60falcon replied to the60falcon's topic in Model Cars
Thank you! Looking forward to seeing your Falcon! -
Gold with black vinyl top '70.5 Camaro full bumper car.
the60falcon replied to the60falcon's topic in Model Cars
Thank you Mike! I used part #100 from Evergreen
-
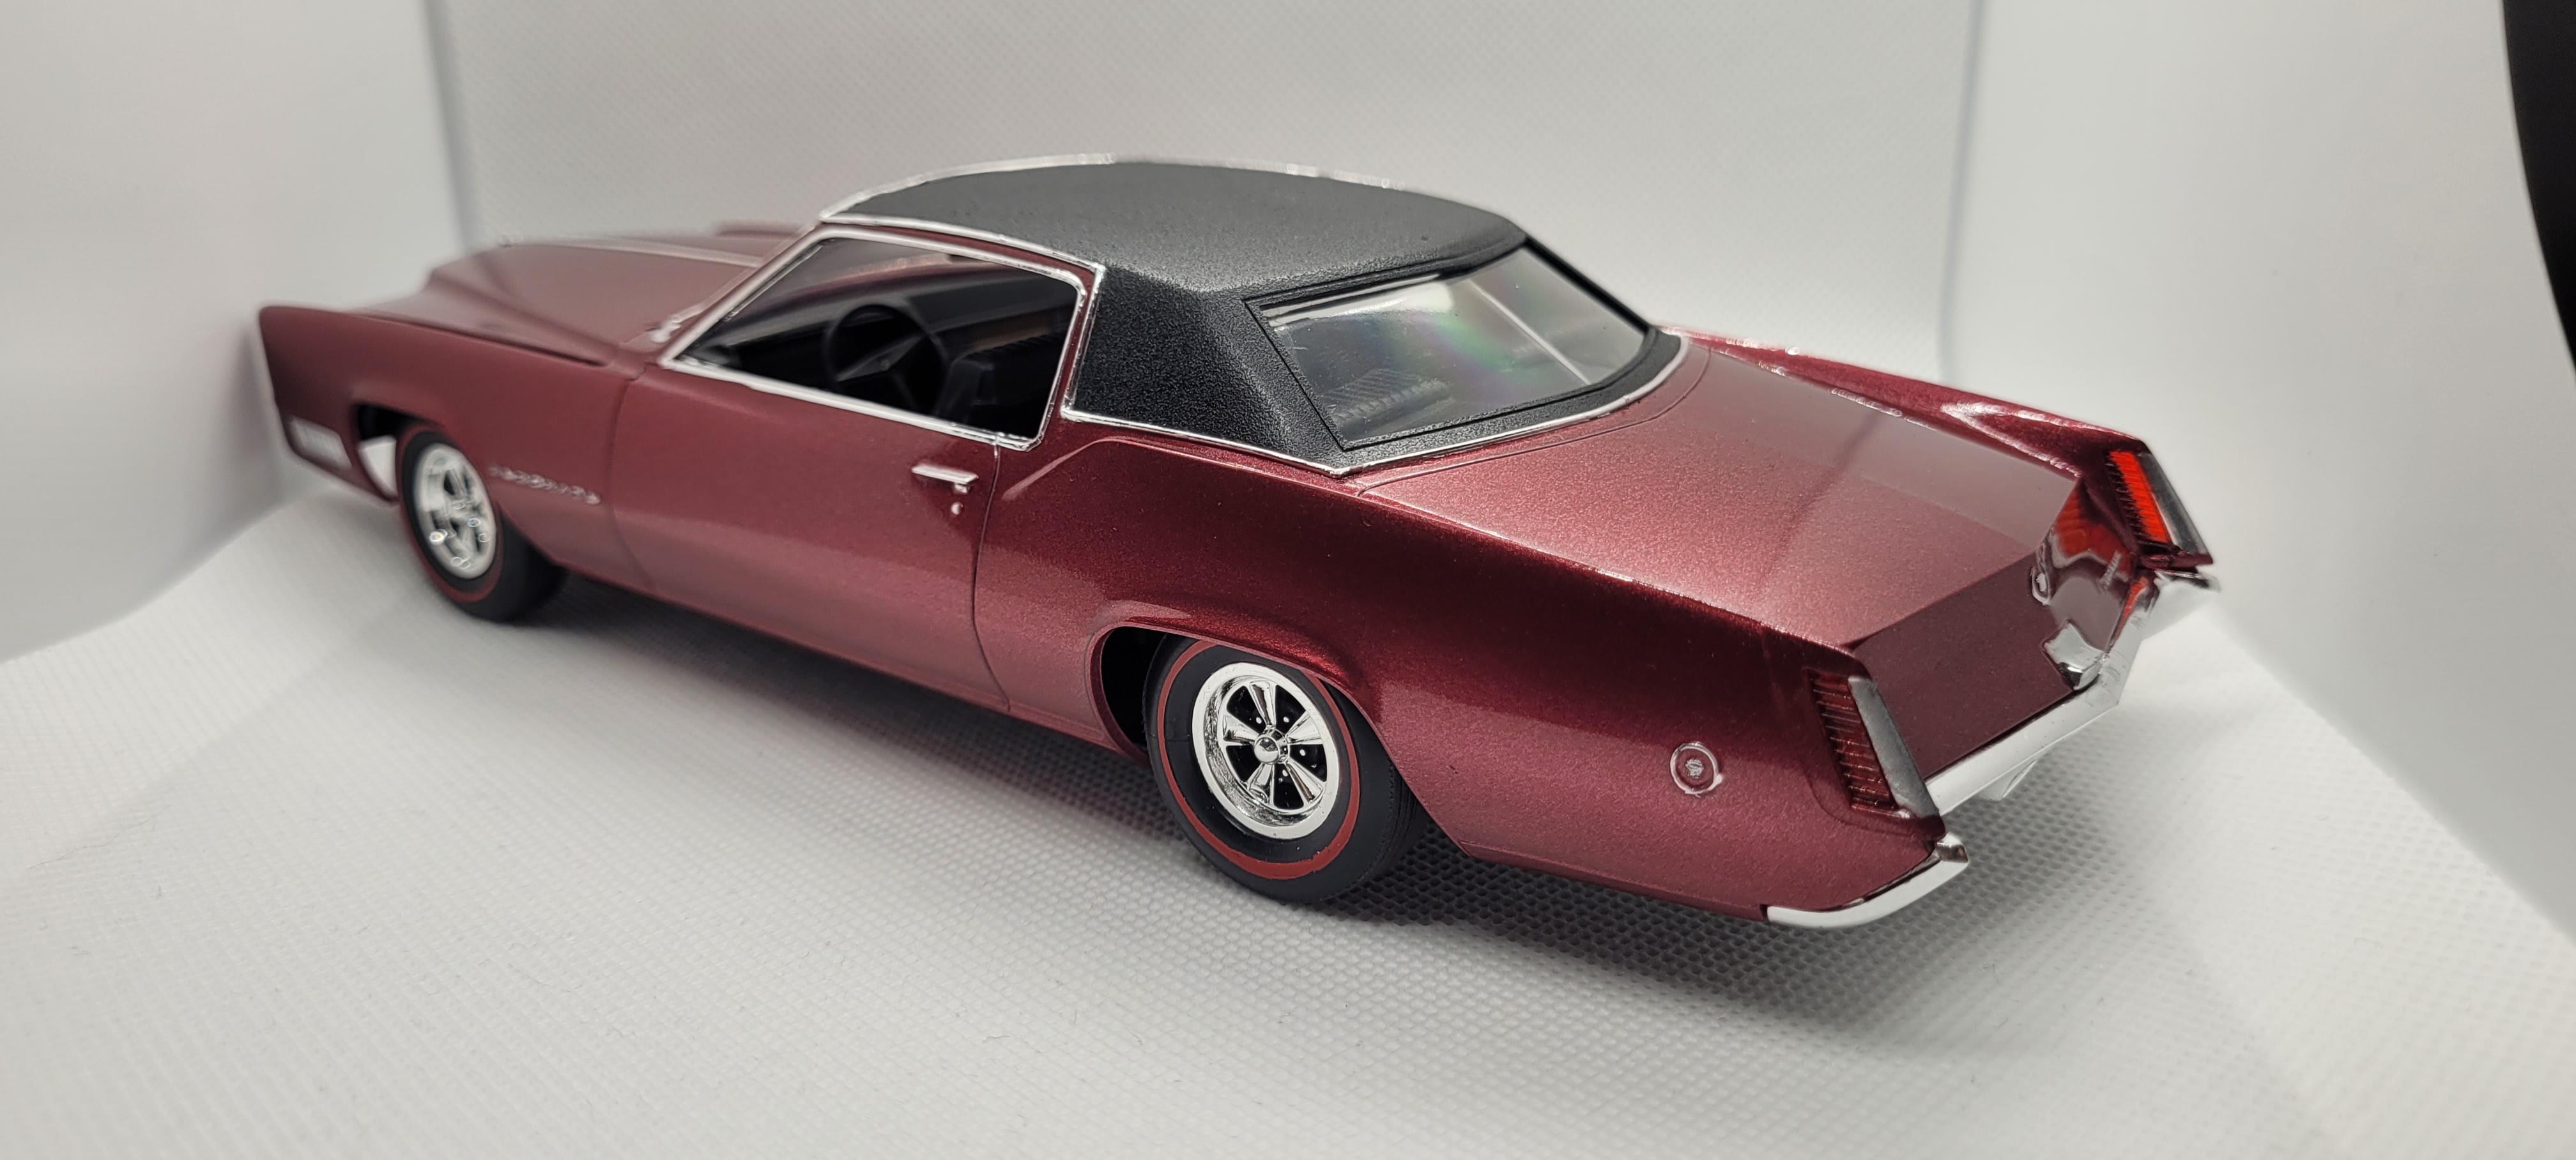
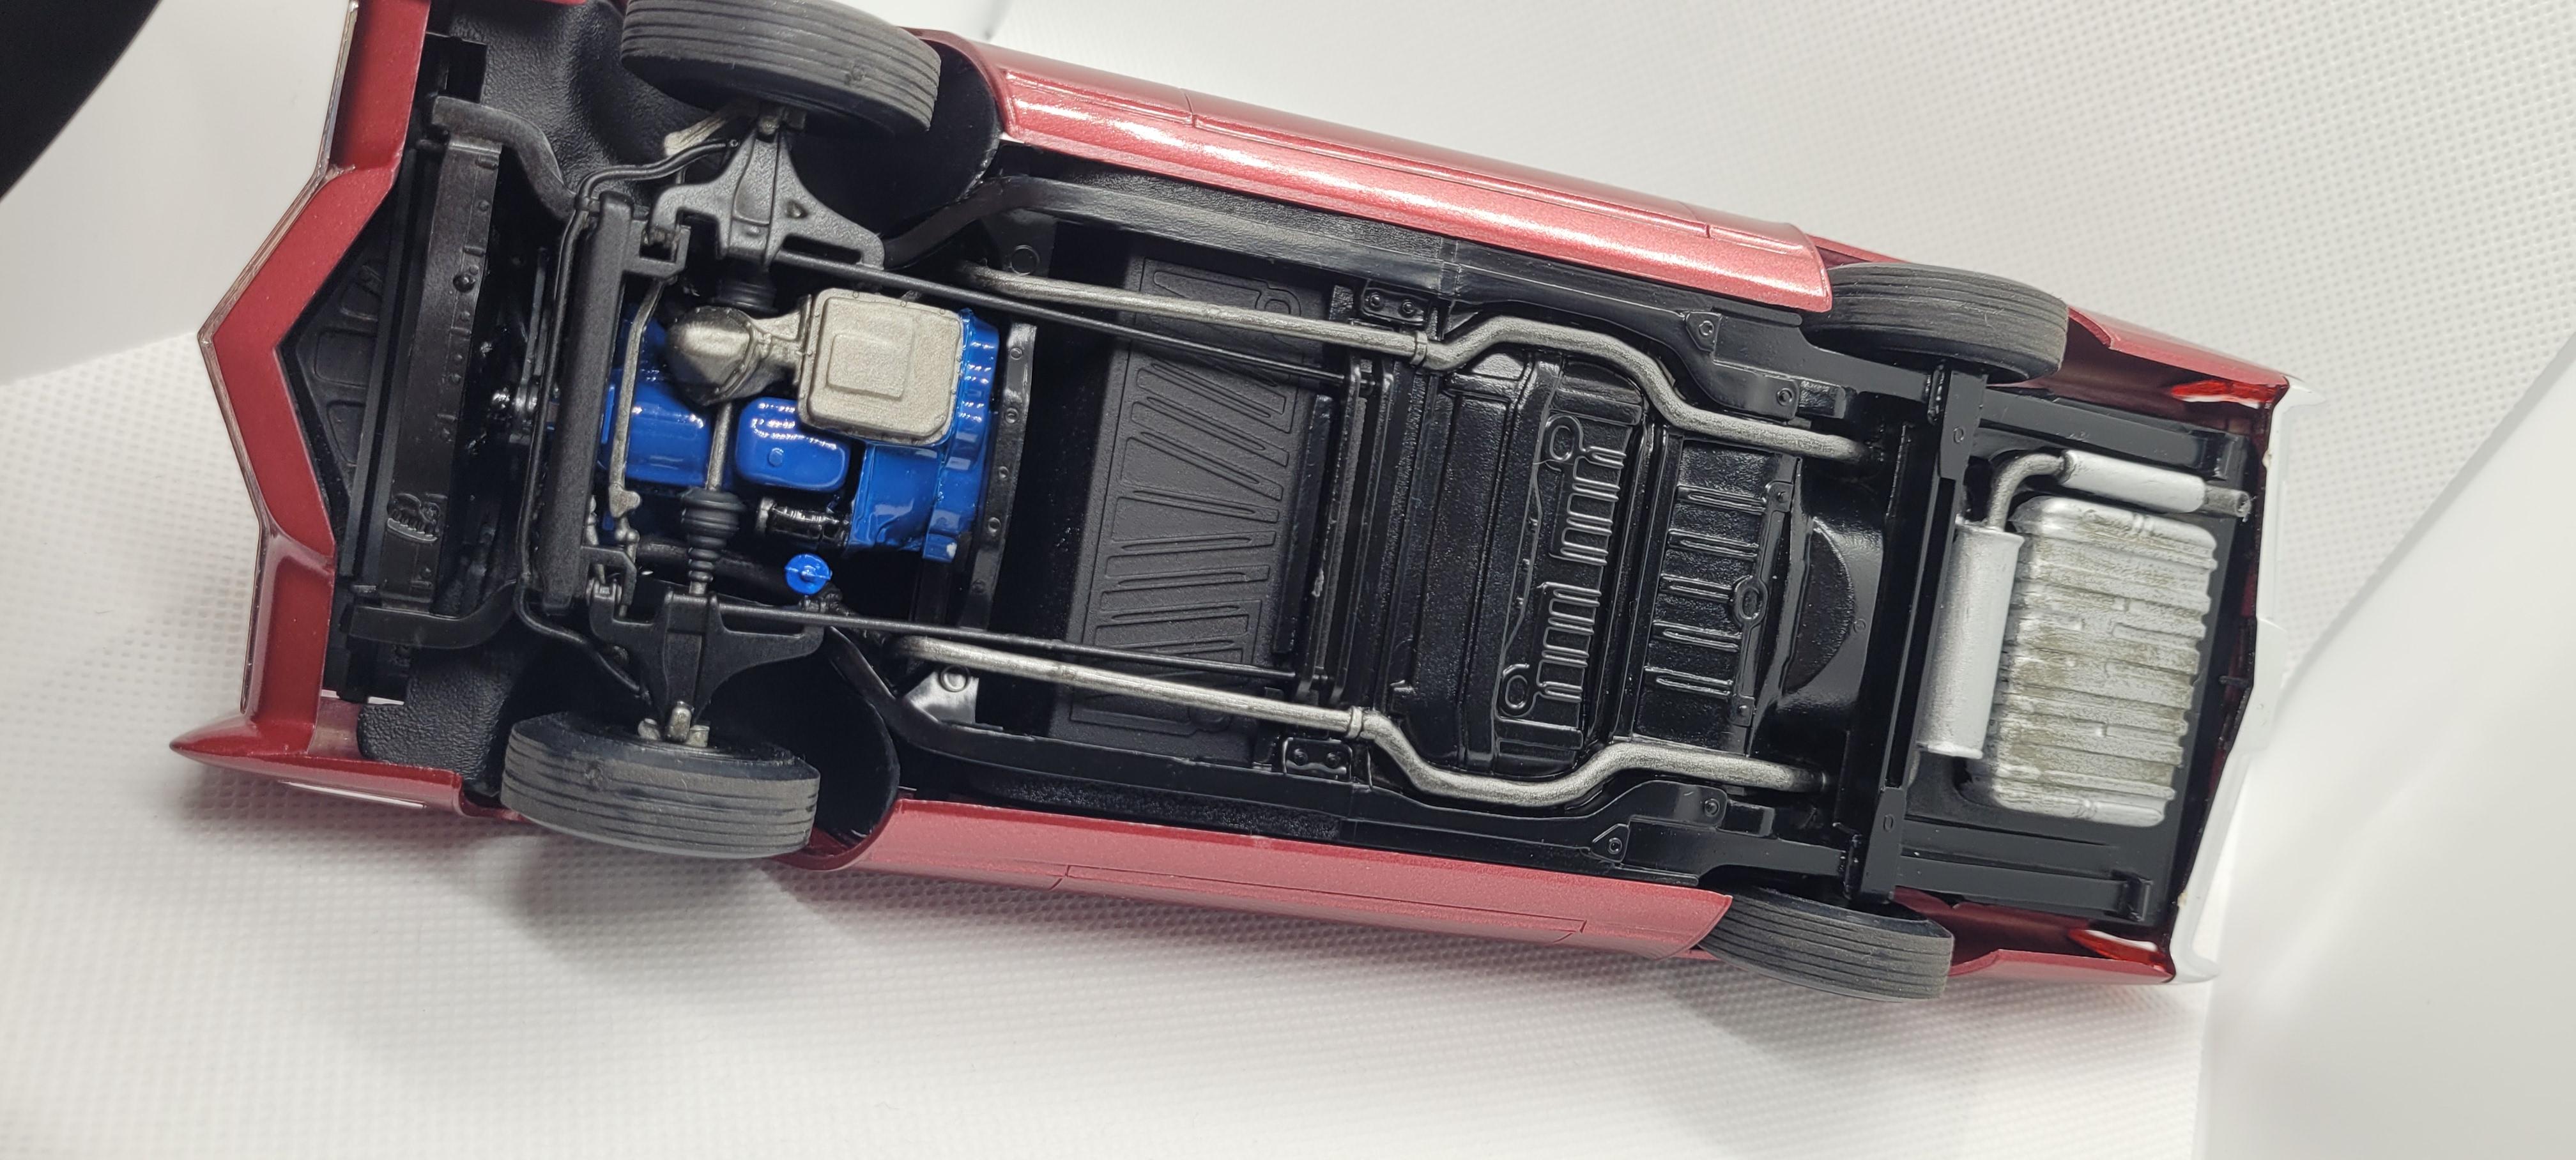
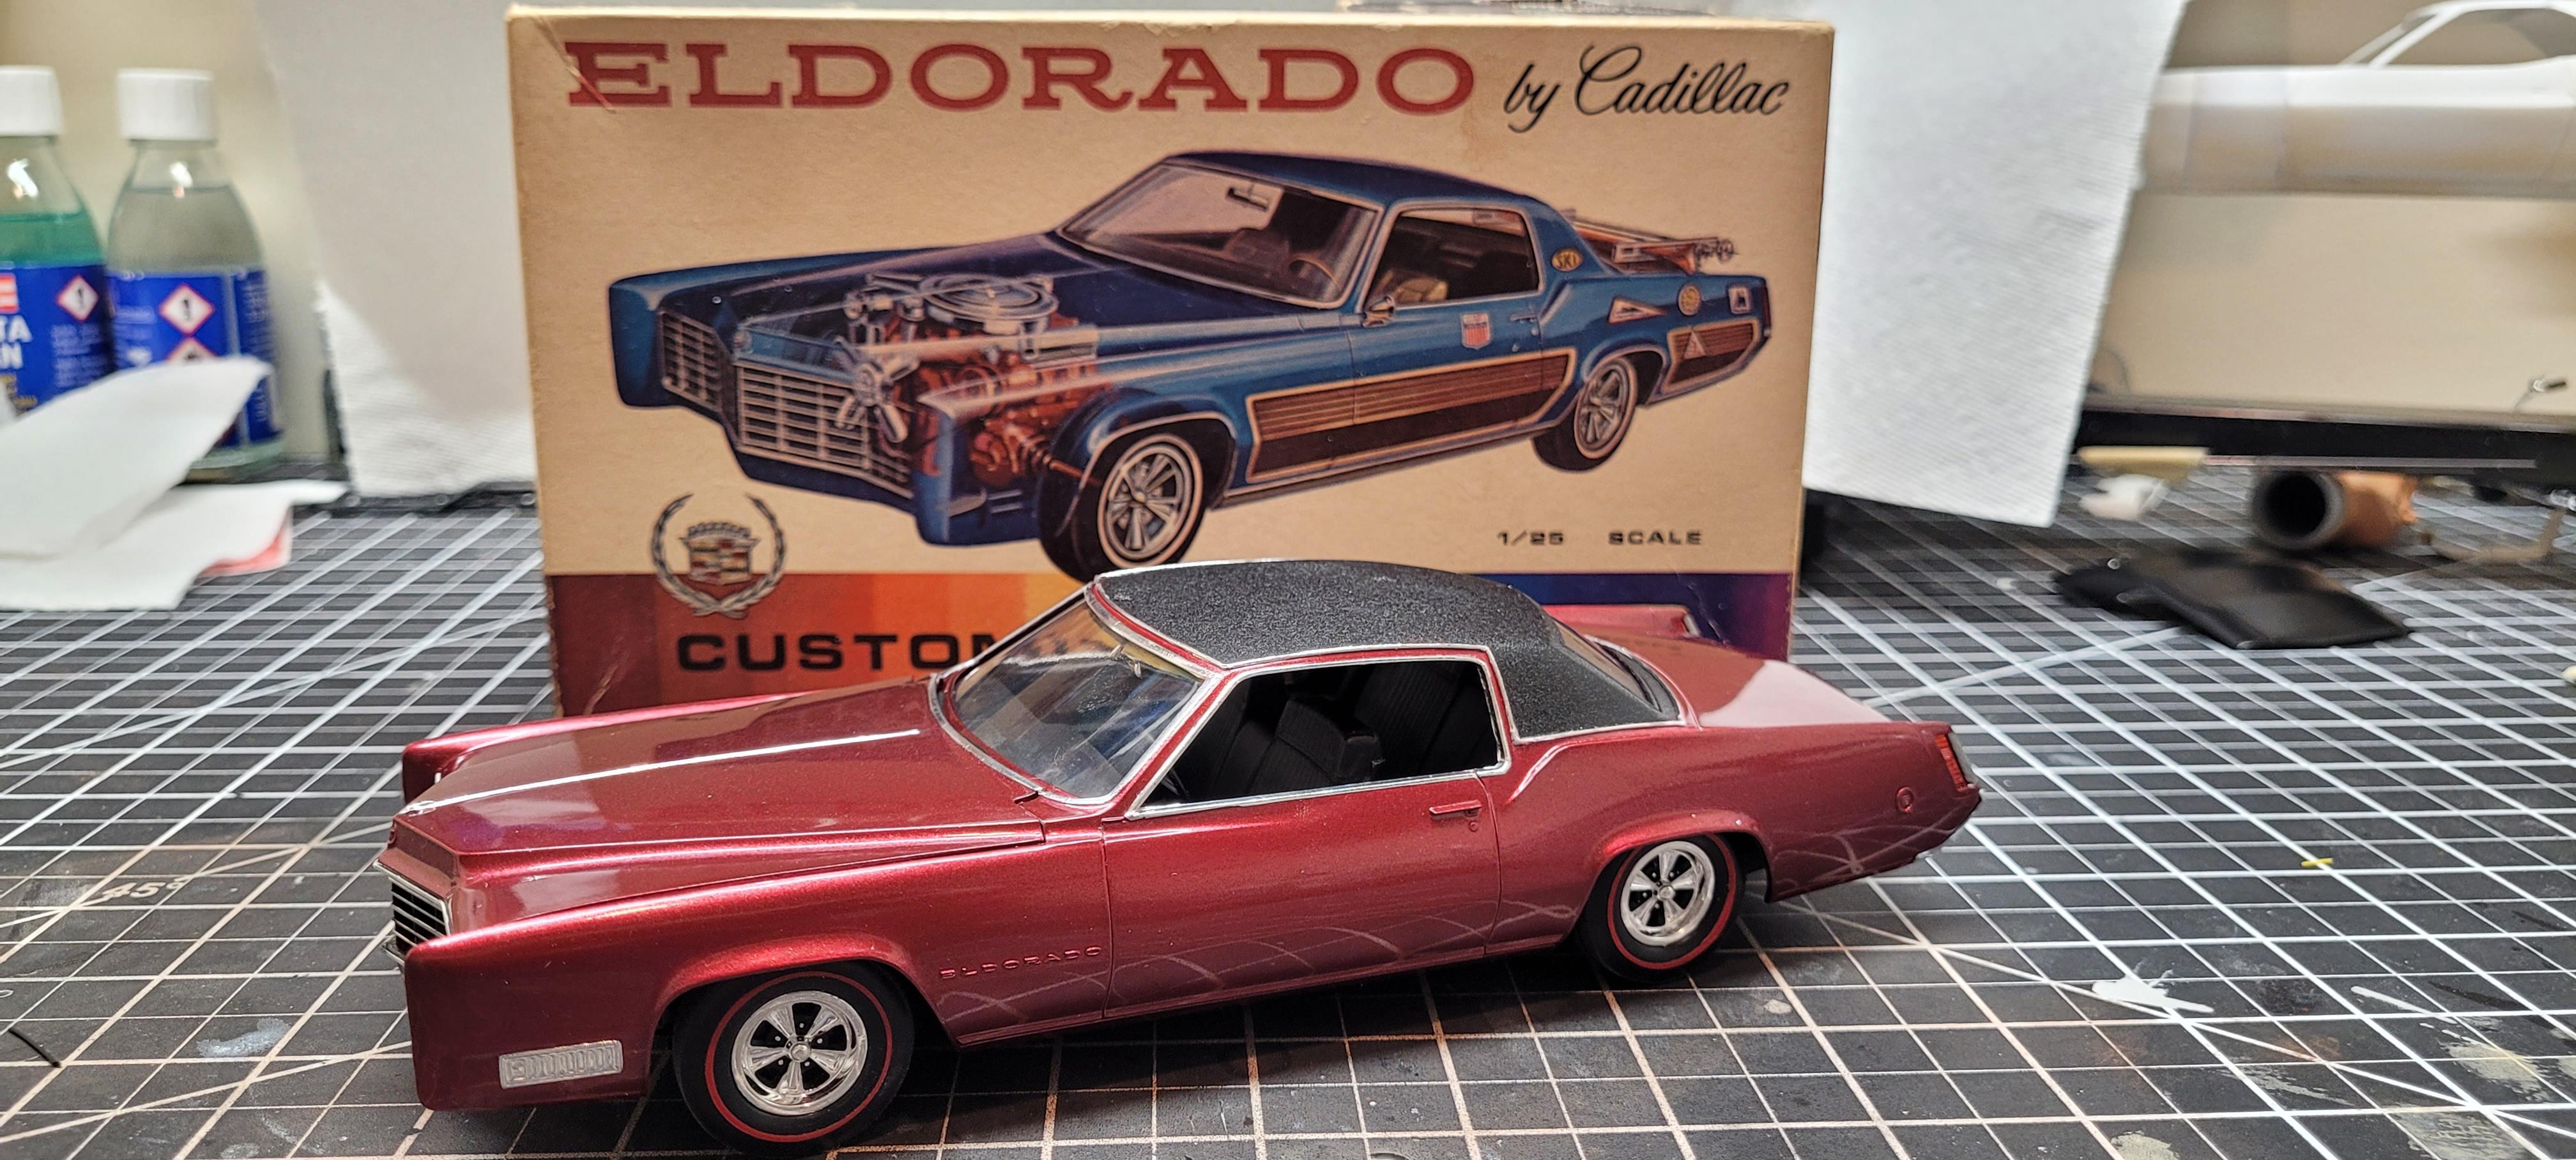
I was super into redline era Hot Wheels for a while, at one point I had over 700. Store display Camaros, employee owned cars, pretty ridiculous. But I always loved the Custom Eldorado, so when I got this kit I knew what I had to do. I repaired a broken tail lamp area as is very common on these, added a quick vinyl top and some of the custom parts for the front end. I also moved the distributor to the correct location for a 69 472 Caddy and did some interior and engine detail, as well as more foil than I enjoyed doing ? Nothin too crazy. I used NOS Steven's international redline tires I had laying around to complete the look. Color is Mr Color metallic bloody red.
- 32 replies
-
- 15
-
-
Thank you everyone!
-
Nice build, much better looking with the single rear axe
-
PETERBILT WRECKER
the60falcon replied to Brutalform's topic in Model Trucks: Big Rigs and Heavy Equipment
Very nice build, love doing big trucks. I've got one of these in my stash to build! -
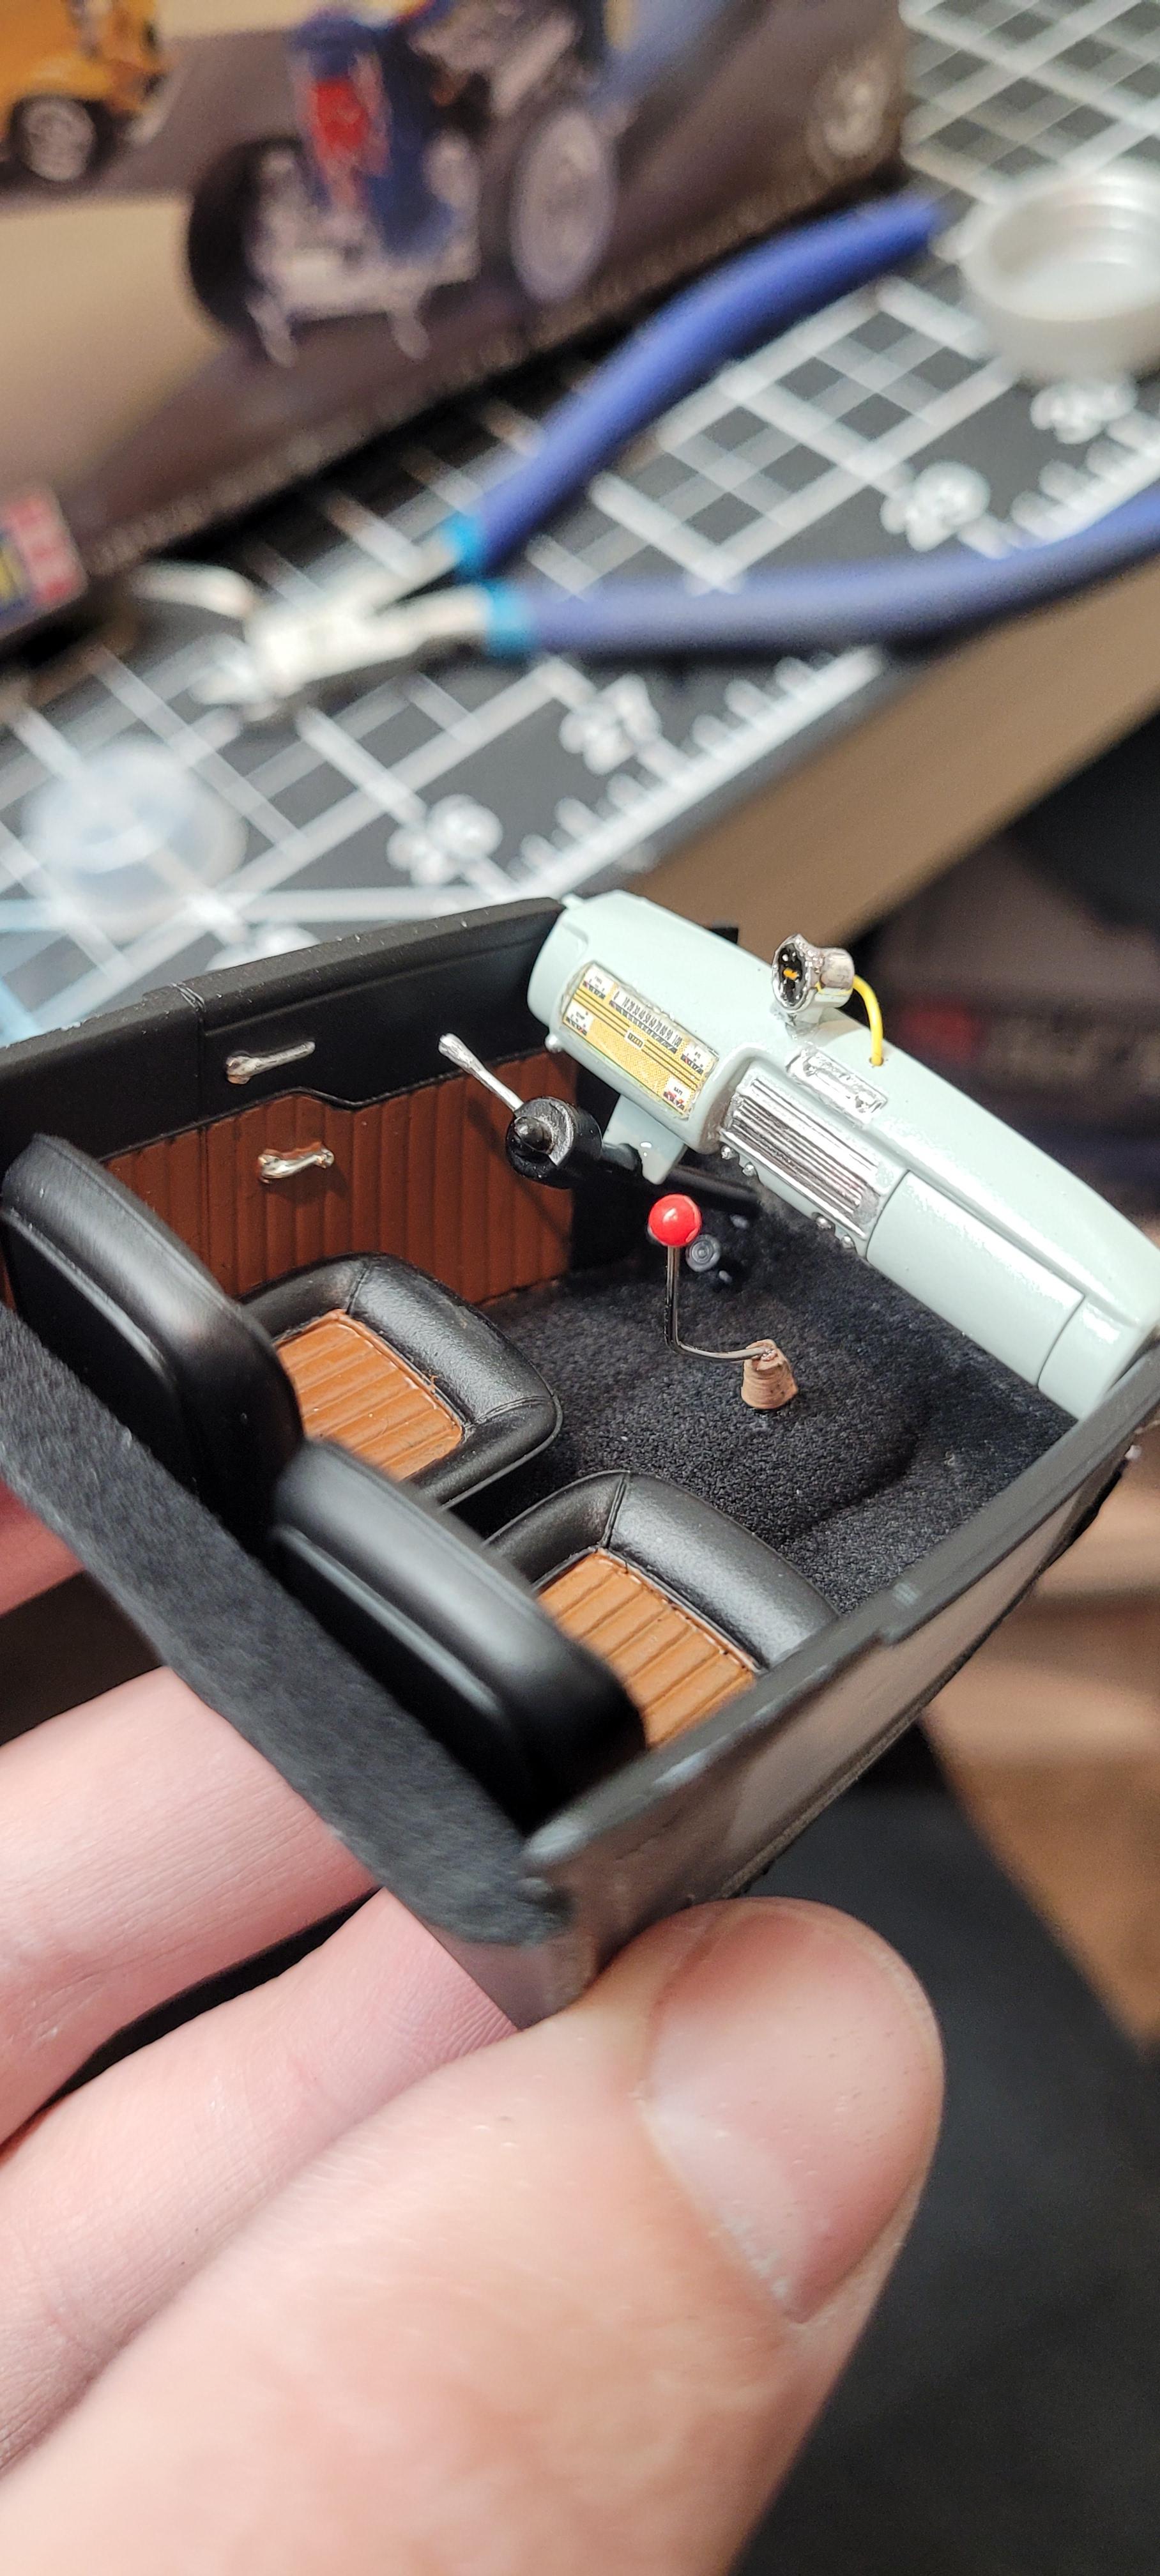
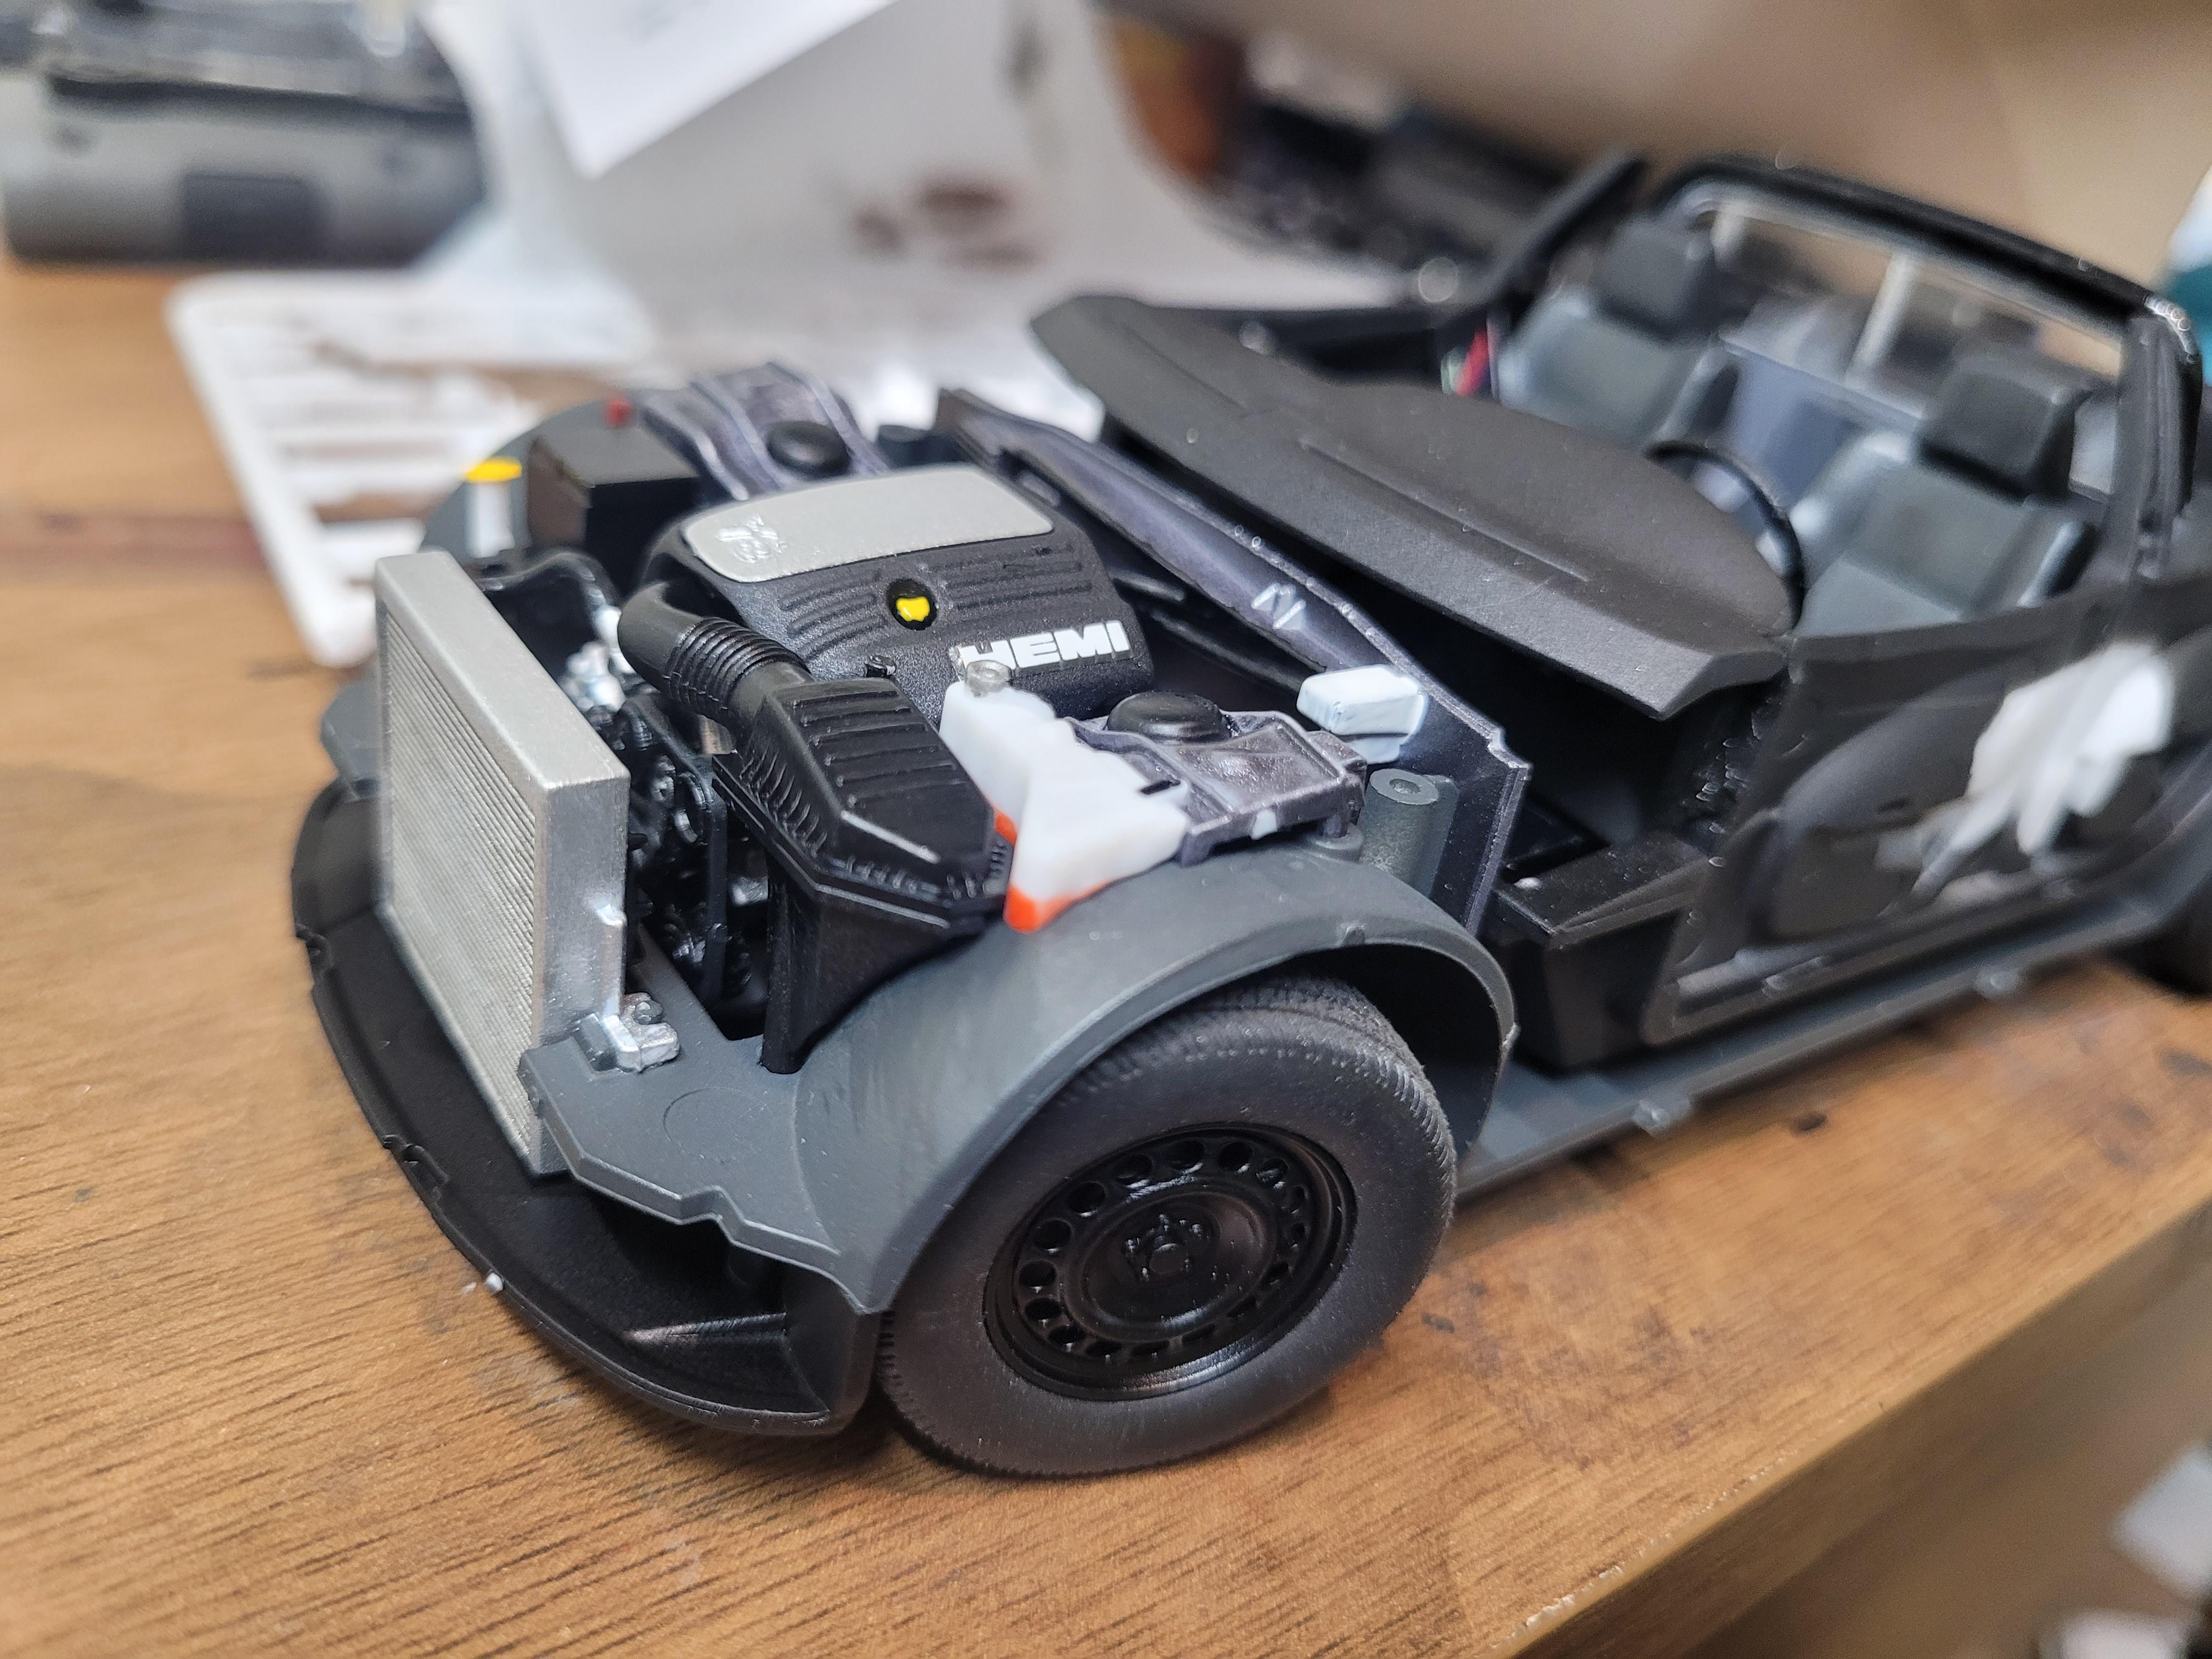
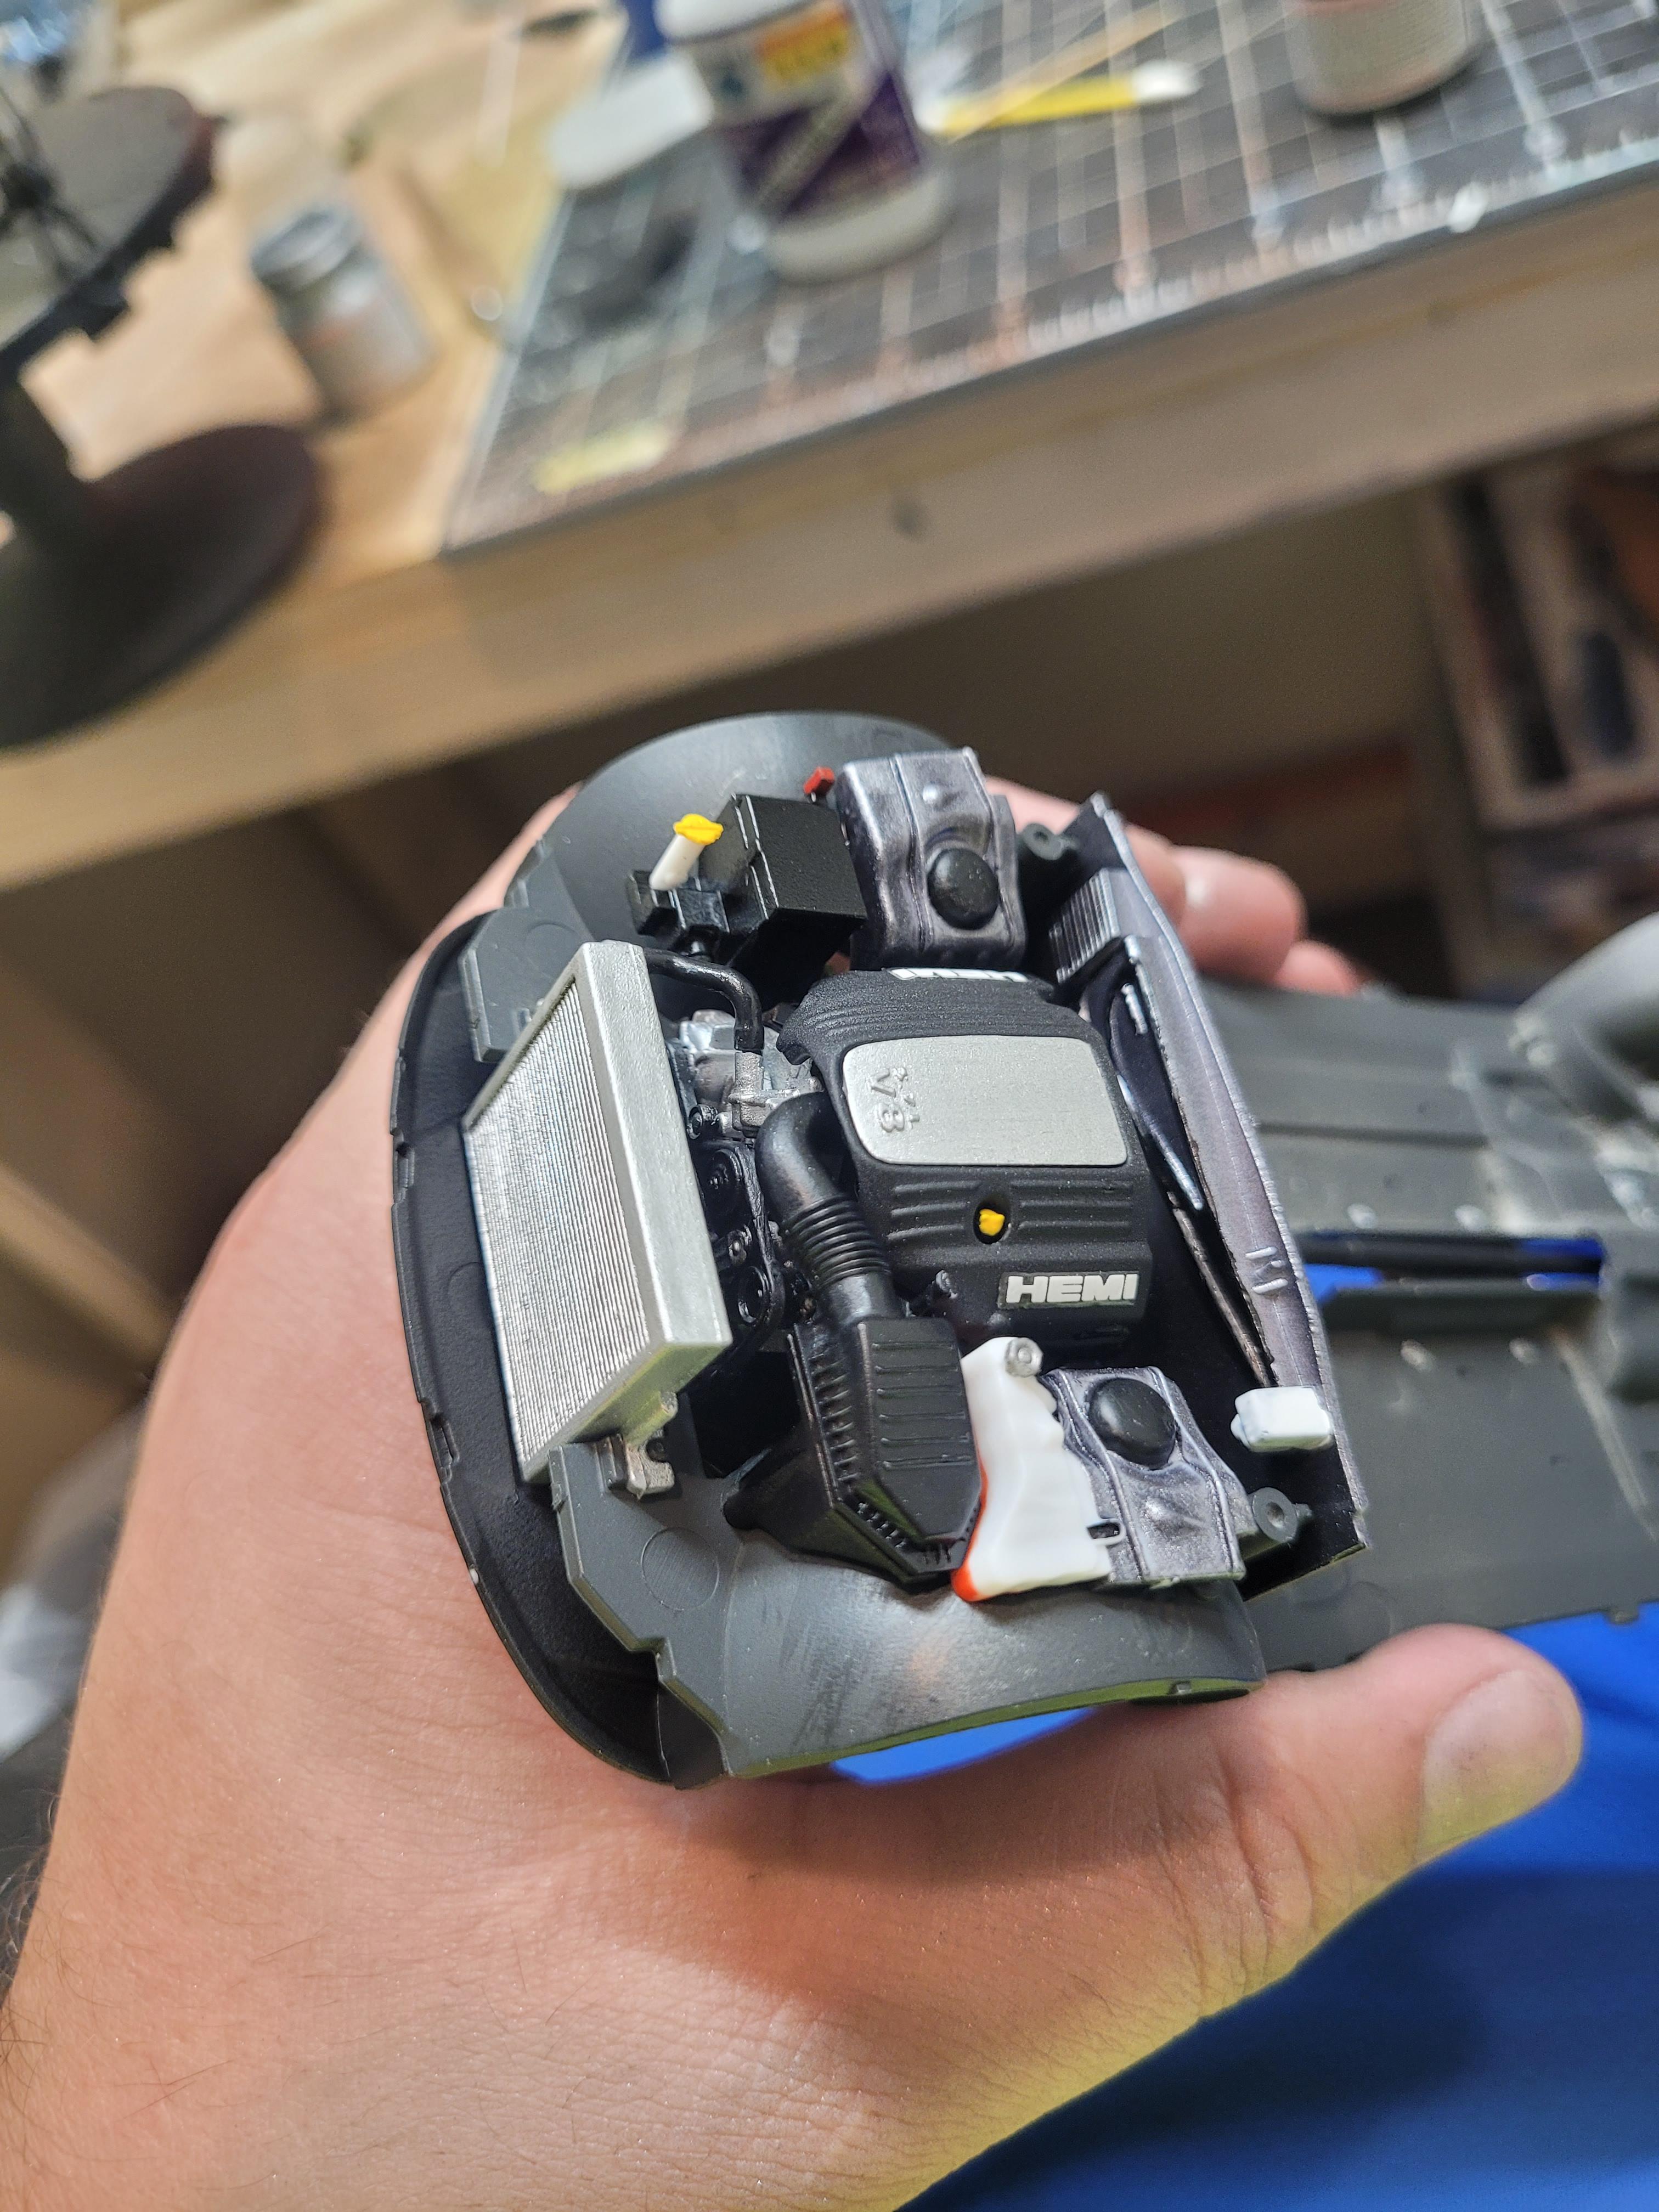
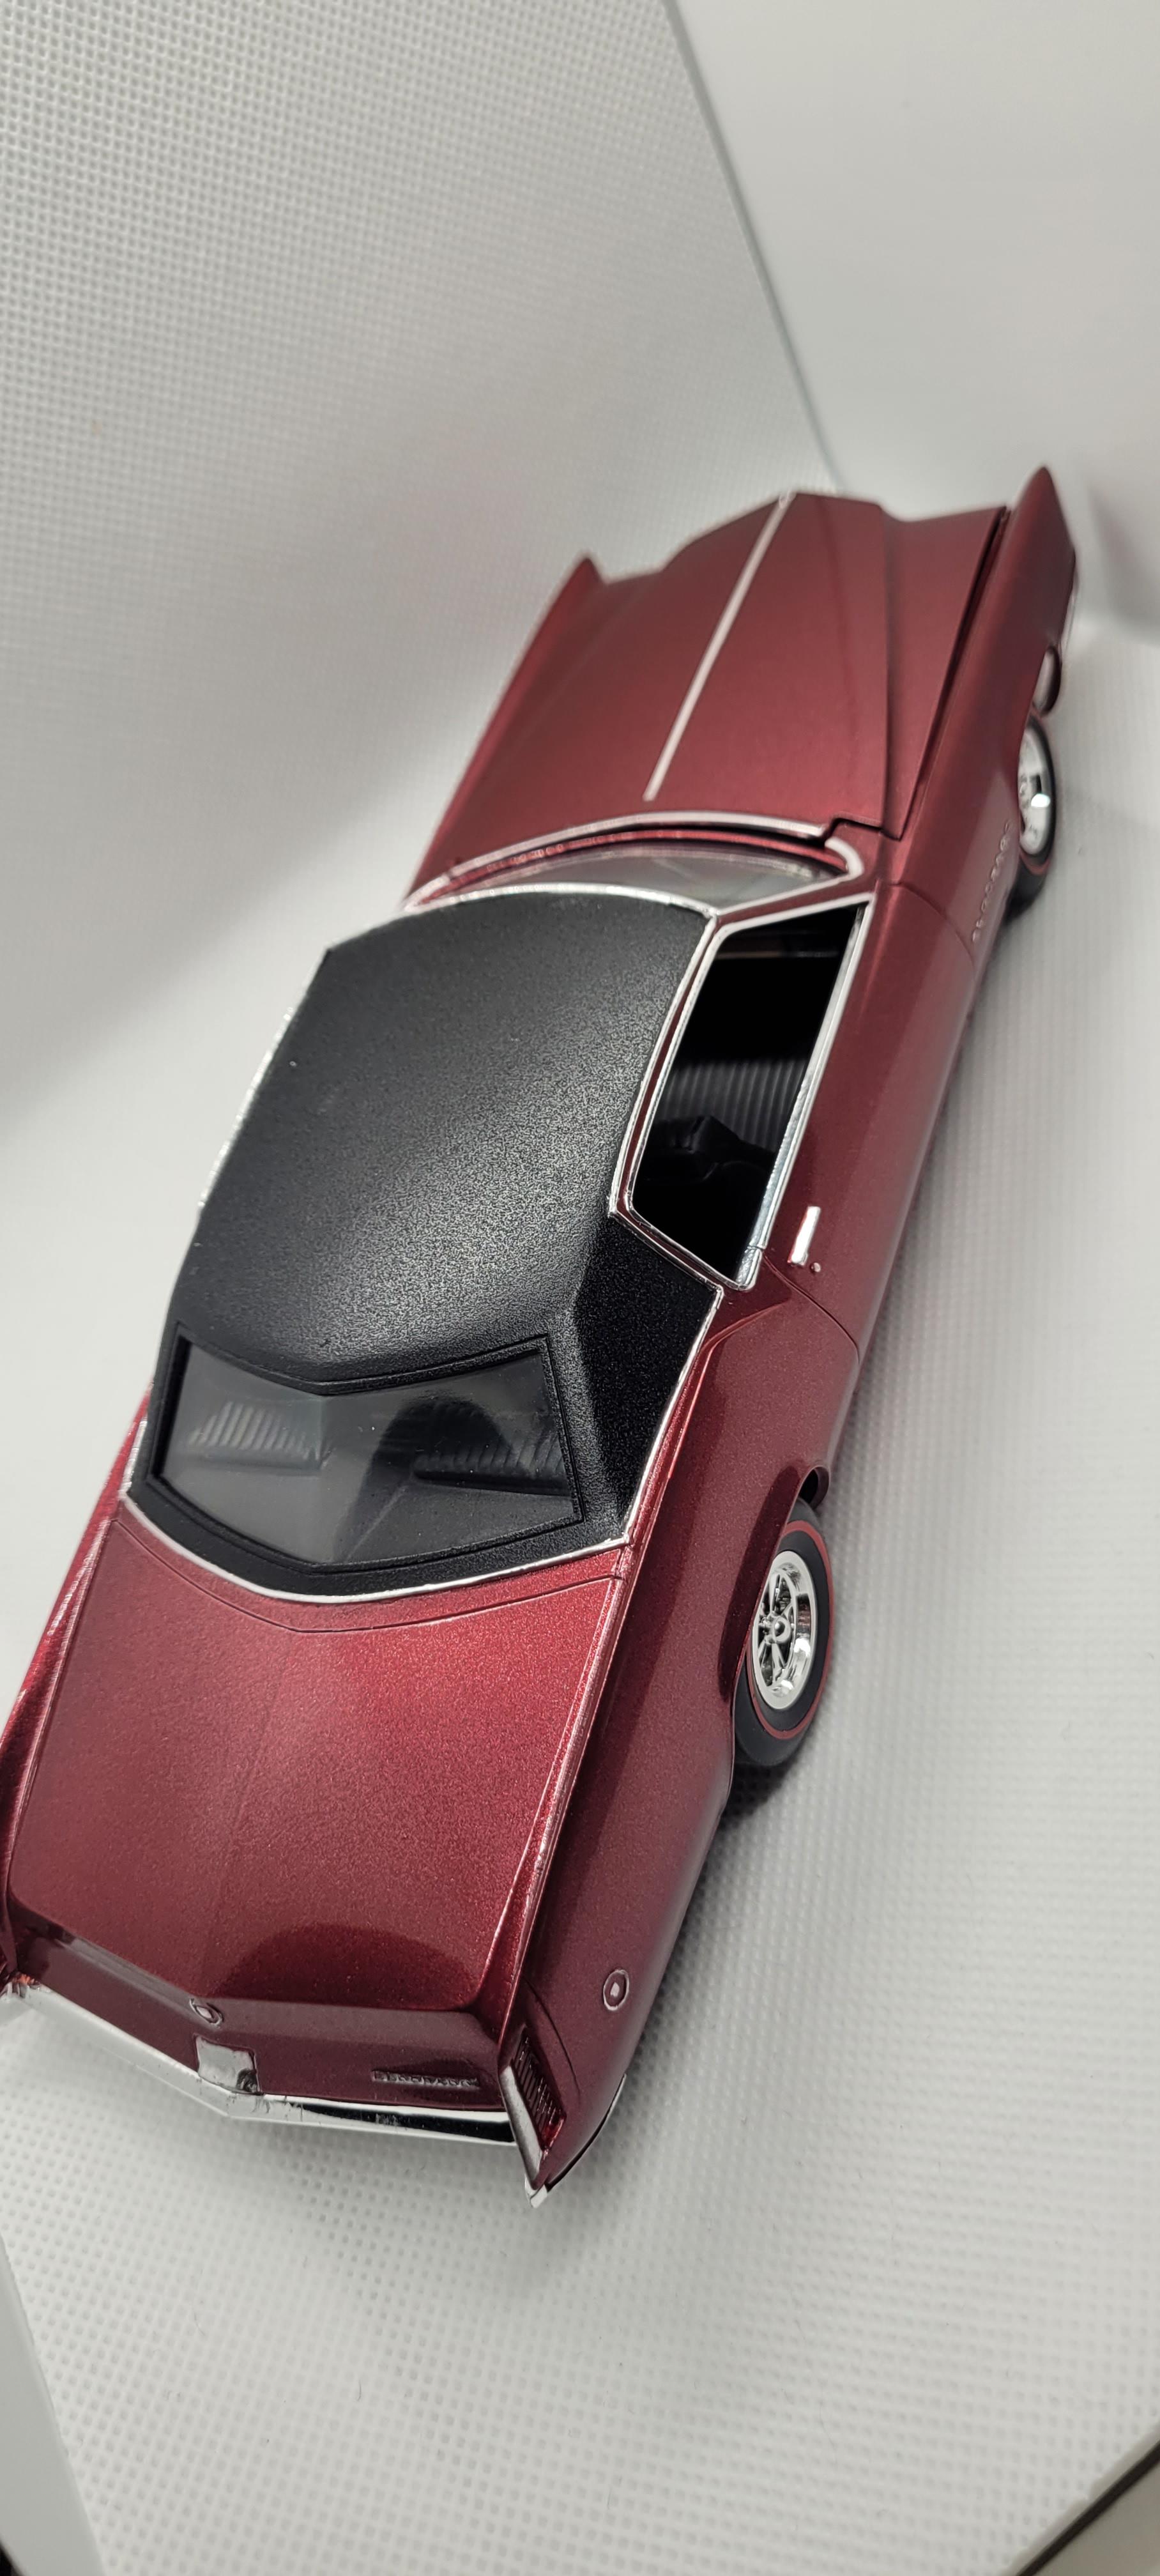
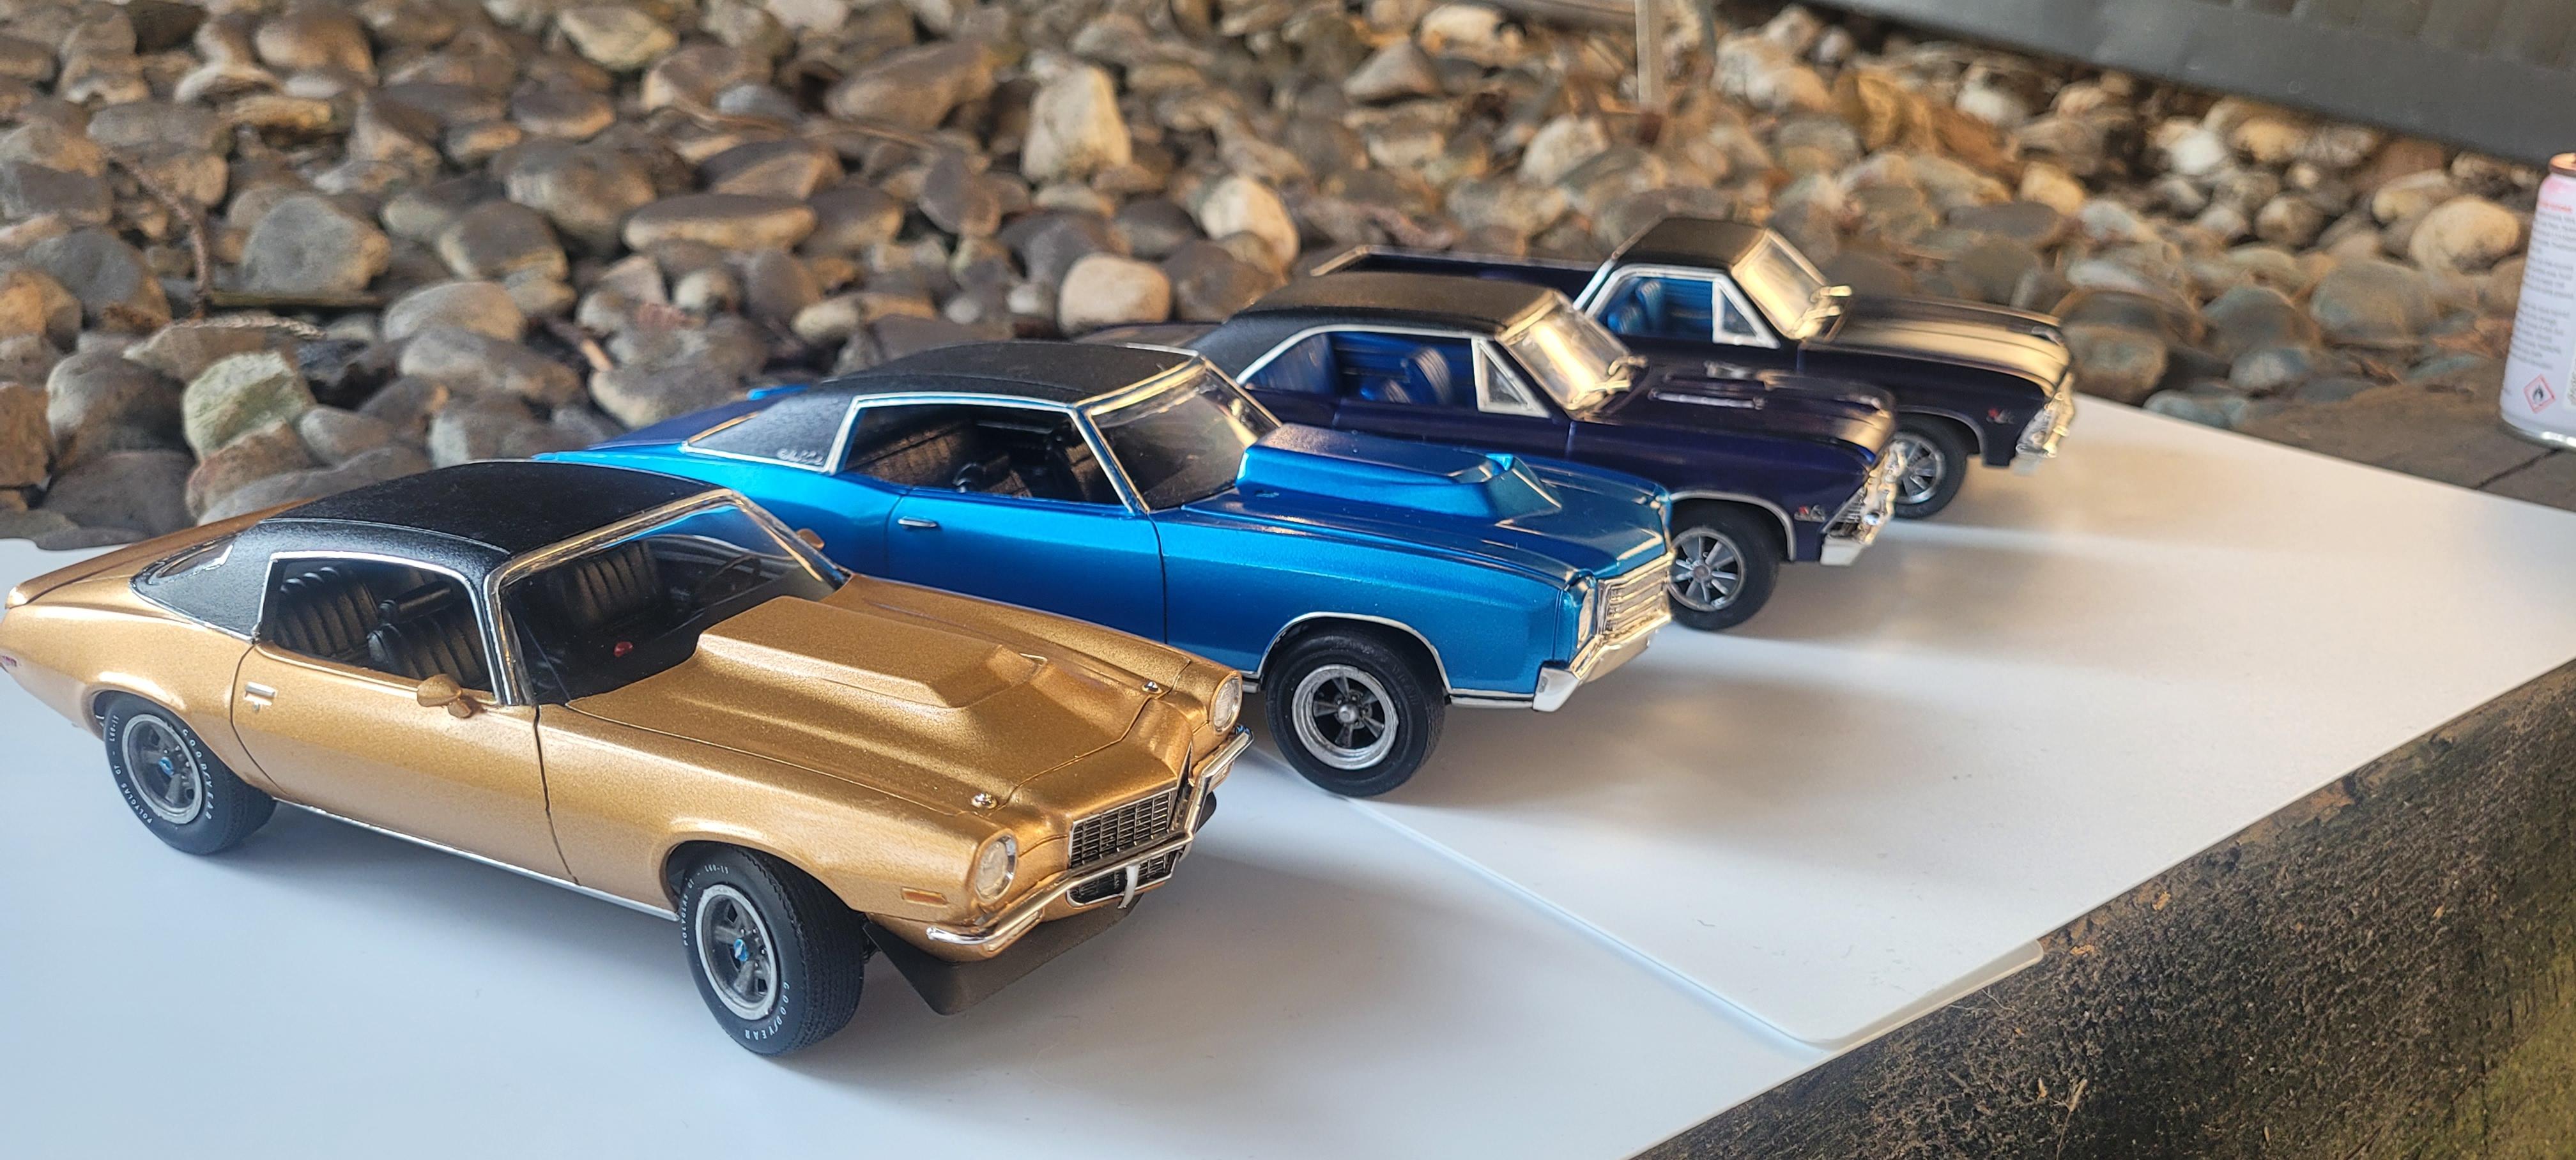
Did this to replicate a car my dad's best friend had. Unfortunately my attempt at the stripe decals didn't cooperate with the L-88 hood. maybe in the future I'll try again, added embossing powder for carpet as I do on most of my builds, fuel lines, plug wires etc. Lots of trimming to the dash and glass to get a proper fitment. I also took some time to make the grille fit the opening a little better. This kit is a little tough but with some work and patience they turn out okay, there's some things I'd have done differently now, but live and learn. My vinyl tops are always done with rustoleum textured paint, shown is the Camaro with my fleet of vinyl top cars, funny enough they're all Chevy's and I'm a Ford guy!
- 17 replies
-
- 12
-