
comp1839
-
Posts
2,003 -
Joined
-
Last visited
Content Type
Profiles
Forums
Events
Gallery
Everything posted by comp1839
-
it can be a daunting task to undertake kaleb. so back to the tires. after machining the tires parallel, i put a 2" bore in the tire to act as the center axis. i then ground both sets of tires to their proper o.d.'s. (4.50" and 4.312") today i ground all 4 tires to their proep widths. next i added the counter bores that will become the bead of the tire (both sides of the tire and all 4). then we add the insde radius to the wall, then the radius to the outide edge of the wall and for now we're done. later we'll add the depth wear holes and some stencils will let me spray the manufacturer names on them. so after 3 days of working on the rear tires we finally have them. a note if your going to duplicate my efforts. these tires are HEAVY! they are , after all, solid tires. they require a very robust wheel, suspension and chassis combination. next i'll start on those robust wheels to support these "hotdogs".
-
derrick, you're not hijacking my thread. this is about modelbuilding not what's mine or yours. i love it! 1/12th scale? i don't know if you're interested or not i have a 1/12 scale pro mod '57 i started a while back. it's in my photobucket. http://s243.photobucket.com/home/comp1839/allalbums feel free to look through it. may be some day i'll finish it. lol. is yours blown and turbo charged?
-
New TDR Products and REVIEWS
comp1839 replied to arick's topic in Car Aftermarket / Resin / 3D Printed
i use 00-80 x 1/4 socket head cap screws for head bolts. it's an internal wrenching bolt, so the head is small enough to fit in the c-bore on the head bolt flange. i use either black oxided carbon or stainless depending on the contrast i'm looking for. -
i'm glad you like the top fuel car guys. it's nice to hear from fellow modellers. derrick, i'm sorry to say i don't sell parts but, i have given permission to the guys @ LSM to copy and sell some of my engines. namely 1) a 737 cu in bbc w/ olds p/s heads 2) a 417 donovan 3) a set of ardun heads for a flattie 4) msd pro mag and coil and point box 5) 3 hole c/f injector hat 6) cragar super trick wheels (f&r). i'm not sure of the sites requirements to purchase, so you'll have to check in. also, there are the super pieces from TDR. they have a host of new products available for 1/8 scale. visit their website , you'll be amazed. 1/8 scale ain't what it used to be! THANK GOD! i hope this helps. if you need any thing else just yell.
-
don, i for one appreciate when people go the extra distance to make things correct. the effort that's being put forth here, to move 1/8 scale into the muscle car era, is extraordinary. keep up the "extreme" effort, it doesn't go un-noticed or under appreciated.
-
grandpa, i don't mind some extra eyes looking over my shoulder. glad to hear my builds inspire. feel free to critique my work. i'm always willing to learn. kaleb.....what kits? this is scratch building extreme. i make almost every concievable part by hand. i hope you aren't detered from trying this. it will test your modelling skills and your sanity. the body for the pro mod cuda build is a TDR '71 cuda resin prototype (these are not yet available to the public, but soon). it will have the rear quarters raised a half inch and the front stretched three quarters of inch. welcome aboard. thanks rick. i see you aswered just before i did.
-
i am staring 2 new 1/8 builds. a twin turbo hemi powered barracuda pro mod and a modern blown brad anderson hemi top alcohol dragster. both cars will require large rear slicks and rear wheels. the size rear tires on the TAD car will be 36-17-16. on the P/M car, it will sport a pair of 34.5-17-16 slicks. the wheels and tires are all hand machined. i've included some in process shots so you can see how much actually goes into making your own parts. the tires start out as raw neoprene round stock 5" in diameter. i band saw them into aprox. 3" widths. i then grind the two sides parallel to each other. since i don't have a hole saw deep enough, i then remove a core by hole sawing from both sides. since the resuls of coming in from both sides is a hole thats not straight, i then take a 2" end mill and bore through the intire tire in one shot. now i have a straight bore and a true center to work from. i install the tire onto an arbor i've made and start bringing the o.d. down to .100" larger than i want, using a long 3/4" end mill. from there, i grind to the correct o.d. while achieving a tire that is concentric to the center bore (wheel bead). in between, to kill the boredom, i also made my wheel sleeves out of 2"o.d.x1"i.d.x 2" long aluminum tubing. i,ve included some step by step pics. next i'll cut the rounded sidewalls and establish the correct tire width. hope you enjoy.
-
simply awesome!!!!!!!!!
-
nice to see you putting something together again! will this be hemi powered?
-
thank you guys. the amount of time (as i'm sure you all know) to build these, is severe. i spend spend about 1800- 2000 hrs to build these. so, when people compliment the cars, i really appreciate the remarks.
-
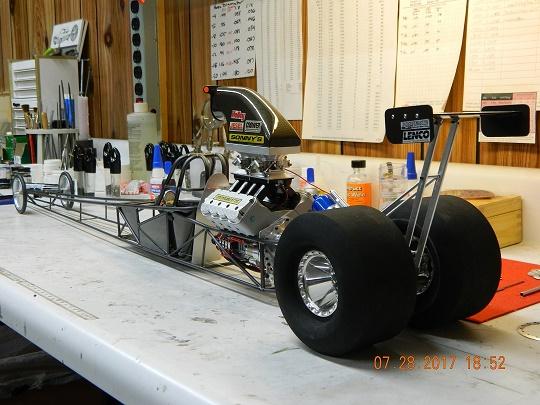
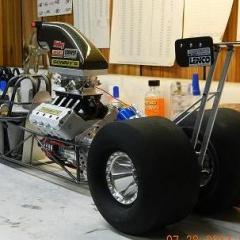
here's a car i built a little while ago. it's a 1-8 scale nostalgia top fuel dragster. it's based on a 225" f/e dragster chassis with a blown and injected, olds headed, big block chevy. waterman pump, msd pro mag 44, 14-71 blower, race pak data recorder. it has a 8 5/8" can with a lenco reverser and 12" chrisman rear. the chassis is soldered brass tubing, hand formed tig welded aluminum seat, hand formed aluminum body. hand made front and rear wheels, even grind my own rear tires. literally every component for this car was hand made from raw materials except the blower belt and the front tires (o-rings). it takes about a year for me to complete each of these cars that you've seen (this dragster and the AA/FA) i hope you enjoy.
-
New TDR Products and REVIEWS
comp1839 replied to arick's topic in Car Aftermarket / Resin / 3D Printed
since you asked......i think you should build it the way that best suits your needs. if a little custom is where it needs to go, then by all means, make it a little custom. i do believe you should push your own envelope though. try some details you've never done before, the dipstick idea sounded great. working in 1/8 affords you the opportunity to take your detail skills to the next level. so......have some fun! it looks good so far! -
blown hemi
comp1839 replied to comp1839's topic in All The Rest: Motorcycles, Aviation, Military, Sci-Fi, Figures
thanks guys. i couldn't be happier with the stuff i've bought from TDR. very nice components. the way TDR has worked with me has been a pleasant experience, to say the least. as you know, i build most all of my own stuff. the parts i've gotten have provided me with a really nice place to start which saves me a bunch of time. -
blown hemi
comp1839 posted a topic in All The Rest: Motorcycles, Aviation, Military, Sci-Fi, Figures
i recently finished a 1/8 blown hemi i started for a future pro mod project. the block started as a TDR unit that i modified to resemble a BAE block. i also used a TDR blower and valve covers. the rest of the engine is entirely scratch built. from the buzzard catcher to the drysump oil pan, it's all scratch built. i hope some will enjoy it. -
New TDR Products and REVIEWS
comp1839 replied to arick's topic in Car Aftermarket / Resin / 3D Printed
i've been studying the pictures of the small block cyl. head and from here it looks to be an 18 degree bow tie head. an added bonus for you performance minded chevy enthusiasts. -
New TDR Products and REVIEWS
comp1839 replied to arick's topic in Car Aftermarket / Resin / 3D Printed
if you're thinking about buying one of these engines, you should. i can tell you, i bought (2) 426 hemi's and i am definately not disappointed. nice detail, "tons of fun" to work with and loads of accessories (or you can do what i do and create some of your own). hope you didn't mind me jumping in and puttin' in my 2 cents worth. -
no