

Jurva
-
Posts
199 -
Joined
-
Last visited
Content Type
Profiles
Forums
Events
Gallery
Posts posted by Jurva
-
-
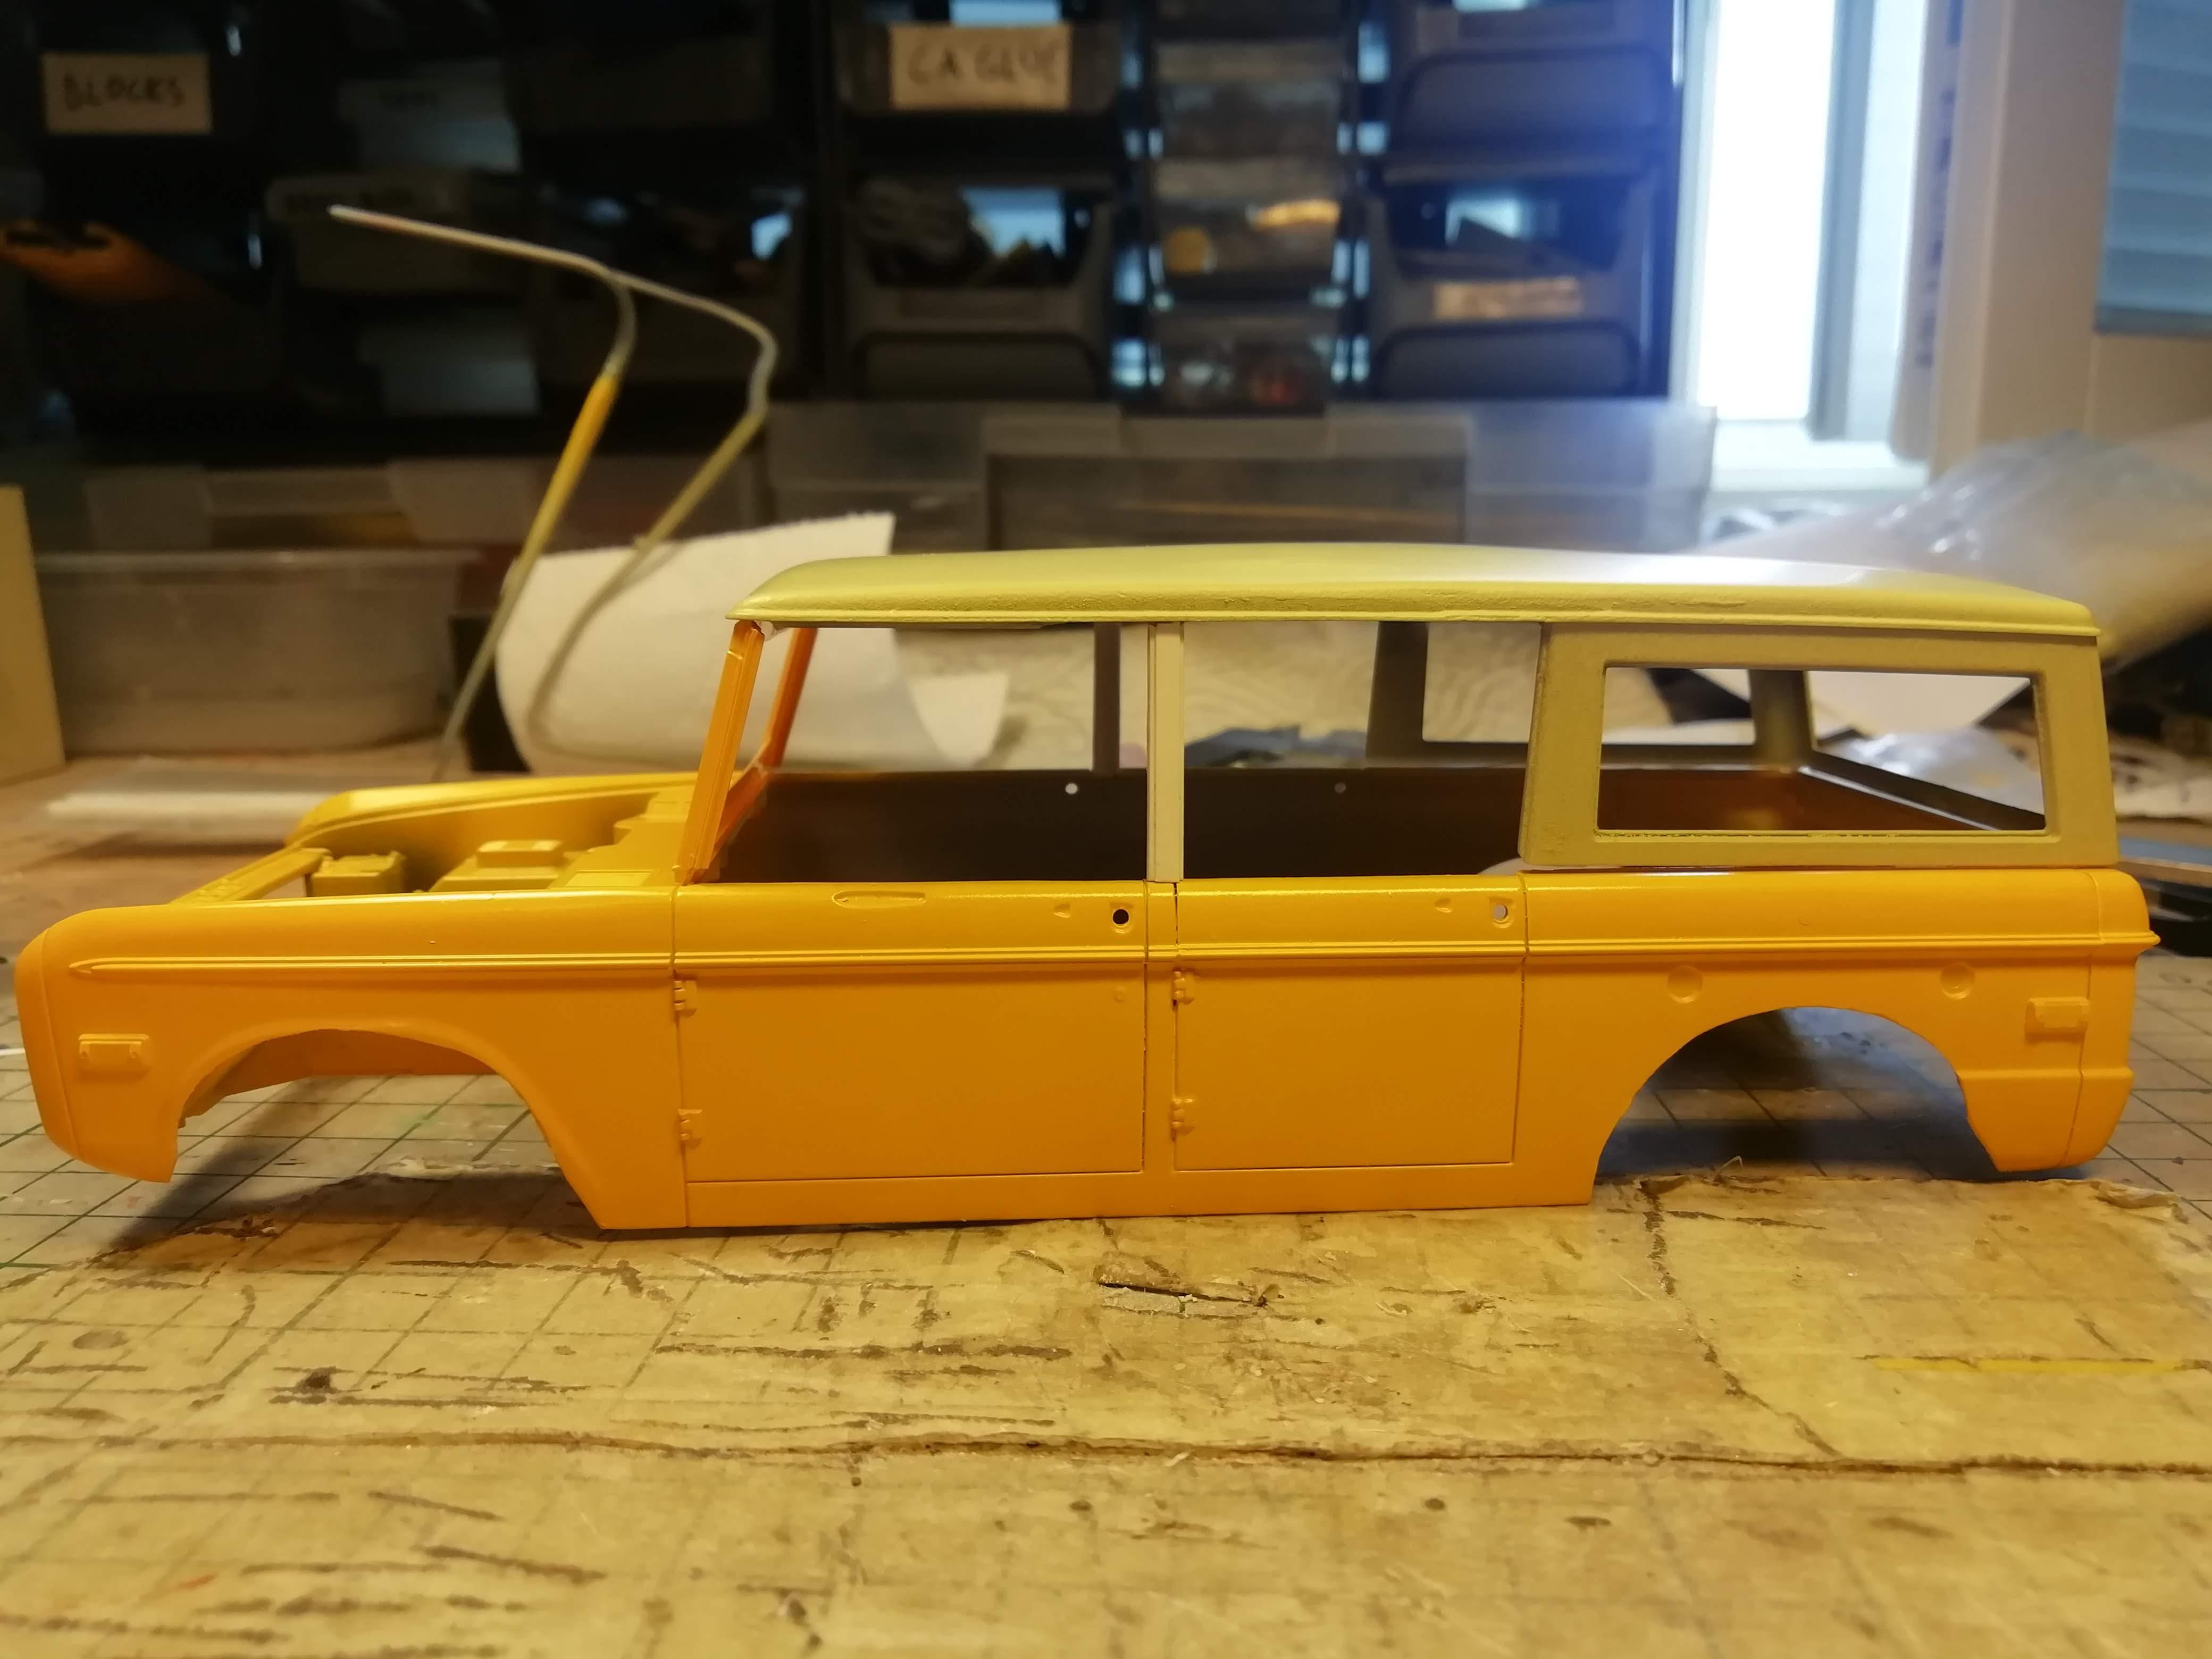
Finally got the roof ready for paint. It took several coats of filler and filler primer to get it smooth. Wasn't easy to get it "straight" as it is roundish in 2 ways. Roof will be white. Body is TS-34 Camel Yellow.

-
1 hour ago, Chuckyg1 said:
This is looking cool already. The roof looks a little tall to my eye.
I agree with the roof. It isn't so bad irl. Its stock height in the picture, but I cut 1mm from windshield frame.
-
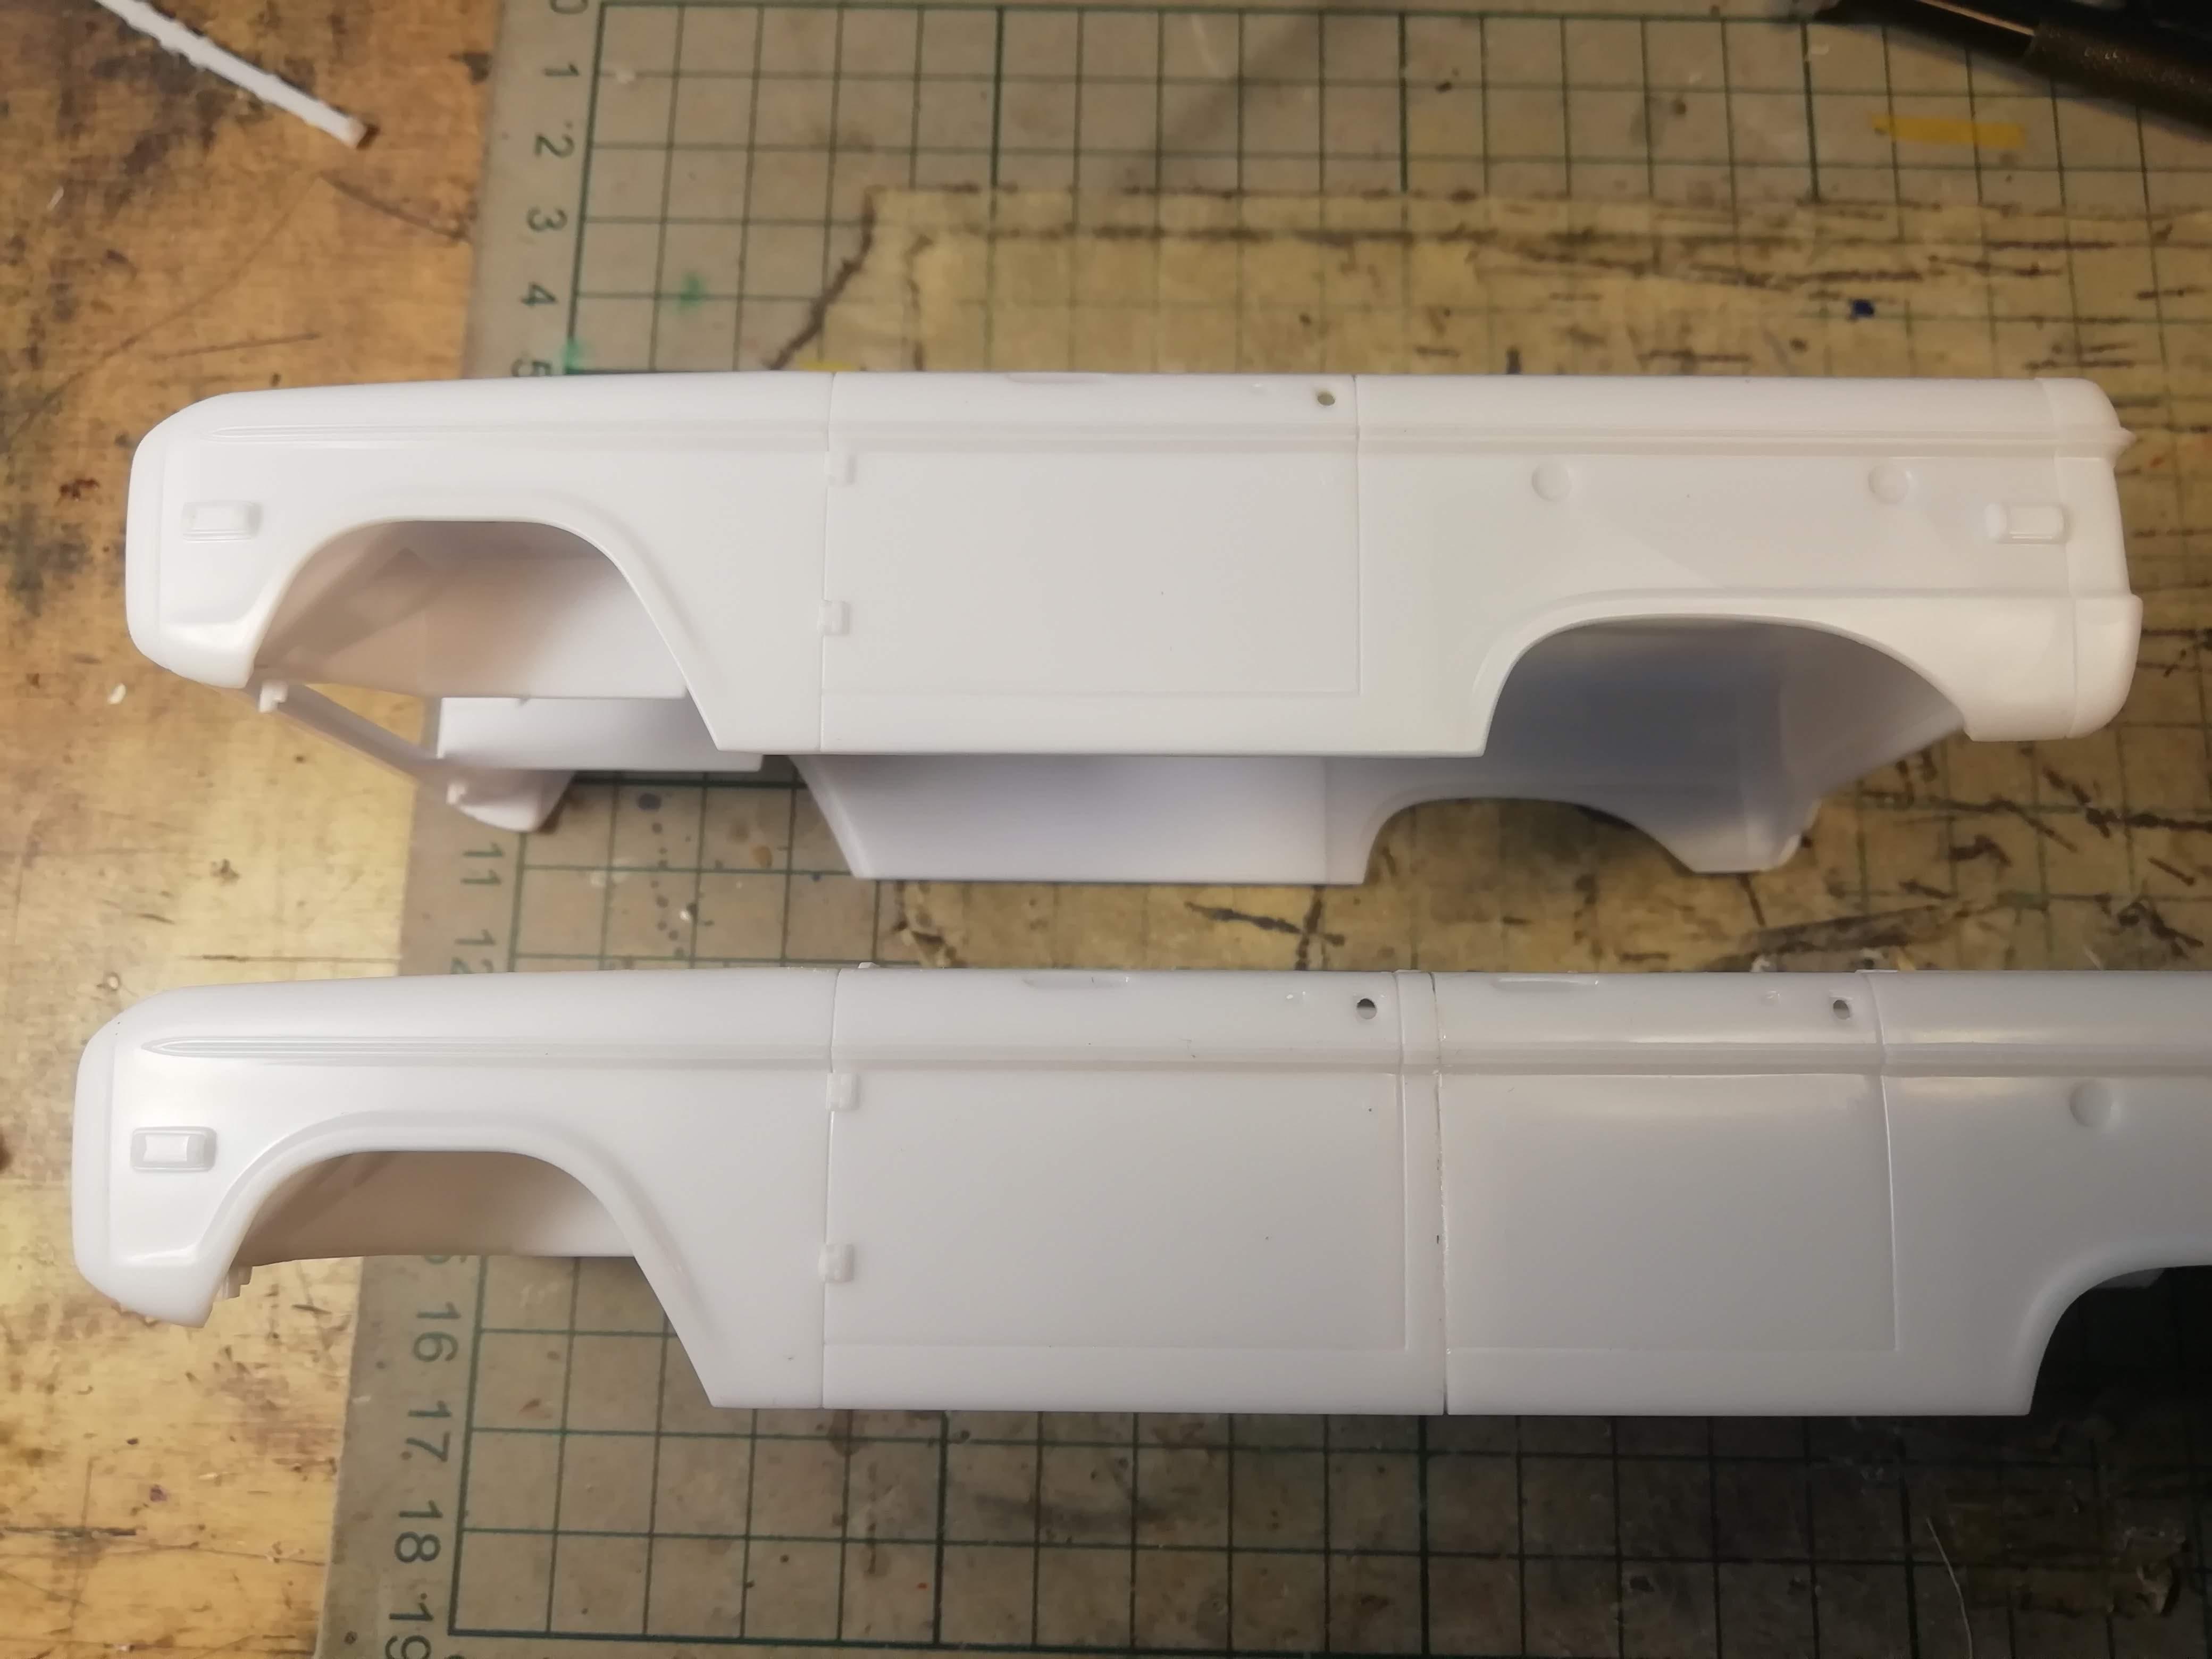
I originally had one stock version and one Baja version with incorrect body. Then I recieved second Bronco as trophy, which had both bodies. Since I had three kits with three stock bodies and one with Baja body, I decided to make one to a 4 door version.
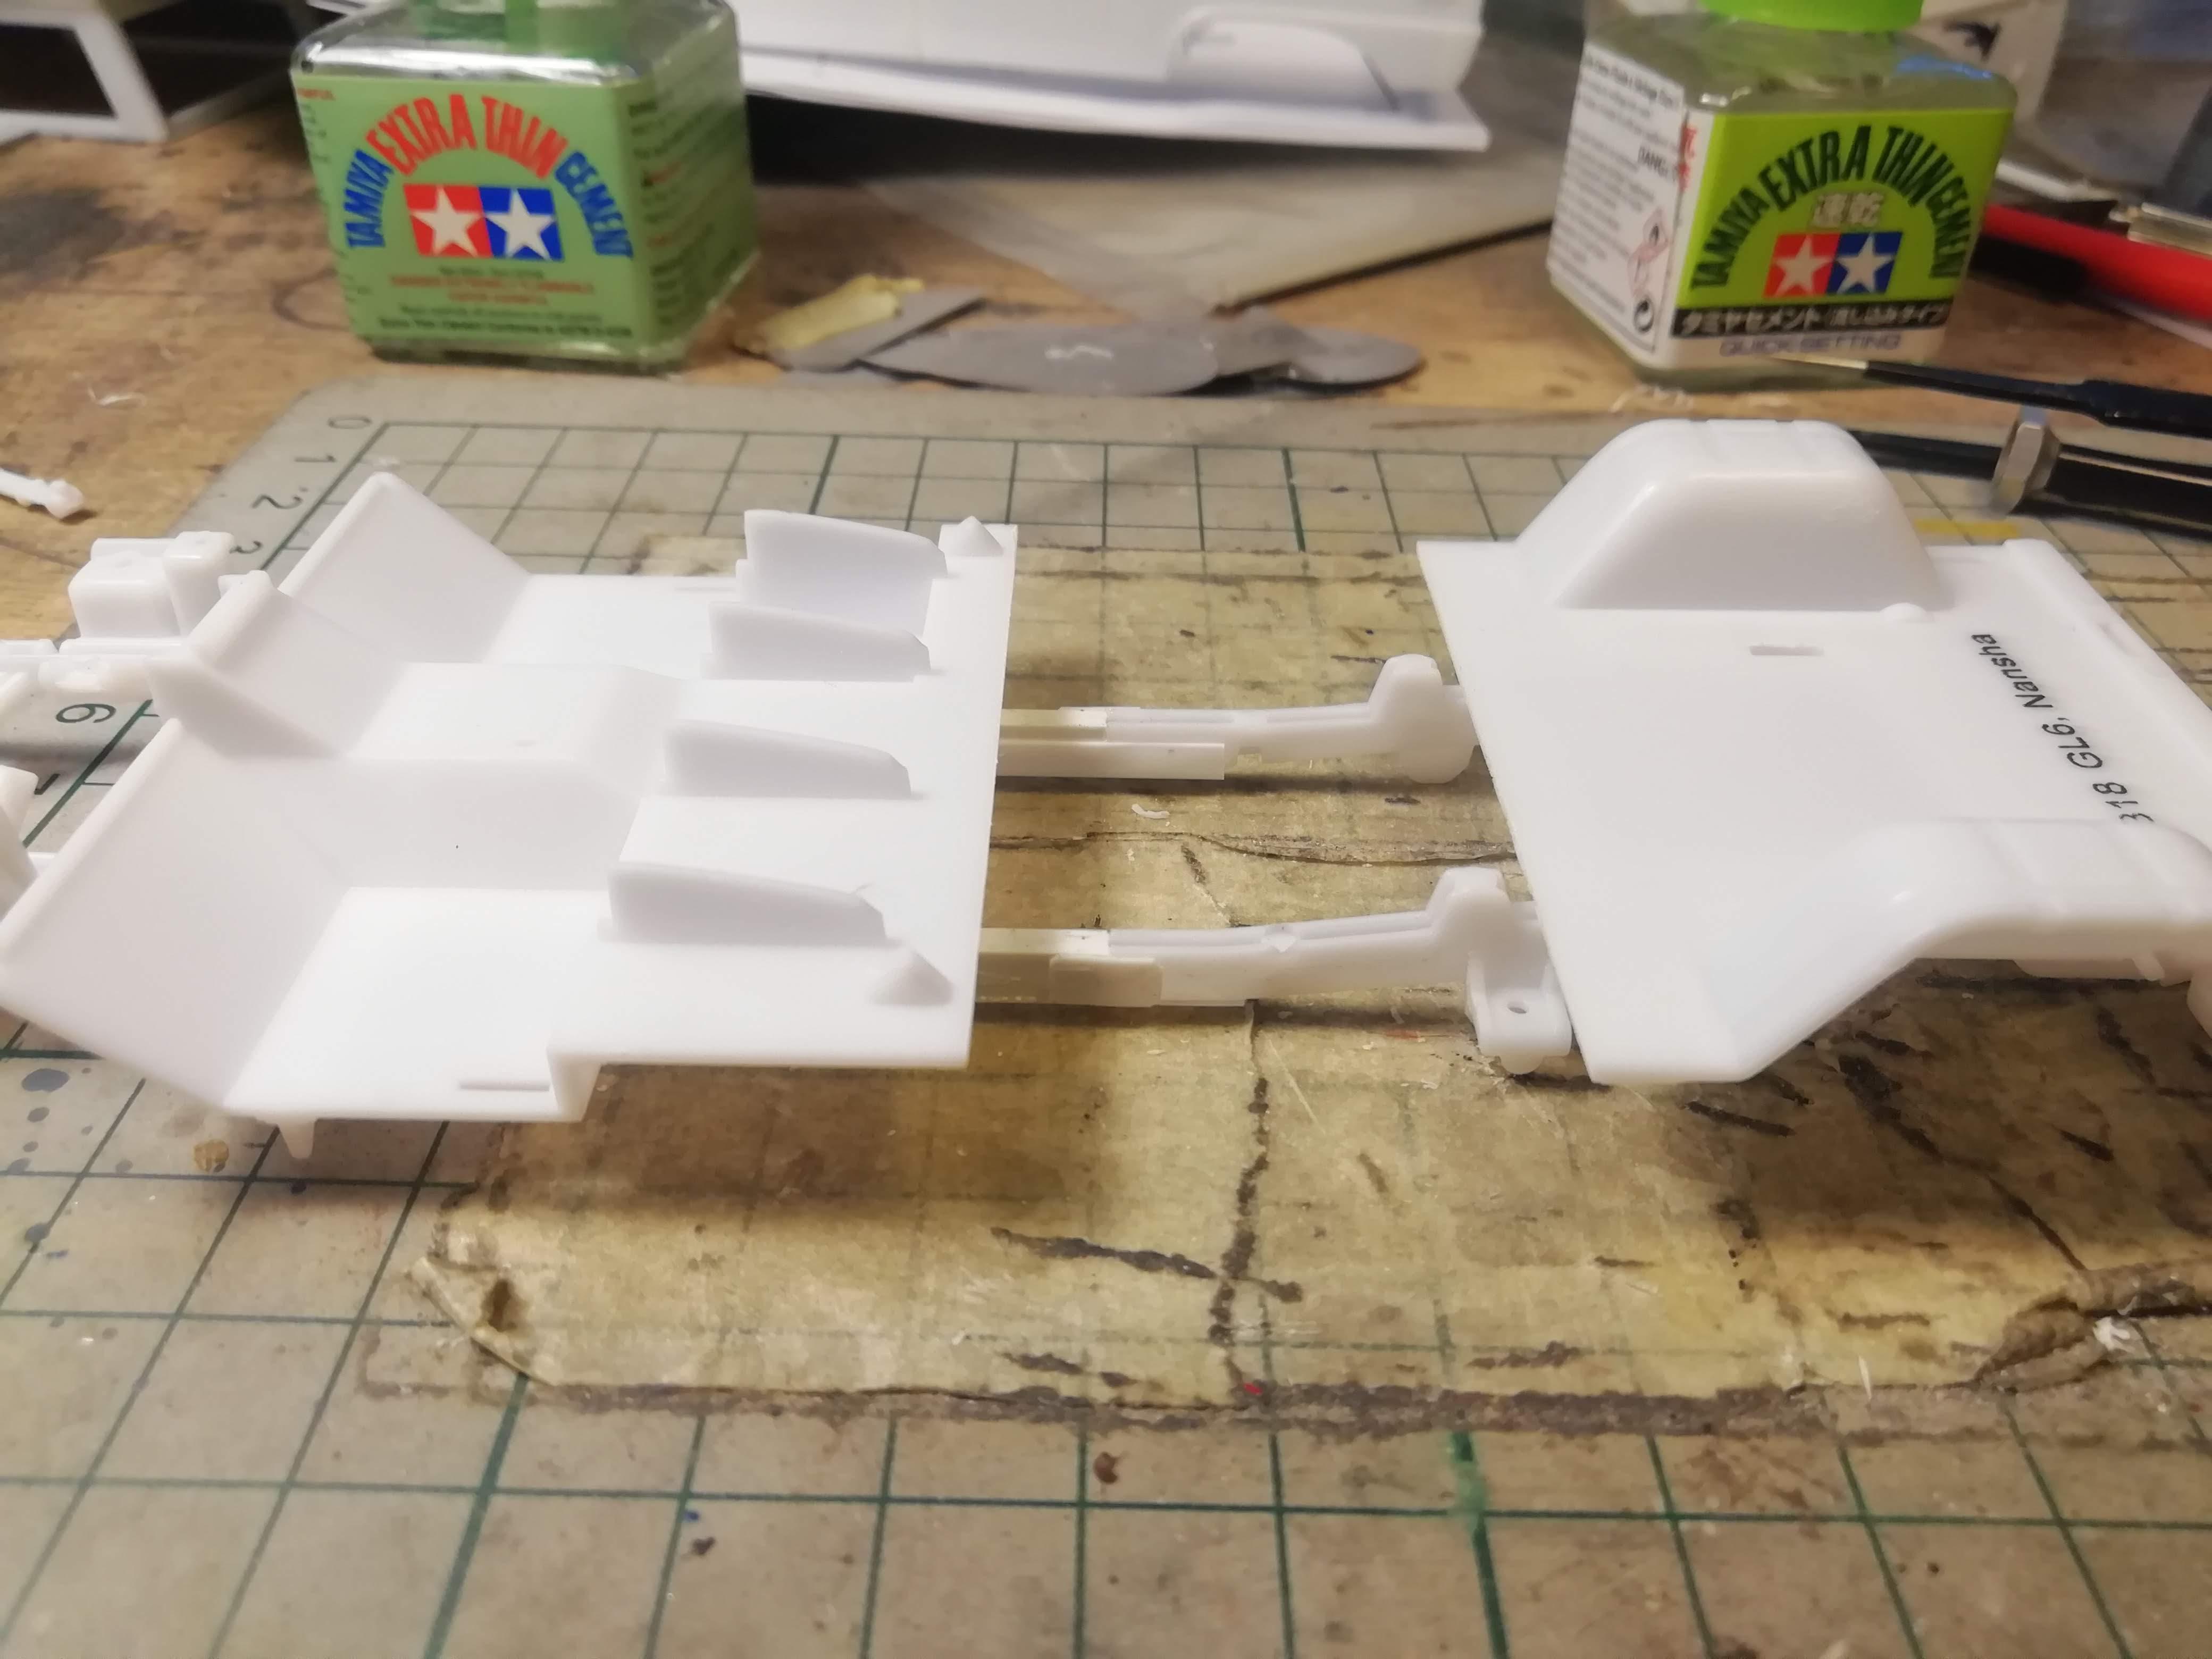
First step was to cut two bodies and combine them. I decided to make rear doors little bit shorter. After gluing the halves, I measured that body was lengthened by 3,3 centimeters. That was important measurement as it would be needed later.
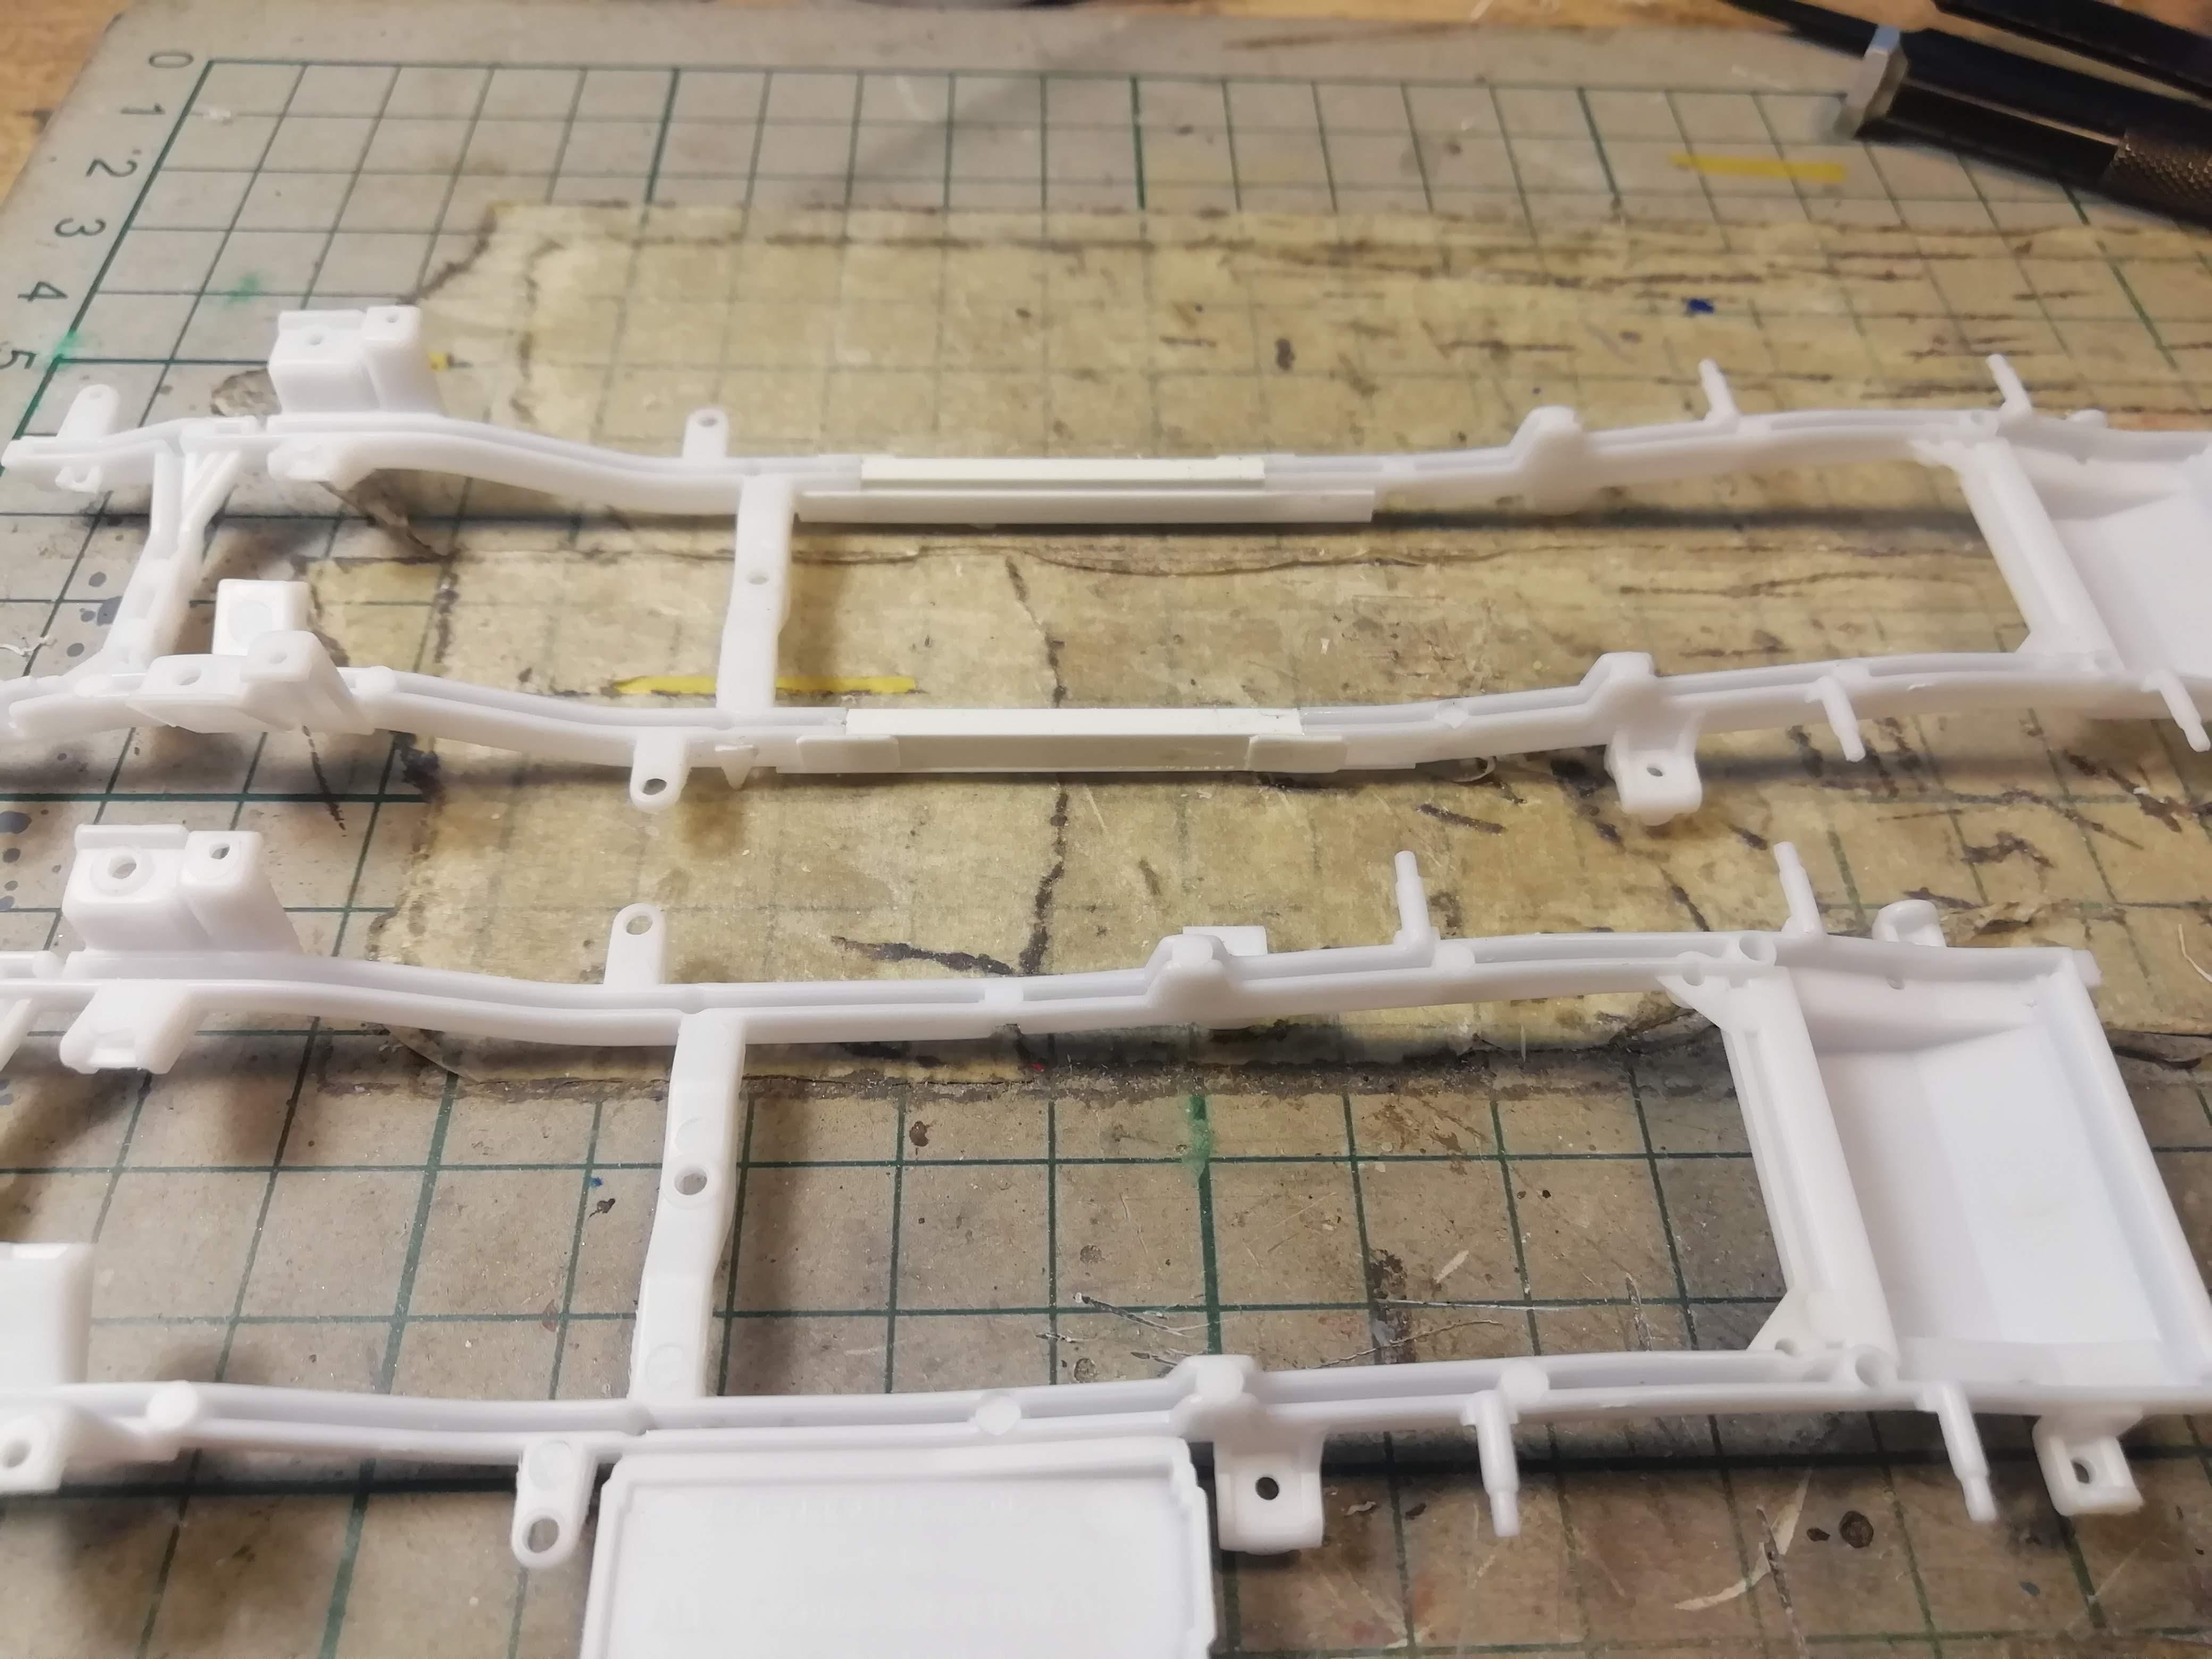
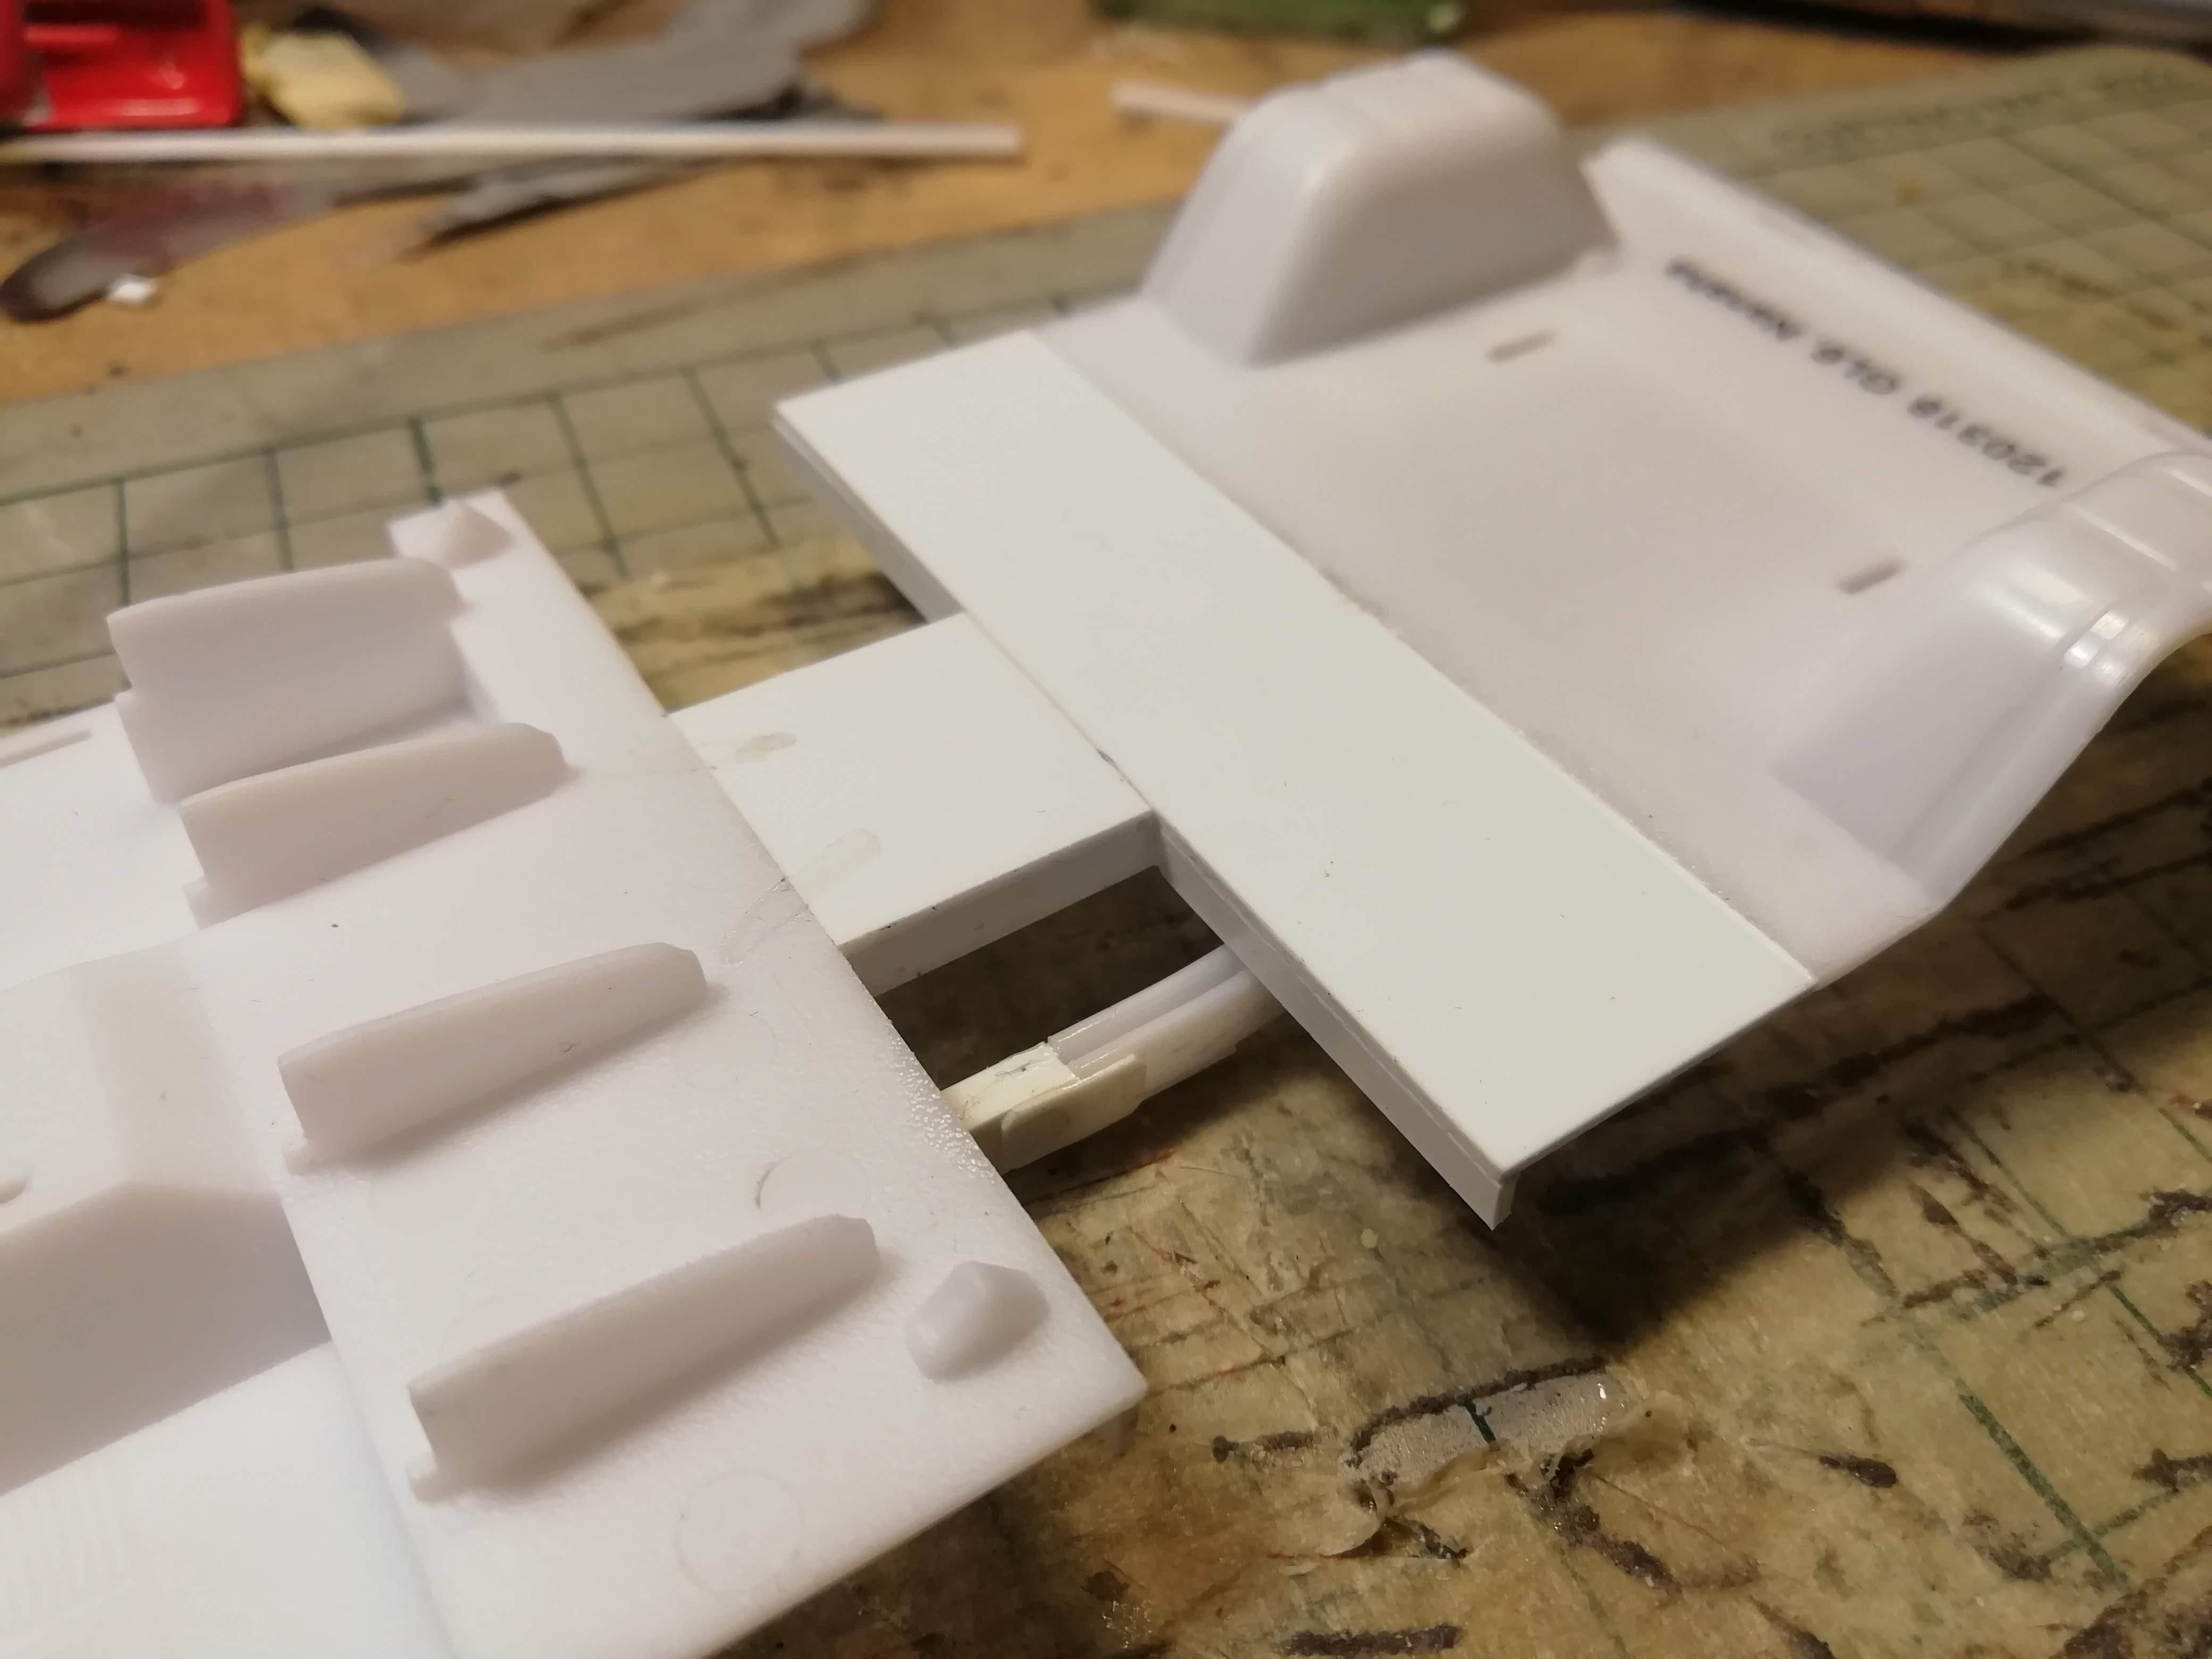
Then the same measurement was used to stretch the frame. I used evergreen L profile and straights for the extra bits. I cut it so that the middle exhaust support would be moved back. More on that later.
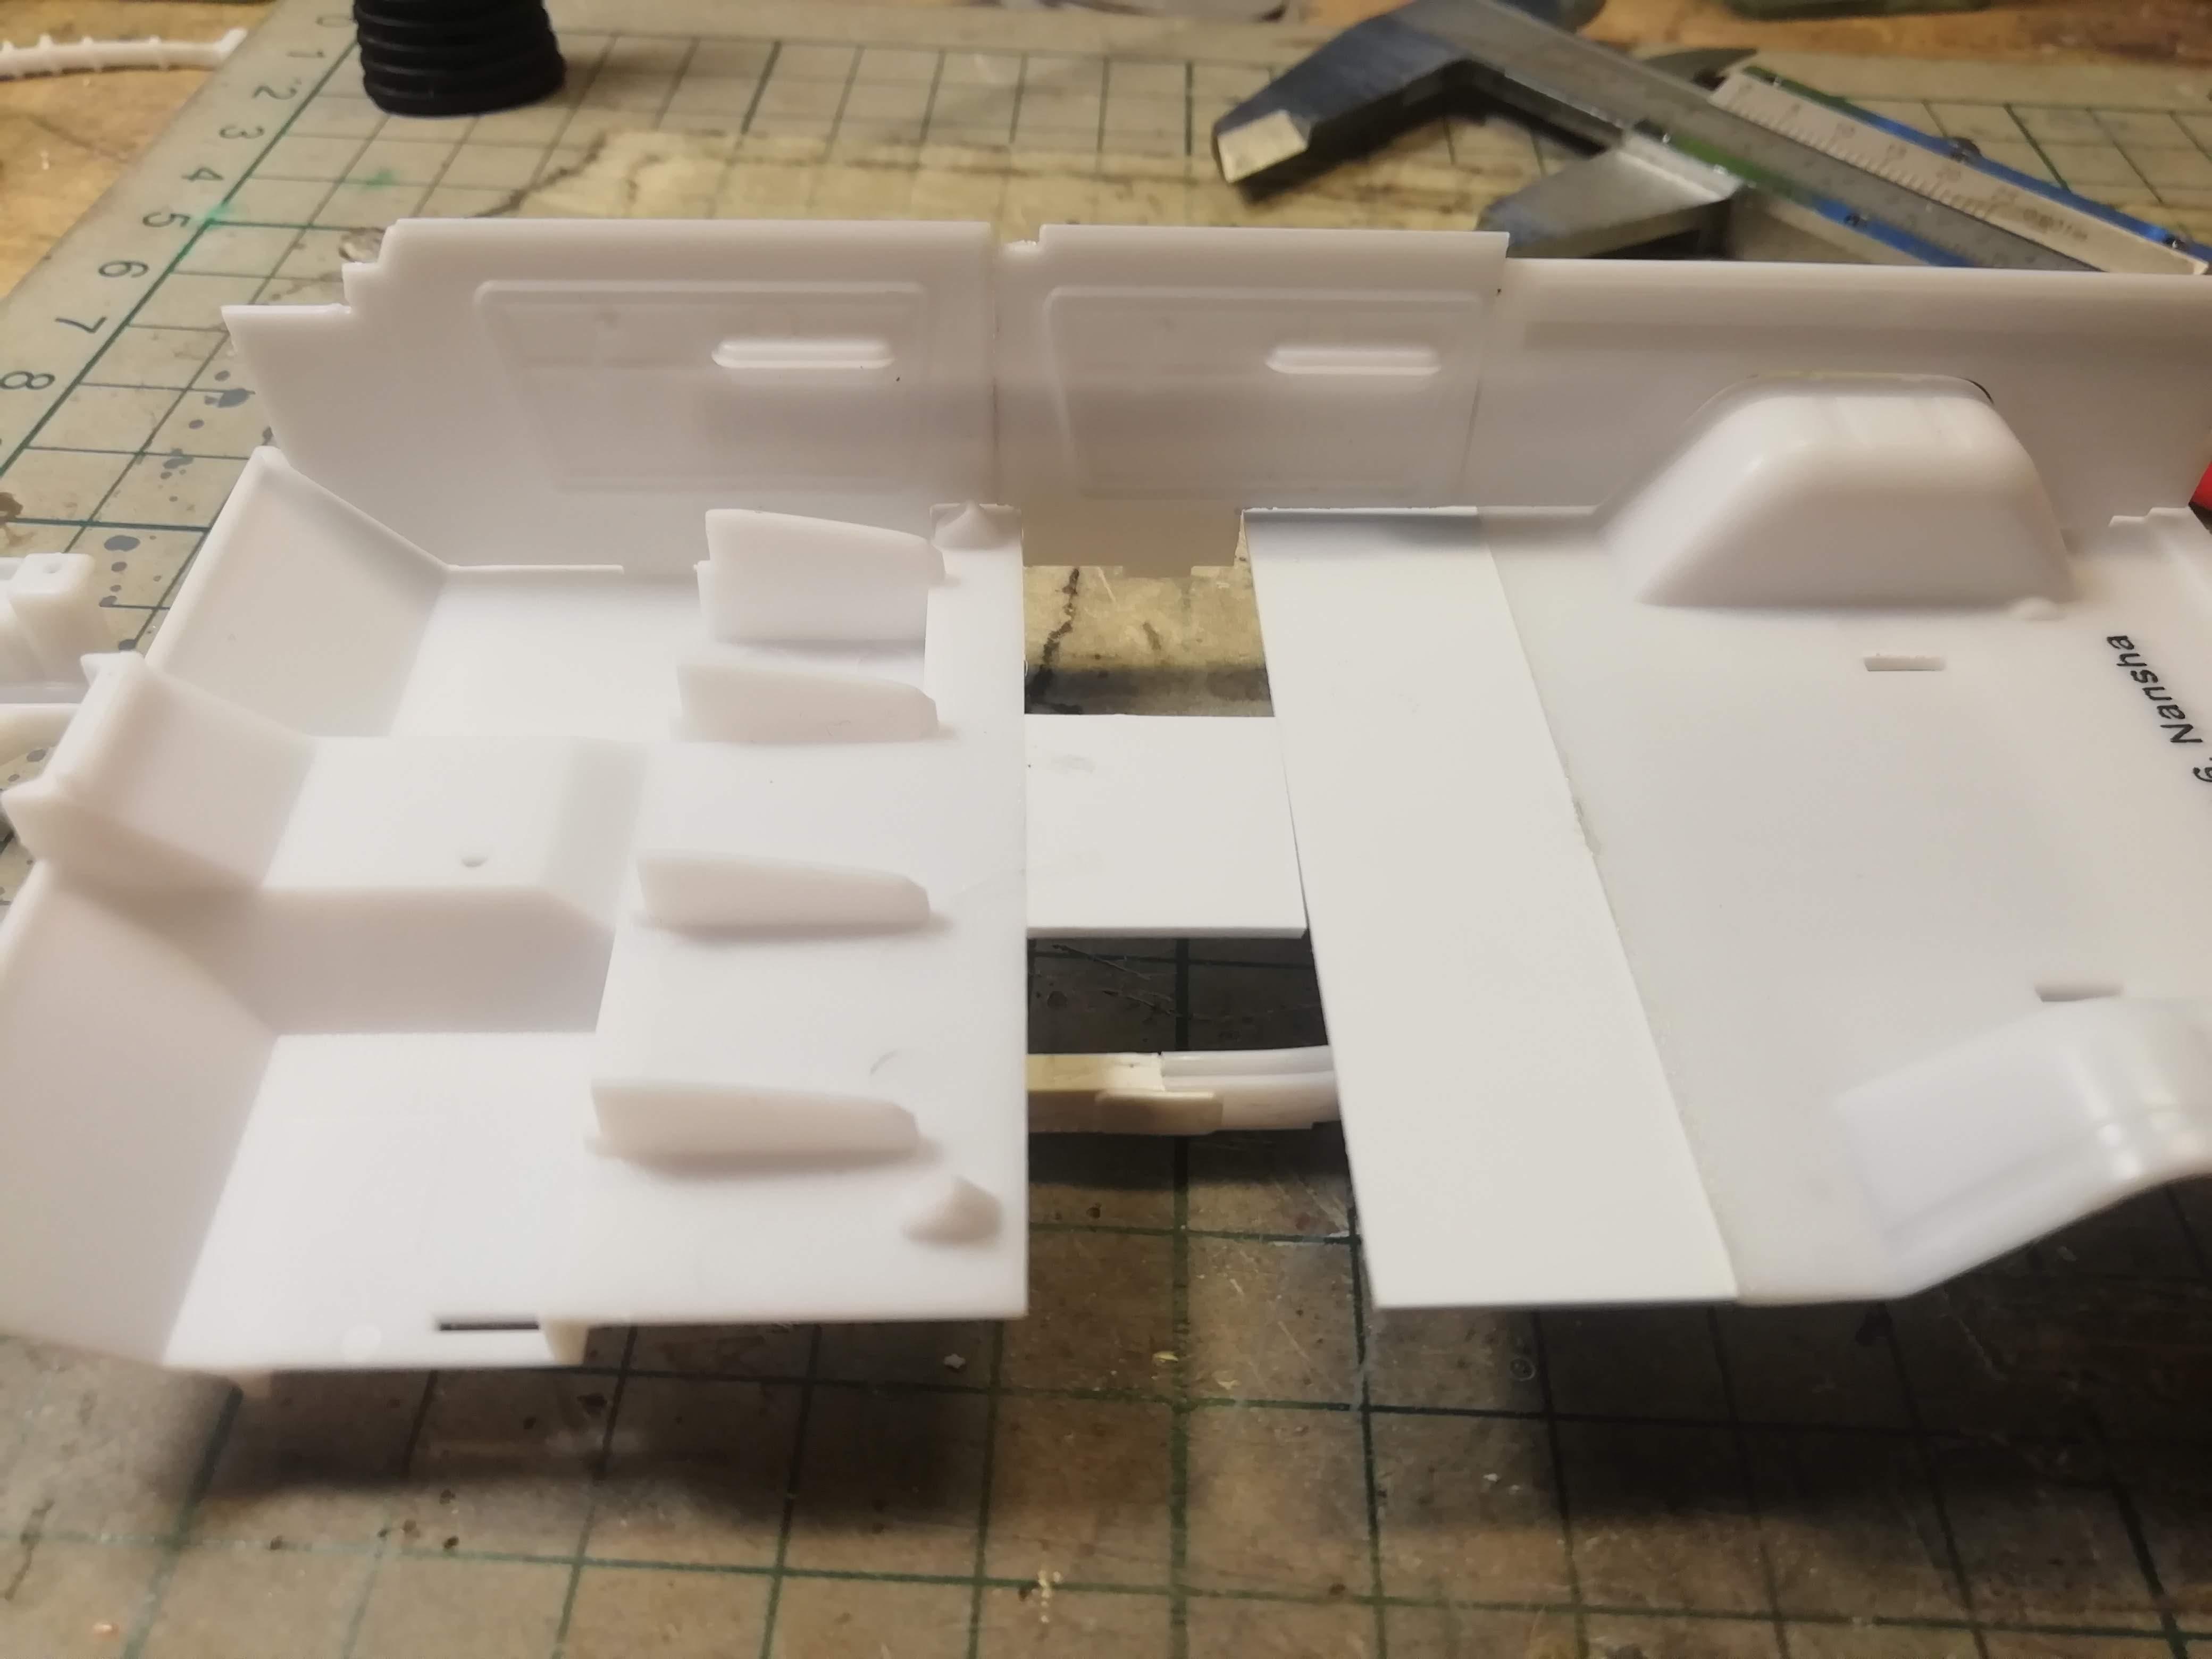
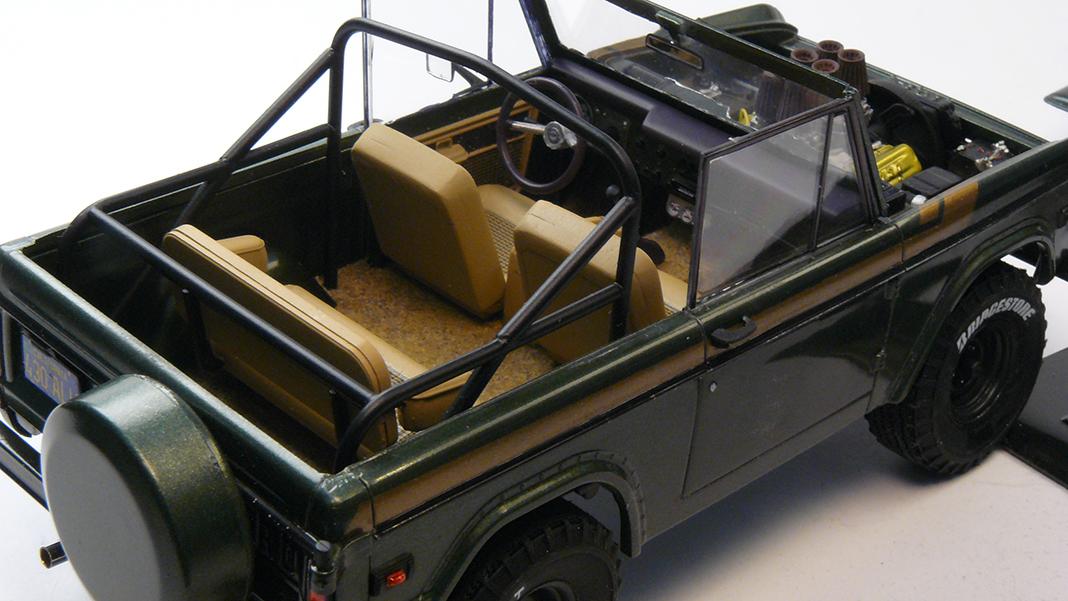
Then it was time to cut the floor and door panels. Both floors halves had locating pins at the frame, so locating them was easy. Then it was matter of filling the hole with new floor bits. I made the floor to have same kind of foor space, as in front seats.
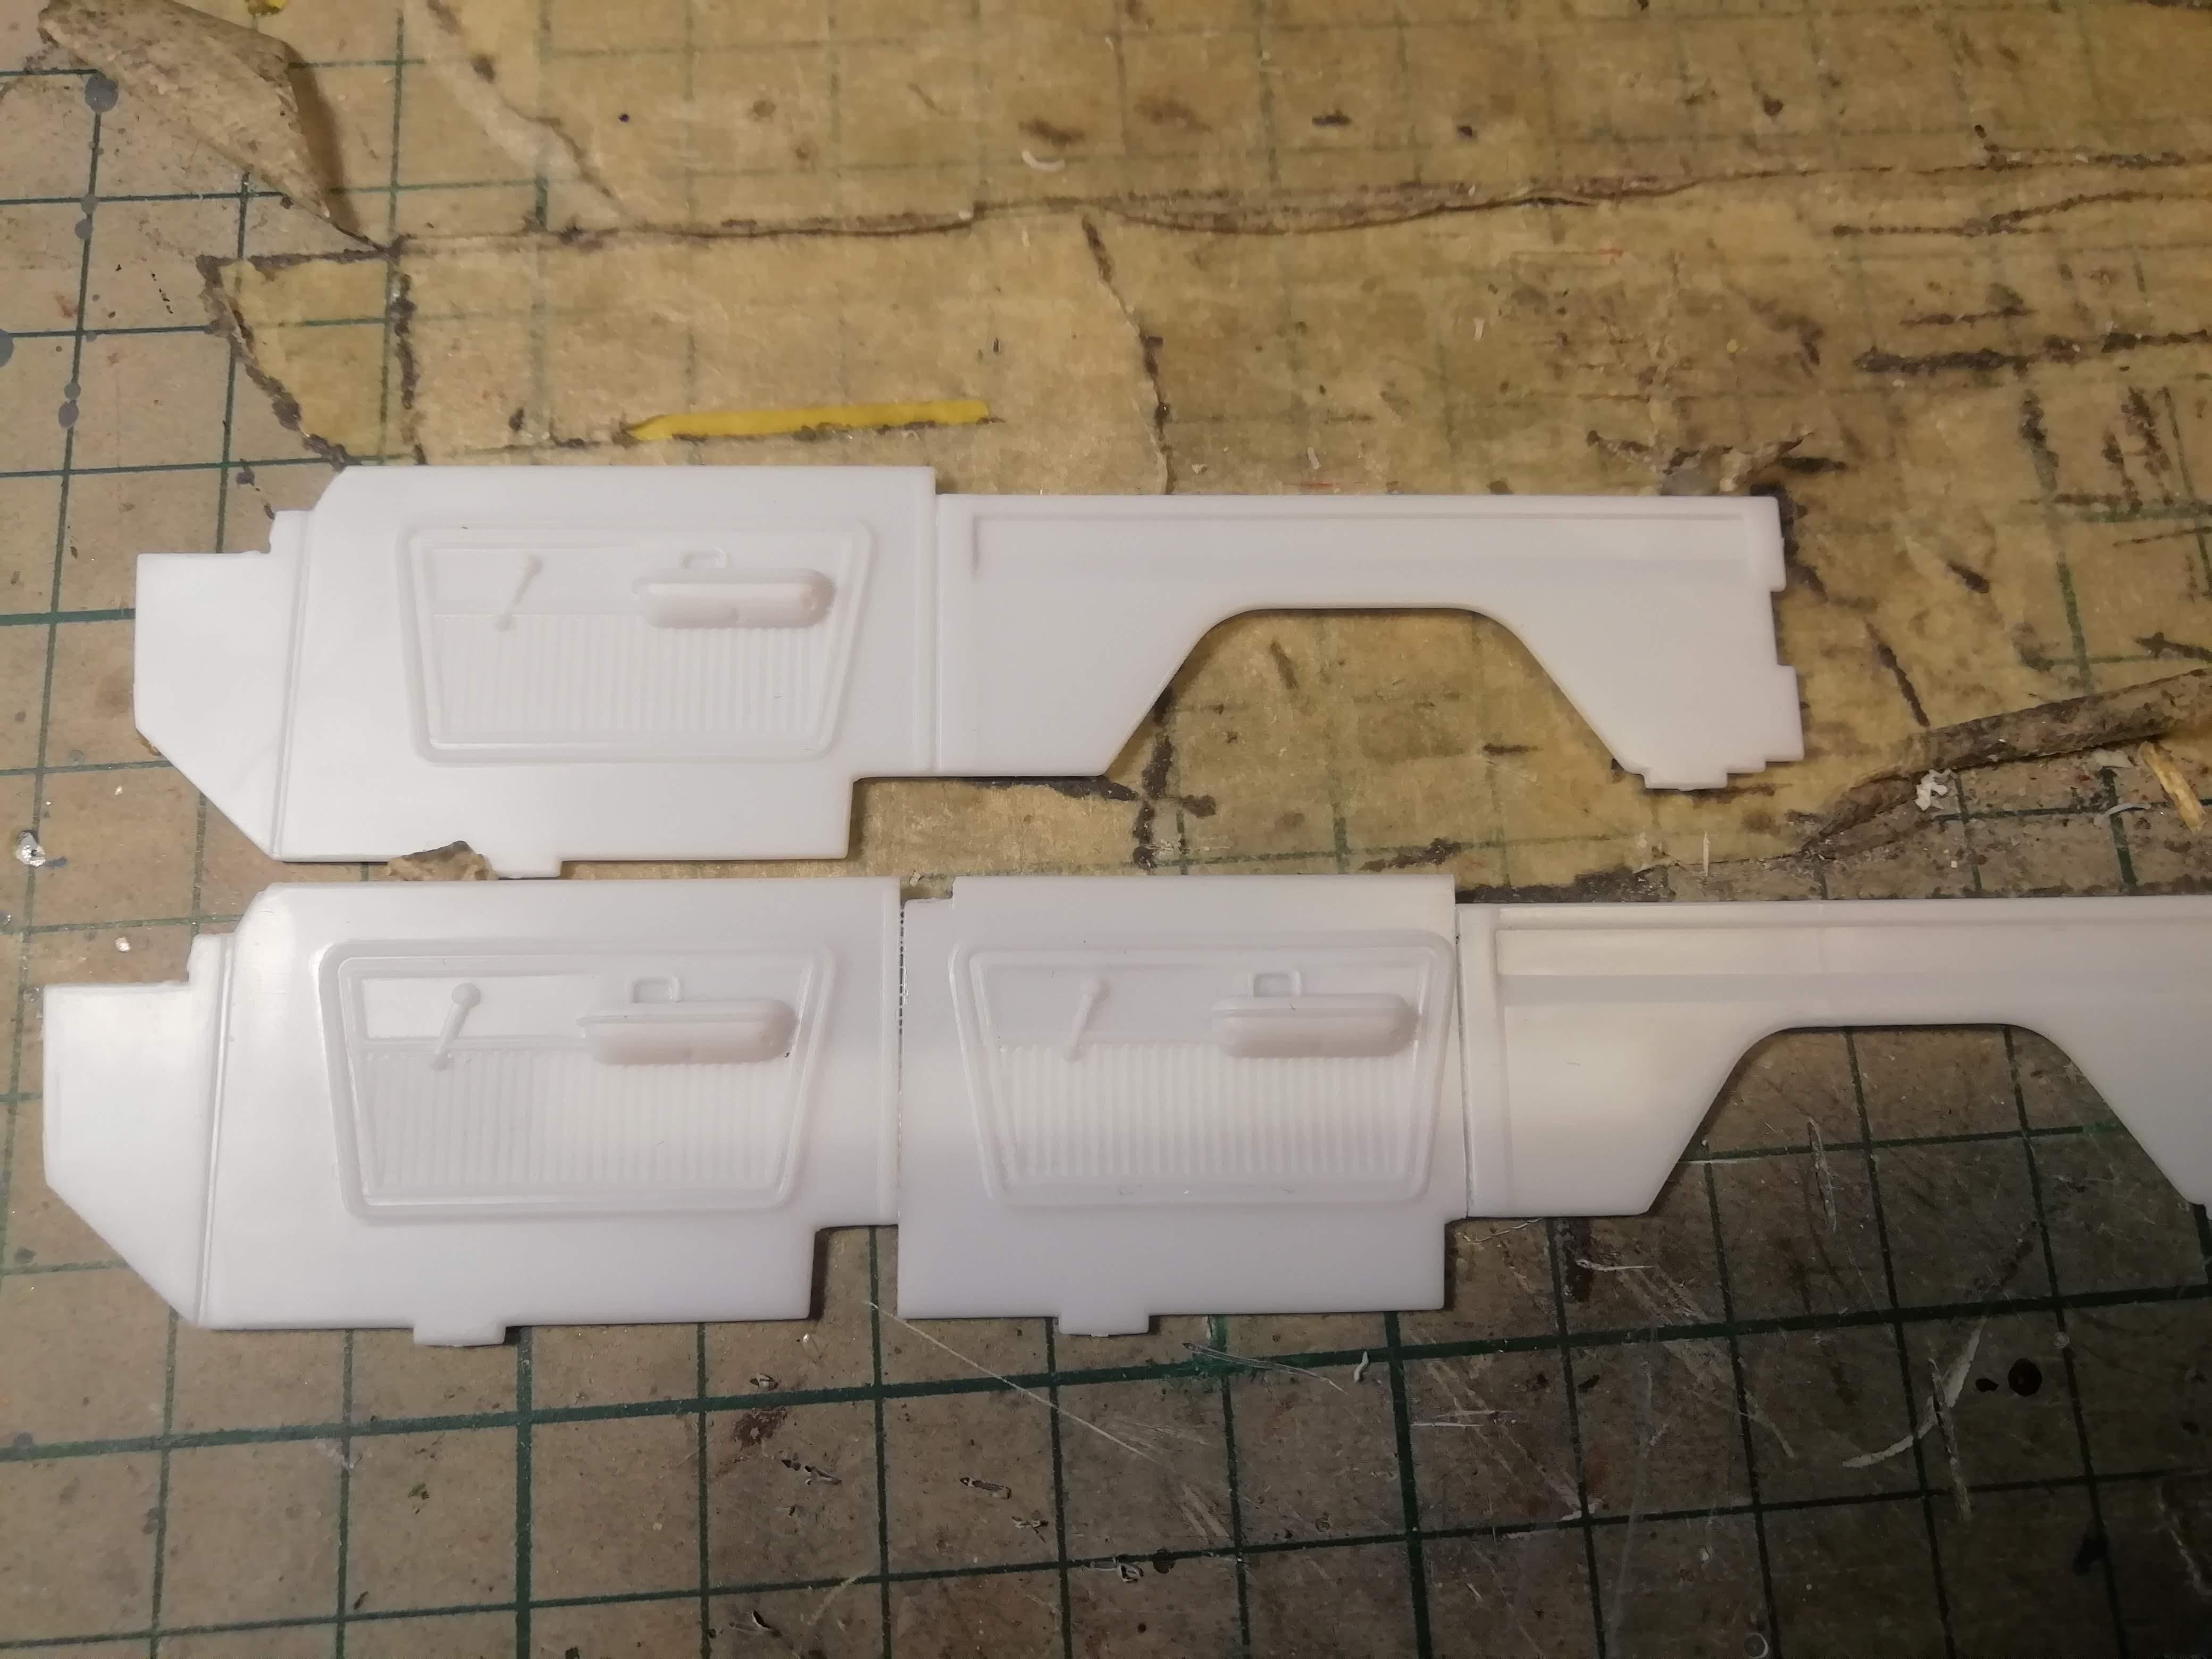
I had to use two door pieces per side. That means that I have to fabricate new door panels to the donor car. Door panels had locating slots, that were used to tell me correct lenght that I needed to make the cuts.
I also copied the shape of the front seats mounts and made couple more. Missing are seat belt things, but I added them later.
Afted that, it was time to focus on mechanical side. Lengthening of tailshaft was done using evergreen rods. For the exhaust pipes, I again used two sets. Locating slots for the exhausts came in handy. When I cut the pipes, rear section were placed on its place. Then I measured what th front needed to be. Only one section had to be added in between passenger side mufflers. I used part of that tailshaft.
I also added some floor strenghtening, frame support and body mounts.
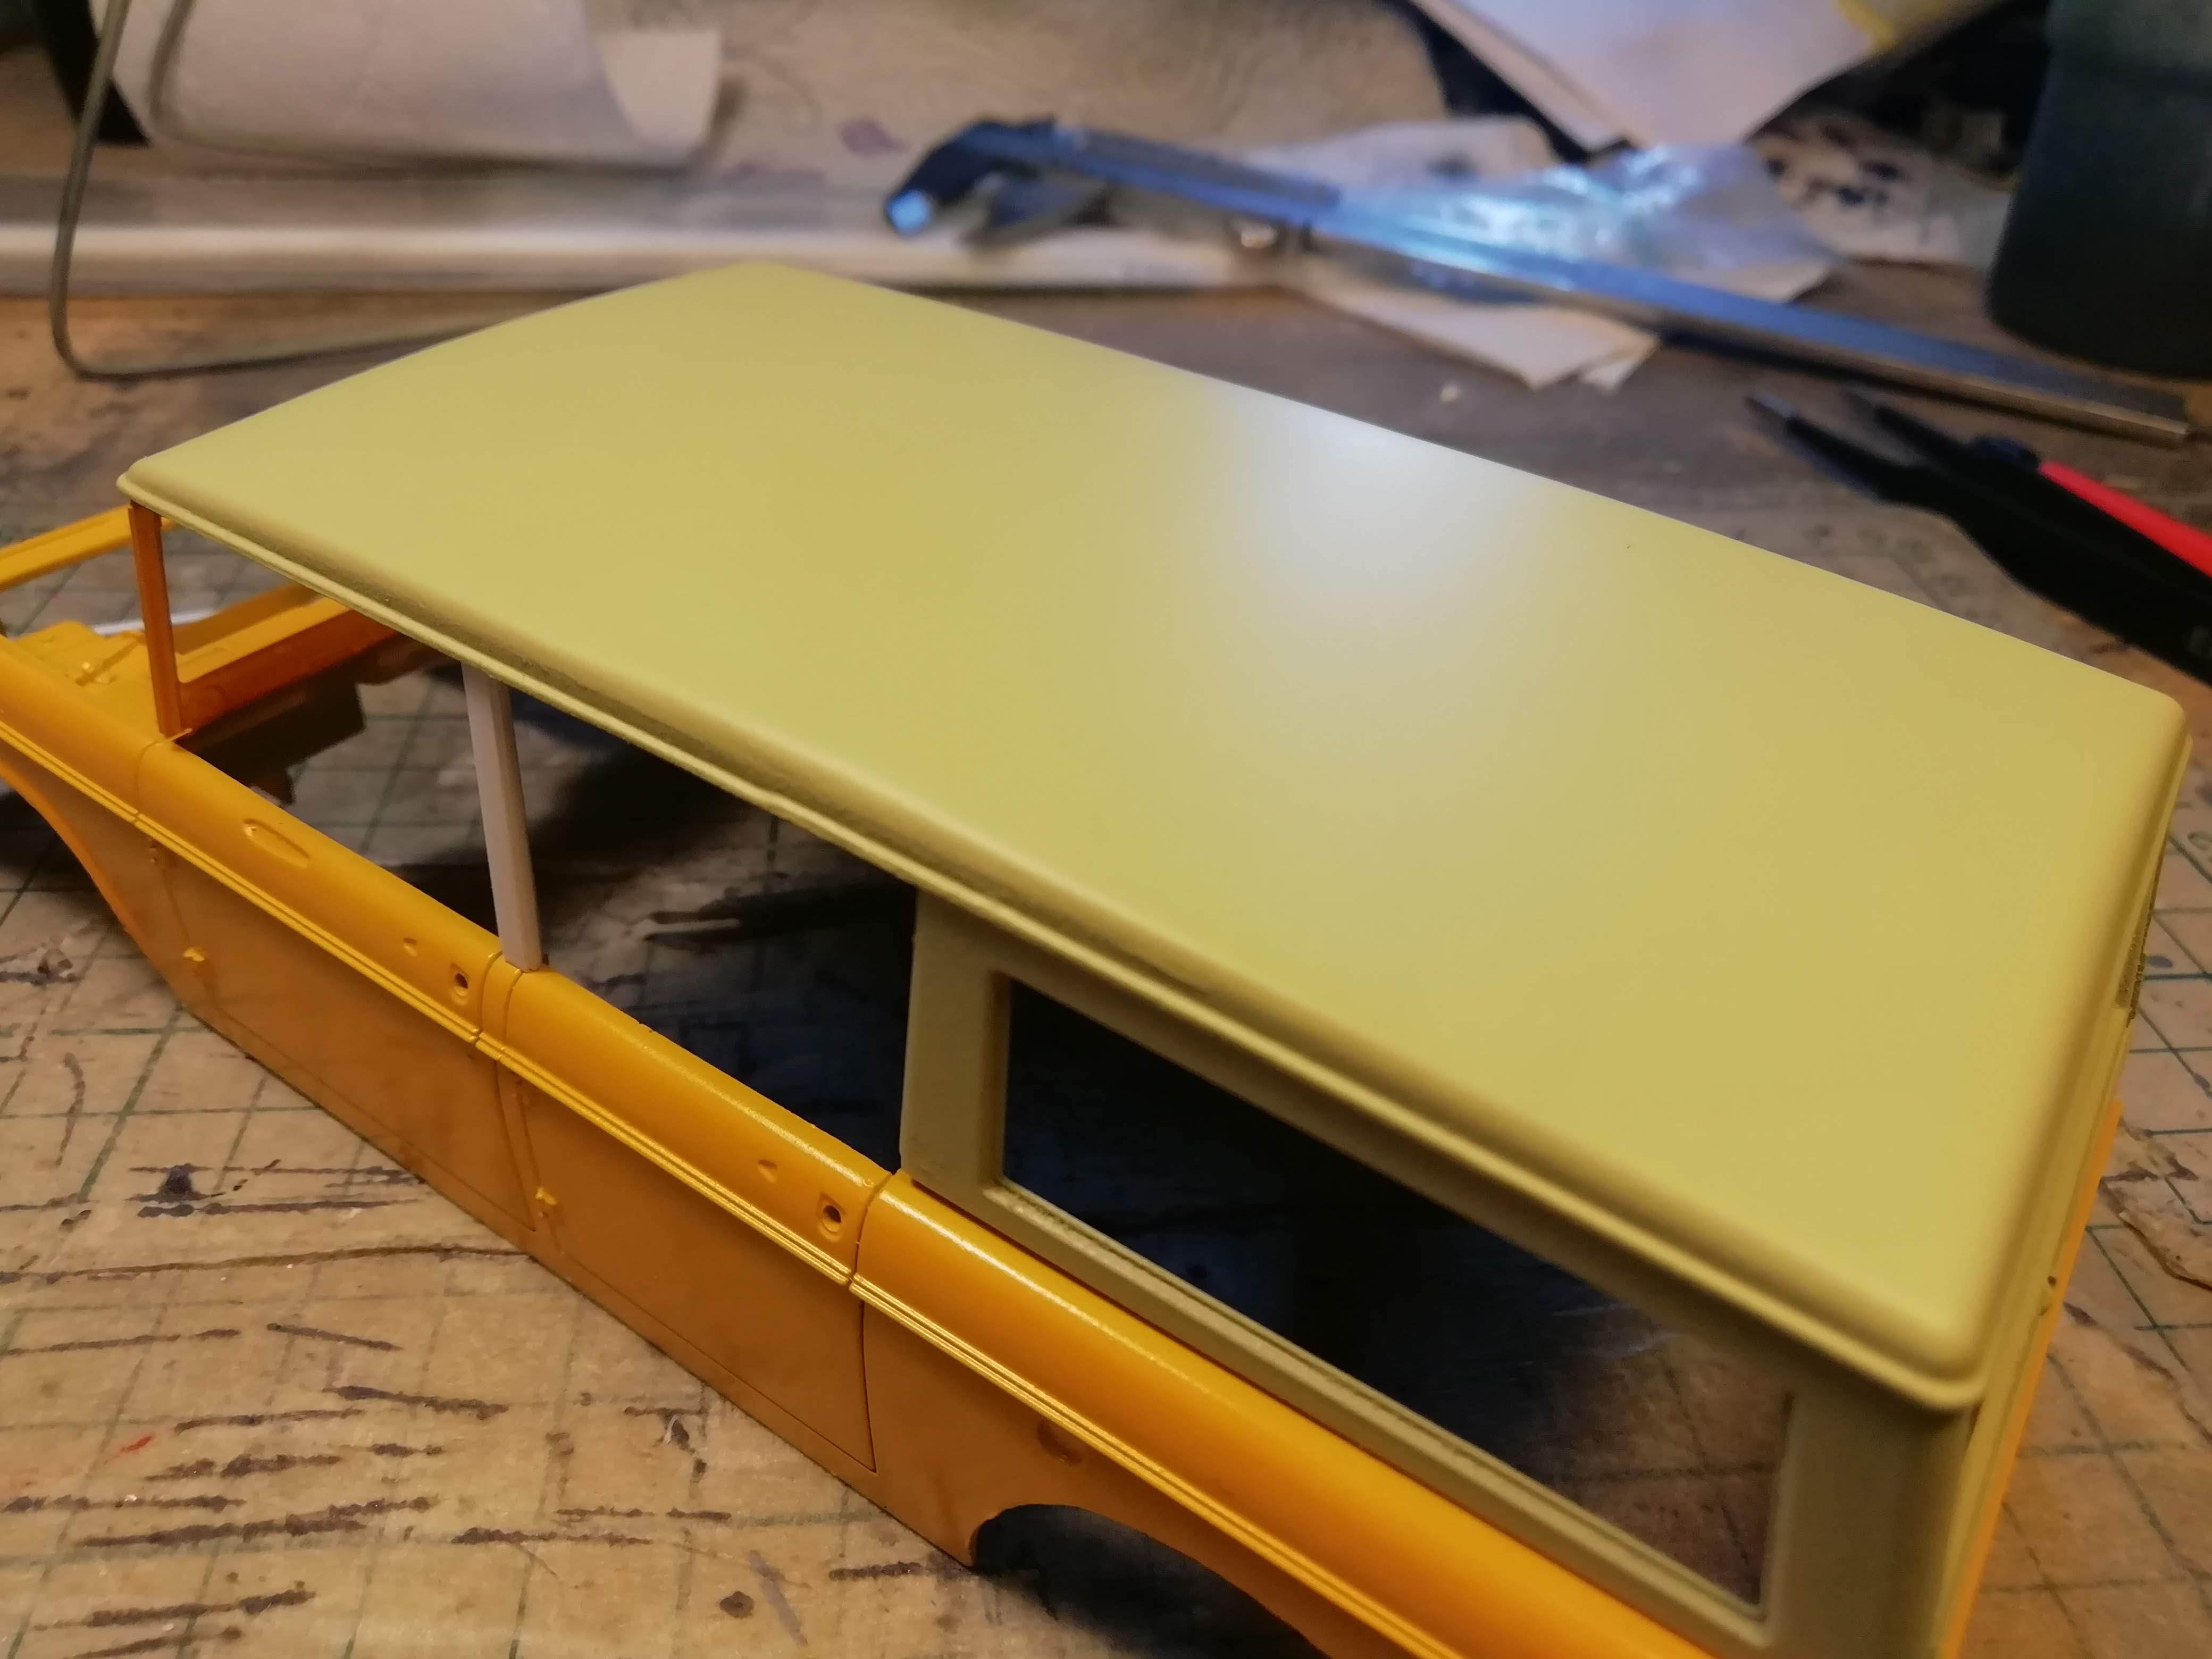
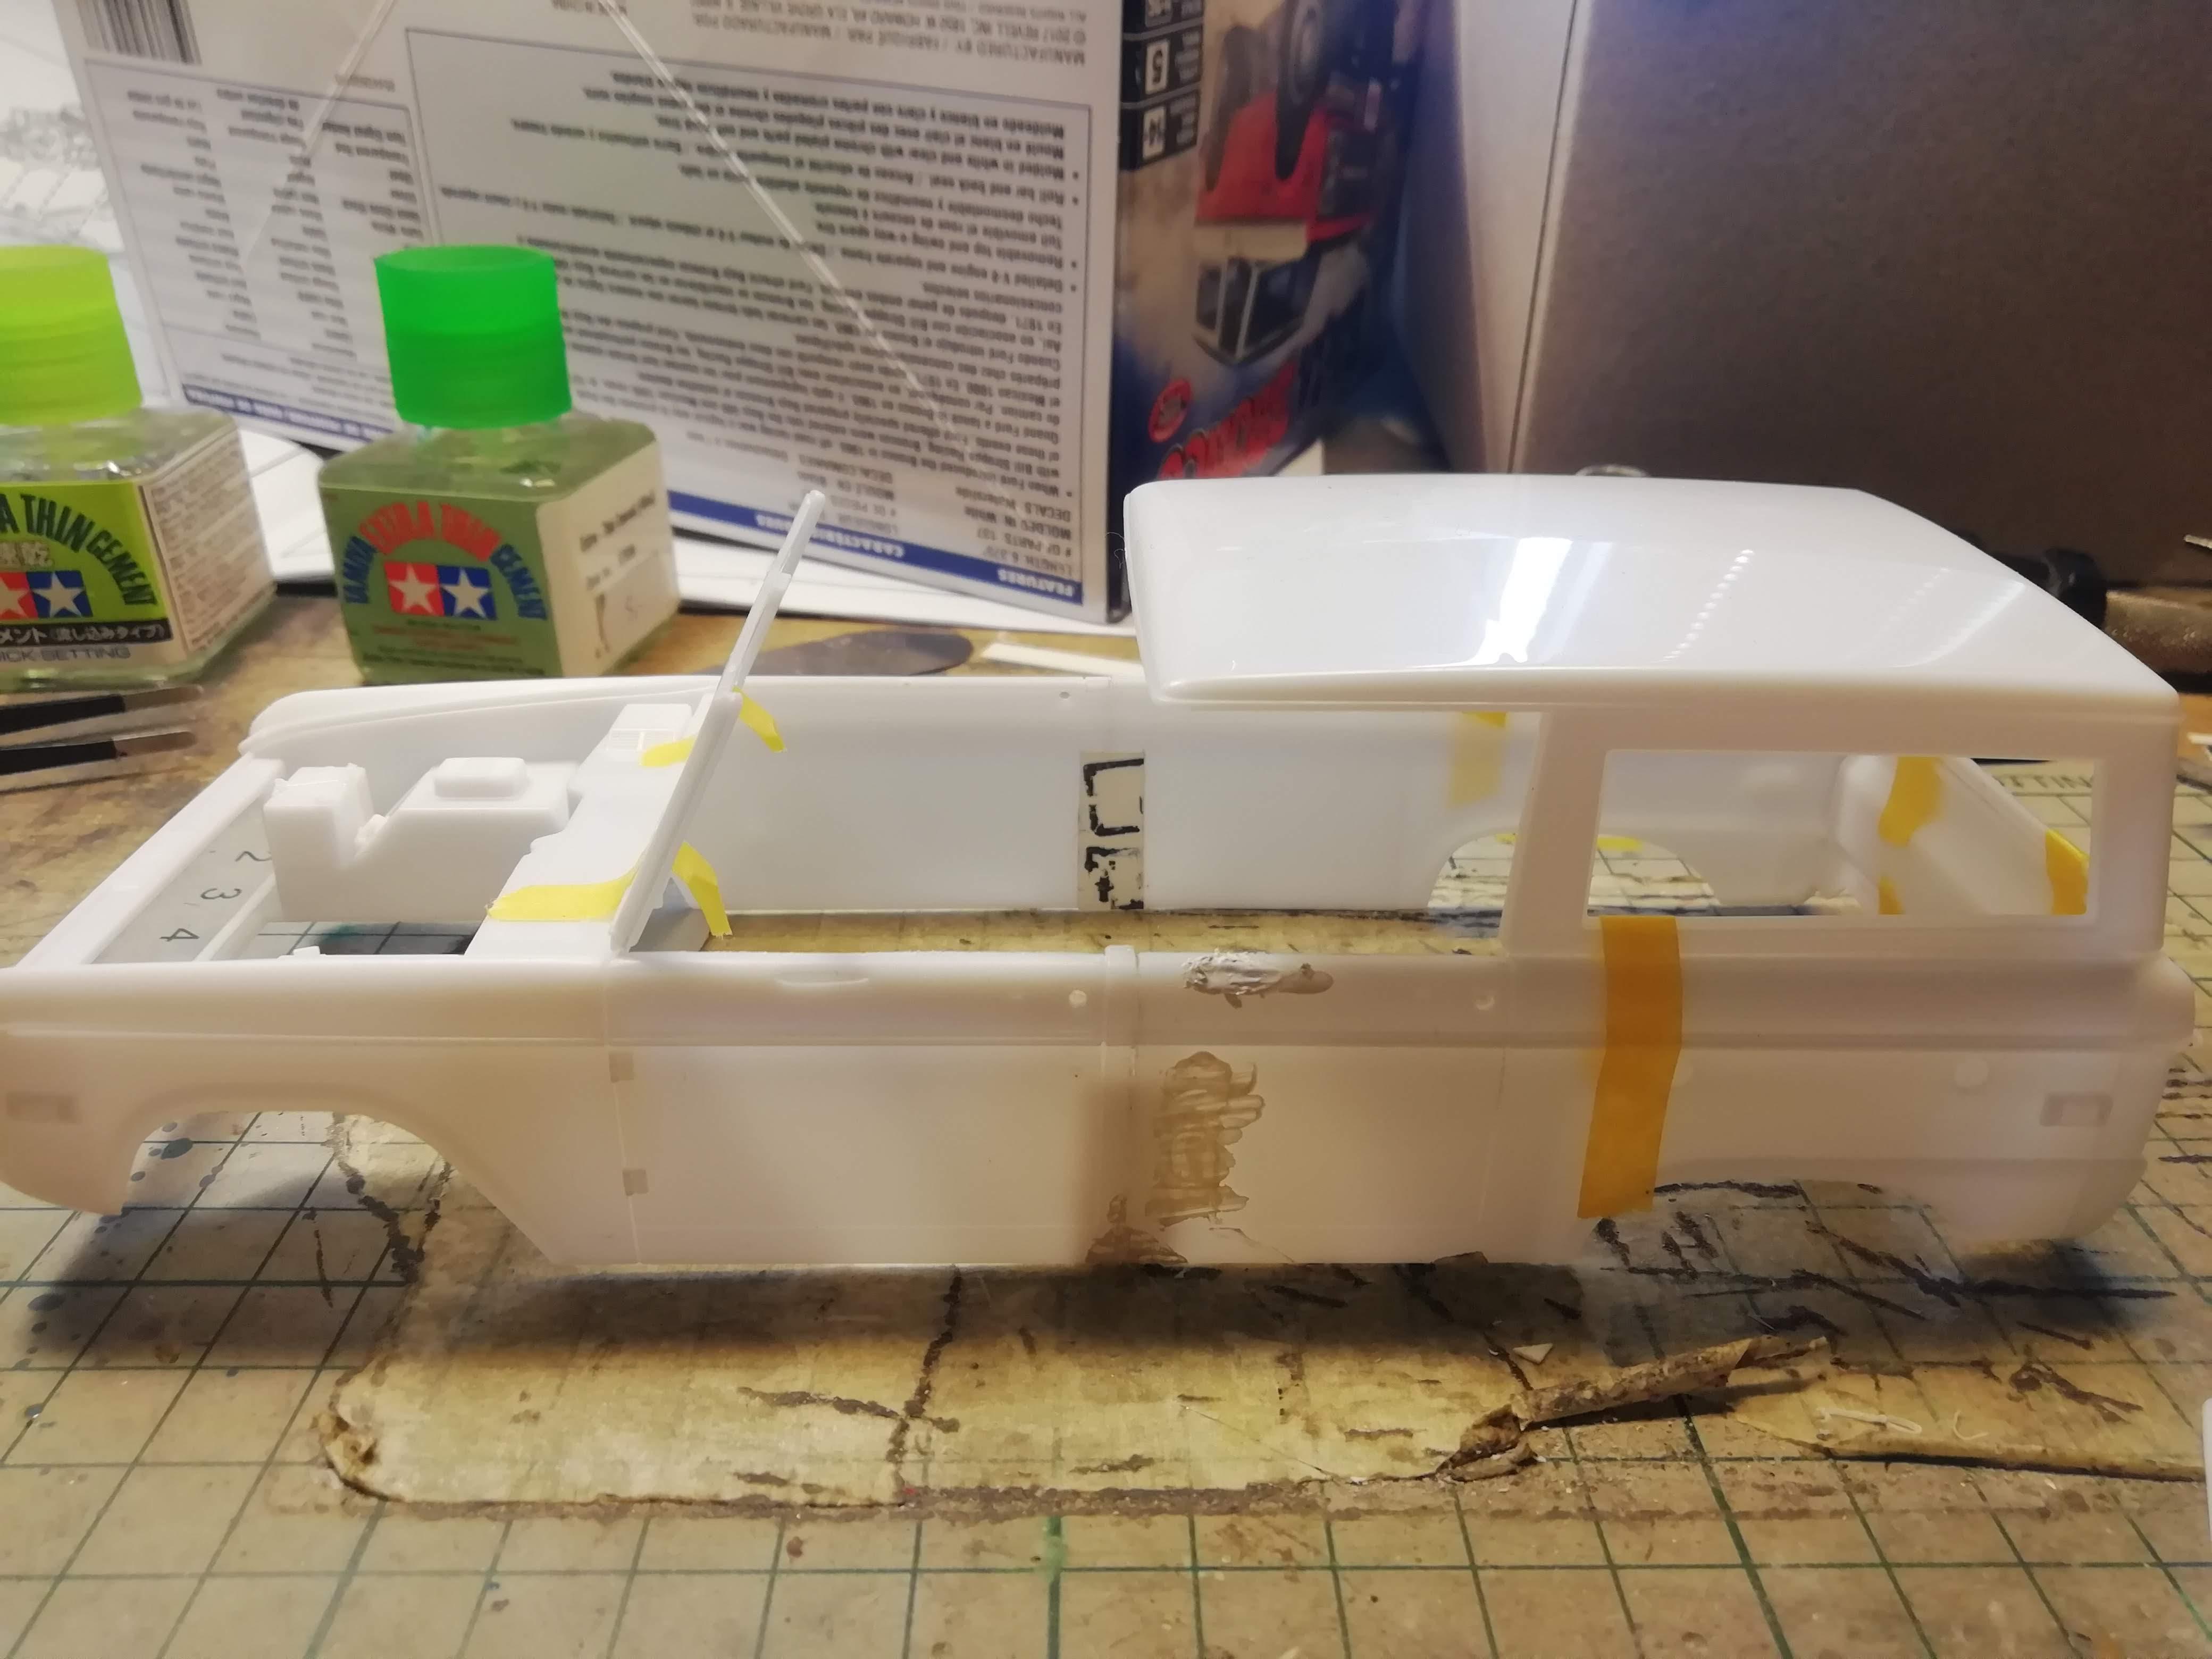
Last big thing was to extend the roof using again donor kits roof. That one will obviously be a roofless racing version, since I've robbed stock exhaust, stock seats and stock doorpanels. Missing are the hinges, which I've added later. If you notice, the roof seems to be lifted a tiny bit. I later cut 1 mm from the windshield frame. I made the wheels arches bigger, to house Baja wheels. I also found some flares from my parts bin. I don't want to glue before the paint, since they will be diffent color.
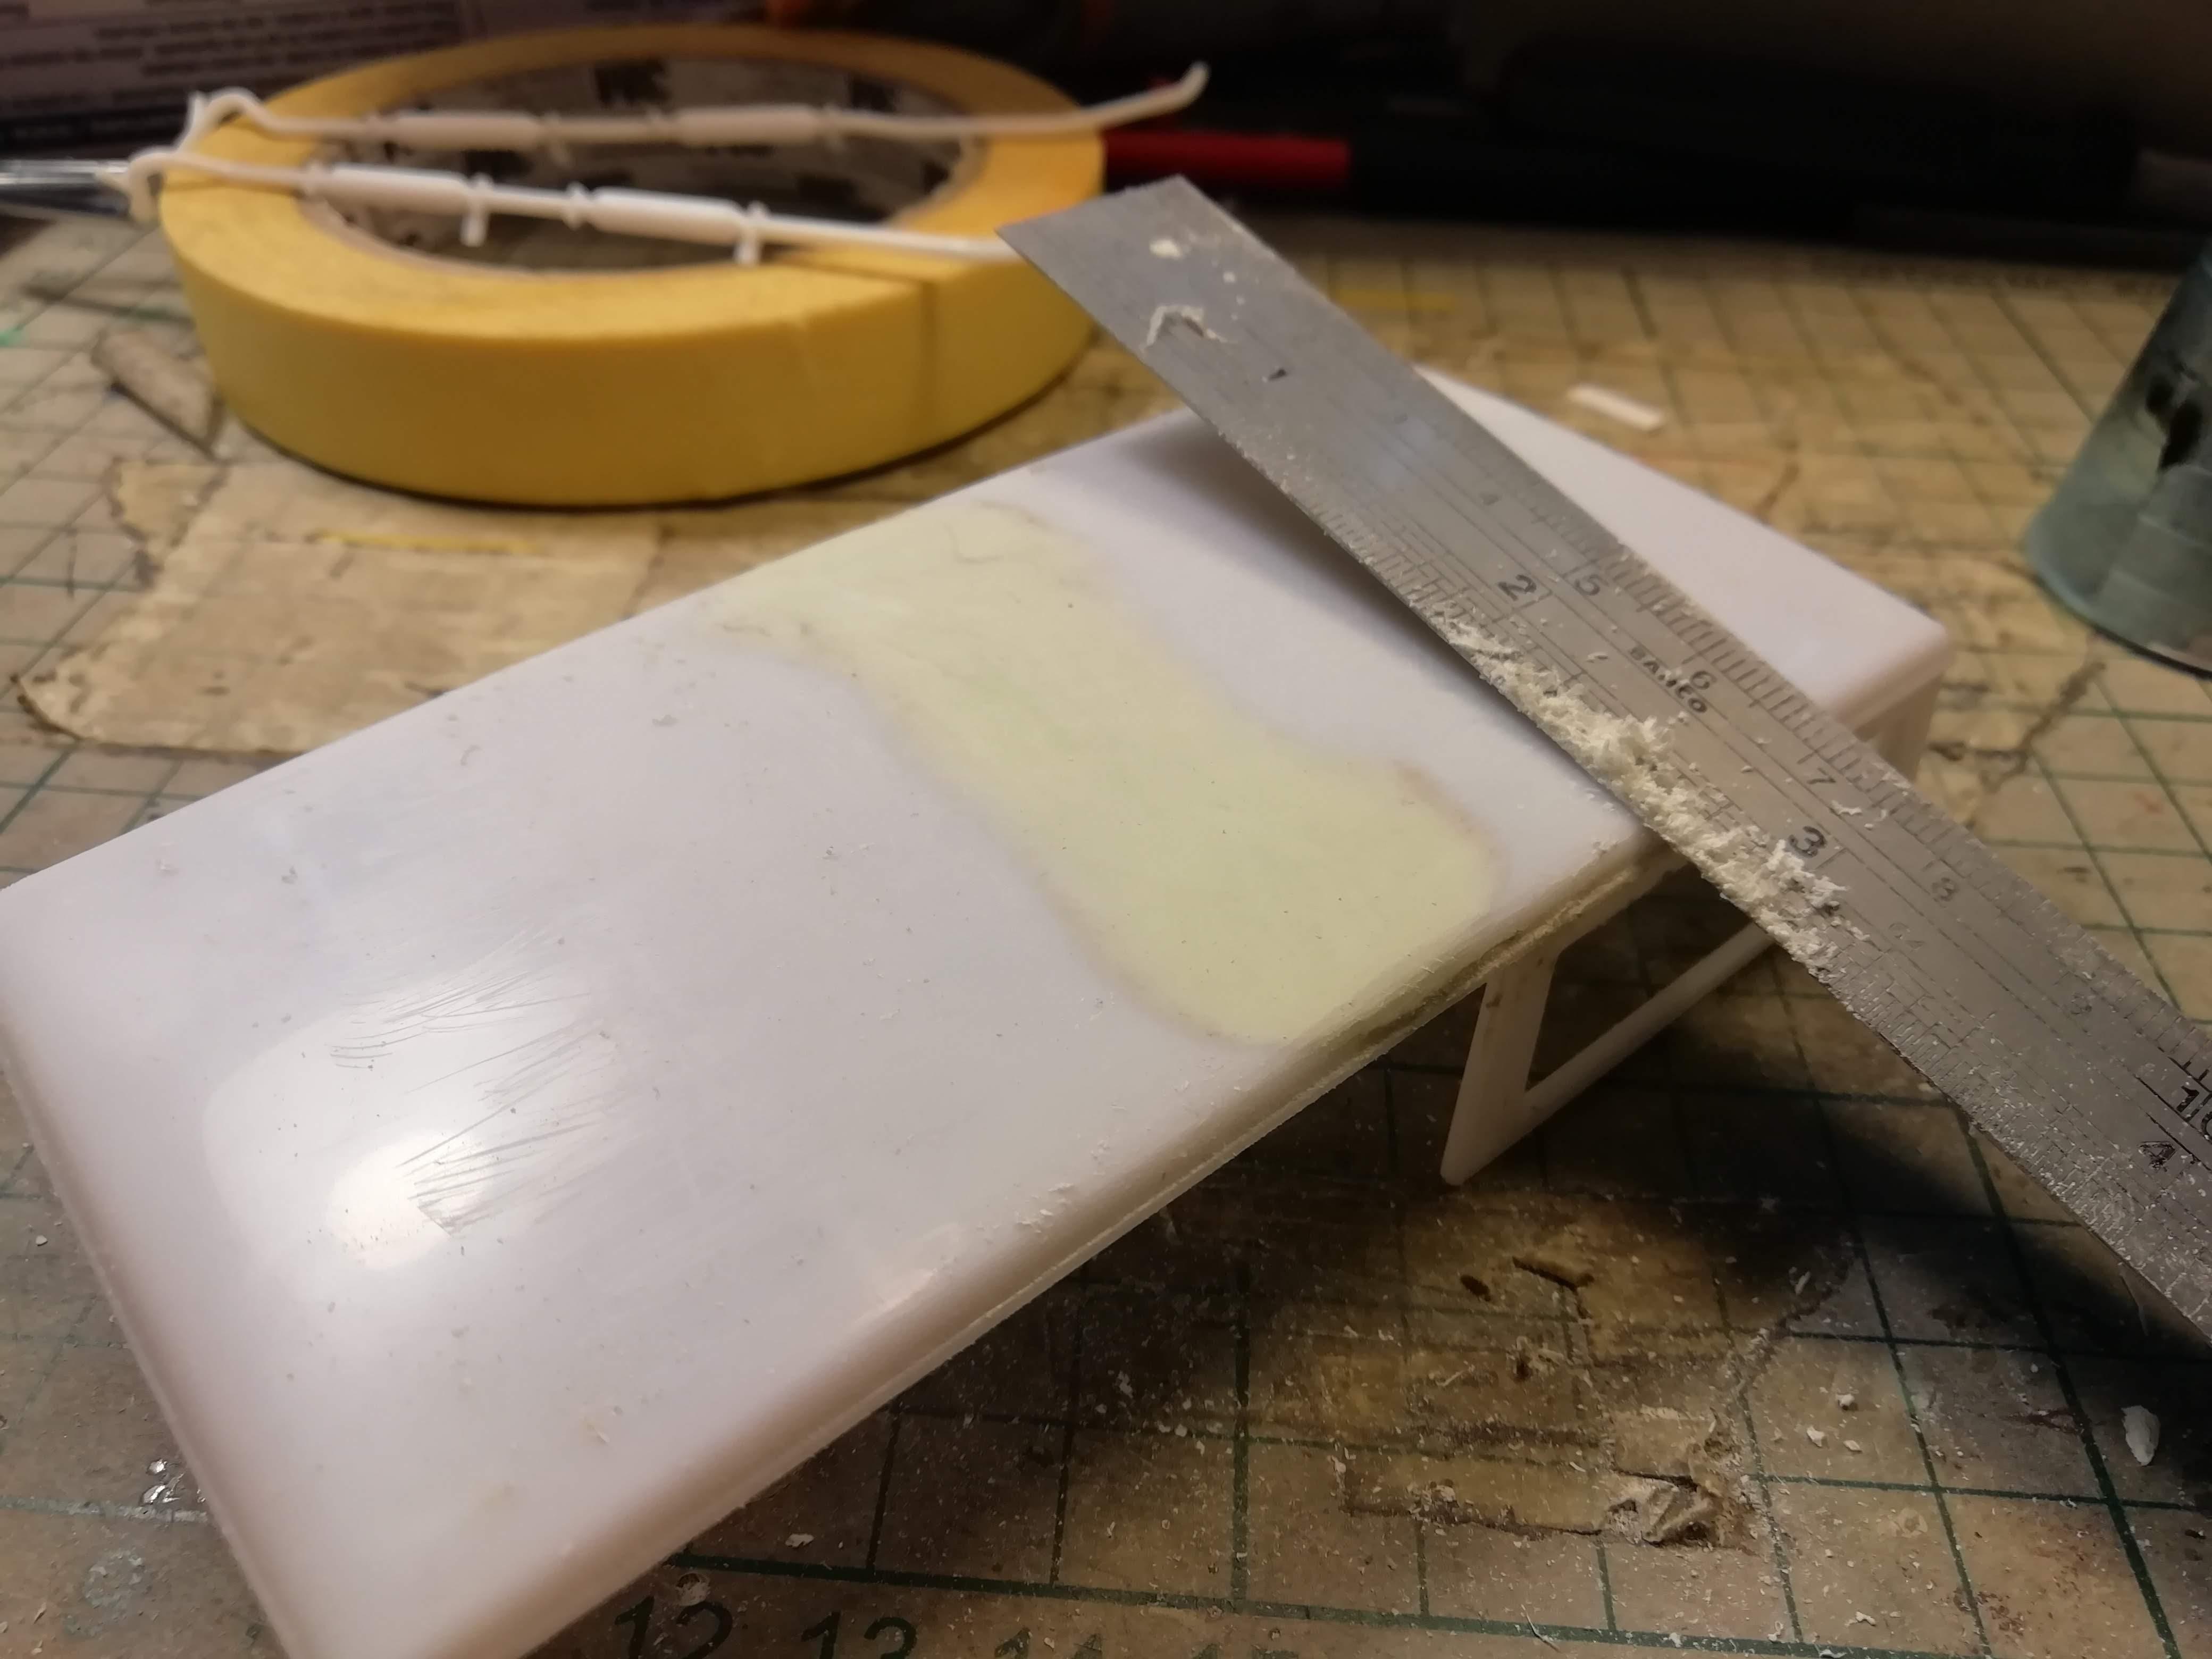
Now it's time to fill the gaps and sand. I used tamiya epoxy putty on the roof, because I don't want the putty to shrink. Middle of the roof needs alot of filling, because otherwise it would have a nasty dip in it. First sanding was done with 80 grit. Then I used metal ruler the same way the carpenters use scrapers to finish wooden surfaces. There will be another layer of different putty so make roof smooth and the arch contistent.
I hope I managed to open my process a bit. Feel free to ask questions.
-
 1
1
-
-
On 5/24/2022 at 6:50 PM, PatW said:
Super cool! I've tried to decide how to lift a 911 for some time and you've gone and done it. Some years ago my son took his Beetle to be refurbed on the body/chassis side and there were these and various other 911's and 356's in the same workshops!
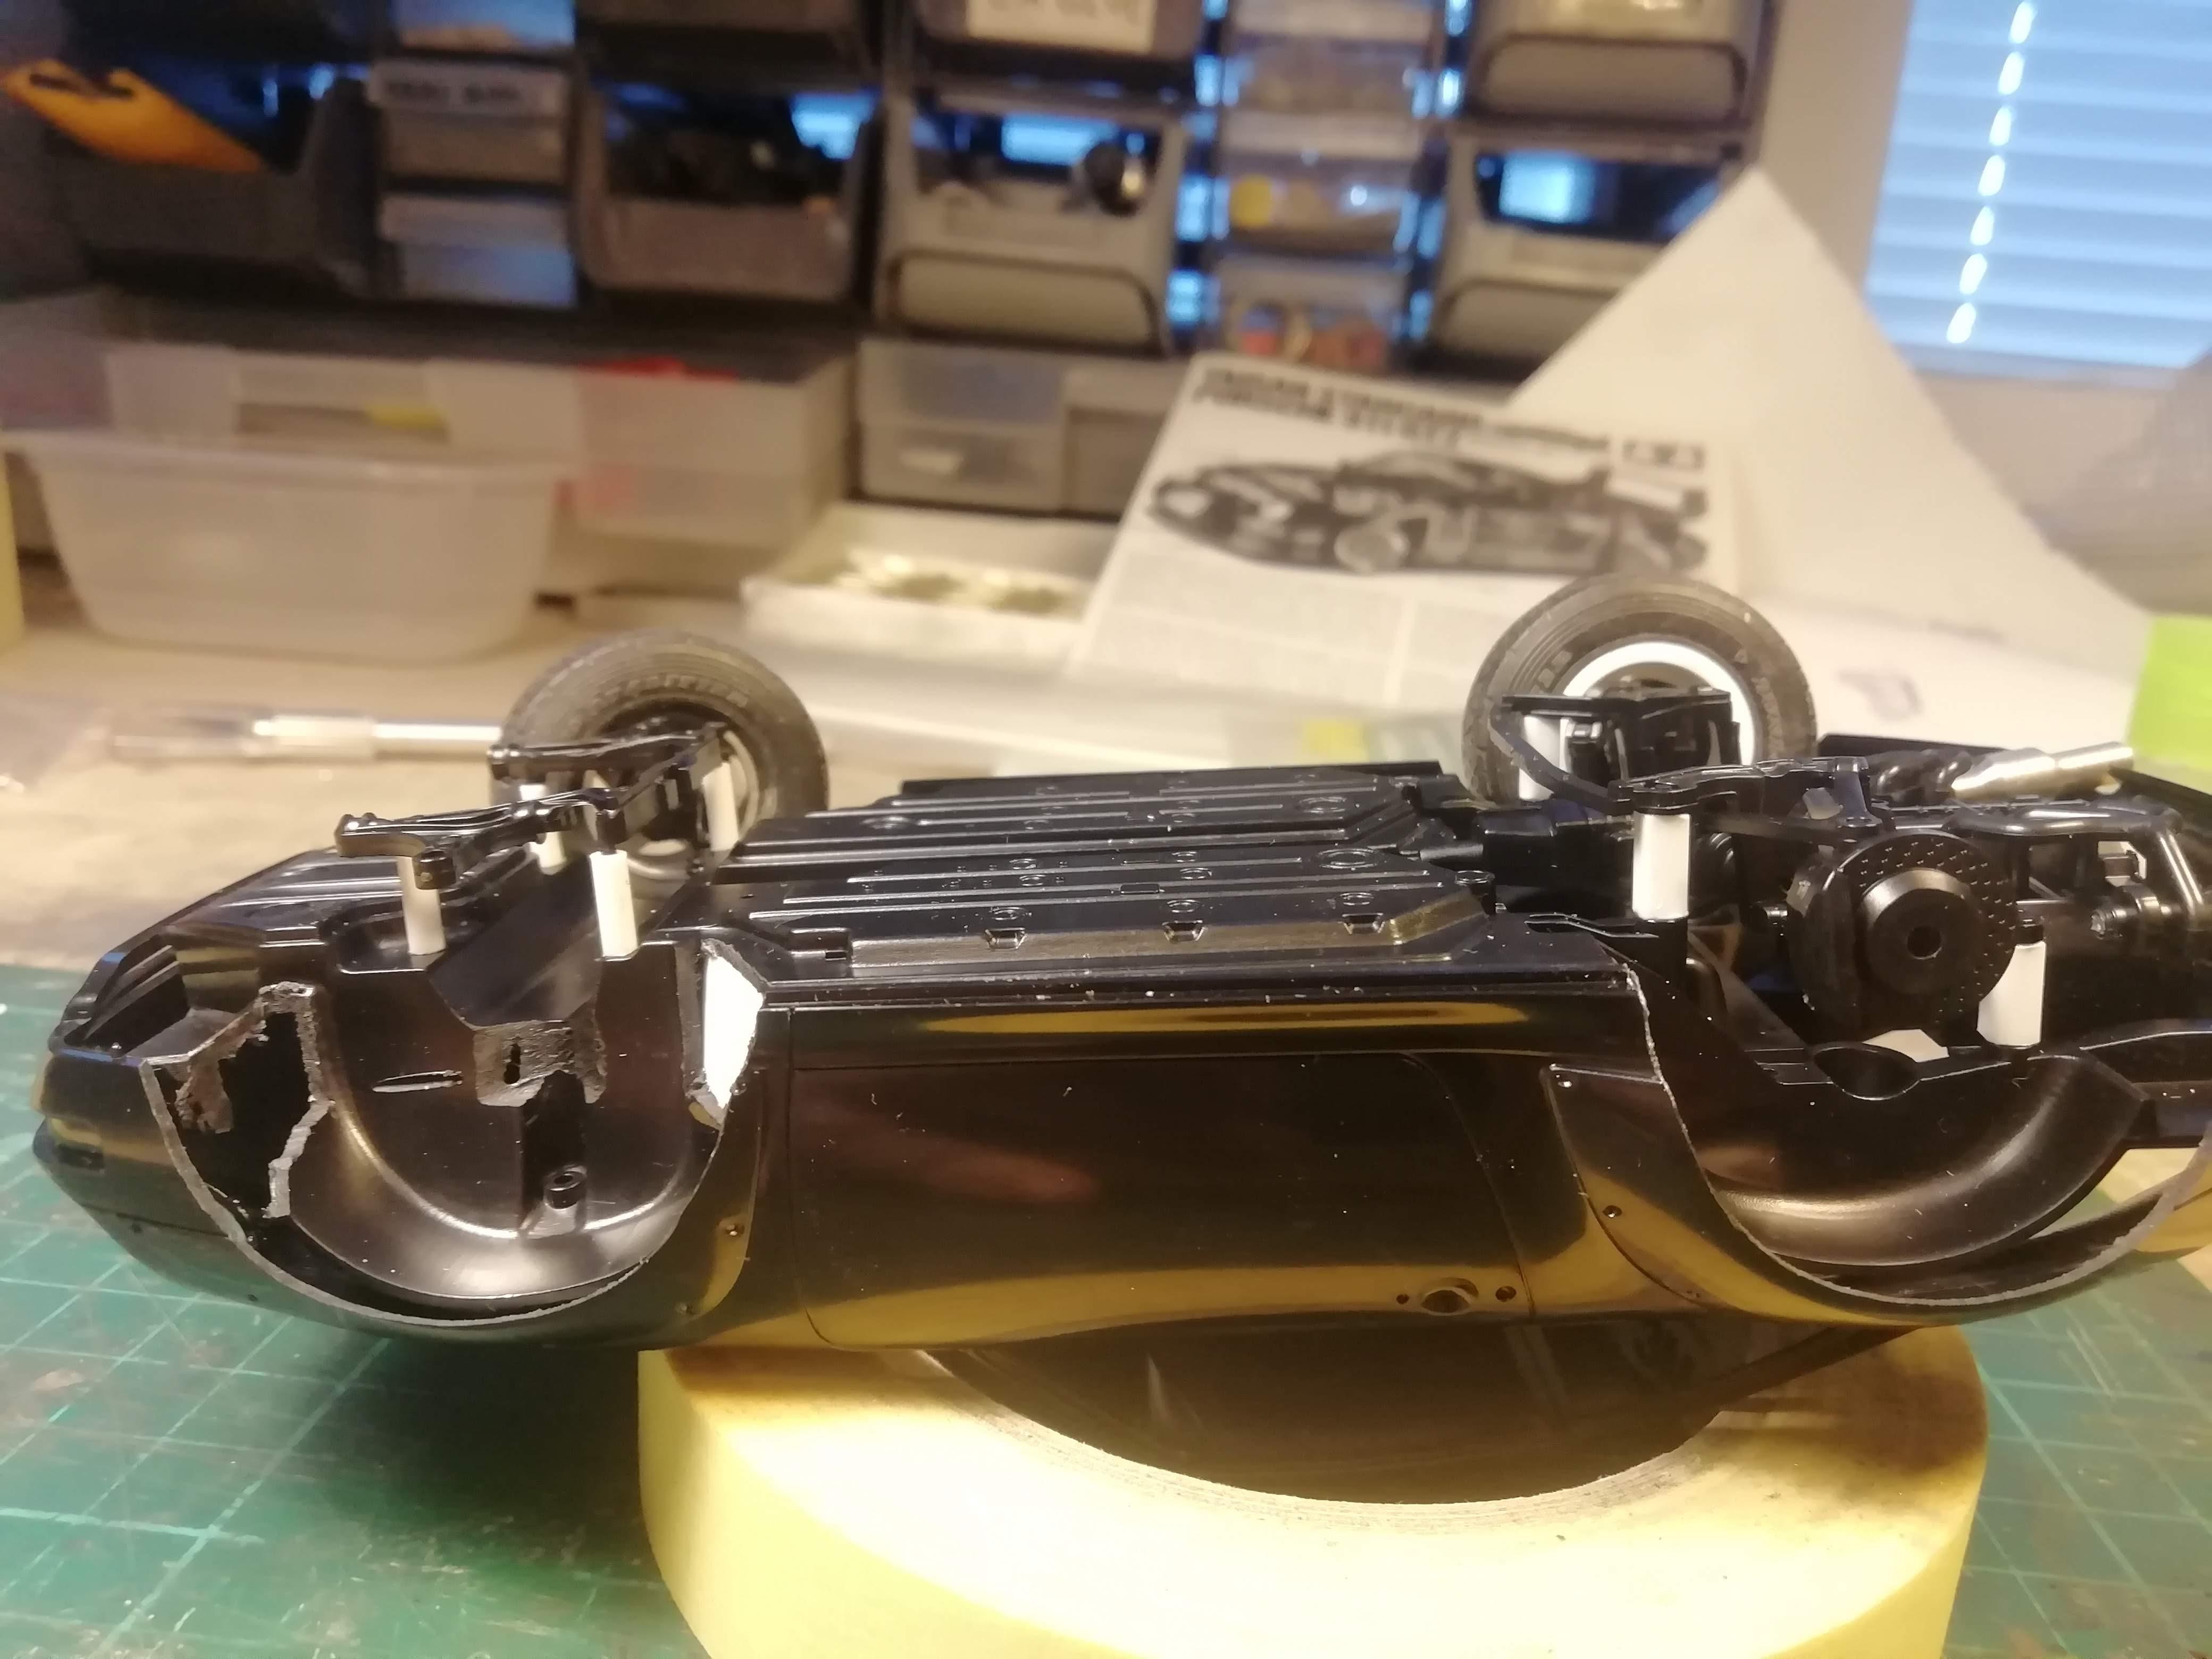
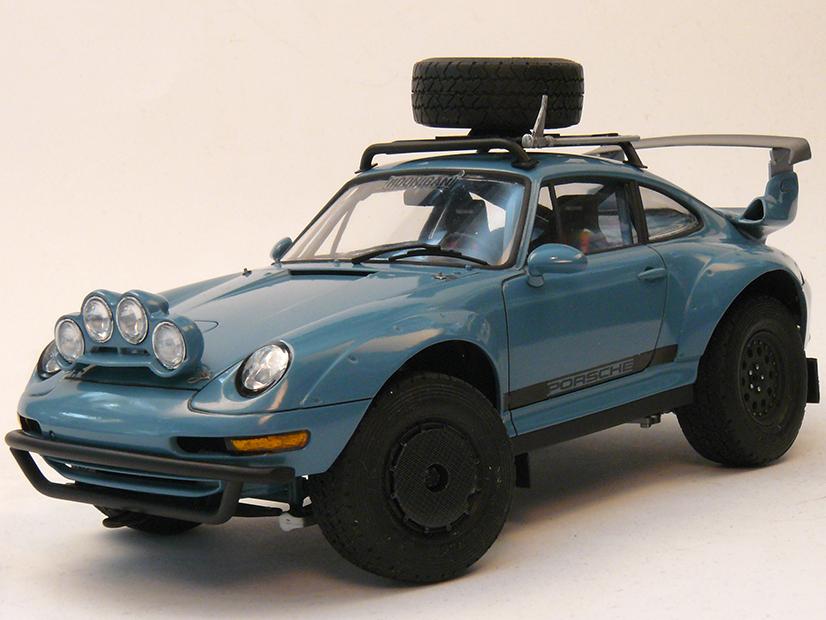
Thanks. I lifted it with lifting blocks. Wasn't keen on cutting every suspension arm, so I took the easy way out. I did add reinforcements to those white connection points. You also have to remember to lift the gear box.

-
14 hours ago, Gramps46 said:
I am impressed with what you have done with the 911. I like the bumper sticker.
Glad you noticed it.
-
40 minutes ago, Misha said:
Very well executed Ville, it was a neat idea to lift up the Porsche! Overall I find the colour to be an interesting choice and very well suited to the vehicle. Was the colour matte and then gloss coated? Your build gives me all sorts of ideas, cheers Misha.
If I remember correctly it was sort of matte. I first used TS-13 to get enough thickness and then finally airbrushed some zero 1k clear.
-
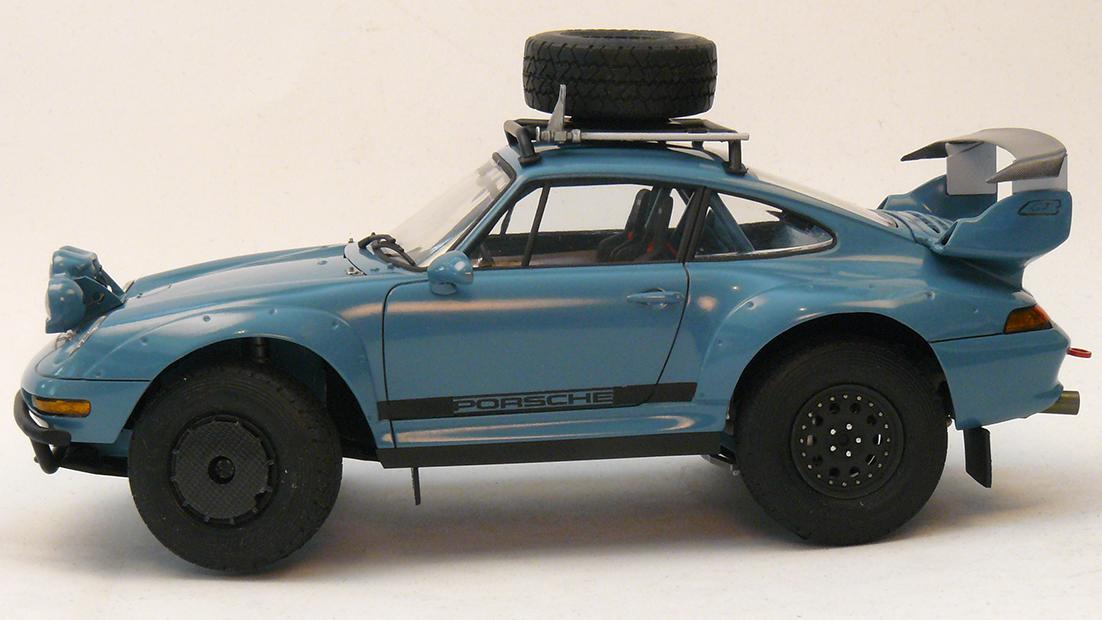
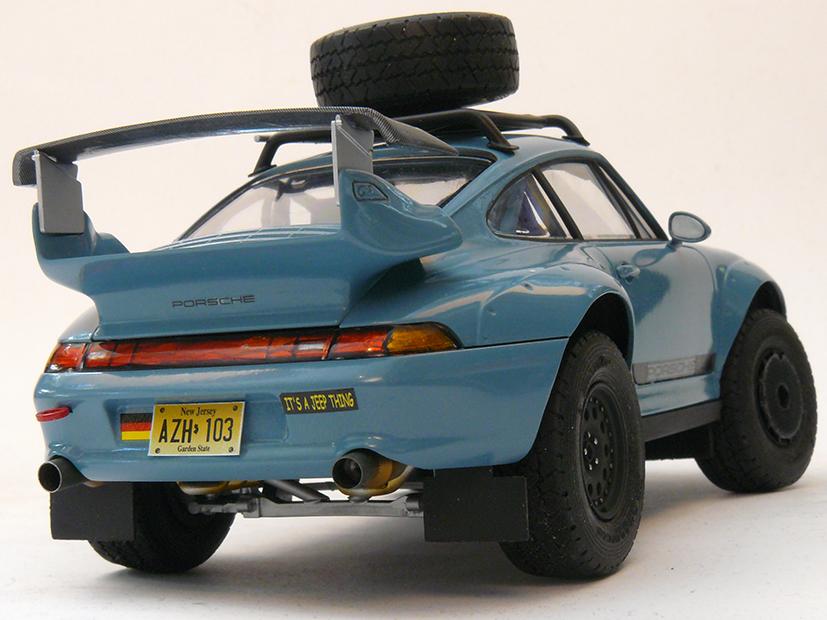
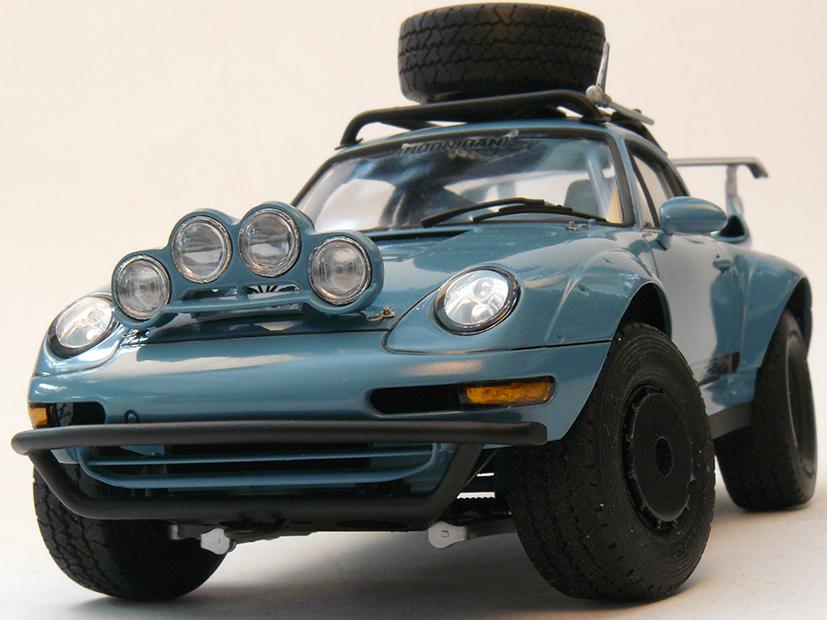
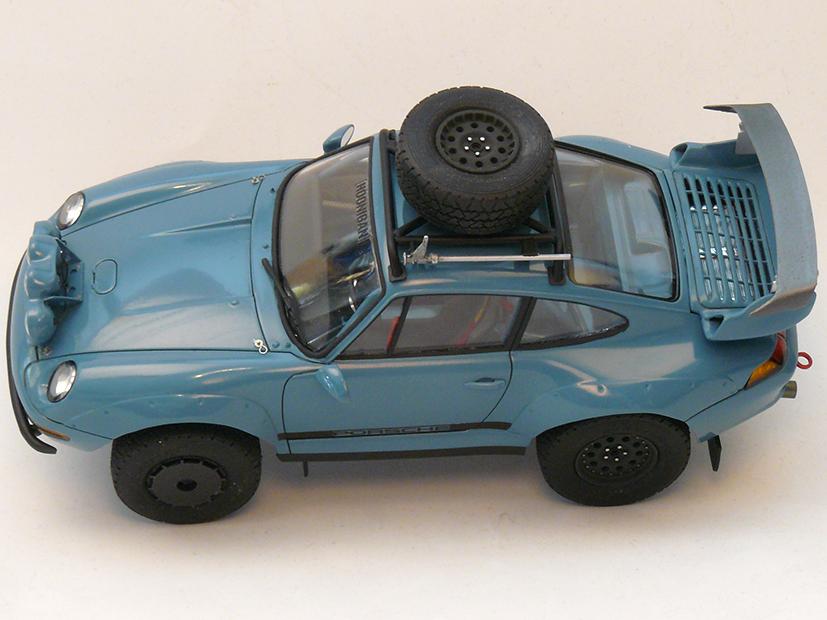
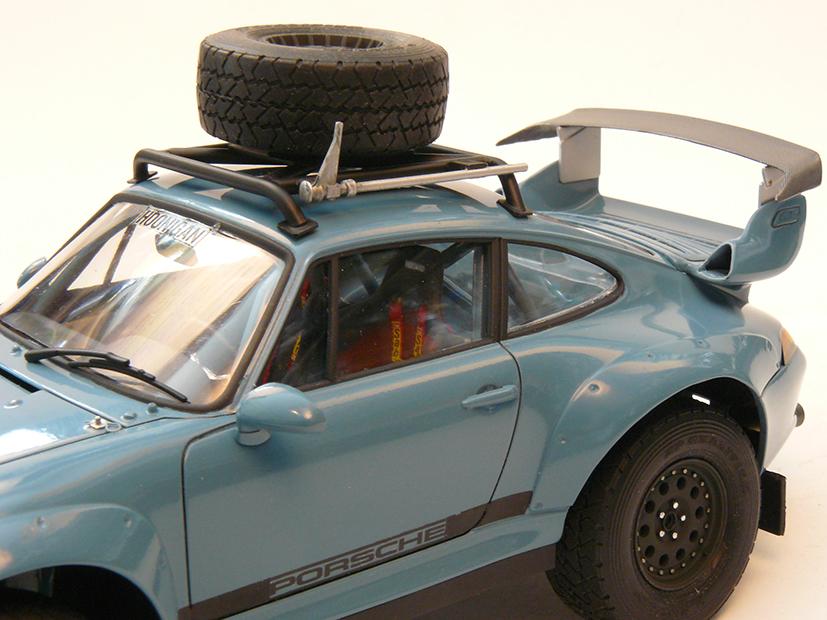
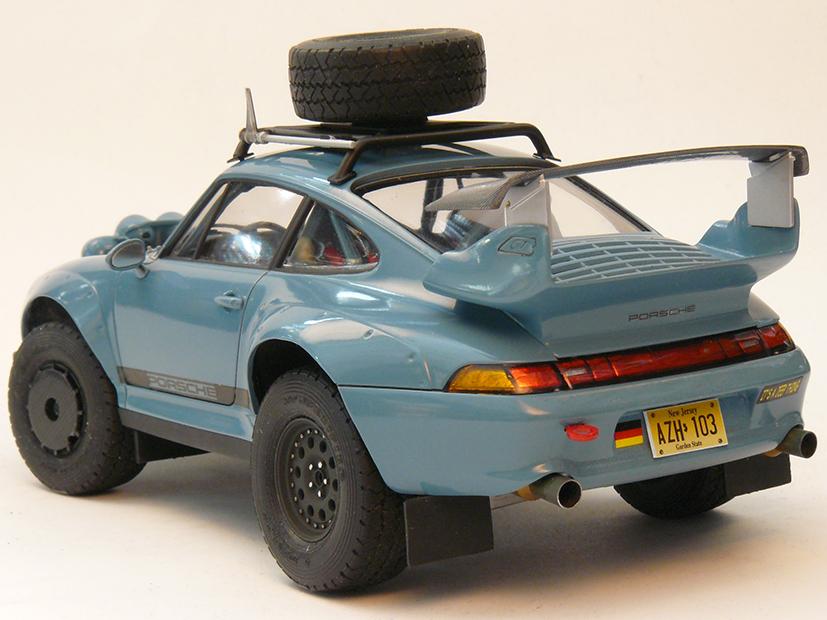
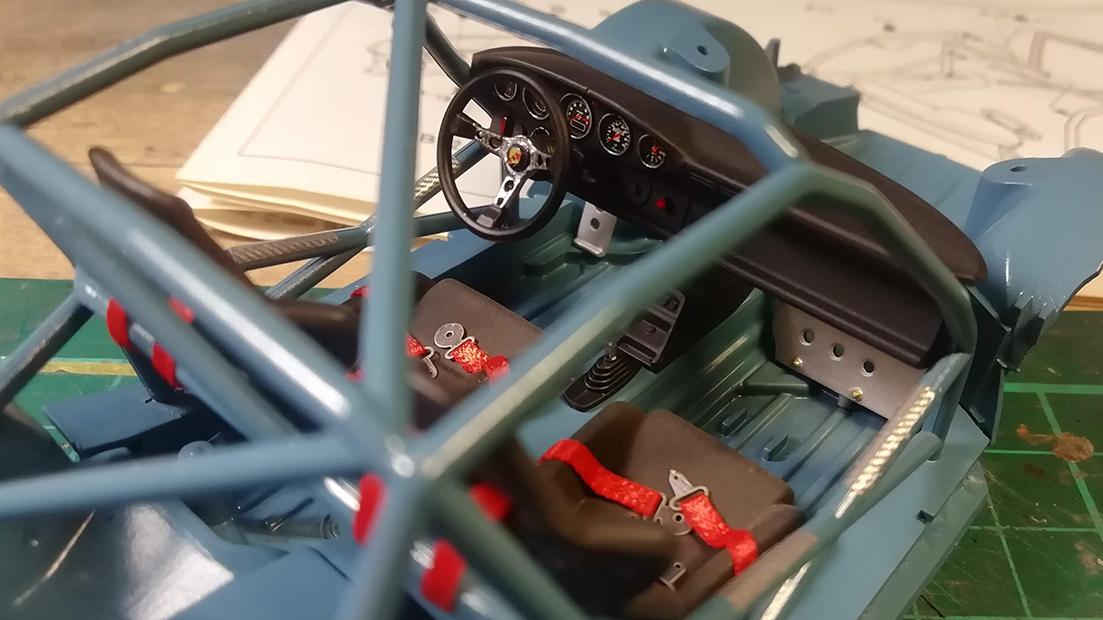
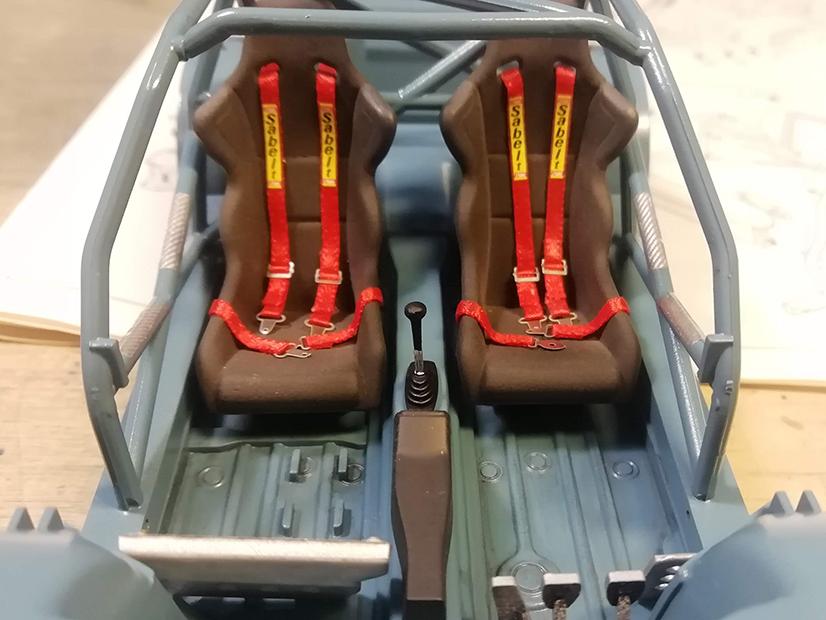
I got 2 Tamiya 911 GT2's cheap. So first got some lifting action. I added lifting block to both subframes. Tyres are from Tamiya Toyota Landcruiser. I had to use it's rims at the front, since I didn't have 5 similar Lancia 037 rims. Hence the carbon fiber Turbo Fans.
I made the front pushbar and roof rack. Extra lights are from Belkits Opel Manta. Metal rear exhaust silencers added. Rear wing changed.
Paint is Tamiya AS-19 Intermediate Blue (US Navy).
-
4
-
-
On 3/20/2022 at 11:38 PM, Smoke Wagon said:
Now that’s cool. I really dig the paint and transparent spoiler. The bodywork is great.
Glad you noticed that. Couple of my friends said last weekend at model show, that they noticed that only when seeing it live.
-
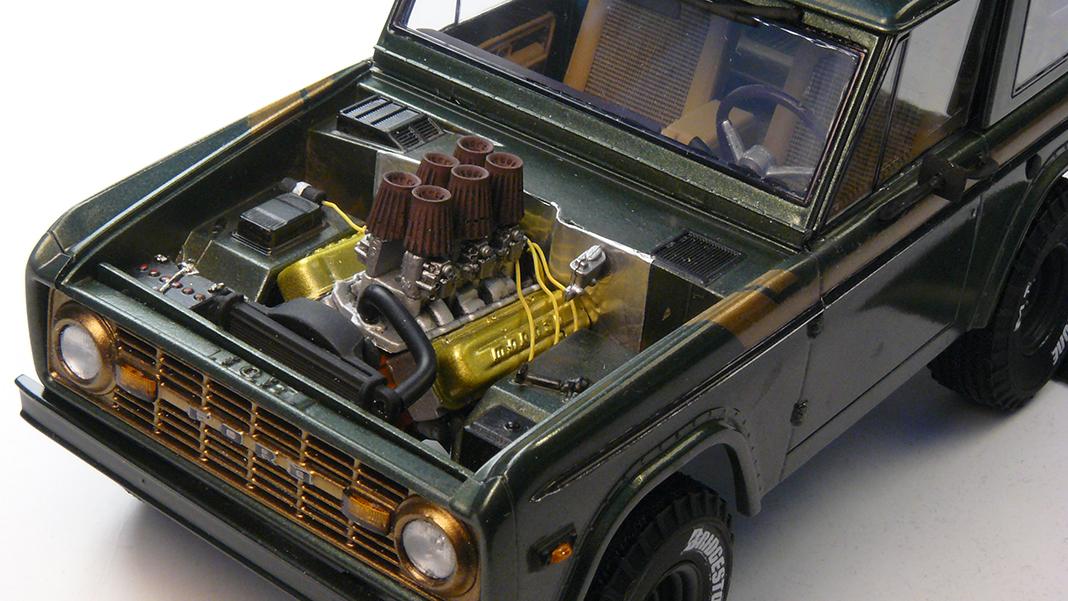
Thanks for the comments. Seems that most folks agree putting japanese engine to german one is ok. But when you put Chevy into Ford...🤣
-
Took this one to model show last weekend and got some price. Can't remember. This project was fun experiment with Tamiya LP-paints and masking. Thanks for your kind comments.
-
Thanks for the kind replies.
-
On 3/27/2022 at 2:37 AM, Dennis Lacy said:
I’m surprised no one complained about the big block Chevy yet! Very nice color scheme.
What paint processes did you use on the valve covers? They look like a perfect match for Moroso Gold.
I painted them first with Molotow chrome, then with Tamiya yellow clear. That's it.
-
2
-
-
21 hours ago, Gramps46 said:
The heat shields on the ignition wires are a really nice touch.
Thanks. I had to make them, as ignition wires "had" to routed very close to exhaust headers. Shield is just some rope I had lying around.
-
2 hours ago, porschercr said:
Agreed, that would be worth building full scale.
In a way this has been built before. Inspiration came from Roadkill's Super Camaro. I copied it's paintjob.
-
1
-
-
6 hours ago, lazlow said:
Looks great, I like the way you made the tips look like they have been heated up
Tips were made from radio antenna tube. Then heated with torch. Remember to clean them before heating. Fingerprints leave ugly surface when heated.
-
7 hours ago, NOBLNG said:
Really nice looking Bronco Ville!👍 Did you cast the air filters from a kit part or scratch build one?
If I remember correctly, they were from Aoshima Nissan Silvia S13 kit, which has an engine.
-
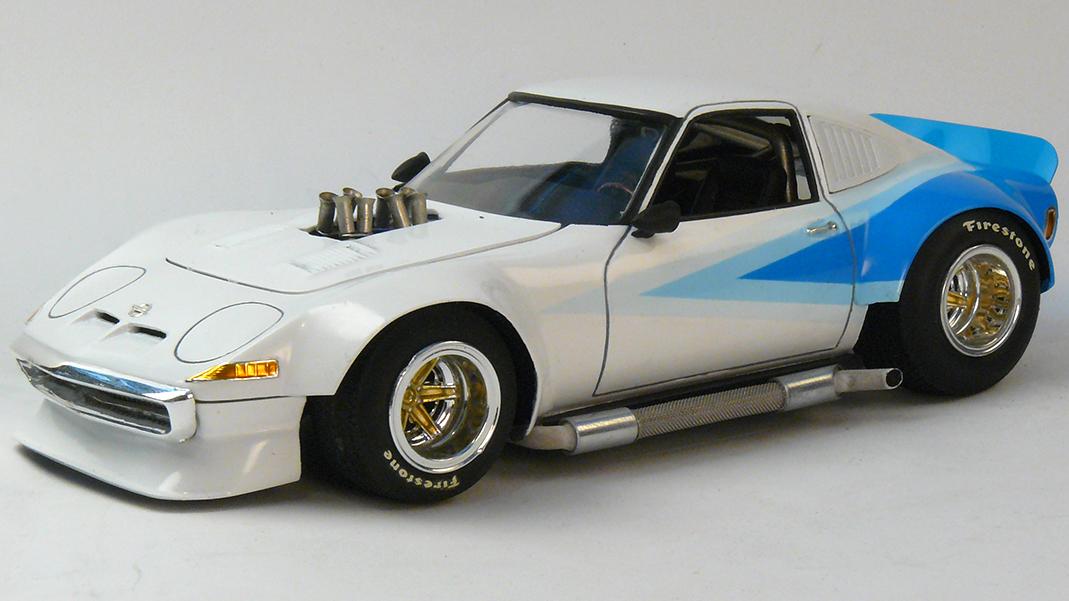
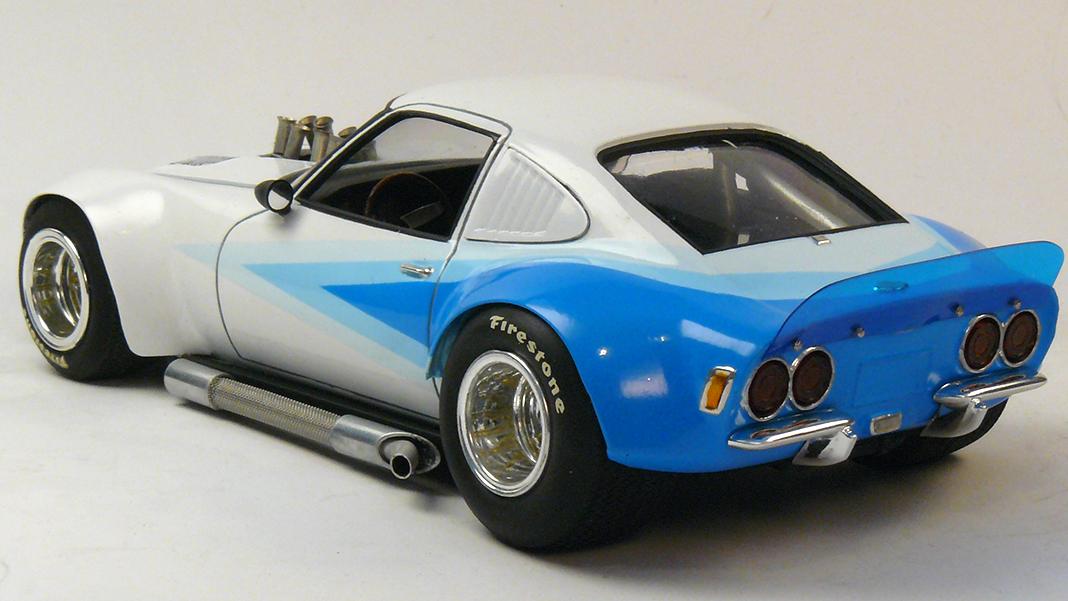
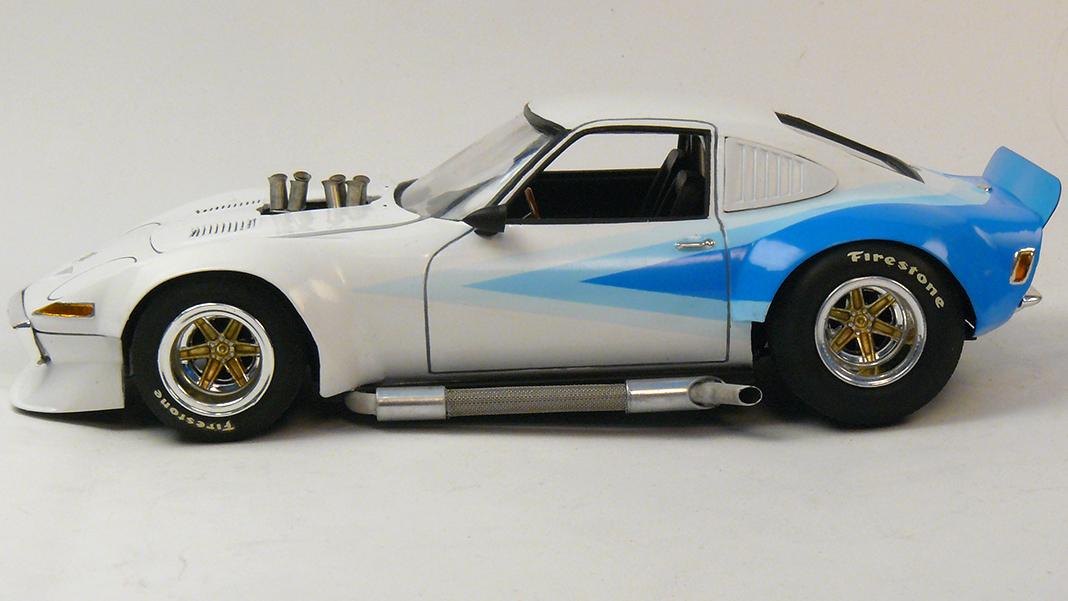
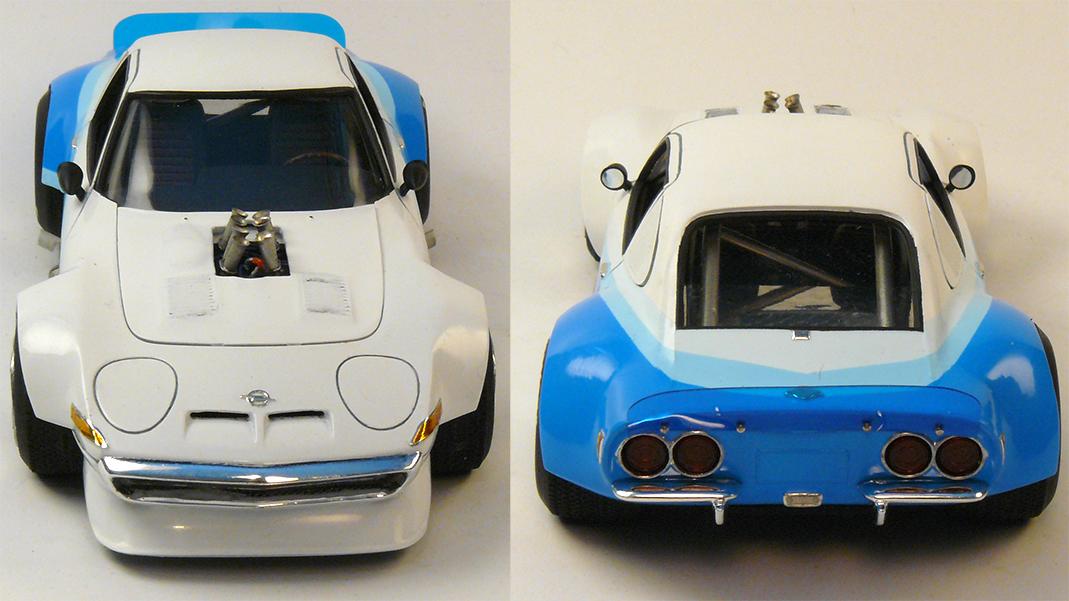
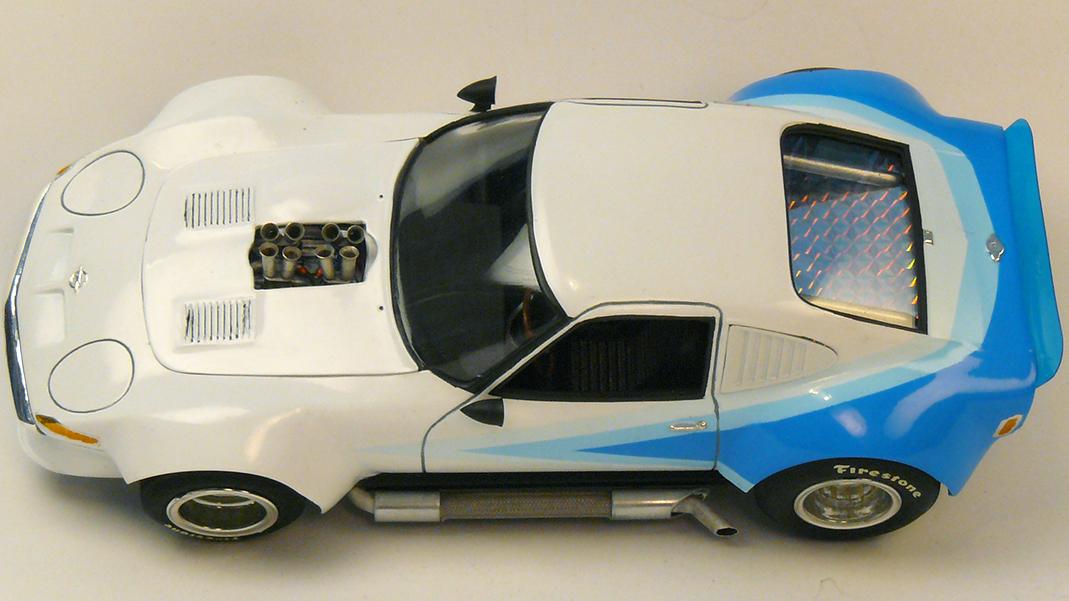
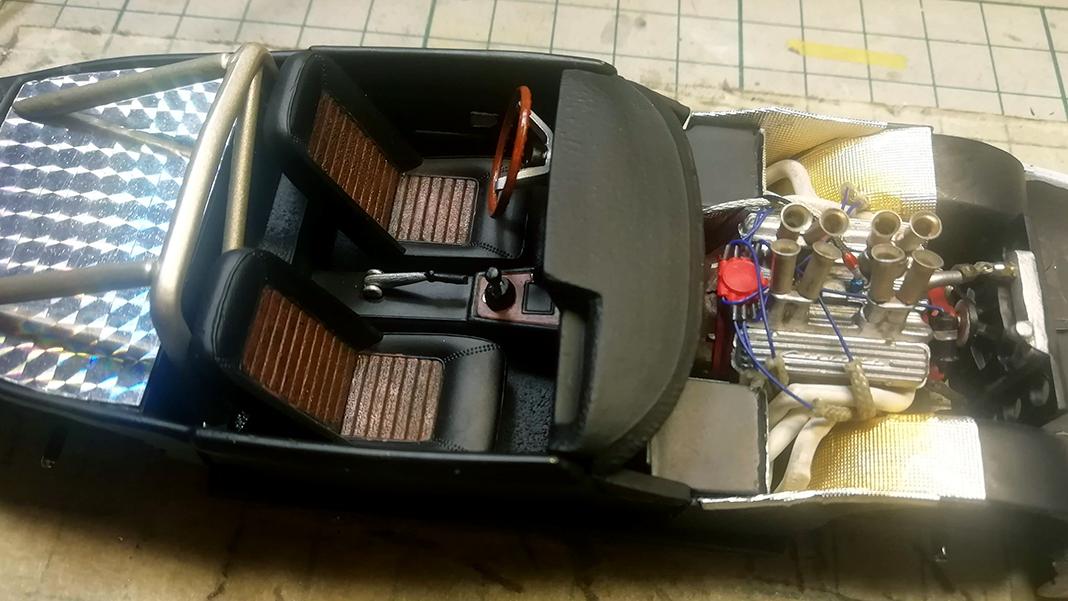
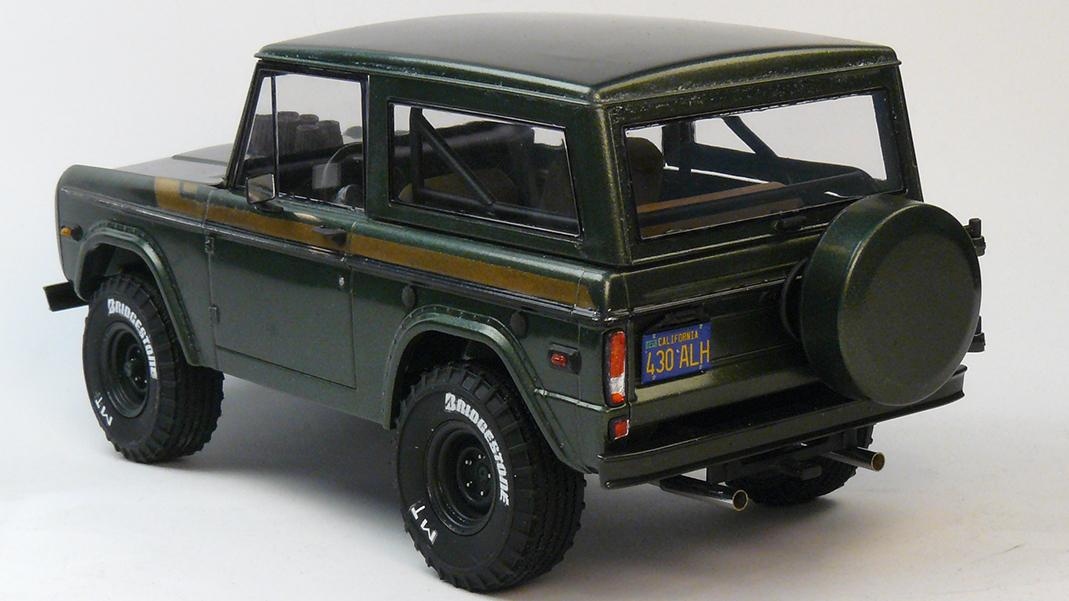
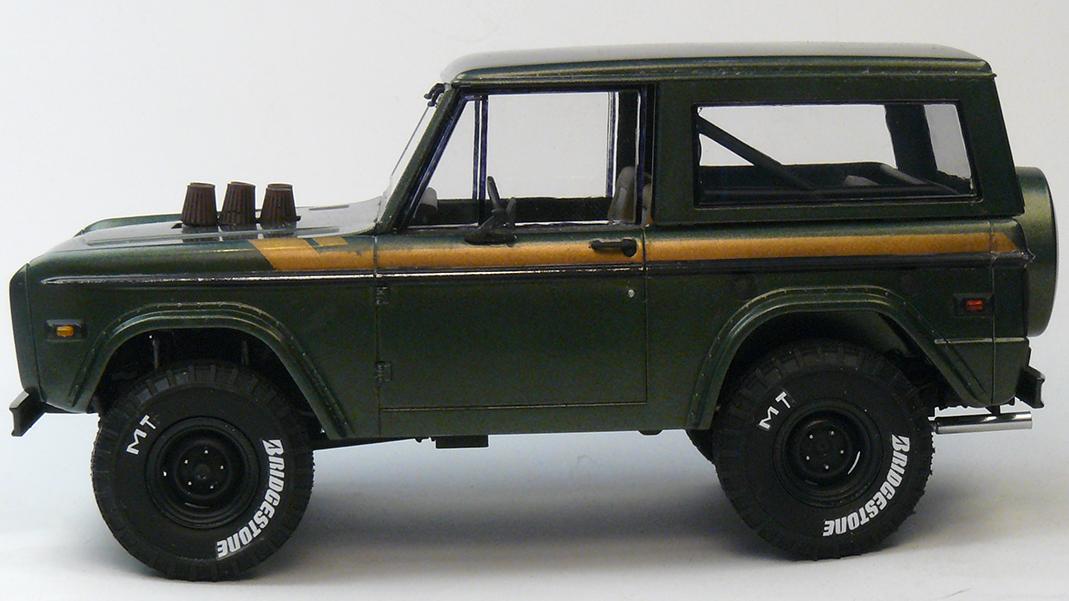
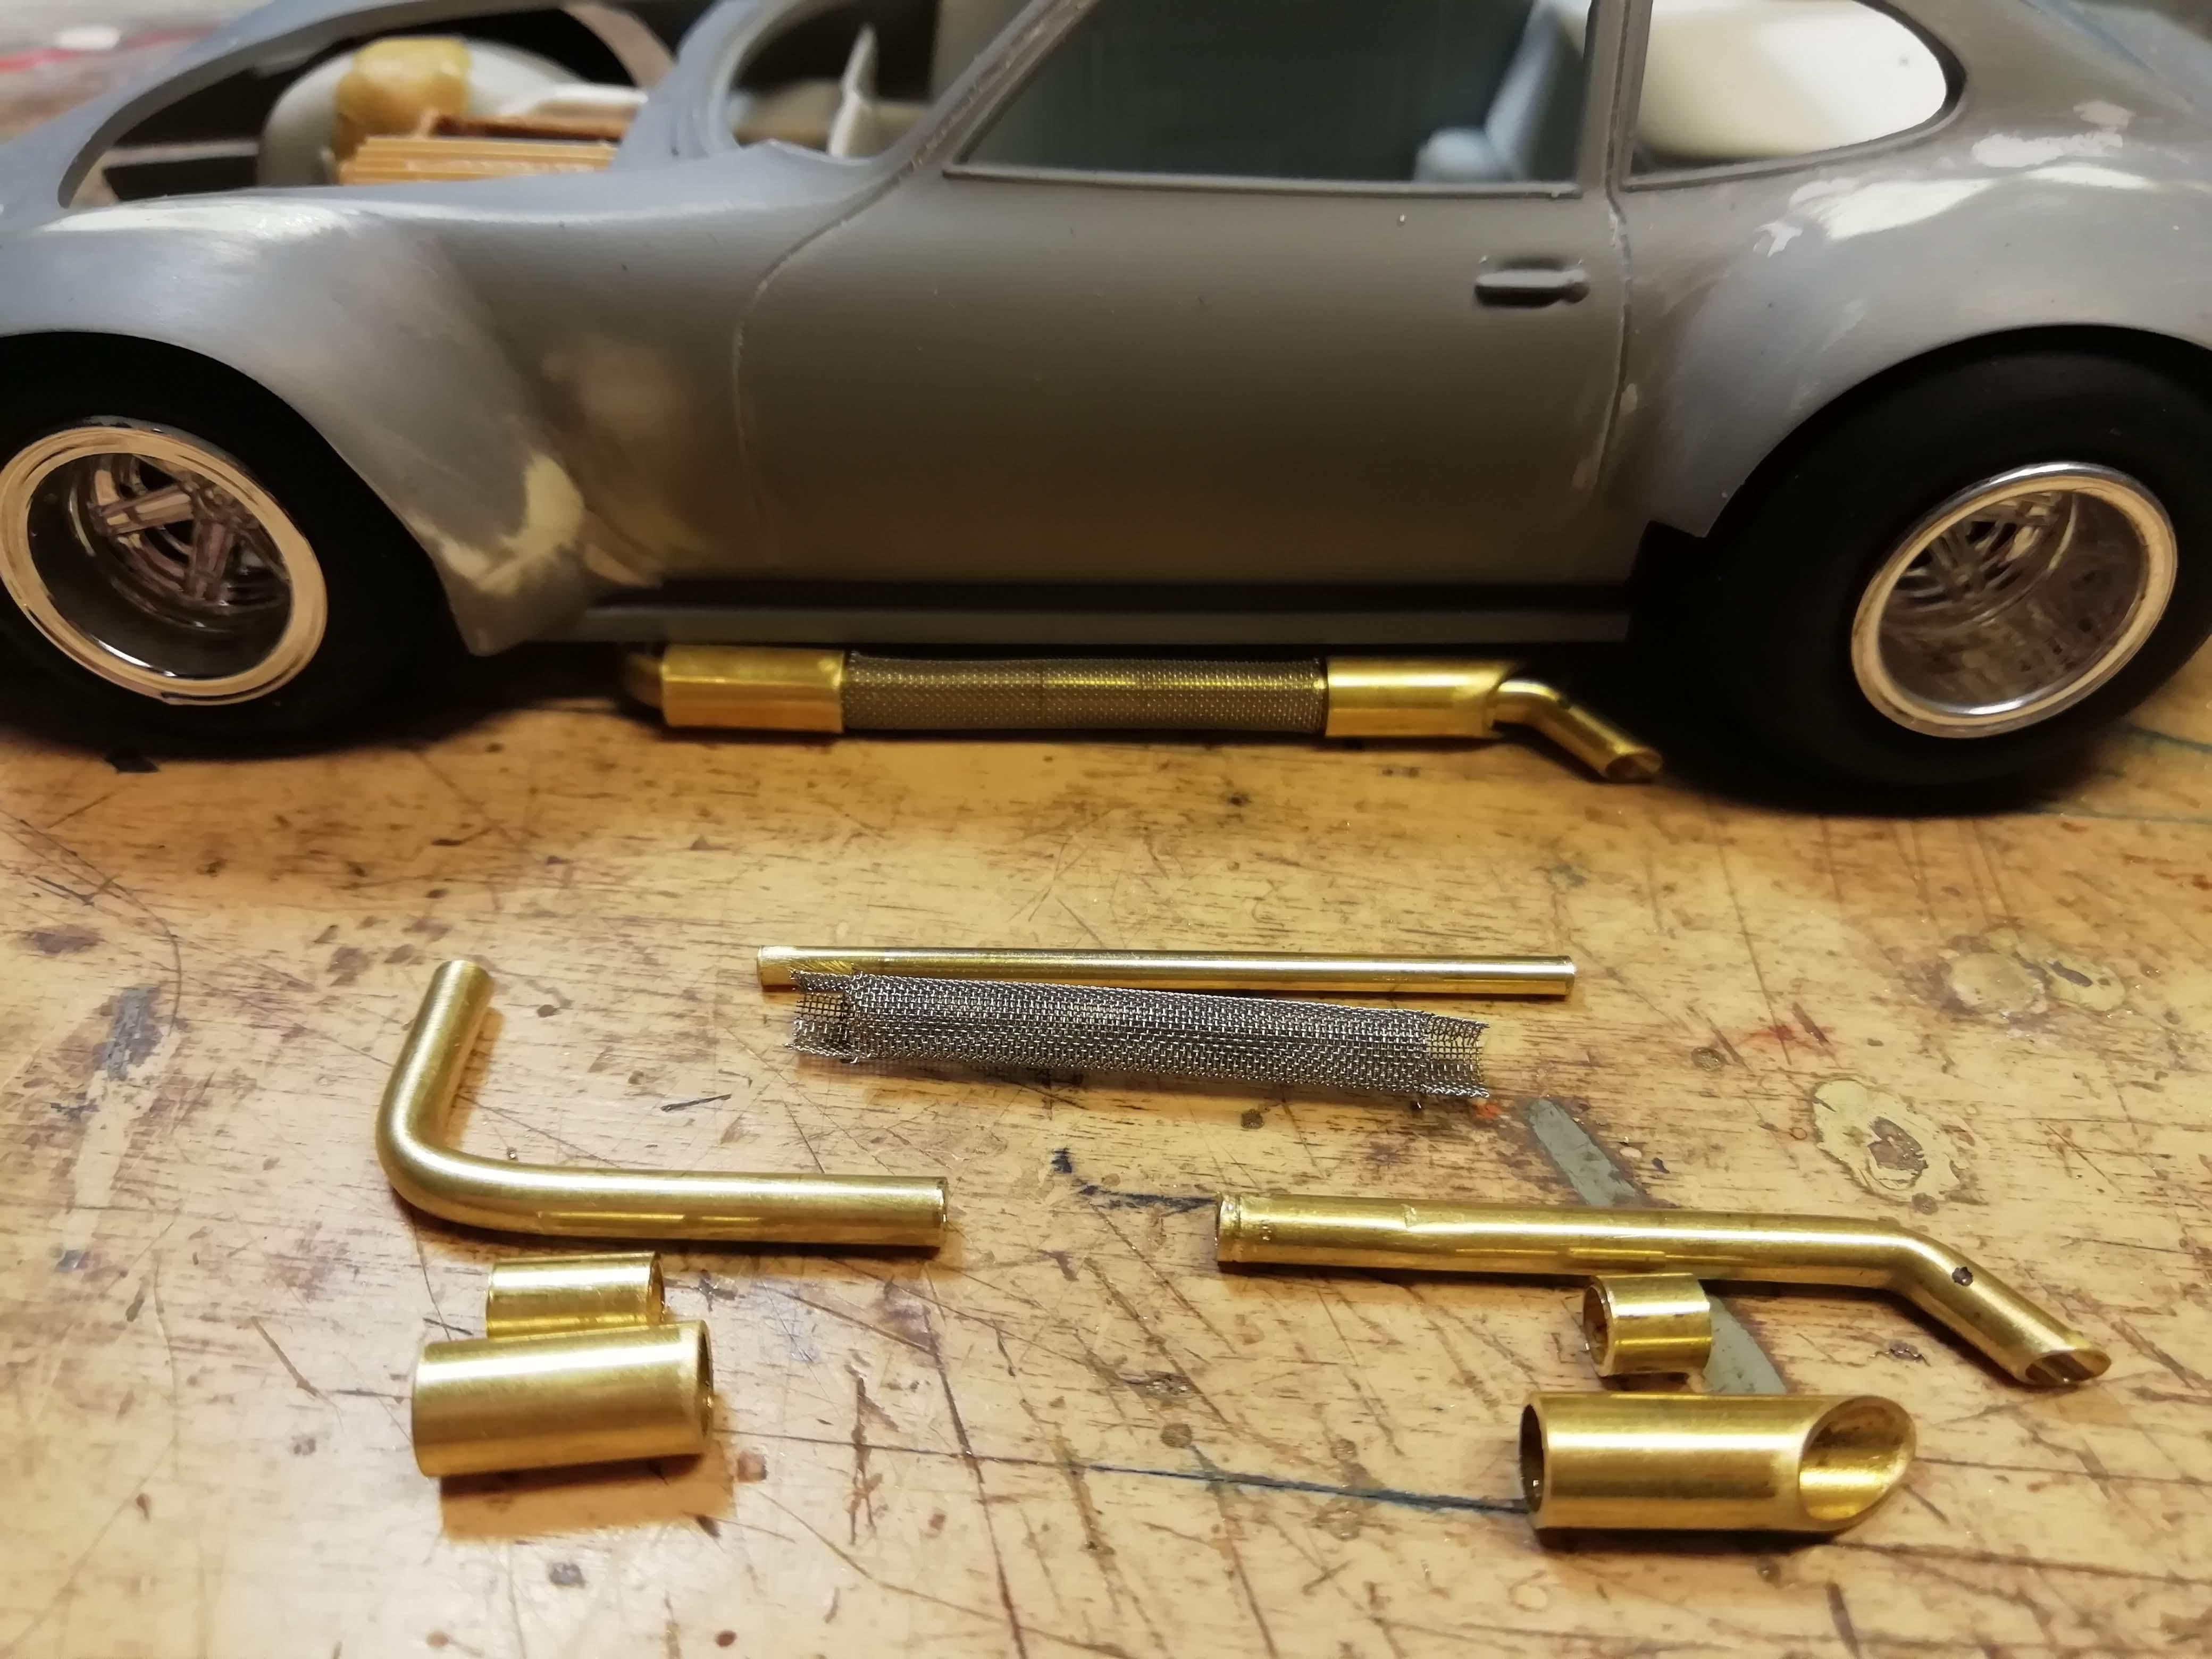
Changes:
- Fender flares from Fujimi set
- Engine is Corvette V8. Changed the intake manifold and carbs. Scratchbuild distributor and exhaust headers
- Sidepipes made from brass tubes
- Model Factory Hiro's 70' prototype tyres with widened kit rims
- Front spoiler out of Peugeot 206 WRC rear spoiler. Rear spoiler is styrene sheet-
5
-
 1
1
-
-
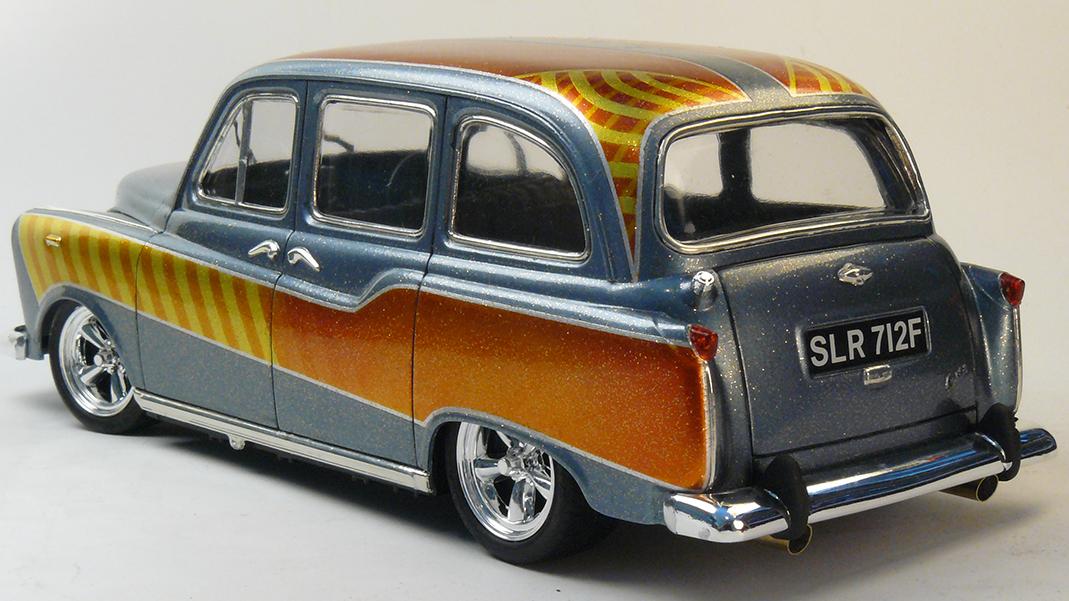
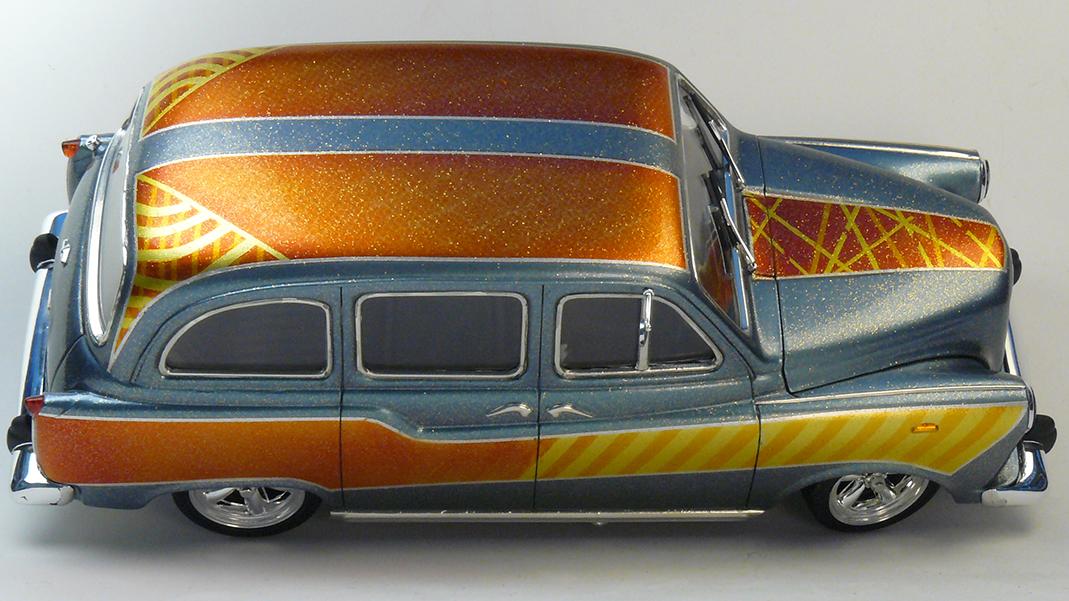
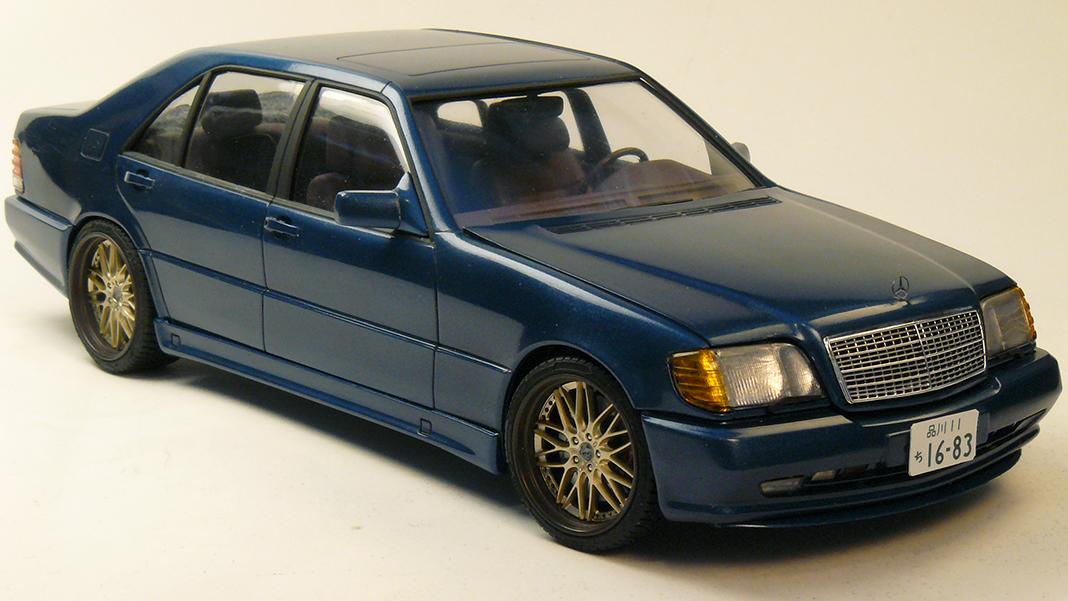
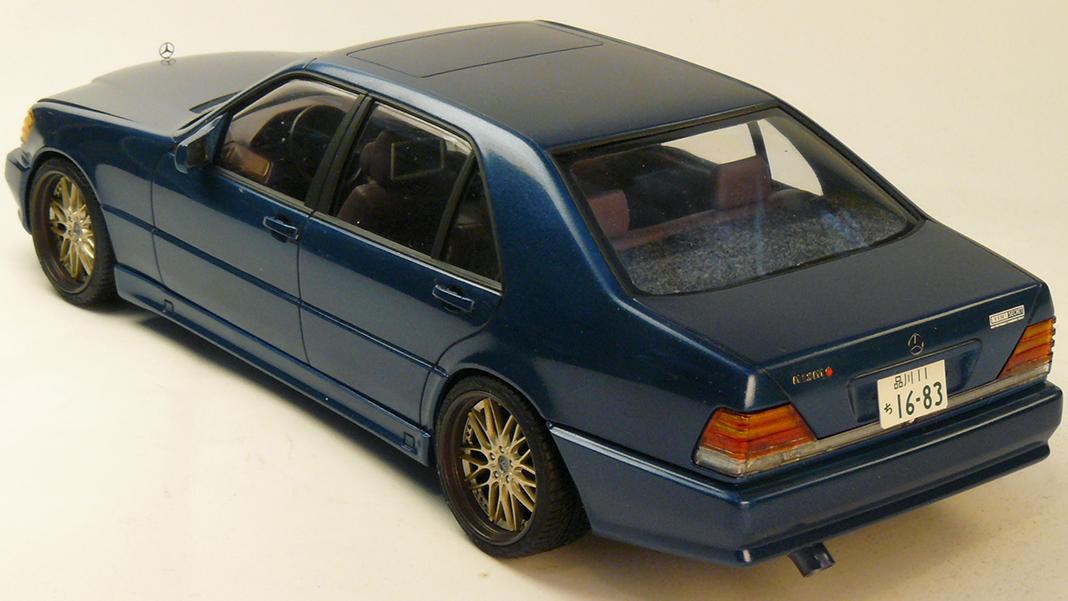
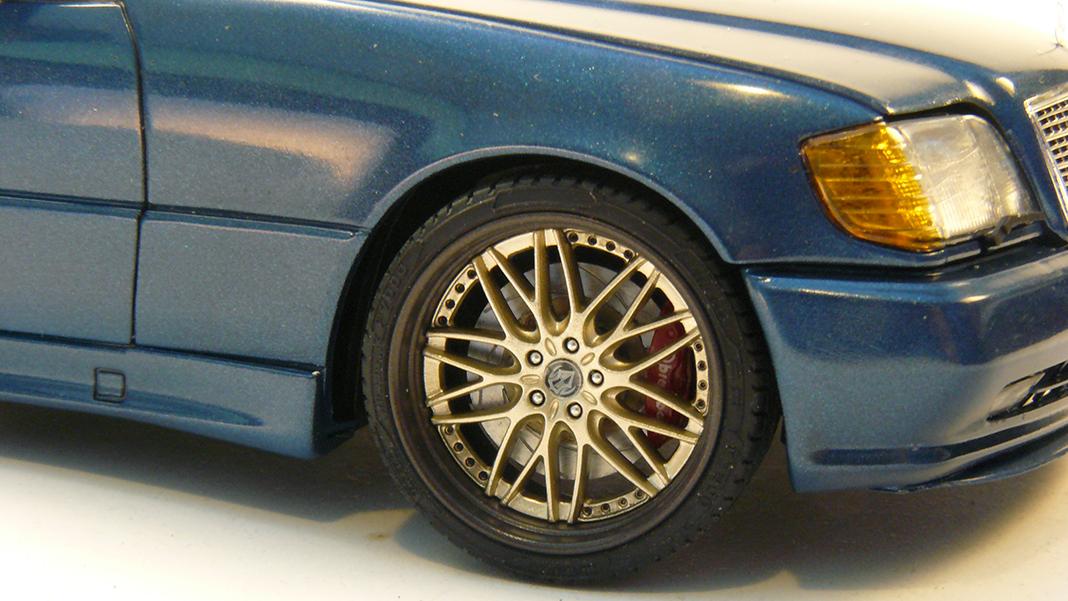
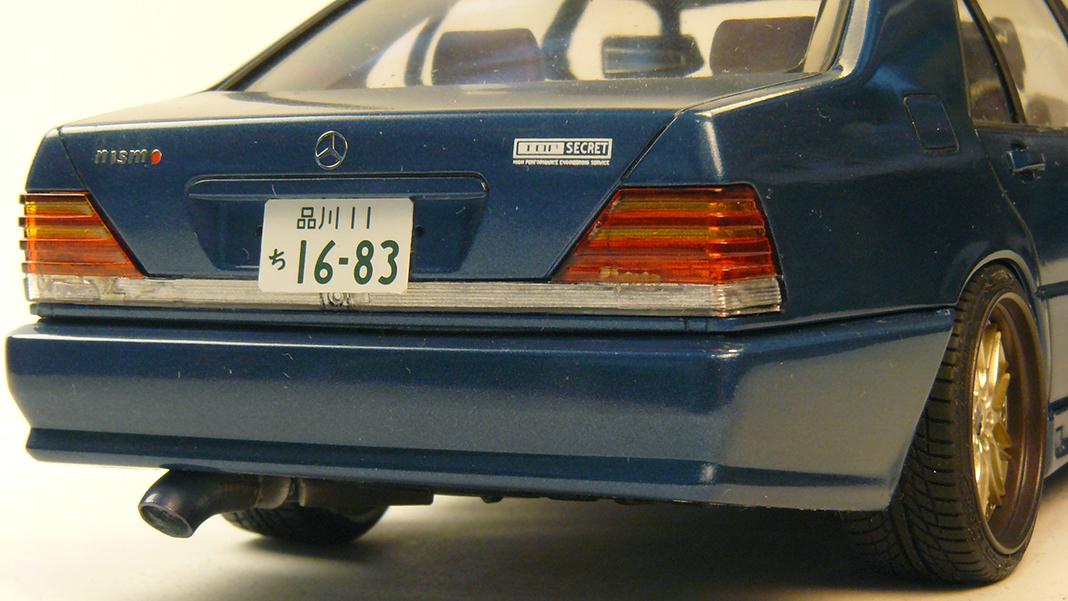
Changes:
- Lowering
- Wheels and tyres
- Double exhaust
- Sideview mirror place switched
- Custom paintjob
Lowest picture is the same kit, built by me in early 2000's. Notice the kit's updated licence plate.-
4
-
-
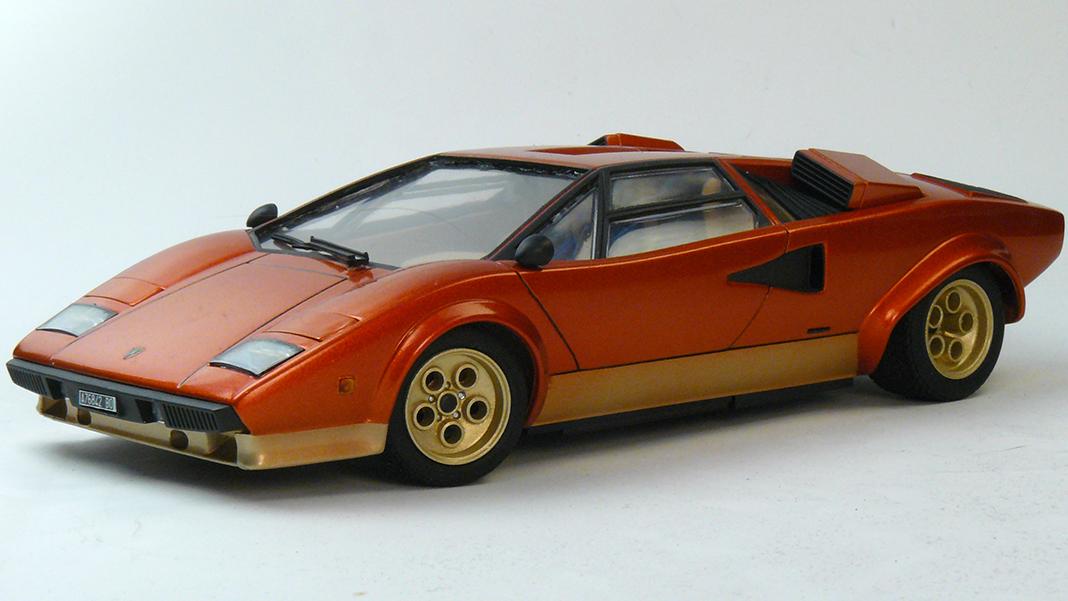
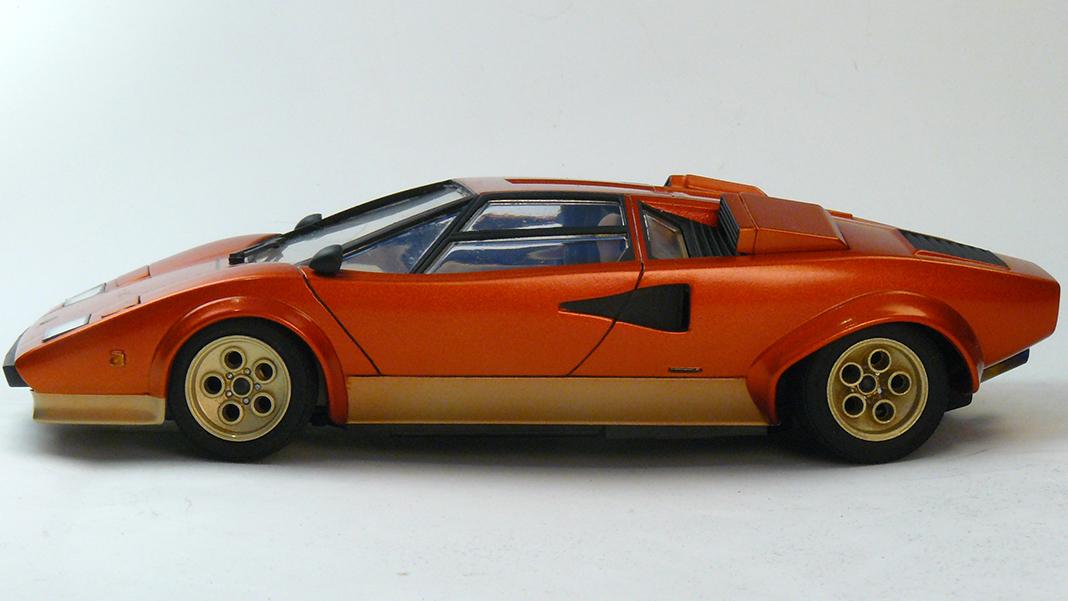
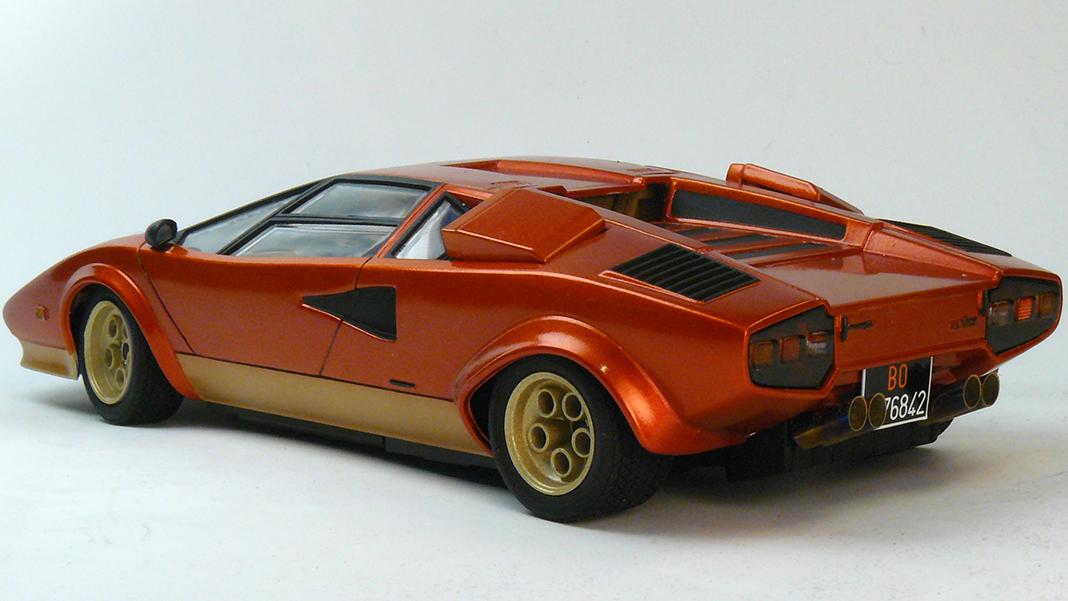
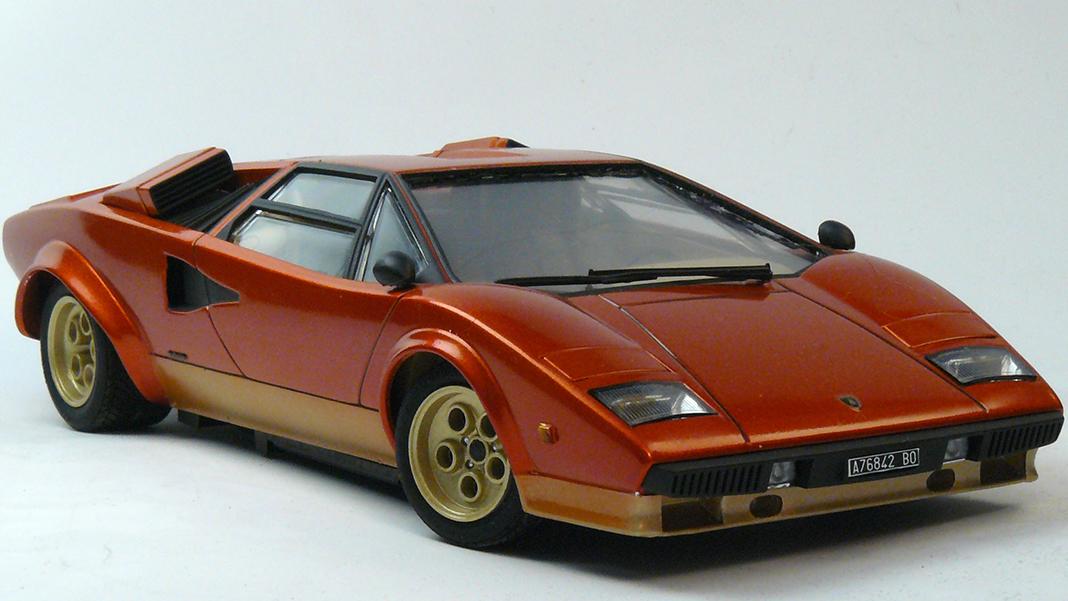
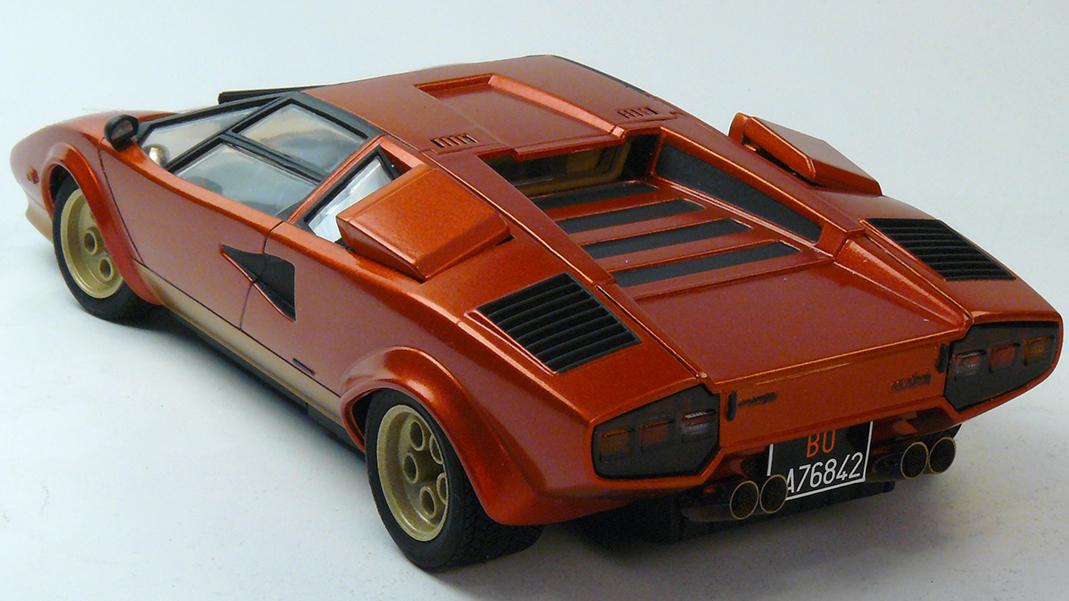
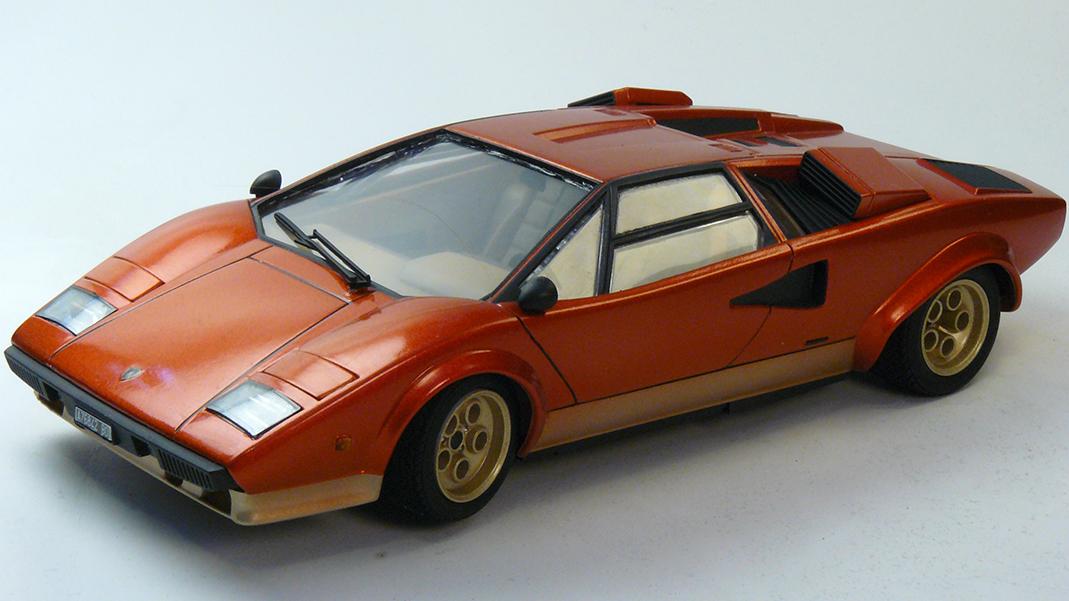
Paint idea came from early Lamborghini Miuras. Changed exhaust tips to metallic ones and removed rear wing.
-
4
-
-
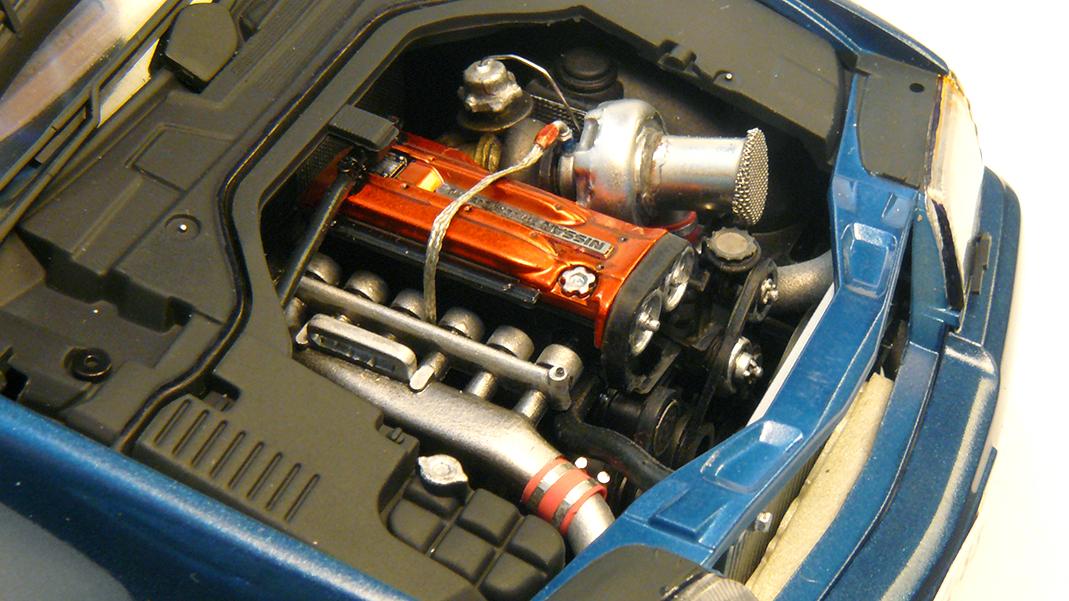
Changes:
- Self casted air filters, carbs and valve covers
- Learned that you can't fix canned spraypaints with airbrush. Metallic chips will align differently mainly because pressure differences.
- Don't touch black bare metal foil after applied. Will rub off. -
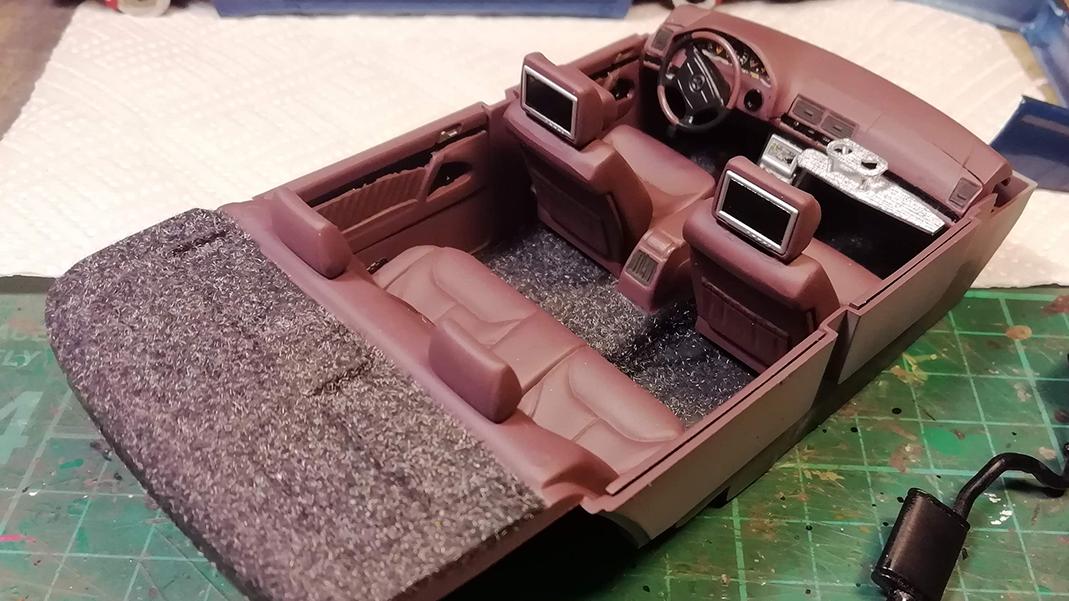
Changes:
- Bigger wheels and tyres from Aoshima
- Photoetch brake discs
- Engine changed to Nissan RB26 with resin turbo
- New front seat headrests with screens
- Scratchbuild "japanese" table for the passenger-
6
-
-
On 8/26/2021 at 8:49 PM, Chariots of Fire said:
Take some brass tubing, put in a vice and squeeze. It'll come out pretty close to what you want. Aluminum tubing would also work and you would not have to paint it.😎
This method might work. There's two things that I can think would be issue. First, you have have something to protect the pipe in the vice. Otherwise you could have nasty marks in your pipe. Secondly, some kind of spacer or stopped would be required to make two identical oval tubes. Thirdly, what if you like a bend in your fresh oval tube. How do you make that? Also how to attach oval tube to reqular round exhaust pipe? I'm in for all kind of advices and tips. I like making custom exhausts to my models and I like to make them "realistic". At least the tips need to be hollow.
-
I used Albion Alloys brass tubing for these side pipes. Mainly because I can bend it, without it crushing. Although, I had to use smaller tube inside bigger, to get 90 degree angle. Secondly, they fit inside each other.
I also had to drill the tips, so the pipe wouldn't have too thick walls.
-
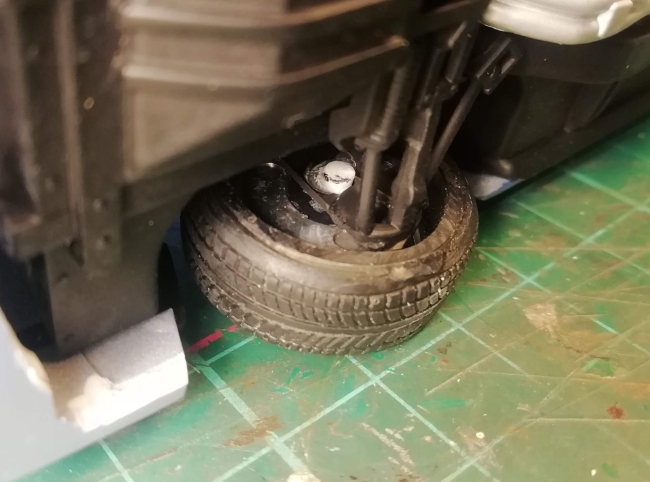
After alot of thinking, I lowered it this way. In front, I didn't use kit brakes. Glued styrene piece to the lower suspension arm. Then drilled hole to it, allowing new stud(white part) to be mounted up(thus lowering car).
For the rear, I left out springs and the triangle structure. I drilled the center axle hole little bit bigger, allowing rear axle to be pushed closer to the chassis. I would have liked to have the suspension little bit lower in the rear, but axle interfered with stock exhaust. So that needs to modified too, if you want lower rear even more.

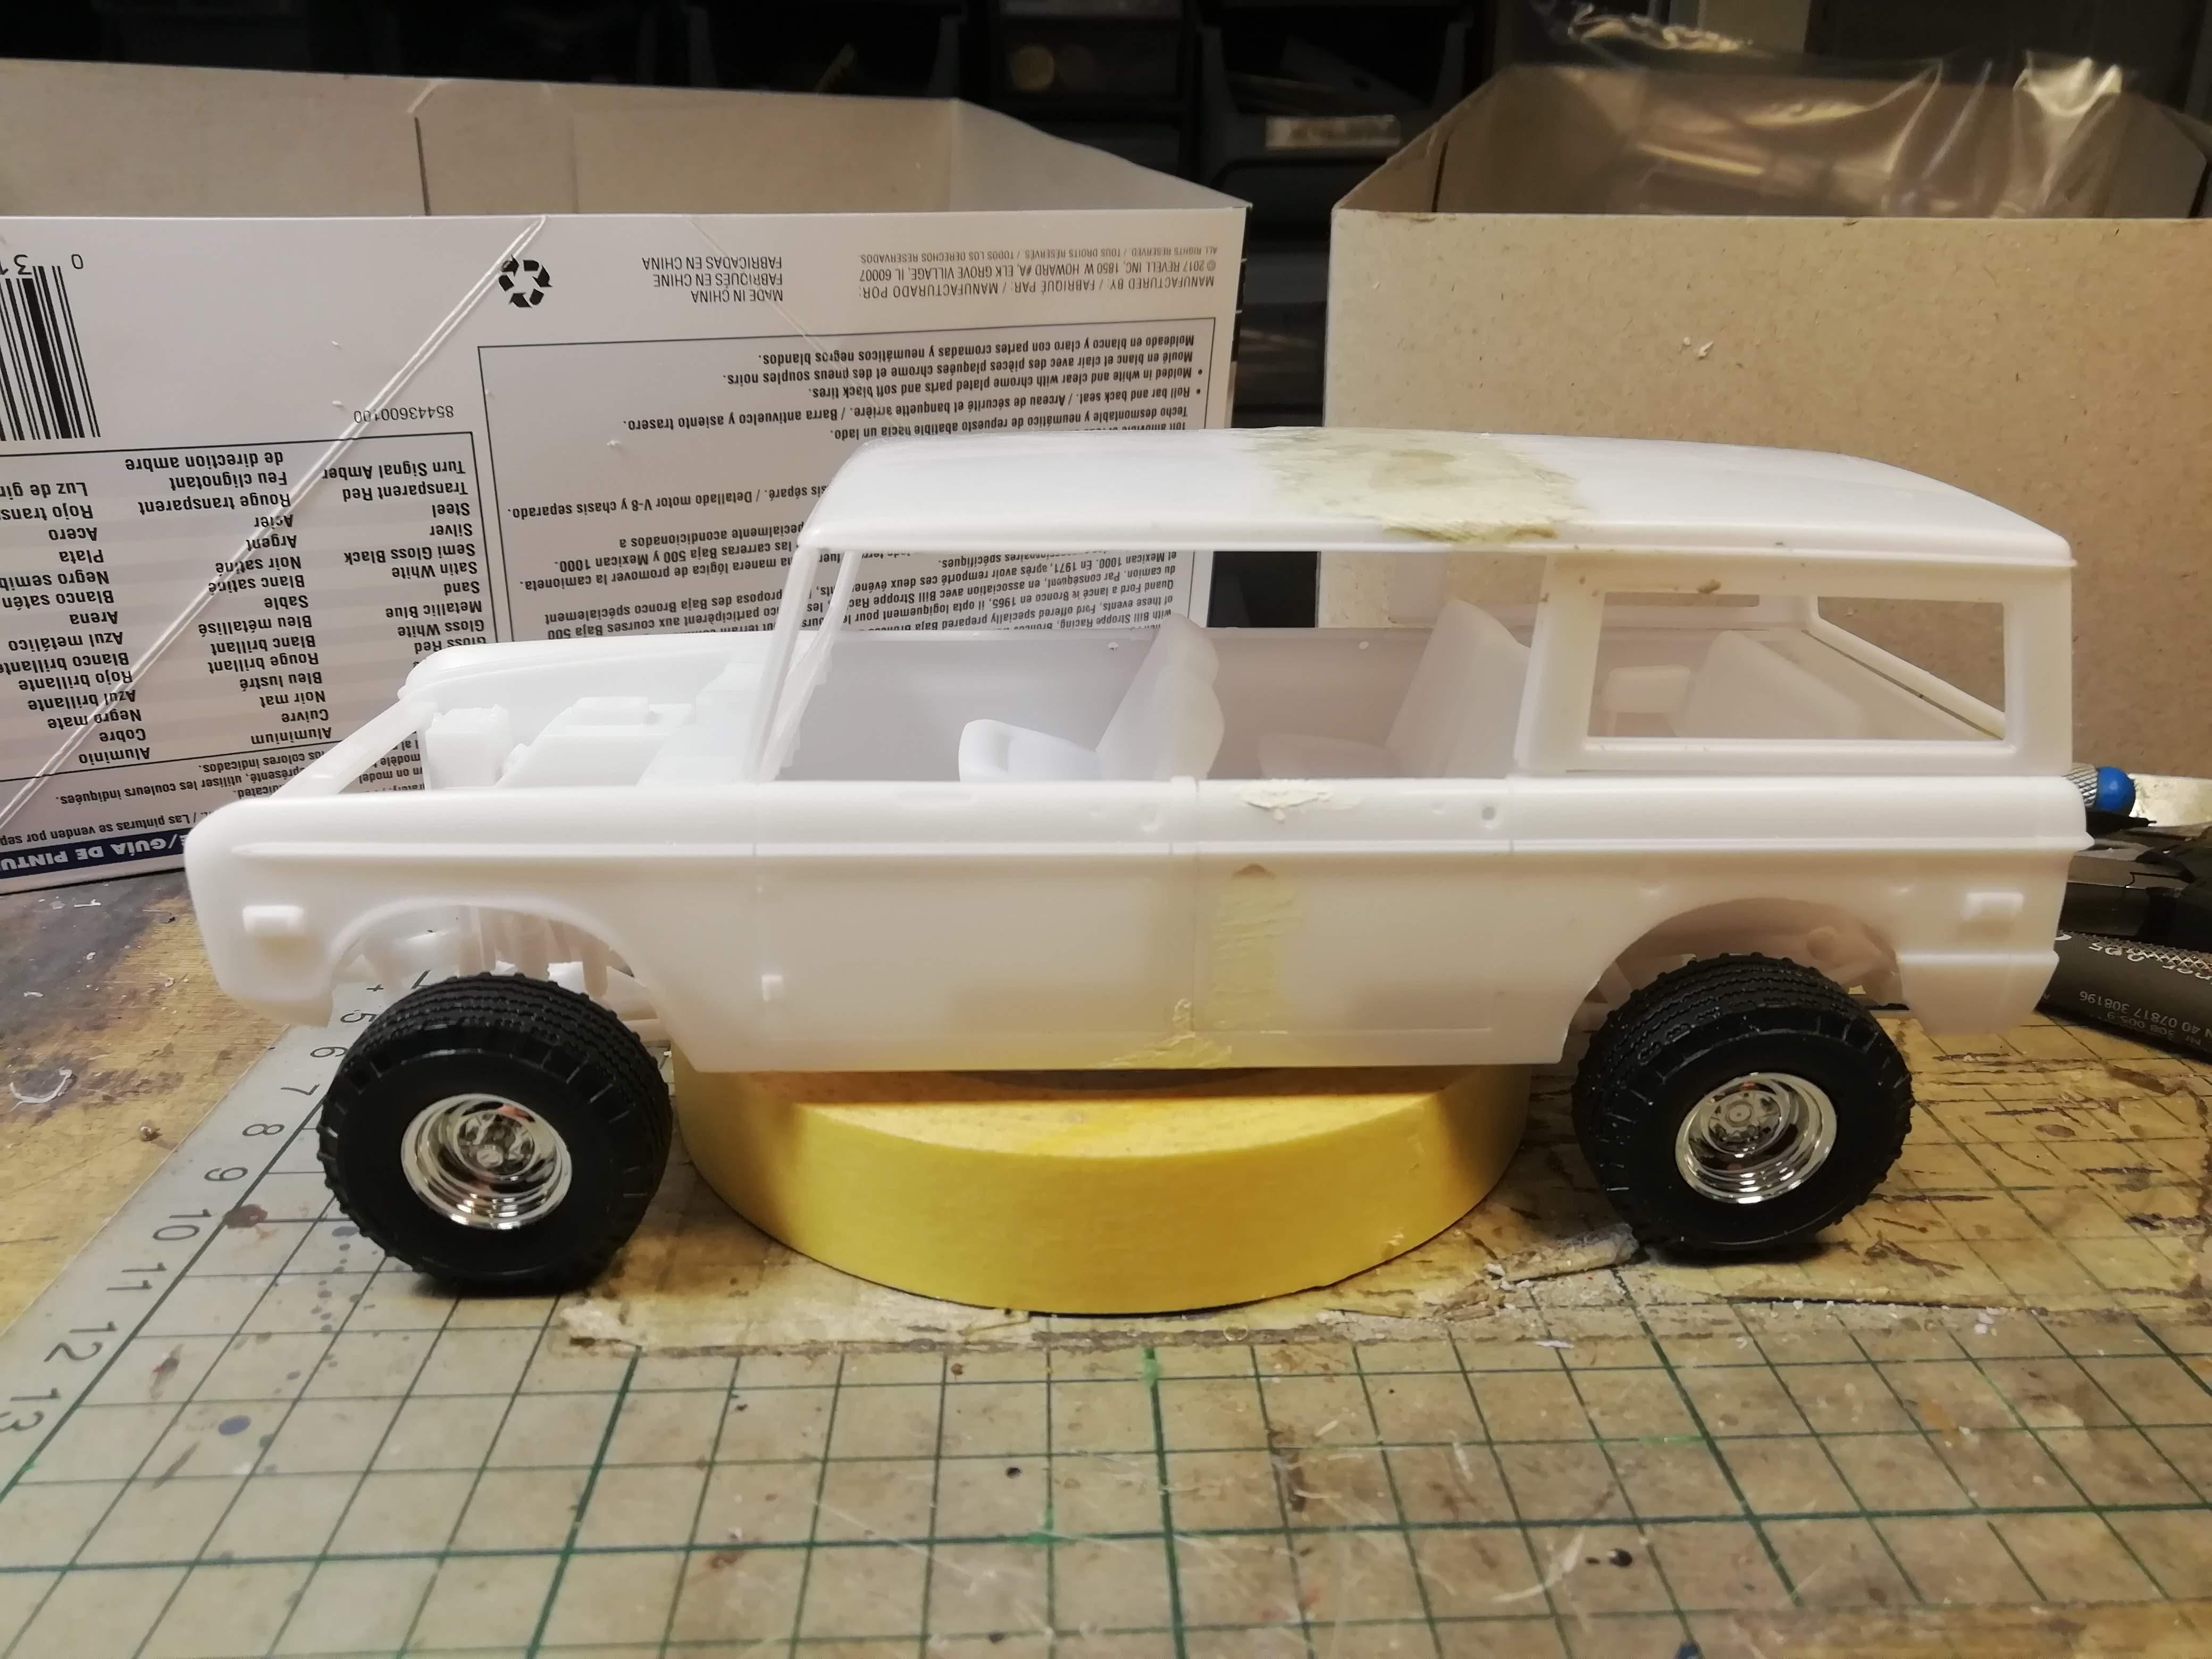


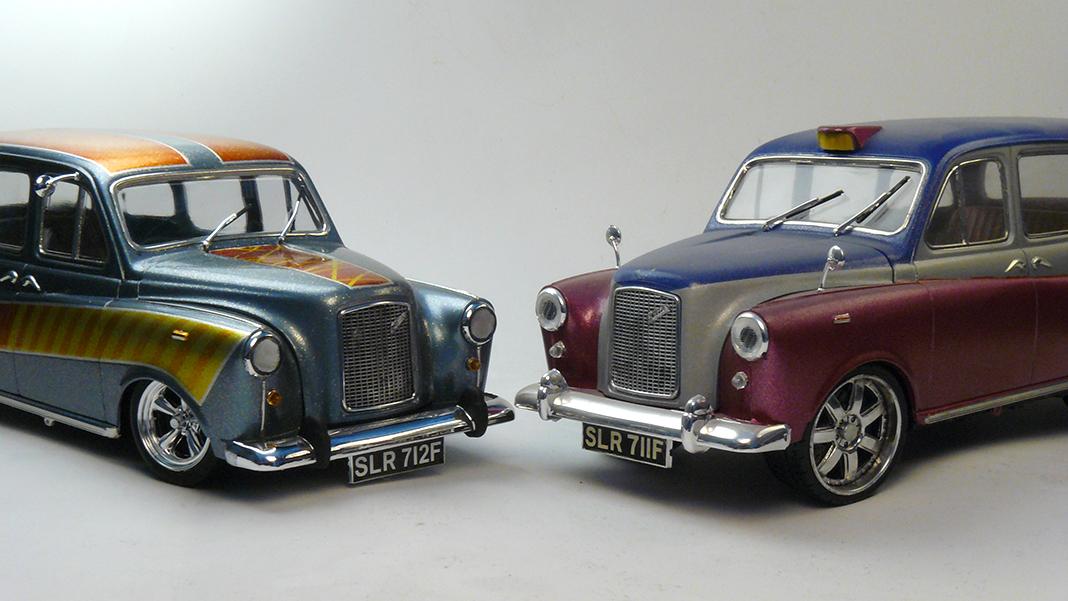
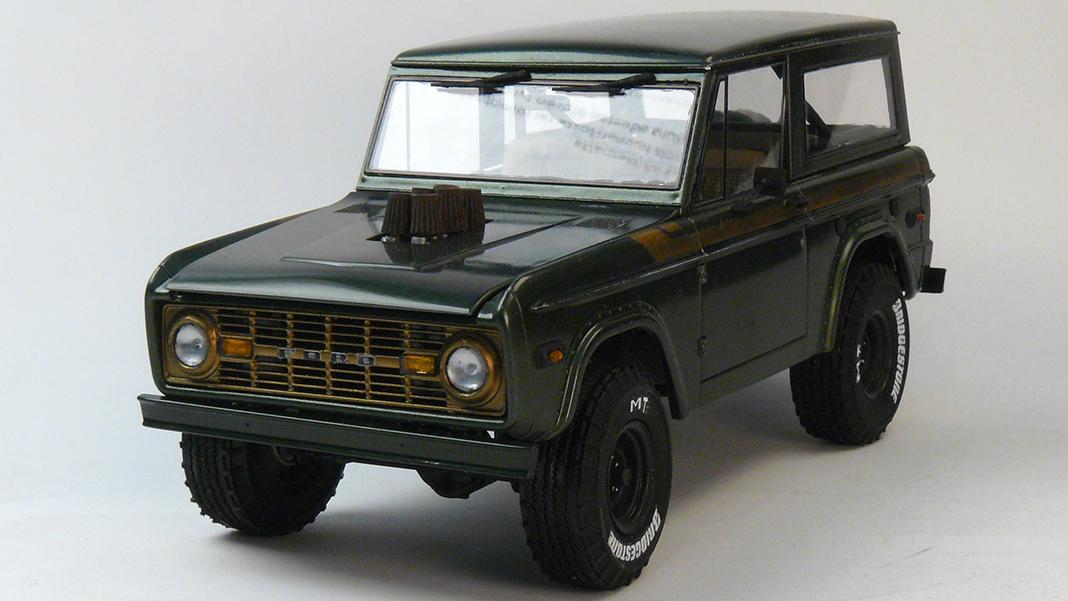

Ford Bronco 4 door version.
in WIP: Model Trucks: Pickups, Vans, SUVs, Light Commercial
Posted
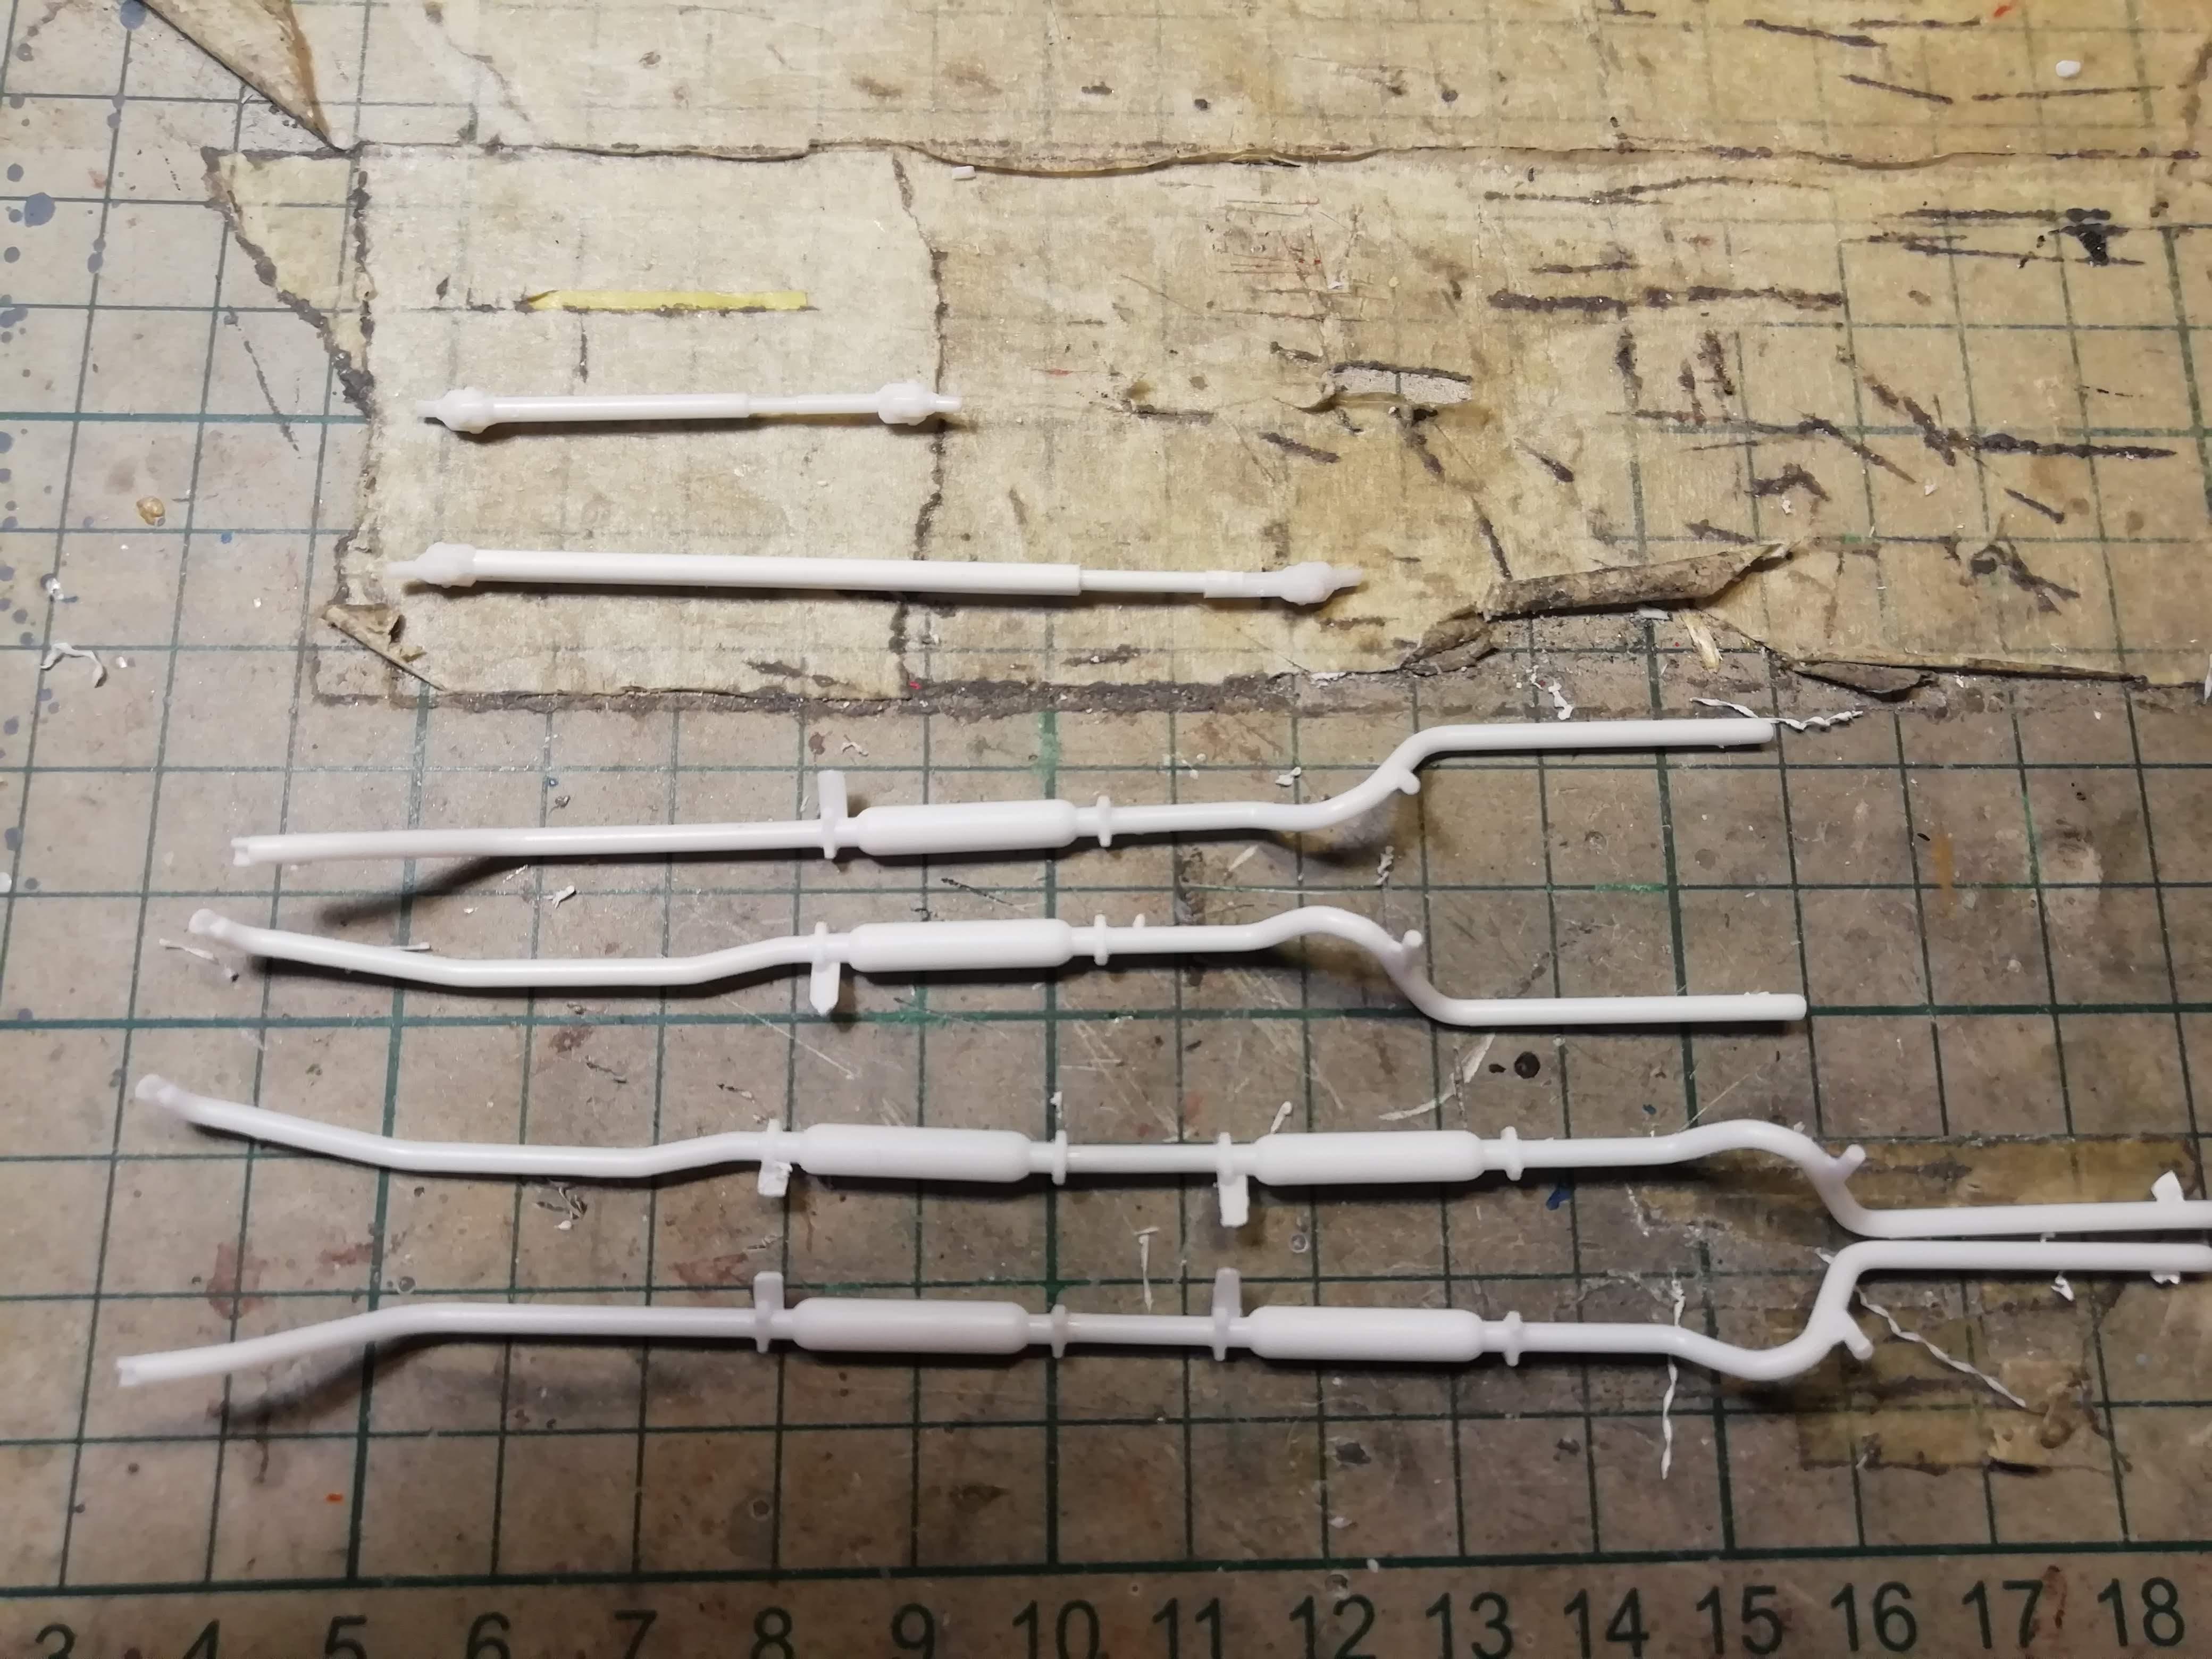
I made roofrack out of Plastruct profiles. The 1:200 rails were perfect for the sides. Then I just made the ends with 1mm round stock.