
KJ790
-
Posts
811 -
Joined
-
Last visited
Content Type
Profiles
Forums
Events
Gallery
Everything posted by KJ790
-
Class A resins was Ben Wicker selling parts made by Jamie Rahmoeller. Ben is done selling parts, but you can buy Jamies parts directly from him now at http://moluminum.com/.
-
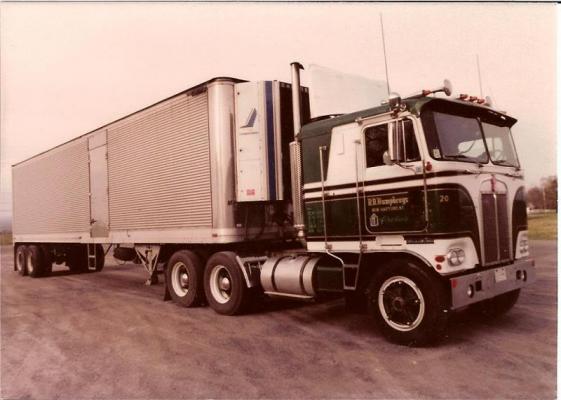
 The torsion bar suspension continued to be popular into the early 80's. It took a couple years for the AG100 to become popular. That is the first time that I have heard that the Peterbilt air leaf suspension was a factory option from Kenworth back then. KW had its own 4-bag air ride suspension in the 70's, but it was different from the Peterbilt suspension at the time.
 -
This was a common upgrade for Kenworths that had torsion bar suspensions back in the day. From what I hear. it was easier to replace the torsion bar setup with a Peterbilt air leaf setup than to try to swap on the KW 8-bag air ride suspension. I have seen quite a few KW's that have been swapped from torsion bar to Peterbilt air leaf suspension.
-
Thank you. I made those out of .030" square styrene rod. They are quite simple to make, but they help improve the look of the model over the molded in wipers.
-
1983 Freightliner FLA
KJ790 replied to KJ790's topic in WIP: Model Trucks: Big Rigs and Heavy Equipment
Rivets, rivets, rivets. Not perfect, but at least there is an essence of rivets on the cab now. -
Most of those Dodge NCT-1000's that I have seen have had Cummins diesels mounted at an angle as the drawing depicts.
-
1983 Freightliner FLA
KJ790 replied to KJ790's topic in WIP: Model Trucks: Big Rigs and Heavy Equipment
Thanks Hermann, your builds are definitely an inspiration. Hopefully I can make something close to yours. I did widen the cab by 4 inches. I am going to use a 3D printed grille that I designed to be the correct width. I think I am going to use archer rivets, but I may try some other options on a some scrap pieces first to see if something else will work better for me. -
1983 Freightliner FLA
KJ790 replied to KJ790's topic in WIP: Model Trucks: Big Rigs and Heavy Equipment
Thanks! Yes I did move the headlights down. I probably should have moved them down a hair more, but then I would be into the heater vent intake on the passenger's side. On the 1:1 the right headlight is about 1" above the heater vent intake, but I don't know how accurate the intake is on the model. The headlight position will have to do for now. -
1983 Freightliner FLA
KJ790 replied to KJ790's topic in WIP: Model Trucks: Big Rigs and Heavy Equipment
I had to extend the chassis by 10 scale inches to match the longer cab. I also swapped out the spring suspension for an air-ride suspension from a Peterbilt pacemaker. Through the 80's, Freightliner used the same air-ride suspension that Peterbilt used in the 70's, so this made for a nice swap. I sprayed the cab with white primer so that I can see what defects need more work. -
I have started on a new (possibly too ambitious) project. Hermann has inspired me to build an Freightliner FLA cabover. I started with an AMT dual drive cabover kit, but the old style 71 series cab needs an extensive rework to be turned into an FLA. I started by cutting the front and roof off of the kit cab pieces. The truck that I am building will have a 96" BBC cab, rather than the 86" of the AMT kit. I decided it was easier to make the sides of the cab from scratch. I cut them out of 2 layers of .020" styrene sheet, laying them on top of each other to make a total thickness of .040. This way I could get the right shape to the doors (rounded corners) and extend the length of the cab without adding extra seems. I widened the kit front, roof, and back wall using strips cut from an old donor cab (which was painted brown). The total width of the cab was increased by 4 scale inches. I also lowered the headlights by 3 scale inches. Still lots of work to do in order make this thing look like a real cab!
-
Thanks! There were a few reasons I went with the Aerodyne. The truck that I was replicating had an 8V92 engine, 8-bag air ride suspension, wider front grille, paddle style door handles, and oil dipstick door on the passenger's side. It was going to be a lot of work regardless of what kit I started with, but the Aerodyne meant that I had to source fewer parts from other kits.
-
I'm calling this one done.
-
BRBO Kenworth K100
KJ790 replied to KJ790's topic in WIP: Model Trucks: Big Rigs and Heavy Equipment
I had a minor disaster last night. I was going to put the cab on the chassis and I dropped it to the floor. There are slight scuffs on the back edge of the cab, the passenger's seat was knocked loose, and a few lights flew off. I was able to do surgery through the passenger's side window and get the seat glued back to the floor, and everything is reattached to the outside of the cab. -
BRBO Kenworth K100
KJ790 replied to KJ790's topic in WIP: Model Trucks: Big Rigs and Heavy Equipment
I worked on getting the cab together this weekend. I am still working on the horns, but the rest of the cab is pretty much done. I used a 3D printed grille, cab fans, and step ladders. I scratch built the windshield wipers and used headlights from a Revell snap kit W900. -
BRBO Kenworth K100
KJ790 replied to KJ790's topic in WIP: Model Trucks: Big Rigs and Heavy Equipment
Thanks Jeff! I use an airbrush for all of my painting. The kit interior was Kenworth's diamond pleated "VIT" interior, but this was not available on the 86" flat top cab. So even though the interior is hard to see, I made a basic "splendor" interior to be more accurate to real life. I also made positive molds for the rear window and passenger side door peep window that were cut into the cab, then vacuum formed clear plastic over them to make the windows themselves. It took me 6 attempts, but I finally got something that would work for both windows. The fuel tanks were finished off with flat aluminum Tamiya paint and some styrene strips for straps painted with Tamiya "rubber black" and then Molotow chrome. The quarter fenders were scratch built and then painted with Spaz Styx chrome. -
BRBO Kenworth K100
KJ790 replied to KJ790's topic in WIP: Model Trucks: Big Rigs and Heavy Equipment
Thanks guys! I spent the last few days painting the cab. Since it was 4 different colors and a lot of masking, it took quite a while. I finally unmasked it and am fairly happy with it. I have to do a little touch up and straighten a few lines up, but all in all it should be a good starting point. I also made some fuel tanks out of PVC pipe. I find this easier than trying to get the seams out of kit tanks. -
BRBO Kenworth K100
KJ790 replied to KJ790's topic in WIP: Model Trucks: Big Rigs and Heavy Equipment
I was able to get some color on the chassis this weekend. -
I'm liking where this is going!
-
BRBO Kenworth K100
KJ790 replied to KJ790's topic in WIP: Model Trucks: Big Rigs and Heavy Equipment
I worked on the cab a bit. I cut off the roof and shortened the length to 86 scale inches. I made the seam int he side line up with where the rear grab handle of the step ladder will go to help hide it. This way I could try to preserve as many of the kit rivets as possible. I made the new roof out of some .060" thick styrene sheet. The raised areas in the roof were cut and sanded to shape out of .040" styrene sheet. One thing that has always bothered me about this kit is the lack of the heater vent detail in the front. There is a weird oval indent like the vent was a separate piece at one time, but it does not seem to be included in the kit. I made some 3D printed vents a while ago to rectify this. This will be my second build using one. Here is the kit as supplied: And here is the 3D printed vent in place: The panel seem is in the wrong place on this kit, as it is not supposed to be going through the middle of the vent. That will have to do for this build though. -
BRBO Kenworth K100
KJ790 replied to KJ790's topic in WIP: Model Trucks: Big Rigs and Heavy Equipment
Thanks guys! I am a weirdo and almost always start my builds with the wheels first. For this build the kit wheels are going to the parts box. I had some old blemished dayton hubs that I had held onto from when I used to cast them. I had to make new molds for my tubeless dayton rims and cast up a set for this build. Some rubber tires and baby moon hub-caps complete the wheels. I still have to do some light weathering. This gives you an idea of the main color of the build, a metalic brown with a hint of red added. -
BRBO Kenworth K100
KJ790 replied to KJ790's topic in WIP: Model Trucks: Big Rigs and Heavy Equipment
Thanks guys! Hopefully everyone isn't tired of K100's. I get a kick out of building them with different base kits (or sometimes parts from multiple different types of kits). This is our first baby, so life will be changing a bit for me in a couple weeks! -
I am not sure if I will be able to finish this one, it will all depend on when this baby decides to come. I will try my best. I had previously built a 1981 K100 that was 3-tone blue using a RoG K100 kit. I have been wanting to build its sister for a while, which was spec'd the same, but was different colors. I will attempt to build it using a Tyrone Malone kit. This will take quite a bit of modification, as the truck that I am replicating was an 86" flat top cab rather than a 108" Aerodyne. I have made these modifications before, so hopefully it will all go smoothly.
-
2020 BRBO Kenworth 86" cabover Aerodyne
KJ790 replied to k100's topic in WIP: Model Trucks: Big Rigs and Heavy Equipment
I am loving this so far! -
I started this one with an AMT Tyrone Malone Papa Truck kit. I shortened the chassis and the cab, cut off the aerodyne roof, and made a new flat roof for the cab. I added some aluminum front wheels and resin 2-hole drive wheels, then scratch built the exhaust, intake, and fuel tanks. The engine and transmission were swapped out for a 3406 Caterpillar from a Revell snap kit.
-
Finished photos are now in the "Under Glass" section.
