
KJ790
-
Posts
811 -
Joined
-
Last visited
Content Type
Profiles
Forums
Events
Gallery
Everything posted by KJ790
-
Made some more progress on the tanker and sprayed a little primer last night. I made some crude brake chambers and slack adjusters. I should have spent more time on these, but they will barely be seen once the wheels are on. The step ladder was made from .060" styrene rod and .080" styrene square stock. The catwalk at the bottom was a resin deck plate that I had bought from Moluminum a while back. I used solid acrylic rod for most of the plumbing. This gives nice bends when heated with a lighter. For the connector ends that are seen open, I used styrene tubing and turned the tip of it in my power drill while rubbing against it with a sanding stick to give it a little more defined shape. For the valve levers, I used .040" square stock and dipped the tip in a dab of elmers glue to give it a bit of a ball at the end.
-
The tank is starting to take shape. It seems to fit on the chassis alright.
-
I have been making good headway on the tanker trailer. Here is the real trailer that I am modeling: The owner had a custom manifold made to make loading and unloading water easier. The landing gear was made using styrene square stock and some flat stock for the sand shoes. The handle was made by heating .040" styrene rod and bending it. I couldn't get my hands on a spring suspension, so I decided to make my own using flat stock and square tube for the axles. I still need to make the brake chambers and slack adjusters. The fenders were made using "V-groove sidinig" styrene sheet. I glued a .040"x.040" strip around the edges to give a rolled metal look.
-
The Revell K100 and the Papa truck represent basically the same truck (year wise). The Revell version is a little more accurate and has some better details, but the AMT one can still make a nice model if you take your time. The wider grille accompanied a larger radiator, this was an option in the mid 70's, but was not very common until the late '70's. From about '78-'80 both widths of grille seem to appear almost an equal amount. By 1981 it seems that almost all K100's had the wider grille. The 110" cab came with what Kenworth called the VIT interior package, which was diamond pleated, while the 86" cab came with a simpler interior for many years. Eventually in the early 80's the VIT interior was available in the shorter cab as an upgrade option. A 7" intake tube was standard for most engine options up through the 70's, with the exception of the V8 detroit engines. Trucks with a V8 detroit always came with an 8" intake tube. Around 1980 it seems that Kenworth went to the 8" intake as standard across the board. The intake AMT K123 kit is fairly accurate for the year and engine choice. The AMT Papa truck and Revell kits both attempted to represent an 8" intake, but they both just seem a little off to me.
-
You can definitely use the Revell flat top to do the same thing. I am actually building this same truck as it was when it was new, using the Revell flat top K100. For that one I have shortened the cab, shortened the frame, swapped the engine, and scratch built an interior as well. It is about the same amount of work to get the model I want, but the AMT kit was cheaper to start with.
-
Thanks everyone! Jeff, this will be at the Fulton show. I am not sure if I will have the trailer finished in time though, I am completely scratch building the tanker to go behind it. Brian, I started with the Aerodyne kit mostly for the engine and the 8-bag suspension. It also comes with the correct doors, wider grille, and oil door located on the passenger's side, while the K123 kit is an older cab with a narrow grille, oil door in the front (next to the grille), and old style doors. I have updated a K123 kit before, but it is about the same amount of work either way. At the time the Papa truck was the cheaper kit to buy. If I ever get caught up with projects, I would like to make new molds for those wheels and cast some more. The worst part is that they tear up molds fast, so I only get a couple sets of wheels out before the mold is trash. It is a lot of work for a little reward.
-
I really wish I had taken more pictures of this one while I was building. I had to cut the aerodyne roof off of the cab and scratch build a flat top. Then I had to shorten the cab to an 86" length. I also scratch built a new cab floor and interior to match the "splendor" interior that the real truck has. I added a Double Take Replicas gull wing bumper and 3D printed grille. The headlights came off of an AMT diamond reo kit, as the original kit ones were terrible. The kit step ladders were also modified, as the angle and step spacing just looked a little off as they were originally. I had Firebird Designs make some custom decals for me and am super happy with how they turned out. I still have a few more details to tie up, but here is how she sits now.
-
A friend of mine has a collection of K100's that my family used to own. Some of them are still working, some are now out to pasture. I was over at his house taking pictures of them this summer and decided to build one of them. Here is the inspiration: I started with the new release of the Tyrone Malone papa truck, as this is similar to the year that I was going to model. I started by shortening the frame and adding some plumbing. I always hated the kit intake, so I made an 8" intake tube and cap that I now offer through Double Take Replicas. Next I added some spoke wheels and painted the chassis. I added a set of correct 8V92 valve covers, and a little weathering to the engine. Next I had to shorten the fuel tanks and scratch built some quarter fenders, mud flaps, and an exhaust.
-
I hope this isn't so! Realistically, they have been out for a long time so I would not be surprised if they have been discontinued. I hope they were a good seller for Moebius. I know I bought over 60 of those reefer kits to use the suspension and wheels to complete the flatbed kits I was making.
-
I am thinking this one will be pulling a stainless steel great dane reefer. I may have to build another one just to go along with this build. I just got back from a week's vacation and realized that I missed July by a few days. I hope that doesn't mean I am out of the build off. Not that there is much progress being made anyways...
-
In the 50's and 60's it was common to have a lot of separate license plates. By the mid 70's it was common for one license plate along with a bingo plate.
-
As for the license plates, each state used to require a commercial vehicle to be registered in that state to drive through it. So a truck would need a plate for each state that it would travel through. In 1973 the International Registration Plan was passed which started with just a few states, but gradually all other states as well as Canada and Mexico joined in. Under this plan, only one license plate would be needed and a commercial vehicle could travel through any of these states.
-
The fuel tax stickers for each state were phased out in stages. Starting in the early 80’s a couple states got to a consensus on how fuel tax would be handled among them. More states joined as time went on. In 1991 a federal act was passed to make fuel tax universal in all 48 states of the continental US. The deadline for all states to be onboard was September 30, 1996. So there were state fuel tax stickers used in some capacity up until 1996 depending on the part of the country.
-
They are close, but unfortunately they are the wrong diameter. The DM600 kit uses 20" wheels while this truck had 22" wheels.
-
The first progress has begun, but not much to show. I started working on a master for the front wheels, since I cannot find any that are a good match for the ones that were on the 1:1 truck.
-
Man, these months are flying by and I have yet to touch this thing!
-
It has been a long time since I have worked on this, but I dusted it off and made some progress yesterday.
-
1981 Kenworth K100
KJ790 replied to KJ790's topic in WIP: Model Trucks: Big Rigs and Heavy Equipment
Well, I seem to have hit a snag. I cleared the cab tonight and I am not liking the way it is looking. Not sure what happened, but it just doesn't look right now. I think I am going to have to strip the paint off and start over. I felt like I was getting close to the light at the end of the tunnel, but now it is a going to be a bit more work. -
1981 Kenworth K100
KJ790 replied to KJ790's topic in WIP: Model Trucks: Big Rigs and Heavy Equipment
Thanks guys! The Revell kit comes with VIT interior, which was not available in the 86" cab. So I used some corrugated styrene sheet to make a standard interior. -
1981 Kenworth K100
KJ790 replied to KJ790's topic in WIP: Model Trucks: Big Rigs and Heavy Equipment
Managed to finish the engine and get it in place. -
1981 Kenworth K100
KJ790 replied to KJ790's topic in WIP: Model Trucks: Big Rigs and Heavy Equipment
Haha, yeah they are in there for sure! He is digging a few of these old ones out this week to get rid of them, so I wanted to take pictures of all of them before they are gone. -
1981 Kenworth K100
KJ790 replied to KJ790's topic in WIP: Model Trucks: Big Rigs and Heavy Equipment
A good friend of mine currently owns this truck along with a few of its sisters. I swung out to his place last weekend and snapped a few reference pictures. -
1981 Kenworth K100
KJ790 replied to KJ790's topic in WIP: Model Trucks: Big Rigs and Heavy Equipment
Thanks guys! Here is the inspiration for this build. -
1981 Kenworth K100
KJ790 replied to KJ790's topic in WIP: Model Trucks: Big Rigs and Heavy Equipment
Next it was time to lay a little paint. There is still some touch-up necessary, but the idea is there. I used a set of AMT fuel tanks, tank mounts, and quarter fenders. I sanded all of the detail off of the quarter fenders and added my own using styrene tube and brass rod. I sanded the raised detail off of the AMT fuel tanks and added new straps. The 8" intake pipe is styrene tube with a 3D printed top on it. The exhaust is styrene tubing with a resin cast "rain cap" on top. I used perforated brass sheet painted with a molotow chrome pen for the heat shield. -
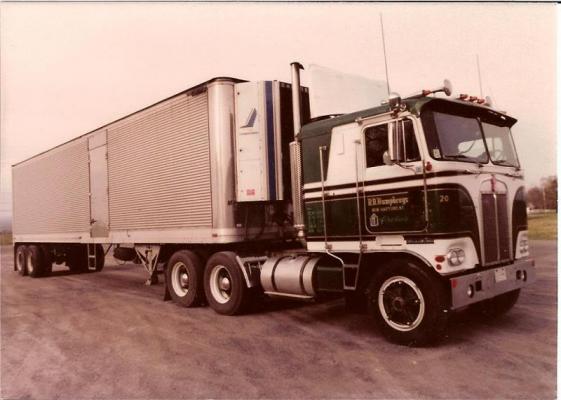
So I have decided to start yet another K100 build. This is the first time I have built a Revell K100. I must say, this is a very detailed kit! Since I can't build anything straight out of the box, this build is getting a lot of modifications. I started by shortening the cab to an 86" version. I also shortened the frame. The frame was a bit of a challenge, because I had to take 22 scale inches out of the frame ahead of the rear cab mount to keep everything lined up with the shorter cab, but I didn't want the wheelbase to be that short. So after shortening it 22 scale inches, I added 4 scale inches back to it right in front of the rear suspension. I also added a set of dayton wheels.