KJ790
-
Posts
811 -
Joined
-
Last visited
Content Type
Profiles
Forums
Events
Gallery
Everything posted by KJ790
-
Jamie Rahmoeller.
KJ790 replied to Andrew Howard's topic in General Automotive Talk (Trucks and Cars)
Yup, that is it. -
1974 Kenworth W900
KJ790 replied to KJ790's topic in WIP: Model Trucks: Big Rigs and Heavy Equipment
Thanks guys! This grille should look better than the snap kit piece. -
Since I can never build a snap kit as a snap kit, here is my latest project. I started with a Revell snap-tite W900. Then I shortened the frame, added spring suspension to the rear, cut the skeeper down to a 36" coffin. Then I put together a KFS Caterpillar 1693 engine and paired it with an Allison automatic transmission. This will be a tight fit in the snap kit chassis, but it should work with a little modification.
-
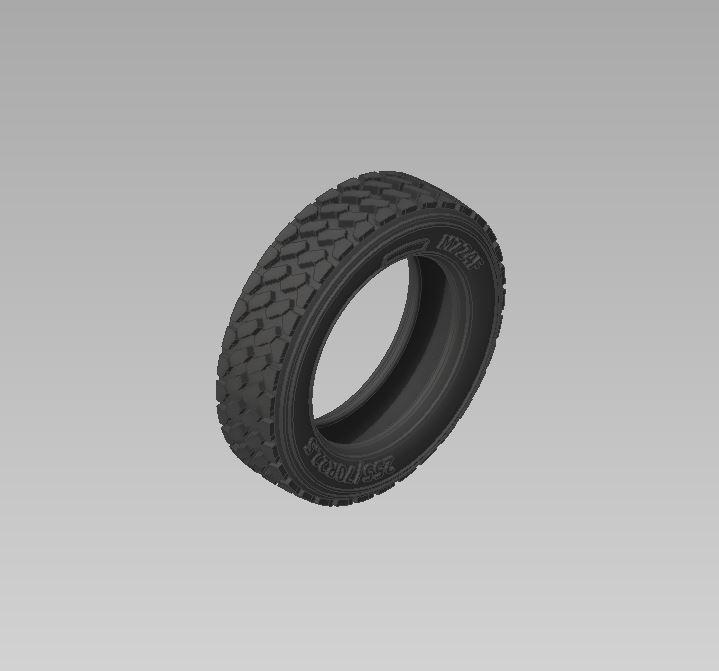
22.5" low profile tires
KJ790 replied to mdlbldrmatt135's topic in Truck Aftermarket / Resin / 3D Printed
This is what I had designed a while ago, but I wasn't sure if people would want it.
-
22.5" low profile tires
KJ790 replied to mdlbldrmatt135's topic in Truck Aftermarket / Resin / 3D Printed
How aggressive are you looking to get? I have considered making a low pro drive tire, but I am not sure what sort of tread would be popular. -
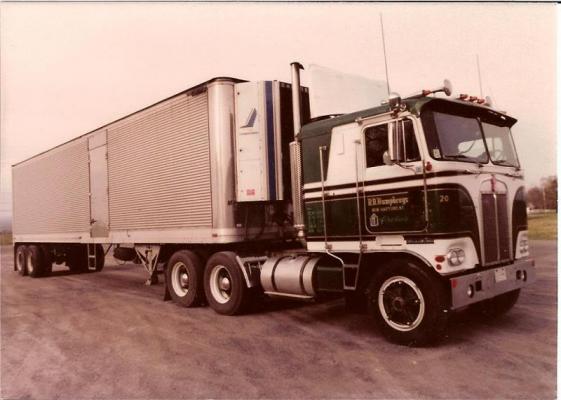
Nice comparison. Also note that the Revell kit has more accurate side steps, bumper, and grille than the AMT kit. There is also a 3rd kit on the market, the old AMT K123 kit, which is of the same model of truck, though modeled after a little older version (late 60's rather than late 70's). These kits can all be built into very fine representations of the real thing with a little tweaking. I personally like to mix parts from all of the kits to get the look that I am going for.
-
45' Stainless Steel Great Dane Reefer
KJ790 replied to KJ790's topic in WIP: Model Trucks: Big Rigs and Heavy Equipment
Managed to do a little more weathering and made some spare tire carriers. -
45' Stainless Steel Great Dane Reefer
KJ790 replied to KJ790's topic in WIP: Model Trucks: Big Rigs and Heavy Equipment
I made some good progress this morning. I built the landing gear and fuel tank, then I weathered the box. I still need to weather the landing gear and fuel tank, plus make spare tire carriers, add marker lights, and plumb the brakes. -
45' Stainless Steel Great Dane Reefer
KJ790 replied to KJ790's topic in WIP: Model Trucks: Big Rigs and Heavy Equipment
Here is a mock-up of where I stand as of tonight. -
45' Stainless Steel Great Dane Reefer
KJ790 replied to KJ790's topic in WIP: Model Trucks: Big Rigs and Heavy Equipment
Thanks! I made the battery box and the air cleaner this morning. -
45' Stainless Steel Great Dane Reefer
KJ790 replied to KJ790's topic in WIP: Model Trucks: Big Rigs and Heavy Equipment
Made a bit of progress on this. The sides are almost done, started working on some detail on the front tonight. -
BRBO Kenworth K125 **Finished**
KJ790 replied to KJ790's topic in WIP: Model Trucks: Big Rigs and Heavy Equipment
Thanks guys! Last night I was playing with some photo editing to try to make it seem more vintage. -
BRBO Kenworth K125 **Finished**
KJ790 replied to KJ790's topic in WIP: Model Trucks: Big Rigs and Heavy Equipment
Managed to get some outside shots today. -
BRBO Kenworth K125 **Finished**
KJ790 replied to KJ790's topic in WIP: Model Trucks: Big Rigs and Heavy Equipment
Thanks guys! For the fans I used 3D printed pieces that I started making a few months ago. I haven't had time to add them to my website yet, but I do have some in stock. I haven't been able to get a good picture of them because my camera stinks, but here is one that a customer sent me. -
BRBO Kenworth K125 **Finished**
KJ790 replied to KJ790's topic in WIP: Model Trucks: Big Rigs and Heavy Equipment
Thanks Tom! Here is the inspiration. -
BRBO Kenworth K125 **Finished**
KJ790 replied to KJ790's topic in WIP: Model Trucks: Big Rigs and Heavy Equipment
Thanks guys! Just a few more details to go and this one will be finished. I need to add license plates and turn signals still. -
BRBO Kenworth K125 **Finished**
KJ790 replied to KJ790's topic in WIP: Model Trucks: Big Rigs and Heavy Equipment
Got the cab complete and mounted. This is definitely the home stretch now! Now I just have to finish up a whole bunch of small details. -
BRBO Kenworth K125 **Finished**
KJ790 replied to KJ790's topic in WIP: Model Trucks: Big Rigs and Heavy Equipment
Finally finished up the intake and exhaust plumbing and got the bumper painted and installed. -
I whipped this up this weekend. I have never put a model together this quickly before. I'm pretty happy with how it came out. If there is enough interest, I may consider offering this as a full kit in the future.
-
45' Stainless Steel Great Dane Reefer
KJ790 replied to KJ790's topic in WIP: Model Trucks: Big Rigs and Heavy Equipment
Thanks! For the sides I used corrugated styrene sheet for the ribbed area, and styrene sheet for the rails on top and bottom. I glued 2 ribs on the bottom rail and have started adding some rivets from Archer. For the front I used sheet styrene and some 3/4" acrylic tubing to make the rounded corners. I still have to add the ribs to the front of the trailer, as well as rivet detail. -
45' Stainless Steel Great Dane Reefer
KJ790 replied to KJ790's topic in WIP: Model Trucks: Big Rigs and Heavy Equipment
Yup, these units are available already. Here is the link: http://kdhumphr.wix.com/double-take-replicas#!vintage-reefer-unit/a8vy4 -
45' Stainless Steel Great Dane Reefer
KJ790 replied to KJ790's topic in WIP: Model Trucks: Big Rigs and Heavy Equipment
I started on the front of the trailer. I cut some acrylic 3/4" tubing for the rounded corners and added styrene for the front wall. Still lots of filling and sanding to do before I add any details. -
45' Stainless Steel Great Dane Reefer
KJ790 replied to KJ790's topic in WIP: Model Trucks: Big Rigs and Heavy Equipment
Thanks guys! Tom, I can make a tutorial of how I weathered the wheels when I weather the spare tires that will hang under the trailer. I will eventually have these spoke wheels for sale, I need to get around to making new molds. I made a bunch of spoke wheels for trucks and trailers and sold them all at NNL East. All I have left are blemish parts, which is all that I use on my personal builds. -
45' Stainless Steel Great Dane Reefer
KJ790 replied to KJ790's topic in WIP: Model Trucks: Big Rigs and Heavy Equipment
Started on the rear doors. I think I am going to call it a night for now. I am very happy with my progress today. -
45' Stainless Steel Great Dane Reefer
KJ790 replied to KJ790's topic in WIP: Model Trucks: Big Rigs and Heavy Equipment
Made some progress on the sides. I used some corrugated styrene sheet for the ribbed siding. Then I added the lower support rails and a side door on the passenger side. Been working on rivet detail all afternoon.