
aksarben
-
Posts
209 -
Joined
-
Last visited
Content Type
Profiles
Forums
Events
Gallery
Everything posted by aksarben
-
Outstanding!!
-
I admit I did just pull the number 44 out of the air knowing that the odds of there being an existing team using that were good, now I know. I had to give it some # though. I love the ALMS as well but I don't keep up too much on the teams. Thanks for your comments. Thanks Alyn, David and everyone else for your compliments. This build is done and I just have to take photos, I'll be posting it in "under glass" in the next few days. Steve
-
A couple of shots of the chassis... Just have to polish the hood and this project will be complete. Steve
-
Here I've cut out a hole in the driver's side glass for a slider. And here is all of the comleted glass.. Steve
-
The body has been painted and decalled.. Champion, Bell, Penzoil and TRW decals are dry transfers made for pine box derby car thingies. The rest are home made. I've since clear coated the body and am just giving it time to cure. I'll have more detailed shots of the completed chassis soon. Steve
-
No problem, let's see what you are using it for. I'm using instant "medium" ca glue from Hobbytown. I don't go to any shows, there aren't any in my area, although I would love to go to one if there were any close by. Thanks everyone for commenting. I have a small update next. Steve
-
Yes this is all from the sign plastic, I'm not sure exactly how thick it is, it's about 0.5 millimeters. Thanks all for your comments. Steve
-
Dave, Glenn, Bear, Fred, huntsman, Rodney and David, wow, thanks for all of your acknowledgement, it means allot. I have the bodywork completed, here are some progress shots..
-
That finish is unbelievable, great stuff. The supercharger is a piece of art. One thing, your star and bar on the left side is upside down. Steve
-
I've started the wheel well extensions. First I glue a strip of plastic around the inner radius of the well, the width of the extension, then glue the outer panels to them. I didn't take a photo of the inner radius pieces but here are the outer panels. Next I glue the top panels to both the body and the outer pieces, shaping around both a little at a time. Once dry, I trim the top pieces outside of the outer panels. This is all stock plastic, no putty.
-
Thanks Romell, do you mean the Challenger? Although the Charger might look cool done up like this as well. I agree that a racing team would want the most power they could get and I started on making some for this from solder, but ran out of room because I'm running the pipes out the side of the car and just couldn't work it out right. Thanks for your comments. Steve
-
Just realized that I didn't pay attention to your question, sorry. I thought that you were asking about the foot petals. Duh I don't have a tube cutter, I just roll the tube along my mat with an exacto blade, until it gets through the metal. It's hit and miss most of the time as sometimes you don't end up in the same groove you start out in and it cuts in a "corkscrew" path. If you set a larger diamiter tube around the one you are cutting, it helps as a guide. Just takes practice and a few attempts to get it right. Steve
-
Awesome! I love all the chrome in the engine and it looks very intimidating. Steve
-
Here is an update, shot of the seat, from a diecast nascar. The belts and hardware are from a set made for 1/32 WWII fighter aircraft models, the scale looks more like 1/24 to me so I tried it out. I think they worked out great.
-
DW, I drill the holes in the aluminum first with just a pin vise, then I cut the shape of the petal around the holes. I score the metal first with an exacto, then fold along the score and it snaps right off. The aluminum is thin enough though that a good pair of scissors will cut it fine as well. Steve
-
The steering wheel is from a diecast Viper, the dash is from the Camaro kit. Everything else I made myself. I made the digital readout from stock plastic, printed the face on brochure paper. The switch panel and fuse panel are both from stock plastic. The switches are small bits shaped and glued to photo etch bolt heads. The guages are also printed on brochure paper for the glossy-ness, then placed in sectioned aluminum tube. The petals are drilled DrPepper can material, set on paper clip stalks and the vent is the old coiled craft wire wrapped with plummer's tape trick. Thanks for looking
-
34' Ford Pick-up
aksarben replied to vizio93's topic in Model Trucks: Pickups, Vans, SUVs, Light Commercial
Crazy! I love it, nice touch with the nascar wheels. I dig the engine too. Some great original ideas here. Steve -
Between your work and the Bob Dudek stuff, the metal pieces here are looking killer. Very realistic. That Wagon Rod kit sure yields allot of cool parts box material. I'm going to keep my eye on this.
-
Thanks everyone for the great encouragement, here is a small update on the interior. Steve
-
Engine update. The specifics.. Scratchbuilt supercharger, intercooler, pulleys, alternator fan blades. Paper clip fuel rails, guitar string wiring harness, ProTech braided fuel line with hex fitting.
-
Looks cool, great work so far with the plastic for the body kit, I like those side vents. Steve
-
David, here is what I use for all of my scratchbuilding sheet plastic needs, I used this on the hood cowl, my intercooler as well as the diffuser. you can find these everywhere, Walmart, your local hardware store. These specific signs I'm showing are of two different thickness. I don't know the exact measurements but the black and white ones are about 1 milometer thick and the red and white are even thinner. They are a great inexpensive alternative to Evergreen or Plastruct sheet styrene, and are just as useful. Steve
-
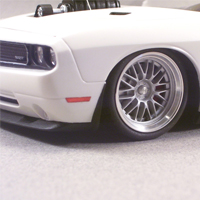
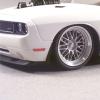
Thanks Alyn, the lines of the new Camaro are already beautiful, I just hope that what I'm doing to it doesn't take away from that. Tim, yes this Viztech stuff is awesome, he has a ton of innovative ideas on his site, a modeler could get allot of inspiration and build ideas from there. I actually debated over whether or not to do this Camaro I'm doing or the Challenger you showed since I have the new Challenger kit already, in the end I decided on the Camaro, I still may build the Challenger in the future. Thanks for your encouragement. Steve
-
Yes, here is an update. I have the intercooler finished, this is completely scratchbuilt.. here it is with the supercharger.. The top of the intercooler is soda can aluminum carefully cut to shape The intercooler on the supercharger Completed engine shots soon. Steve
-
Very cool, the interior looks sharp and the wheels are sweet. Steve