
monkeyclaw
-
Posts
453 -
Joined
-
Last visited
Content Type
Profiles
Forums
Events
Gallery
Everything posted by monkeyclaw
-
Alternative To Westlys Blech-white???
monkeyclaw replied to mademan's topic in Car Aftermarket / Resin / 3D Printed
As a caster myself; I do not use any release agents when making parts; and I only recommend the use of an agent such as PREP-SOL for pre-cleaning resin parts. As a life long painter; this product has served me well...easy to use ...wipe on...wipe off....you can find this product at an auto paint store; and a quart can last for years! I don't do immersion cleaning on any resin; unlike plastic parts; the resins may have micro pores that will hold moisture; even when you think the parts have sufficiently dried to paint....my 2 cents........matt -
here's a little something red...matt
-
Hey Wingnut; The guys are right; try using a better Quality paint to start...I prefer Lacquers myself....even if you use dupli color; warm the cans; shake them well; and I go a step further; I have a food service heat lamp that I pass the painted parts under to "melt" the wet coats down....if you can read the lettering from the light bulb in the reflection of the wet coat; you will have minimum polishing to do....matt
-
I have to go with Bill on the chrysler turbine car; although the pieces were nice; they just never amounted to anything nice when assembled...followed closely by the airfix 1/12 scale bentley ....the surface texture on that kit is horrible; and I have had several of them...all poorly packed with warped tires....not even a reasonable parts donor....classic case of silk purse from a sows ear.......matt
-
Anyone Ever Try To Dye Kit "glass????
monkeyclaw replied to Len Geisler's topic in General Automotive Talk (Trucks and Cars)
you can easily "tint" the clear parts by applying tamiya clear acrylic colors with an airbrush....you will have to mix them down with tamiya clear; and thin with alcohol; but great results can be readily had; with a minimum of effort........matt -
It's Official - No Tamiyacon For 2008
monkeyclaw replied to SoCalCarCulture's topic in Contests and Shows
I was BUMMED about the announcement....I have ebeen hounding the tamiya guys weekly for a date; so i could book the trip....I had been planning my entire year around that trip....well; there's always next year....MAYBE! Matt -
Tools You Can't Live Without
monkeyclaw replied to Kenny's topic in General Automotive Talk (Trucks and Cars)
Raul; Much appreciated; and that's really why I pretty much only build big scale anymore....the small parts aren't as small! As long as I can still hold on to the tools and stuff; I will keep at it...........matt -
Tools You Can't Live Without
monkeyclaw replied to Kenny's topic in General Automotive Talk (Trucks and Cars)
I have got to go with Jairus...Hands are (were) great! For those of you who still have fully functional hands; you won't truly appreciate "special" tools; the way I do now....with only 3% mobility remaining in my hands; the work is getting a bit tougher to accomplish; but I am gonna stick with it...TWEEZERS are now my best friend...it's the only way I can pick up (repeatedly) the small parts I drop on the floor! I have had to give serious consideration whether or not to keep trying to build stuff; it's a hard addiction to break after 30 odd years. Thus far I have been able to adapt, and overcome the difficulties and challenges of building models that are of the same quality I did before. The bad news for me: there is a very good possibilty that in the VERY near future I will be losing 1/2 of the middle finger on each hand; due to complications of cardiac/vascular issues....the good news is when I whack the ol' X-ACTO thru my fingers ...they no longer bleed (silver-lining?). I do think no matter how hard it gets to do the work; I will keep at it; just at a much slower pace......matt -
Dave; Saweet! I know you will be getting right to it...once you open those boxes; you won't be able to stop yourself! I look forward to seeing it.....matt
-
sounds like good choices! So many out there...I use an HVLP gravity feed for overalls; and a Paasche VL for fine work....They have both served me well; and I really like the Paasche airbrush; because you can get parts for it (if needed) ..............matt
-
Just Wondering About The Confederate Flag...
monkeyclaw replied to JAFFA's topic in General Automotive Talk (Trucks and Cars)
Since we are on the subject of the confederate flag; I just thought I might interject some actual model related insight ....attached is a photo of a truck I built a couple years back; that was out on the show circuit around the U.S. The truck was named "DIXIE" mixer ...one of the features of the truck model was the large "confederate" flag on the mixer drum; and of course; Mississippi license plates...I built this truck as a humorous poke at the type of things you only see in the south....The mixer actually did very well out at the shows; but did meet with some quizical looks and comments in states outside the region...GO figure! There was no malice intended by displaying the flag on the truck; it's actually quite common down here in the south....That's right...down HERE in the south....having lived all over the world; I now reside in Alabama; and I enjoy seeing some of the traditions in a bit more humorous manner than most people do....for instance; At a recent model show; I got odd looks from some of the "Nascar" modelers, when I asked them if anybody had done a "Ricky-Bobby" decal sheet yet...Being a transplant down here; Nascar is not my favorite racing venue; and that often does not sit well with "locals" , but at least I have the sense of humour to build a "spoof" model, to celebrate the tradition it represents....Matt -
This car is based on the Tamiya 1/12 martini kit... but features many modifications from 935/76 to 935/80; which entails all new body work for the car....when this car is done, my next build will be the old 1/8 scale entex 1974 935 RSR martini car ( "the car that started it all") as it is known to Porsche fans..thanx for looking..........here's a shot of the car i am currently building.........matt
-
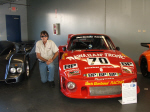
Hey guys; here's a couple update photos of the #70 Sachs car....The tub has been done in Semi-gloss black; and I had to do sub-assemblies for this one...you will note that the tunnel is in; with a new shifter tower and happy knob assembly; necessary for the inverted tranny; The suspension is all hung; using the SMS rotor assy's on the drivers side; and the tranny is in place; had to do it this way to get the rear swingarms in place correctly...I am making the new rear struts right now; so they are not in the pix...the dash is complete; done from photos of the dash of the 1:1 car....as is the fiberglass laminate on the fuel tank....yes; REAL fiberglass!!! I also laminated the seat shell with fiberglass. The tank will be fitted with all of the p/e stuff from the sms set, for a bit more "pop". Next will come the plumbing and electrical harness on the chassis; as this car will be built so the unibody structure is visible; and I didn't want to have to do "ship in a bottle" work inside the monocoque...have a look........matt
-
Kenworth Th-800?
monkeyclaw replied to Aaronw's topic in WIP: Model Trucks: Big Rigs and Heavy Equipment
Aaron; tell your freind to check out Brad Lawson at BRL modeltrucks ; he has my old molds and masters for ALL of the T 800 variants....aero, High hood and wide hood..I hope this helps.......here's his addy: brlawson@mrtc.com matt -
Thanks for the comments guys! Me...Obsessive....HMMMM . I think we all tend to obsess a bit on our favorite subjects. These Big Tamiya Porsches are my all time favorite kits; when you consider the age of the tooling; they still hold their own today....Whether you build them straight from the box; or do any add ons; they build up nicely; and the SMS super set was the best thing to happen for these kits....worth every penny. I would also say that I too am a big 935 fan in general; at Renn-Sport; I was in heaven! I too like the K3 and K4 cars; and will be building several this year... the best advice I could offer when you decide to build one ....pick a particular EVENT that the car raced; and build that version...many of the 935 cars varied race to race, both in the livery; and equipment; so the way the car raced at Lemans may be totally different from Daytona or Watkins Glen. There are a few different decal artwork sets out there in both 1/24 or 1/20 scale; which can be scanned and resized, so you can build a few diffent version with a bit of effort....I appreciate all of the input; and I will keep you guys posted as this one progresses............matt
-
Simon; you are correct; it is 1/12 scale....my usual working scale. I have been wanting to do this car for some time; finally getting to it; it took a lot of research time to be able to figure out what mods had to be done to turn the Martini car (K2 ) into the 935 K3....of course nothing available to do it...so just alot of scratch building ... my plan is to build the car so that ALL of the body panels may be removed for display, even the rear 1/4's ....thus far it has been a fun project; with the usual tedium thrown in for good measure....each air jack is made up of 13 individual parts; all of the twin turbo hardware is ready for molding; and that tends to slow down the build process a little, but essential to be able to build more than one car! I am also using the SMS P/E set for this car......matt
-
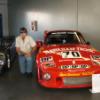
Hey guys; just a couple photos of progress on my latest 935...This one is the pole car of Dick barbour/John Fitzpatrick; Lm 1980....working from the Tamiya 935 Martini kit; the chassis had to be heavily modified...pretty much the same way Kremer did them back in the day...but smaller. I got the cutouts removed; and all of the rear sub-frame complete; suspension hangers done, as well as the air jacks on all four corners; also finished up is the rear engine mount/"gate", and the intercooler fender inlets. This chassis will be pretty nice I think; I have even done the hammer dings; and the spot welds will be done with a micro tip soldering iron. Also shown is the engine mockup for fit. This was the first customer car from kremer; and retained the "tub" up front; rather than being tubed by the recipient; as many later cars were done. The chassis is now in primer; and will be finished in typical Kremer semi-gloss black...have a look........matt
-
Hey guys; just wanted to share my latest WIP...I am working on a conversion of the Tamiya 935 to the 1980 Lemans pole sitter; The Sach's 935 K3 #70 car...The first project was to "borrow" an engine assy from a parts kit I have; to use for mock up....I fabbed up new injectors, Intake plenums, Intercooler, headers, twin turbos and all associated piping for the boost systems....This will bring the engine to 935/79 T-T specs...I have begun surgery on the chassis tub as well; It requires major surgery to do the rear sub-frame to accept the bigger engine unit; as well as the "inverted" transmission unit. The front of the tub will be removed as well; as these cars used a bolt on tubular sub-frame up front....then the body will be modified to K3 spec and mounted. I plan to use the SMS P/E set on this car as well; along with casting all of the components, so that I will be able to build several of these cars; and the cast body sections will give me a K3 baseline to work from to build other cars; with the appropriate body mods; as virtually every k3 car (body) was unique. The engine pictured is just the mockup; so colors and detail didn't matter much at this point....just need to make all of the parts fit....and they do! SAWEEET!!! I will be photo documenting this build up in detail; so I will post more pix as the project progresses over the next month or so....have a look............matt
-
Alumilite Mini Casting Kit
monkeyclaw replied to James Flowers's topic in General Automotive Talk (Trucks and Cars)
Once the mold is cured; the heating of the mold in the microwave will not have any ill effects on the microwave....there are no fumes to worry about....I do it all the time; in fact I bought another microwave for my shop, just for heating molds....nothing to worry about....in fact; you can now buy muffin pans that are made from silicone; and some fancy chocolates are also made in silicone molds.....I hope this helps.....matt -
The tire markings are usually found on ALL four tires; Not due to the rotation of the tire; but more for the sake that each wheel may be slightly different in weight; and that would adversly affect the suspension setup for each corner if the tires were mis-mounted, and that different compound tires may be needed at each corner... In researching my Hawaiian tropic project; I found that all the pit photos had detailed tire markings; which generally included: placement, direction, and car number (for team cars) I dug through photos going back to the mid 1970's, and found this common in Lemans series racing. On the Porsche cars (935 in particular) that used variable suspension geometry that could be adjusted on the fly, tire position is critical due to loading....although the tires may appear to be the same on both sides; the compounds may differ greatly side to side depending on the track and loading requirements....unsprung weight calculations are usually calculated down to the GRAM to establish spring rate and pre-load....so you can see How critical tire placement would be....just a little egghead info to get your day started........matt
-
Hey flame...thx for the fast response....I guess we'll have to agree to disagree on this one...after all; it is a PHOTO based contest; so the models will actually only be judged by the quality of the pix....I think the odds would actually have to go to the smaller scale builders; as there is just WAY more aftermarket detail stuff avail in the smaller Bi-scale; whereas the big scale guys have to pretty much make everything they need....the smaller models also photograph much better; as they are easier to frame and show off the added details....I do appreciate the effort though....thx again...matt
-
Nice 6 banger....now THAT's different...what's it going in??? keep us posted..........matt
-
Sounds like a hoot! Just one "little" thing...(no pun intended) why only 1/24 and 1/25??? Some of us don't build small scale models.....and it leaves alot of good subject matter exempt.....how about "build a roadster of your liking" with no scale limitations...BTW If you hadn't gotten the jist already...I am a big scale builder.........matt
-
1/12 Wheels And Tires
monkeyclaw replied to guysmilie's topic in Model Building Questions and Answers
John; there is a great selection of wheels and tires to use on 1/12 scale cars....check at your LHS in the radio control section...there have been great improvements in the looks of these size tires in the past couple of years; and they no longer "LOOK" like toy tires...very accurate tread patterns and such; with a big variety of rims available as well; especially modern type (tuner style) rims...I can't remember anyone doing pro-touring stuff in 12th scale, I hope this helps.......matt -
1/12 Porsche 934 Rsr
monkeyclaw replied to novadose71's topic in Other Racing: Road Racing, Salt Flat Racers
Rob; NICE RSR!! I agree with you completely...the big tamiya kits do just "fall" together...gotta love it! The color combo is great; I appreciate the work....I build the Tamiya Porsche kits ALL the time; probably my favorites to do..........good work..........matt