joemac
-
Posts
40 -
Joined
-
Last visited
Content Type
Profiles
Forums
Events
Gallery
Everything posted by joemac
-
I always store paint upside-down. Makes mixing a breeze, after setting it rightside-up for a few hours.
-

Laminating thin styrene instead of molding
joemac replied to joemac's topic in Tips, Tricks, and Tutorials
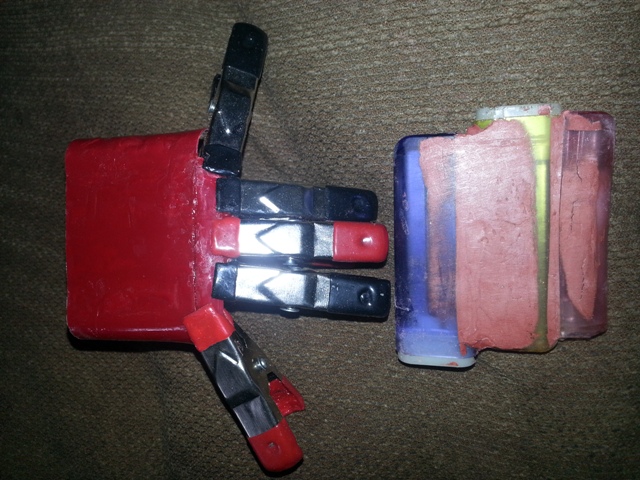
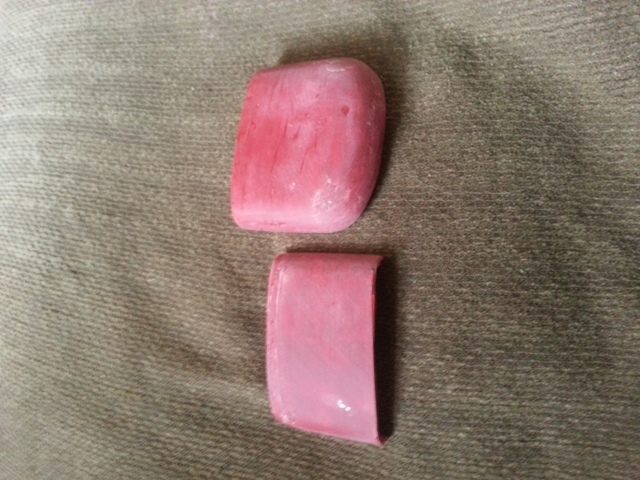
OK, the first shot is of a few pieces that have been laminated to form the basic shape of the roof. A new piece is clipped onto the front, forming the beginning of what will be the 'brow' above the windshield. Next to it sits the 'mold' made from the three lighters. It's not really bent. I don't know why it looks that way in the photo. The second shot is of the two pieces that are nearly finished. They're still a bit rough, but I think one more layer will do the trick. The nice thing is, you can always add another layer if you screw up and remove too much material. Once the glue has cured, it sands and files like a solid piece of styrene. It's easy to manipulate small pieces into the piece, as the glue softens the smaller pieces, allowing easy integration and shaping. Oh yeah, another source of smaller, but thicker pieces of styrene is the little 'clips' that are commonly attached to bread bags. I'm always checking the recycle triangle on containers these days. The wife gave me a large, clear container that something came in, as well as a black, rather rigid tray, both made of styrene. On a similar note, the dollar store has five-packs of CD cases for... you guessed it... a dollar!
-
I wound up with a bunch of very thin, almost transparent, styrene that I'd saved, but didn't know what I would use it for. Well, in the midst of building/modifying a Mack CF pumper project, I decided to start over. I bought another kit and began the modifications. All the while working on it, I wondered about what to do with the first one. It finally dawned on me that I could further modify it into a Mack C model, possibly my favorite truck. This would mean that I would have to scratch-build the cab. I made a simple mold/form, by gluing three disposable lighters together, side by side, and filling the gaps with putty. I then sanded it flat on the side that I'd filled. This gave me something to form the laminated styrene to. I found that certain yogurt containers are also made of styrene; polystyrene, to be exact. Look for the recycle triangle with the number 6 and the letters P S (poly styrene). Cassette tape and CD cases are also styrene, but they're thicker, flat and rigid. I use them for flat body panels, doors, etc. I started with a rectangular piece from the yogurt container and glued a sheet of the thin styrene to it and formed them to the lighter 'mold', using rubber bands to hold it overnight. After that, it was just a matter of adding layers of the thin, red styrene and re-forming it onto the lighters. When the thickness was getting close to what I wanted, I set some folded cardboard between the styrene and the mold, creating a slight arch, which was needed to achieve the appropriate shape for both the roof and the nose panel for the cab. Both pieces are coming along quite nicely, actually better than I'd expected. When they're closer to being finished, I'll post some photos. That is, if the sun ever shines again.
-
Thanks for the responses thus far. I know nothing about producing decals and not much more about printers. My main concern is in producing a decal of the gold leaf that is only a half-inch wide with a thin black border in the small size to match a 1:32 scale model. It means the strip will be about a millimeter wide. The other issue is the 'spun' effect that is imparted to the gold leaf. Can a photo be scaled down that small? Is the general consensus of opinion that I should go to a decal service?
-
I've been told by various graphic/printer types that if you can photograph it, you can turn it into a decal. I have yet to find anyone local who can actually produce the decals I need for a 1:32 scale model fire truck I'm building/modifying. What is needed to actually produce the decals I need? My son has a printer, but I don't know what type, although I can find out. The problem I see is that it's difficult (impossible?) to reproduce the real gold leaf that is used on the real thing. I've done actual gold leafing and i can't imagine doing it in scale. The sizing (adhesive) is too thick, for starters. Any advice greatly appreciated.
-
I'm doing up a plastic fire truck model and I'd like to make the tires look more authentic by re-shaping the bottoms, sort of slightly "bulged", like they do when they have weight on them. Any tricks? I was thinking of sitting the bottom portion in some hot water to soften them, then pushing them against a hard surface for a bit. The wheels will be glued in place, so it won't roll.
-
1/18 Lowenbrau Porsche 962, Miami Winner, 1985, Finished
joemac replied to surfjunke's topic in Model Cars
I've had the pleasure of working on this car a few times. It's usually kept in Holbert's in Warrington, about forty minutes from here. If I'm not mistaken, A.Unser Jr.'s name is also on there. Nice job on yours, by the way. One of these years, i plan to build one, although probably a smaller scale. -
My brother scratch built an entire motorcycle model using the leftover sprue trees from various kits. I'm stretching the rear body of a kit of a fire truck. The trees are very useful in bracing and connecting panels from the inside, where it won't be seen. The trees come in handy when making all sorts of small parts, I haven't built that many models, but I have an entire box full of trees.
-
I'd suggest cutting the tubing and leaving a gap in the middle of the bead. It would look just that much more realistic without the red tube going through it. Still, a neat trick.
-
Used tape for a fabric look on interior.
joemac replied to retired & glad's topic in Tips, Tricks, and Tutorials
Masking tape. Yes, masking tape. The adhesive will last the life of the model. You can paint it and it will resemble vinyl. If you use wax-type shoe polish, it will look just like leather. -
Hi gang, been away a while. I'm modding/ improving a boxed kit fire truck. 1/32 plastic. I'm going by closeups from my cell phone cam pics of the real truck. I found myself wondering how I was going to mimic the aluminum under the door that has a pattern of 'lines' across it that form series of tiny diamonds. Life-size, it's small. My wife is a smoker. I went past the dining table this morning and looked at the pack and the lightbulb went on. Sure enough, the foil has the exact pattern in miniature. Under the magnifying glass it looks like what I'm seeing in the photos. The scale is perfect, as is the amount of sheen. Thought I'd pass in along. Sometimes, it helps to be resourceful (and lucky).
-
Is Ebay really that evil?
joemac replied to lanesteele240's topic in General Automotive Talk (Trucks and Cars)
eBay used to be great, for buyers as well as sellers. Now, not so much. They've gradually slanted things so much in favor of buyers that it's unfair to the seller. Sellers are trying to make up the difference by charging more for shipping, which means the bargains are just about gone (for buyers). I rarely use eBay now, as the shipping has gotten out of hand. The shippers all charge more than before and sellers charge more than actual rates to make up for losses incurred by the increased fees. I sold a drum to someone who waited three weeks to file a complaint that it was not as described. He claimed damage that didn't exist. I'm sure it was a case of buyer's remorse. He lied to eBay, telling them that he'd emailed me several times and that I wouldn't cooperate. They gave me no opportunity to defend myself and sided with the buyer, giving him a full refund and making me pay to have it shipped back. When I opened the box, the buyer had exchanged hardware with inferior pieces. eBay was a vehicle for this guy's means to rip me off. That was the final straw for me, and I understand it's gotten even worse. No negative or even neutral feedback against buyers makes no sense to me. eBay doesn't weed out the problem clients, they just make it easier for buyers to take advantage of sellers and in the process, chase off decent sellers. -
Paint Strippers - What to Use?
joemac replied to pbj59's topic in Model Building Questions and Answers
The Dollar Store (Dollar Tree) sells their own water-based cleaner that I've found to be every bit as good as Purple Power, Simple Green, etc. It's yellow in color, called, "La's Totally Awesome". For the unbelievable low price of a buck, you get the best spray bottle I've ever found, with little grippy ridges at the top that keep the bottle from sliding out of your hand when wet, filled with 20 fl. oz. of cleaner. The refill bottles are even larger, but don't include the sprayer. I've been using one of the sprayers for about six years now and it still sprays as good as it did when new. I've used the cleaner to de-grease automotive parts, as well as household items. -
I've been known to use sprue trees wrapped in sticky sanding disks. A worn (dull) razor blade or utility knife blade make a great substrate, with a nice, straight edge that the paper can be folded over. I have sticky disks of 400 grit. They're made by Wurth, in Germany. I used to restore cars... Auto body supply stores have 'em.
-
I use the little plastic clips for projects, as they're polystyrene. The wire ties have extremely useful wire in them for all manner of repair and fabrication.
-
CD/DVD jewel cases. I've been using pieces from one and haven't used it up yet. I don't have my caliper handy, so I can't give you an accurate thickness, but my ruler tells me it's very close to 1/16th on an inch. Now that I know this stuff works, I have a lifetime supply of polystyrene. Activia yogurt containers ( the little multi packs) are also made of polystyrene, but much thinner. Think paper. Cuts with scissors. Great for building up various thicknesses. Dollar Store cotton swabs with the plastic shafts are a great supply for what seems to be 3mm hollow tubing. Anything with the recycle triangle with the number 6 is polystyrene.
-
what water does at -30
joemac replied to walt francis's topic in General Automotive Talk (Trucks and Cars)
When my dad was a young boy in Philadelphia, someone dared his friend to touch his tongue to the trolley track. Held the trolleys up for a couple of hours until someone thought to pour some warm water on the track. My sister got her bare hand stuck to a wrought iron railing once when we were little. I remember it being so cold once that if you spit upwards, it would freeze before it hit the ground. -
Why yes, Glenn, they be the guys. Thanks for supplying the image. I looked, but I didn't find anything through a Google Image search. You mean there's no tool I can buy and snap out my own perfect louvers? Hey, hey... I'm joking. I'll probably give the quarter rounds a try. This model sure is giving me the challenges... like rear wheel arches that look like they were cut out and flared, rear lids that are too small, as well as shaped wrongly, no panel seams, beltline profile all wonky, no bumpers and rear wheels and tires that wouldn't look out of place on a 1971 F-150... Thanks for the ideas. You guys are swell.
-
I'd like to know if anyone can help with making some louvers in styrene. The louvers I need to make are the slat-type, sort of like venetian blinds. I need to install ten in the lower side and three more in the upper panel of a VW van. The kit came with fake louvers, which stuck out. I need to make the ones that are flush with the surrounding panel. Any ideas?
-
Ideas on How To "Unwarp" Plastic
joemac replied to Bruce Poage's topic in Tips, Tricks, and Tutorials
I had a VW Bus model that was semi-built that was then put into storage. The box was moved and then moved again and in the process, it was somewhat squashed and sat that way for about a dozen years. I recently pulled it up from the dungeon that the wife calls a basement and discovered the thing was warped, to the point that I thought it was ruined. I decided to have a bash and placed some sprue trees strategically between the body and the undercarriage, holding everything in place with a few rubber bands and some clear shipping tape. i then placed the configuration on the top of the CRT computer monitor for a while, where it is slightly warm. After a few weeks, I remembered it being there and removed it, placing it in the unheated back room for a couple of days. I'm busy with life, so it's not always on my mind. Afterwards, I took it back to my modeling room and removed the tape and rubber bands and, voila! It's perfect. Been that way for a couple of weeks, even with the undercarriage assembly removed. I might just eventually finish it. -
You Say You Want a Spray Booth, Do Ya?
joemac replied to Dr. Cranky's topic in Tips, Tricks, and Tutorials
As a volunteer fireman who has spent more time in professional automotive spray booths than I care to admit, I would be remiss if I didn't say something. I'm only glad that someone else raised the issue (so I don't have to be the stick in the mud) that the use of anything other than an explosion-proof fan motor is dangerous. I'd hate for someone to build one of these booths, only to lose their possessions, and possibly more, to something catastrophic, which is frightfully more possible than some of you seem to think. Please, don't do this. -
I don't really know what to call this rant!
joemac replied to 2002p51's topic in General Automotive Talk (Trucks and Cars)
My favorite palindrome: RACE CAR -
My bad. Styrene, then. BTW sjordan2, nice job on the Teflon ducting. Tres cool. My son came home and we took a couple of pics with his 5 meg camera, but I couldn't upload them, for some reason. I just got an announcement that I was unable to load such files. Jpegs, they are... (?)
-
As more of a matter of practice than anything else, I decided to finally assemble a kit that I received as a gift, some twenty-something years ago. It's a 1:25 kit of a VW Beetle, made by Revell, called Penny Pincher. As far as resin kits go, I think it's pretty bad, but I'm only doing this to practice my unused skills and try out a few things. I've had to modify several things, such as removing the flares from the fenders and some flashing/bad spots/poor molding and just tidying things up. Being a VW tech from the sixties, I've rebuilt/repaired thousands of these air-cooled engines. I can picture every component and detail. The engine that is supplied in this kit leaves much to be desired, as far as completeness and detail. I decided to change a few things and one item I had been thinking about was the heater hoses that connect the fan housing to the heater system. On the real thing it is a pair of lengths of two-inch paper/foil/paper flexible hoses, usually black on the exterior. The surface has a texture, formed by the groove that is there which affords the hose its stretch-ability and flexibility. I thought about how I might replicate the effect. The "hoses" in the kit are totally unacceptable I thought I would try something. I was so pleased with the result that I just had to come here and post it. I took a small piece of black sprue tree and chucked in in my cordless drill. It wasn't perfectly round, so I spun it and held a small file against it until it was acceptable. I tapered the tip, slightly. Then the fun part: I spun a 3mm x.5mm die onto it and carefully worked it up and down the piece and, voila! I now had a perfect representation of what I was trying to mimic. It far exceeded my expectations. A little heat from the side of a candle flame and some careful bending and it's perfect. Any time you need a piece of what looks like black flex hose, that's how you do it. I would imagine different sizes would also work, depending on the scale you're working with. I tried taking some photos, but my camera is only 3.2 meg, so the detail becomes somewhat lost.