
northendmetalallstar
-
Posts
66 -
Joined
-
Last visited
Content Type
Profiles
Forums
Events
Gallery
Everything posted by northendmetalallstar
-
Thanks for the comments guys. I didn't do anything special to the engine so I forgot to take a pic at the time.
-
This was a fun build. This was my 2nd Tamiya kit and I love how everything fit together flawlessly. Great detail on this kit too, I would recommend this kit to anyone. looks like I have a droopy tailpipe, LOL Questions and comments are always welcome.
-
The Van...
northendmetalallstar replied to Brizio's topic in WIP: Model Trucks: Pickups, Vans, SUVs, Light Commercial
I just bought this kit too and was thinking about opening the doors as well. I'll be very interested to see how you approach it. looks great so far, keep the pics coming! -
Thanks guys! Here it is completed for anyone who wants to see...
-
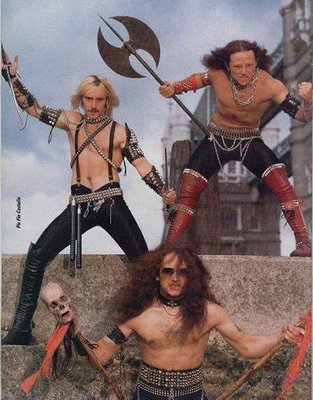
In addition to my full-time band, some friends and I perform in a Slayer tribute band once a year in our hometown and a few select shows regionally throughout the year. Our first stage backdrop was lost in a fire so I decided to paint a new one. Seeing as I'm the new owner of a Badger 155 Anthem airbrush, I thought I would give airbrushing the backdrop a try. Pretty happy with the results so far. Once the white basecoat is finished I will add color. For size reference, the backdrop is about 7 & 1/2 feet tall.
-
I didn't do anything special under the hood so I didn't think to take any pics of it, lol. I'll take some and post them next update.
-
That's OK Raul, no worries at all. I think i'm going to use the ones that came with it. I'm going to try reversing them and hanging them upside down from the top of the door frame. I do appreciate the offer though, maybe another time. Cheers!
-
I got some paint on her... Three coats airbrushed, wet sanded between each one. Now its time for more wet sanding and polishing.
-
Right way to apply Future?
northendmetalallstar replied to cherokeered's topic in Model Building Questions and Answers
I found this article on this forum somewhere, told me everything I needed to know (and more) about using Future. http://www.swannysmodels.com/TheCompleteFuture.html -
2012 POST APOCALYPSE/ZOMBIE HUNTER COMMUNITY BUILD
northendmetalallstar replied to Dr. Cranky's topic in Community Builds
Awwww you pulled that straight from google, lol. Actually, the Michonne character is not in the TV show, she's from the comic book series. She is such an important character in the comic, i'm sure she'll be introduced in the TV show soon. -
2012 POST APOCALYPSE/ZOMBIE HUNTER COMMUNITY BUILD
northendmetalallstar replied to Dr. Cranky's topic in Community Builds
I've been following this zombie apocalypse build for awhile now, and have been wanting to join but I couldn't think of a good subject for it. I was at my LHS yesterday and found this on sale for $15... I think it will make a good "bugging-out" vehicle. Not only are we fleeing the apocalypse in style, there's lotsa storage room in the back and ready-made slots on the hood for 2 small chainguns. (Where do you guys find your weapons in the right scale? All I can find is stuff in 1/35 scale.) I'm gonna open the doors and the trunk in this one too. I think I'll call it "Michonne". 10 points for whoever gets the name reference. -
Hey all. I'm fairly new to modeling. Have never done a resin kit before. I was searching ebay to see if an Audi TT coupe model even existed. I found this one by Hobby Design for $170 plus shipping. Is this reasonable? seems awfully steep to me.
-
If you look at the pics at the beginning of this thread you can see mostly how I did it. I am still new to modeling but I gleaned as much info from this forum as I could about lowering and just gave it the old college try. I can try to explain more if you're wondering about something specific. Also its just the shocks and license plates that are still attached to the tree. The other parts were snipped from the tree, sanded and then I glued a piece of sprue to a more inconspicuous spot to have something to hold onto while i airbrushed it.
-
I got some more work done to this truck. I wanted to customize the rear bumper. I didn't like the stock bumper, the way more than half of it was supposed to be the body color. So I decided to strip all the chrome parts and try out this fancy Alclad everyone seems to be talking about. I must say I'm pretty impressed with the results. Here are the parts after i sprayed them with Alclad gloss black base. and after... more to come!
-
I've never seen them that nice here in Canada. I've only seen converted short buses and milk trucks. I've always called them "The Botulism Bus"... Looks like it would be a fun build though.
-
That's very kind of you Raul, thank you. They would look great on my truck too i think. I'll PM you my address, maybe i can return the favor someday.
-
Spectacular Raul! I love that truck! Thanks for the comments everyone. I'm really looking forward to finishing this. I don't have any time during the week to model, what with work and band rehearsals. This weekend I'm going to sand and prime it again in white this time, so that my yellow paint is poppin'! (I hope)... Stay tuned
-
Wow Raul, nice job! That red one is really sweet! I love what you did with the doors. Did you make those side mirrors too?
-
You know, I haven't even taken the windows out of the plastic yet. Kinda disappointing to hear poorly fitting windows are standard with this kit. Hopefully the sun visor can hide it somewhat.
-
Thanks for the compliments folks. \the primer is actually gray, the picture is dark. Actually its this AMT kit
-
Thinking about bright yellow for the truck, with the tonneau painted black, vinyl looking
-
So here's my first try at something custom. I did a lot of reading from this forum for ideas for this build. I wanted a lowered truck with some nice wheels and a hinged tonneau cover. I was thinking about opening the doors but there was such a huge gap between the body and interior, I deemed it to be beyond my skills at the moment. The wheels are from an old Ertl "Fast and the Furious" Camaro kit that my friend gave me recently. Here you can see where I blocked up in front of the leaf spring to lower the back end. Here I put the axle on top of the leaf springs and cut the springs to lower the front end. Its a little scabby but it worked. I added the sun visor but i wanted it to look smooth and one piece. I also wanted the lines to be straight all the way down the truck, so I built up the areas behind the doors with putty and sanded smooth. Here you can see how much I had to build up to achieve the effect. Here's my hinged tonneau. I used a sheet of styrene and half round rods for the edge trim. I didn't want the big ugly badge on the front either, putty putty And here it is primered
-
1965 Mustang 2+2 fastback
northendmetalallstar replied to northendmetalallstar's topic in Model Cars
What is this hood trim you speak of? I don't remember anything like that in the box? -
Thanks for the comments folks! I've been using Micro Kristal Klear for my headlights and windshields since this model and the results are like night and day.
-
I didn't take any pics during the build so there was no "On the workbench" thread for this one. I got this one for my dad for his birthday and one for myself so we have a little competition going, hehehe. While mine is finished, his is in the purple pond after a screwed up 1st paint job, lol. It was an alright build but my windshield was cracked when i opened the box.