
stulee11
-
Posts
534 -
Joined
-
Last visited
Content Type
Profiles
Forums
Events
Gallery
Everything posted by stulee11
-
flea market find (update) all done now in "under glass"
stulee11 replied to stulee11's topic in WIP: Model Cars
i no it will need alot of body work but i do like a challenge lol . i realised that i should of stripped it first after i started it lol . -
flea market find (update) all done now in "under glass"
stulee11 replied to stulee11's topic in WIP: Model Cars
they are quite big over here but it was a modding mag that really got me going on this one . plus i like the older cars to me i think they have more caricature -
flea market find (update) all done now in "under glass"
stulee11 replied to stulee11's topic in WIP: Model Cars
hey mate i am really sorry for the bad grammar . i didn't get much of an education i left school in the first 2 months of what you guys in the states call high school . and prior to that i wasn't at school much as i was always out in ice skating compitions . so i really didn't learn much but i get along with out having to write hardly at all . sorry again i will try to write better for ya . but thanks for the compliment on me having some good modeling skills this will only be 6th model i have made and my first trying to open the doors and stuff . so i hope i am doing things right lol -
flea market find (update) all done now in "under glass"
stulee11 replied to stulee11's topic in WIP: Model Cars
it might take a while to do as i am only learning but as they say all good things come to those who wait lol if anyone can see anything i am or have done wrong please dont wait let me know as soon as so i can keep learning from master builders like you all thanks stu -
flea market find (update) all done now in "under glass"
stulee11 replied to stulee11's topic in WIP: Model Cars
some more this is ov the hinges i use cuz it was the only way i could think ov it working obviously its still very early in progress but any comments welcome thanks again stu -
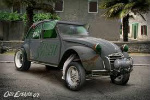
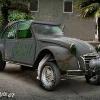
hi all i went to my local flea market yesterday and picked this up for £1 was a little worse for wear but all parts are there i didnt get a pic ov it wen i got cuz i got a hell ov a load ov ideas running through my mellon so i just got me knife out and went to town but heres a pic ov it sort ov together well anyway after getting it i looked at it for about 5/6 mins lol and thought "right ppl on here are doing normal doors , lambo doors and even suicide doors but i aint seen and raptor doors" so that was it i tried them and after that i pulled out a old max power car moding mag and saw a hood that opened on the diaginal split in half so i thought i gotta try that and well i will let the pics do the talking cuz my fingers are hurting lol hope you all like and as always any comments welcome thanks stu
-
Show us your Engines - Post Dedicated to the Engine
stulee11 replied to TheCat's topic in Model Cars
heres my 70 boss 429 -
thanks for the gd comments regards to the chrome to be honest this is only my 6th model and i didnt really know what to do on them bits as i have tried to paint it and it looked worse but now u say BMF it i will try that one for sure lol . i use to for get that bit under the hood i did on my last one so i just BMFed it lol
-
some more last one lol
-
hi all here is my boss all done hope you all like the colour as it was inspired by my little girl who was born on the 11/11/11 . all coments welcome and i hope you all enjoy it as much as i did
-
lol me to on 1:1 cars its easier there bigger lol but models are so fiddely u can get bleeding no matter how careful u are
-
that clear trick does work i use to do it on 1:1 cars wen i worked in the body shop i aint tried it on a model yet tho
-
how do i upload gallery and avatar from photo site
stulee11 replied to randx0's topic in Model Building Questions and Answers
u aint the only one i been trying for the last 2 months to do it and every single pic i got on my harddrive it keeps saying failed to upload lol -
thanks guys i am a right plank i used that black wire for the coil lead lmfao how dumb can i be lol oh well we all learn the hard way lol thanks again
-
hi all i just got a little question i have been learning to wire up the ignition wires with little hasstle but i was wondering on some peoples engines i have seen on here they have put the little rubber boots on them where the wires go on the spark plugs and the dizzy cap . how do i do this ?? as i have been looking around for the wiring kit with them on but i cant find them anywhere so could someone please tell me how to make them ..... thanks stu
-
i love the old style scoobys and you my friend have just made me love them even more i dribble from every where lmao. that is the sexyist scooby i have ever seen brill buid everything just fits together so well on it well done cant wait to see what u have instore for us all next ?????
-
the paint should loose all it glossyness and be dull but be very careful not to sand to hard or much as you will go through the clear coat and into the colour then you will have to strip and start all over
-
thanks mate my lil girl is no.3 of my lot to lol . the funny thing is the hoods been polished up and the body is just the clear coat lol i have tried to polish the hood up more but it dont get any better so for this one i am going to leave the body as is . good luck with your lilun in march hope all goes well and hope mummy is doing ok to
-
hi all small update the hole shell has had its final coat of clear that makes it 9 coats all together lol just to be sure the hood has been wet sanded but i dont know if i like the out come your comments will help tho the body with the decals on body hasnt been wet sanded yet
-
have you tried "micro sol or micro set" thats made to make decals form to any shape and to remove them
-
how to replicate stone chip
stulee11 replied to stulee11's topic in Model Building Questions and Answers
i aint sure its the stuff that gets put on under the car to stop rust its like a rough sandpaper texture then it gets painted the same as the car -
hi everyone i aint sure of the name but i think its called stone chip its the stuff you put under the car to stop it rusting and stuff has anyone ever tried to replicate it and if so how as i would like to give it ago ???? many thanks stu
-
happy birthday for yesterday bruv hope u had a good one . thanks for the comment and if i do have any probs i will ask ya thanks . i wasn't to sure on how the colour of the motor would go with the car but i think it goes really well
-
body has had its 2nd and 3rd coat of colour and the engine has had its 3rd coat let me know what you think all comments welcome good or bad
-
any advise on what filler i should be using as i am using this one and to be honest for the first time using it i am finding it ###### it might be me but any help please