RobRus
-
Posts
67 -
Joined
-
Last visited
Content Type
Profiles
Forums
Events
Gallery
Everything posted by RobRus
-

Working Air Bag Suspension
RobRus replied to 91blaze's topic in General Automotive Talk (Trucks and Cars)
I have given this some thought also since I am working on a 40 ford that is lowered. The idea I came up with but have not tried is to mold the airbags using silicone. The bags should be hollow with the bulge of the bag being thinner than the rest of the mold. Then I thought of running the lines from the bags to a small tank just as they would in real life. I would then use a medical syringe connected to the tank to raise or lower the suspension. Since the volume of air you would need to move the suspension up and down would be very small just the action of pushing the syringe plunger in and out should be enough to activate the suspension. The problem I can see with this is the suspension (not the bags but the actual suspension) has to work with little or no resistance or the car will not go up or down very well. After giving it some serious thought I decided not to do because I didn't think the effort would be worth it. But that is the idea I was thinking of using. -
I was not talking about artistic ability when I said that glue doesn't take any skill. It takes plenty of skill to chop a car up and turn it into something else. I was talking about the act of applying the material. It isn't a matter of how much I abuse a model. It just makes a stronger joint and a stronger joint will last longer. I still use glue and I am not cursing the glue gods...
-
@ crazyjim, I would love to come to see that but it is a pretty long drive from Michigan. @ GrandpaMcGurk, By all means post anything you have on the topic. The more info the better.
-
I understand your rant. I have been in the racing sim community building 3d models. A very similar thing happens there but it is guys ripping off other peoples work and passing it off as theirs. The only thing worse than that is someone correcting anothers spelling. (he said with a grin)
-
crazyjim, I would love to go to that and see how someone else does it. I started playing around with it when I was about 15, as a matter of fact the soldering iron I am using is the very same one I started with. It was actually my dads and everytime I used it he would yell at me and take it away... He finally got tired of taking it back... Back in the mid 70's and I was working in body shops they came out with an actual plastic welder that used hot air in a small jet. I talked my manager into buying one and I took a class on how to use it. The technique of making the V came from that class. At the time cars were going plastic on us with inner fender wells, radiator shrouds and bumpers which are the first things to crack in an accident. We made our money over and over by welding up a crack rather than replace a part. For anyone interested in this here is a cool video that shows how to use an actual plastic welder. I am doing exactly the same thing but with a soldering iron. They don't show him doing the other side of the bumper but the process is the same, grind out a V and melt in the plastic.
-
@ Plowboy and SuperStockAndy, thanks for your comments relating to the topic. I know most guys use glue of some sort and it doesn't surprise me that you voice your opinion about how easy/safe/fast glue is but it is clear you have not tried welding because you would find out that it is about 75% stronger and about 50% faster once you learn how to do it correctly. The one thing I will give you is that glue is easy and doesn't require any skill. If done correctly the joint is much stronger than the surrounding plastic because you are using the same material and not introducing a solvent into the mix. I ask you do try an experiment. After you have glued a seam and you think it is dry (in what 12 or 24 hours?), grab your part like a 3 year old would and twist it. When (not if) it breaks apart take an exacto knife and scrape at the seam. You will find that it is soft and mushy inside. That is the solvent that has melted the plastic and will probably not evaporate out for weeks. And even when it has evaporated out completely you will still be able to snap the joint right along the seam. If I snap one of my welds it will not break the seam because there isn't any seam left. You can break it but it will be somewhere other than the weld. Very much like welding metal, the weld is much stronger than the surrounding metal. As a testimonial of how strong the joints are. I am working on a project right now were I cut part of the roof and hatch off of a car and welded the sail panels back in. As I was just finishing up I made the mistake of setting it down right in front of my dust collector. I just bought that new dust collector you see in the pictures which draws air at 600 CFM and has a velocity of 5500 foot-per-minute at the opening. You can see I have not put a screen over the opening (yet) and when I set the model down it sucked it right into the collector. The hose is a 4" corrugated tube with the collector installed down stairs in my shop. The hose is about 25 feet long and it sucked my model all the way down into the base of the collector. I was shocked at how quick it sucked the model in and I sat there thinking "all that work for nothing". I went downstairs and opened up the collector and there was my model all in one piece. It has a few nicks and scratches but the welds held up just fine. @ Scale-Master, The weld is completely through the plastic so there is no seam anymore. If you look at the last 2 pictures I am showing both sides but one is ground down and ready for filler. I could actually sand it smooth and prime it if I wanted to but I prefer to use bondo. As far as you saying current technology is faster and stronger that is just not the case. I am guessing you do not glue a seam up and start filling it as soon as you close the glue bottle do you? And as far as strength... no comparison what so ever since there isn't a seam anymore if it breaks it will break beside the weld or somewhere else but not a properly welded seam. I am not trying to convert anyone from how they work now. I just thought I would put this tutorial up here for anyone interested in learning about how to weld plastic. I don't think it is really necessary to make a post saying you prefer glue and why. Now it all honesty, the weld I did for this tutorial is much more "finished" than I would do on a car. I wanted it to be "proper" looking weld for this example. Here is what my welds usually look like. This is the car that was sucked through my collector. This stage I have already welded the seams and shaped the window opening and the welds you see are just filling in the shape so I don't have to use as much Bondo to smooth it off. It has not been ground down so this is a good example of welding an actual car.

-
I have used regular model glue and Testors Plastic Cement which like Tenax7 is mainly acetate and has no fillers. Both are solvents which melt the plastic and chemically welds the joint. I have found that joints usually bleed through after priming and painting because the solvents become part of the joint. Even after a week or 2 of drying under a lamp I have seen joints pop after priming or painting (leave raised marks right where the joint is). Any time I do a body mod that requires welding the 2 pieces back together I prefer welding with a soldering iron. It takes practice (and a variable temp pencil tip soldering iron) not to warp the parts but the advantage is that you do not have any drying time and you can sand and fill the parts immediately after welding. You also don't have any solvents to bleed through so you don't have seams popping up after you apply paint. I will put a heat welded joint up against any glued joint as far as strength and durability any day. I actually wrote a short tutorial on how I do it and your question sparked me to post it in the Tips section here: http://www.modelcars...showtopic=58043 I have also heard of some guys using 2 part epoxy with good results also but I enjoy welding because it is more like what you would do on a real car and it is very strong. Just my 2c Bob
-
There is nothing that makes me more crazy than waiting for glue to dry when I am trying to do some major modification like adding fender flairs or chopping a top. What is worse is the model is much more fragile than before I cut it and the glue lines always seem to bleed through to the finish. The reason is because we are using glue that softens and melts the plastic and it takes a long time to evaporate out. I started welding plastic when I was about 15 and there is nothing that is stronger and faster than using heat to weld seams and joints. I use an adjustable temp pencil tip soldering iron. It has a very small tip that is perfect for welding plastic. It is important not to melt the surrounding area so a variable temp soldering iron is a must. I have to make this warning and I want everyone to read it and understand that melting styrene fumes and smoke is not a good thing to breath in. WARNING!!!! VENTILATION IS THE MOST IMPORTANT THING WHEN WELDING PLASTIC. AT THE VERY LEAST SIT BY AN OPEN WINDOW WITH A FAN BLOWING OUT TO EXHAUST THE FUMES. DO NOT BREATH IN THE FUMES OR SMOKE!!!!! OK I have warned you... Don't be dumb and ignore this. The first thing to understand in welding plastic is not to get it hot enough to smoke. If it is smoking and turns brown you are burning the plastic and it will become brittle and your joint will fail. When you see smoke stop and clean the tip of your soldering iron with steel wool. Practice is the best thing I can suggest to figure out how hot to get it and when to get off a spot before it starts to warp. But here is a quick explanation of how I do it. I will put a good weld up against any glue as far as strength and the best part is when you are done welding you can get on with your customizing and do not have to wait for anything to dry. Thanks and I hope this helps. Bob First make sure your area is clean and free of any flammable materials like paint or thinner. Start by tacking the parts together to keep them in position. V out a small section and weld in the rod to fill the V. Then create another V and repeat the process. Notice when I create the V I push the plastic out to the sides of the V. This will be mixed in with the rod in the next step. Start welding by laying the rod in the V and moving the iron very close to the end of the rod. When you see the tip of the rod begin to melt start pushing the rod into the V. While it is soft I start to move it around and then pull the sides of the V in to create the weld. The real trick is to get a very small spot hot but not melt or warp the surrounding plastic. I like to brace the part I am working on with a finger under the spot I am welding. If the opposite side is too hot to keep your finger on then you need to stop and let that spot cool (it only takes seconds). After I have welded a complete seam I like to go back over it and clean my weld up buy dragging down both sides to move any bumps into the middle of my weld. Then I drag a diagonal line to create a nice smooth weld. If your joint looks smooth with no holes or burns then it will be a good strong joint.
-
Revell '49 Merc - I need a favor
RobRus replied to Jantrix's topic in General Automotive Talk (Trucks and Cars)
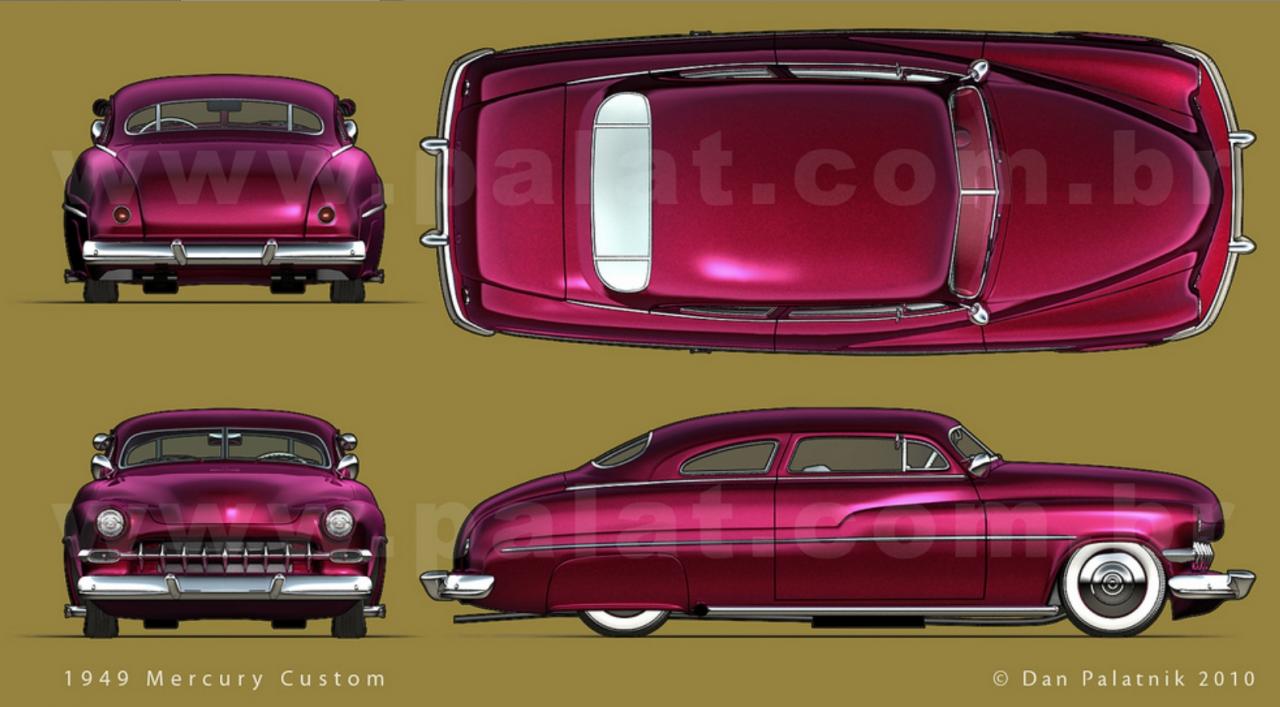
There is a blueprint of a 49 on this site. http://www.palat.com.br/cars.htm It also has a LOT of other cars this guy has done in 3D in renderings and blueprint type drawings. Look at the top of the page and you will see his blueprint page. Heck... Here is the image of the 49. (I am not sure if the admins will allow this so if not please remove it. ((Or ask me to and I will)) Hope it helps.
-
Thanks for having an interest in my build. @ Eric, Gee thanks, I have been away from this for a lot of years but I was doing 3D modeling and had a forum (that I just shut down). I always tried to help people learn 3d modeling so I had a number of tutorials in the same format. I found it easier to follow than having a big page of text or showing pictures that guys had to figure out. (if you are interested in seeing the kind of 3D work I have done you can Google "Team Players Virtual Garage"). @Raul, Nice looking chop on your ford. That is one way to do it and it gives a different kind of look. I wanted to keep the stock look but give it an "update". @ Roger, Interesting idea using 2 cut-off blades. I guess I am old school... I just used a saw.
-
Thanks guys, Back when I was in the body shop I have actually helped do a couple of chops so I know the kind of planning it takes to do one right. I was surprised that I didn't have to cut the roof up lengthwise to get it to fit but I guess that is due to only cutting 1 1/2 inches and the 40's pillars are nearly straight up and down. @Don, Yes I will be putting the drip edge back on. I think that is one of the things that will keep it looking like a mild custom. I found some really nice channel strips at the Hobby shop I think will work very well for that. The one thing that has bothered me from the start is the body line where the drip edge stops by the trunk. On this die is is not straight so I may have to fix that. I am guessing that most people will never know it has had so much cutting done on it but that is one of the things I love about mild customs. The average person will look at it and see a 40 Ford but the trained eye will be able to pick out the modifications. More to come...
-
Very nice job with the rust, I am not a big fan of it but you really captured what I barn find looks like. The only critique I have is the wheels should have the same amount of dust on the lower part of the rim. That is unless you had to put new tires and wheels on it to move it out of the barn.... Oh that's right, this IS a model... Great job for your first.
-
Here is what the final results look like after being sanded, filled and primed. Not to bad for for the first one I have done in years.
-
Ok some more progress. Keeping with my theme of low, smooth and shiny I decided to do a mild chop. I am not a fan of radical chops, especially on the 40 Ford Coup. The lines of this car are beautiful just the way they came from the factory but that doesn't mean it can't be improved on. This is the first chop I have done in a number of years but I am not afraid of cutting up a perfectly good car so... I decided to do a mild 1 1/2" chop because I wanted it to be subtle and I also didn't want to distupt the lines of the body (especially the roof line flowing down into the trunk. At first I thought about doing a raked chop leaving the back about where it was but I decided on a full 1 1/2 all the way around. I actually raked it backwards very slightly leaving it just a bit taller in the front. That is a trick I learned a long time ago (it gives the illusion of stock proportions when doing a mild chop). Here is the progress on how I did it and the final results. Enjoy, Bob I cut a strip if blue tape 1 1/2 inches wide and laid out where I wanted to cut. The Cut I left the tape on and then sprayed some paint on it so I could tell where my guide lines were. I then sanded the white area up to my guide line.
-
A100 lowrider...5-22-12 DONE!
RobRus replied to zaina's topic in WIP: Model Trucks: Pickups, Vans, SUVs, Light Commercial
Looking good, and I love the color combo. I think the white bed cover is a bit much, at least in the picture it kind of takes over the nice custom work you have done. But that is only my opinion based off of one photo. Maybe if you put some white faded lacing or something to bring that whilte into the rest of the vehicle? It is coming along very nicely though. -
Wow this is some kind of monster Frankenstine project that is looking way cool Ira. I am pretty new here and have been trying to go through a lot of the workbench projects but this is one I didn't see. Glad you posted an update so it floated to the top where I could find it. I love the Vette and have always loved the Cord, mixing the two together is very creative and very tasty too! Love it and can't wait to see how the final build comes out. I am sure it will be stunning.
-
Hey thanks guys. I acually had the chance to buy one back in the late 70's for $1500 from a body man I worked with but decided not to because I didn't want to commit to such a large project. I had just bought a 60 Chevy that my wife wasn't too happy about so I figured it wouldn't be a good health move for me... I still kick myself for not buying it anyway. I have been thinking about doing a very mild chop to the top but I have not decided yet. Either that or I have been eyeing an old Mercedes Gull wing I did many years ago that is in pieces. It looks like that roof would almost fit but that is pretty radical for what I see as a mild street custom. Those Porsche headlights are actually from a die cast 911 that I got from a friend. He was going to throw it out because it fell off of the shelf and broke the hood hinges so the hood would not open or close properly. It is a 1:18th scale so I need to trim them down but I like the way they look in the 40. Again, I am open to any suggestions or ideas since I don't have a specific plan I am following.
-
I would say go for it also. I got into modeling when I was about 9 years old and we didn't have any money. I got almost all of my models in the first couple of years from friends who either couldn't put it together or smashed them. So I started out cutting up plastic just to build a whole model. It wasn't until I had been doing that for a couple of years that my mom bought me my first kit. I actually didn't know what to do with it because I never had instructions. I still remember the car, it was a 58 Chevy that I ended up cutting the nose off of it and building a new one from balsa wood. In my life I can only think of about 3 models I have done box stock. Depending on your skill level and what you are comfortable with you might want to get another model to do as a box stock along side of your chopped custom. You can work on the stock one while stuff dries on your custom and if all else fails you will have learned a lot AND finished a complete model. I don't know how many models I have started only to find I didn't like the direction I was headed or just outright failed on... But those builds are not a failure because you just add it to your parts box for an inspiration on something else another day. Just my 2 pennies Bob
-
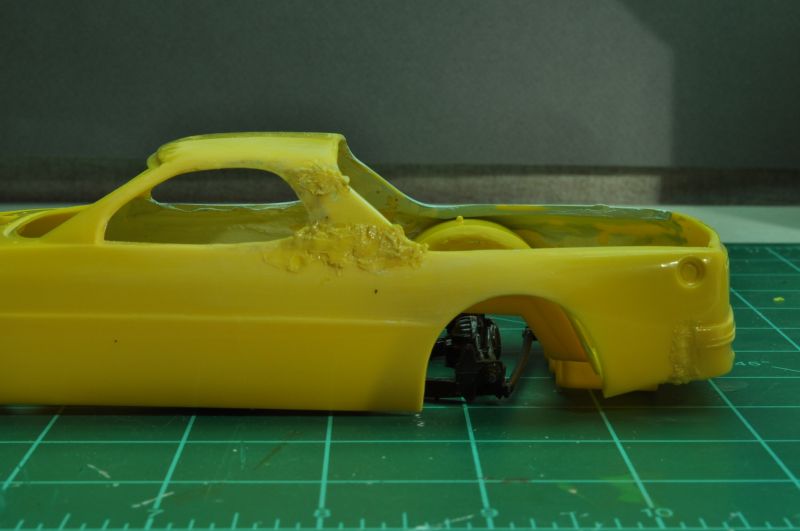
Hi Guys, This is a project I started about 2 months ago when I decided to get back into plastic modeling. I know the 40 has been done over and over but this is a car I always dreamed of owning so I thought it would be fun to start with. My plans are some what open but I know it is going to be a low, smooth and have a hand rubbed laquer finish. Other than that I am open to any sugestions and opinions on it. I ran into a bit of difficulty when trying to fit the motor and front suspension in and decided to stop working on it and do something less custom (for those that have seen it I did that blue 69 Cougar in the "Under Glass" section. I figured I needed something simple to get completed before I got to far into sawing plastic. I think I have documented the pictures pretty well so you can follow along to see what I have done but the short list is this: Models: 40 Ford Coup 79 Dodge Ram - Tire Donor / partial wheel donor (for silicone mold) Nascar Lumina - Engine and suspension/drivetrain donor Customization done so far: Shaved all chrome, door hinges, wipers Widened rear fenders 4 inches Frenched in Porsche Headlights Custom molded wheels using parts from the above kits. I want deep dish chrome reverse with baby moons and wanted to try my hand at casting a set. I looked through the Under Glass section to see if there were any other 40's for some inspiration but only found one. I have a few photos I have collected to give me some direction but I am really open to any ideas you may have as long as they are in the same theme as "low, smooth and shiny I think the pictures speak for themselves but I will be happy to explain anything you don't understand. An interesting thing I found when molding the tires is I tried to inject Hot Glue into the mold and it actually worked better than resin and the results actually feel just like kit tires (soft and bendable). I am sure someone else has done this but I thought it was cool...
-
Eric, espo is correct, try it on a plastic spoon or a scrap. I am using automotive laquer with a very fast thinner (can you say melt plastic?) I was having problems with Dupli-Color and Tamiya primers so I asked in another thread. Dr Cranky suggested using PlastiKote so I gave it a try. It layed down nice and stayed down so you may want to give that a try if you have problems.
-
Thanks for the reply Pat, I will stick to laquer then, I seem to get the results I am looking for and as long as I don't see problems from the laquer/styrene combination I am cool. I like the fact it is dry to touch and dust free in seconds.
-
I don't want to veer this off topic but I am curious and HOK paint. You say they are enamels? I left working in body shops in the mid 80's but kept doing some custom paint beyond that. I recall HOK paint back then but I thought it was laquer. I used mainly Metalflake Candy colors and was very happy with them so had no need to try them out (and still have about 8 quarts of it that is still good). Is this the same HOK that produces automotive custom paint today? I was going to try it because the wide variety of colors they offer, but if it is enamel then I am not sure I want to. I have sprayed my share of enamel and it just doesn't give the results I like.
-
@ Lunajammer, Thanks for the kudos on the BMF work. I guess it is partially due to having steady hands and the perfectionist in me. I also used dullcoat brushed on all the inside edges so they didn't jump out so much. That may contribute to the overall clean look since just the edges pop. @ Badluck 13, I left plastic modeling do do 3D modeling for racing sims. So I have still been modeling but I switched styrene for digital bits. I achieved the glass like finish by doing it the same way I did on 1:1 cars... wet sanding with a very small pad between each coat of paint. I prefer the look of rubbed laquer over enamel or urethane but I have seen some top notch work from guys like Dr Cranky and Donn Yost so they could make a convert out of me... @ Harry P, I should have just sanded them off. You probably see I sanded through to the plastic on one of those edges. I was going to foil them but got impatient with this build and called it done so I could get on with another project I have going. I could never figure out why door handles are always part of the body anyway. They are not realistic and usually distract from a well built model. Plus they are a pain to rub around... yup.. should have sanded them off.
-
Thanks for the compliments guys. I think it turned out pretty good. Not half as good as some of the stuff I see on the forum but that gives me something to strive for. The color in the pictures don't really do it justice. The first shot is closer to the actual color because the black really shows through. I see where I could have done a few things different and I missed a couple of parts (forgot to paint the mirrors), but this was more about getting back into the hobby.
-
Detail is amazing and I love it sitting in that garage. Looks right at home.