MoparMark
-
Posts
85 -
Joined
-
Last visited
Content Type
Profiles
Forums
Events
Gallery
Everything posted by MoparMark
-
Thanks all for the great responses, doggie427 you asked about the blower, I grabbed one out of a Revell late model Top Fuel kit like a ARMY kit or Ken Bernstien Bud King kit. Yes I do plan on posting progress on the rail build as I can remember to do so,I'll do my best. Thanks again!
-
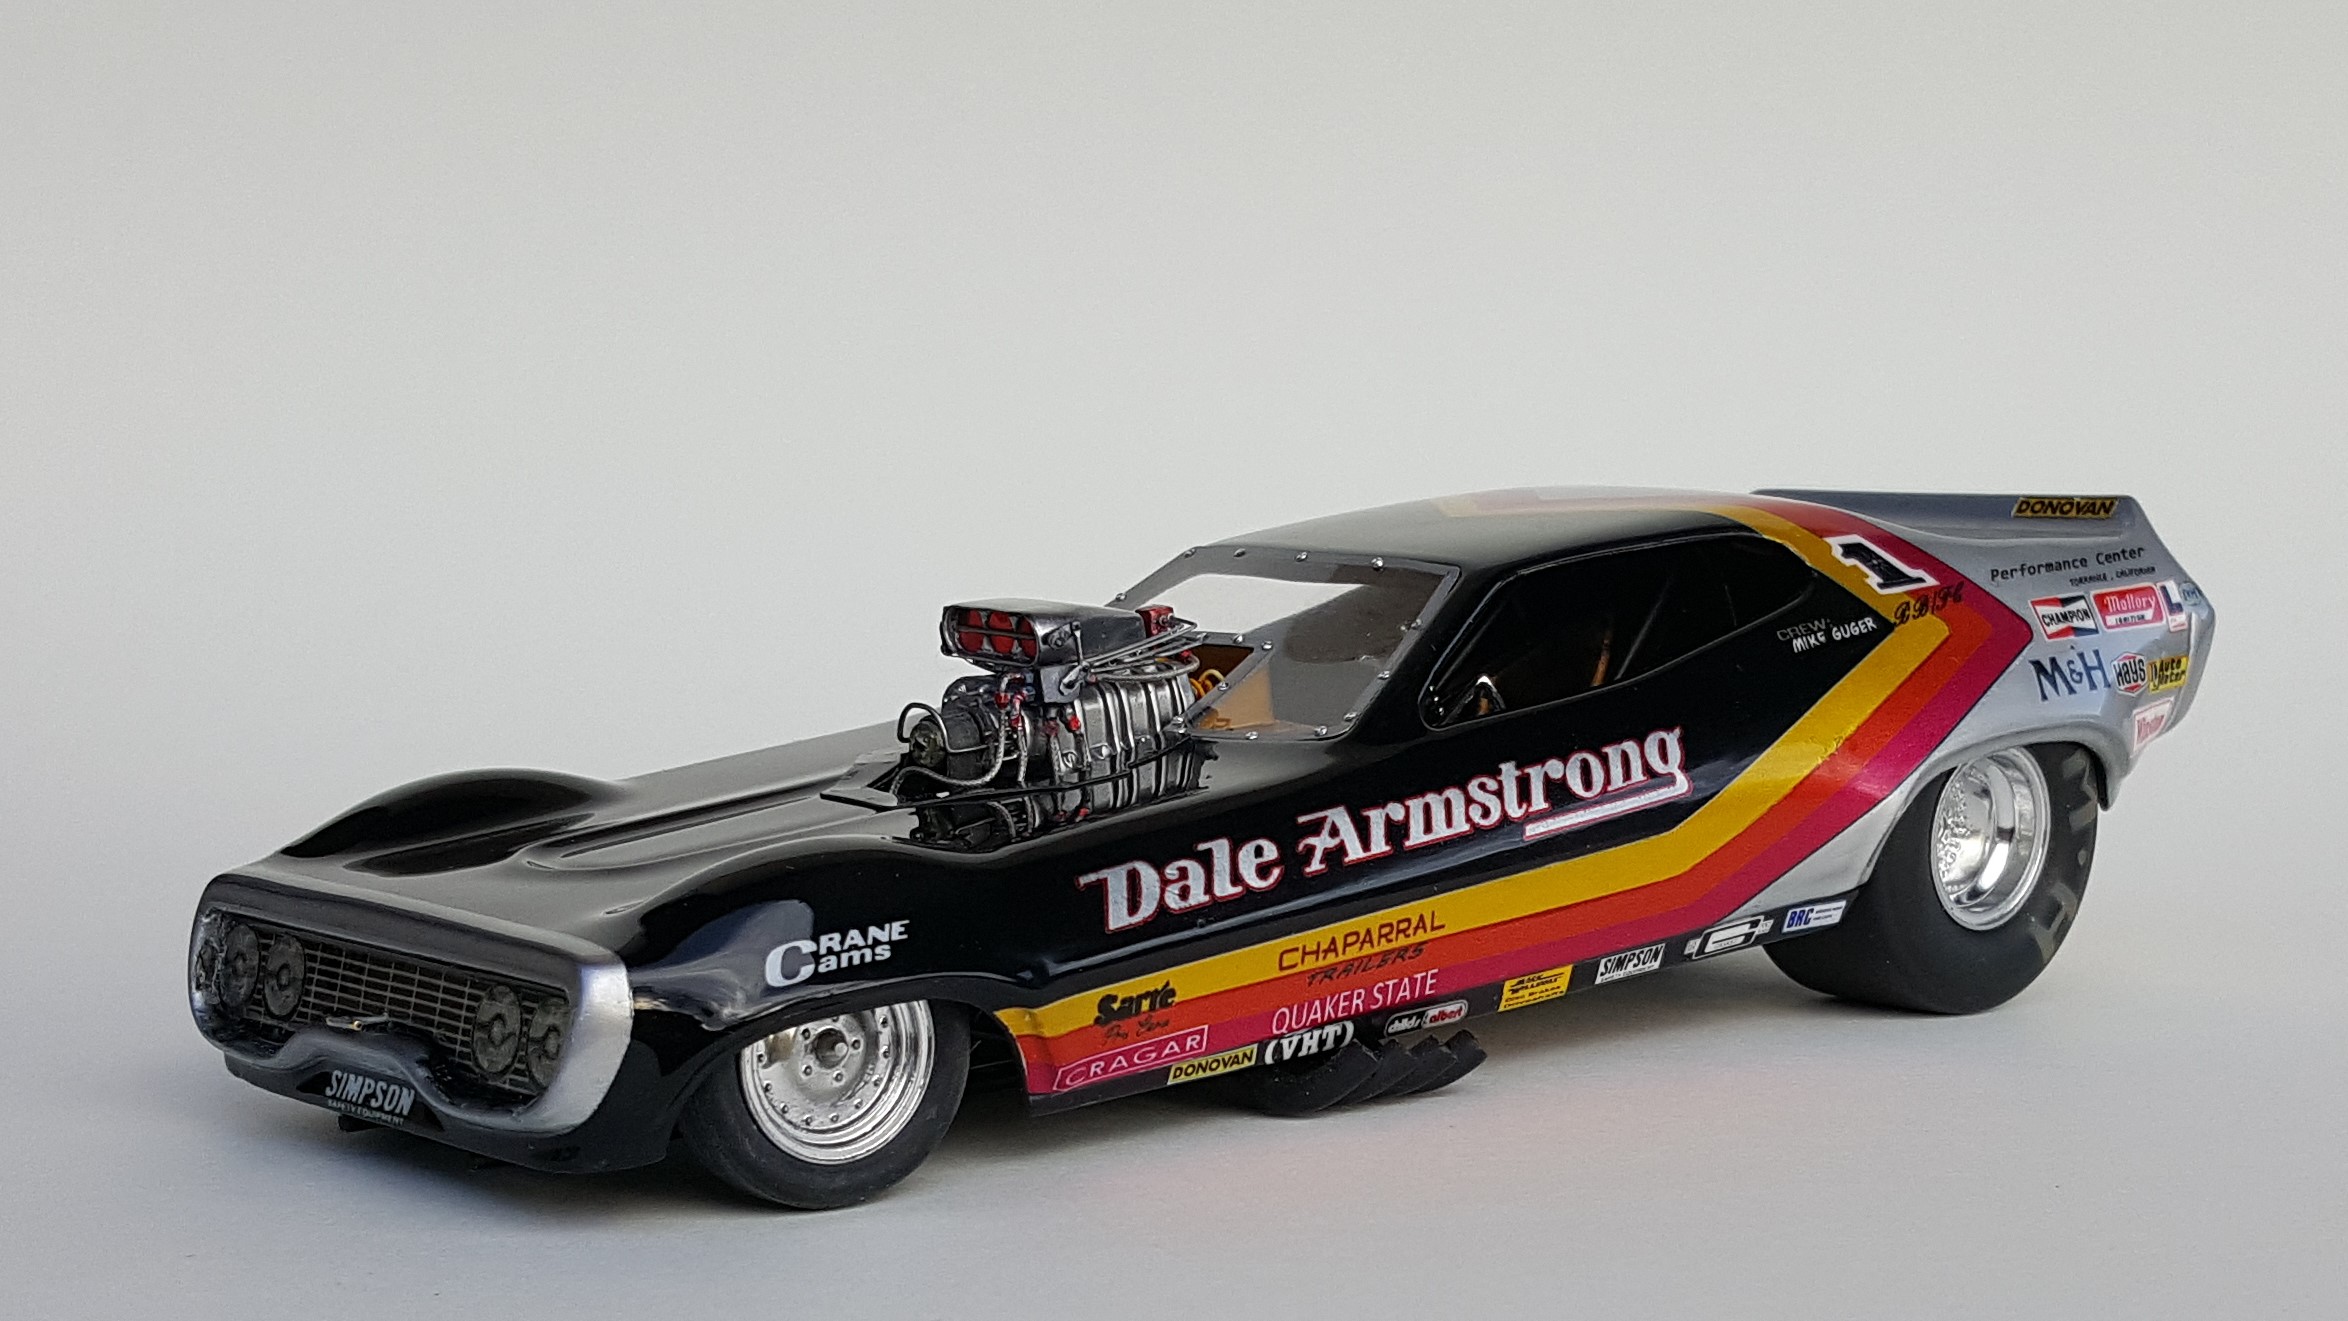
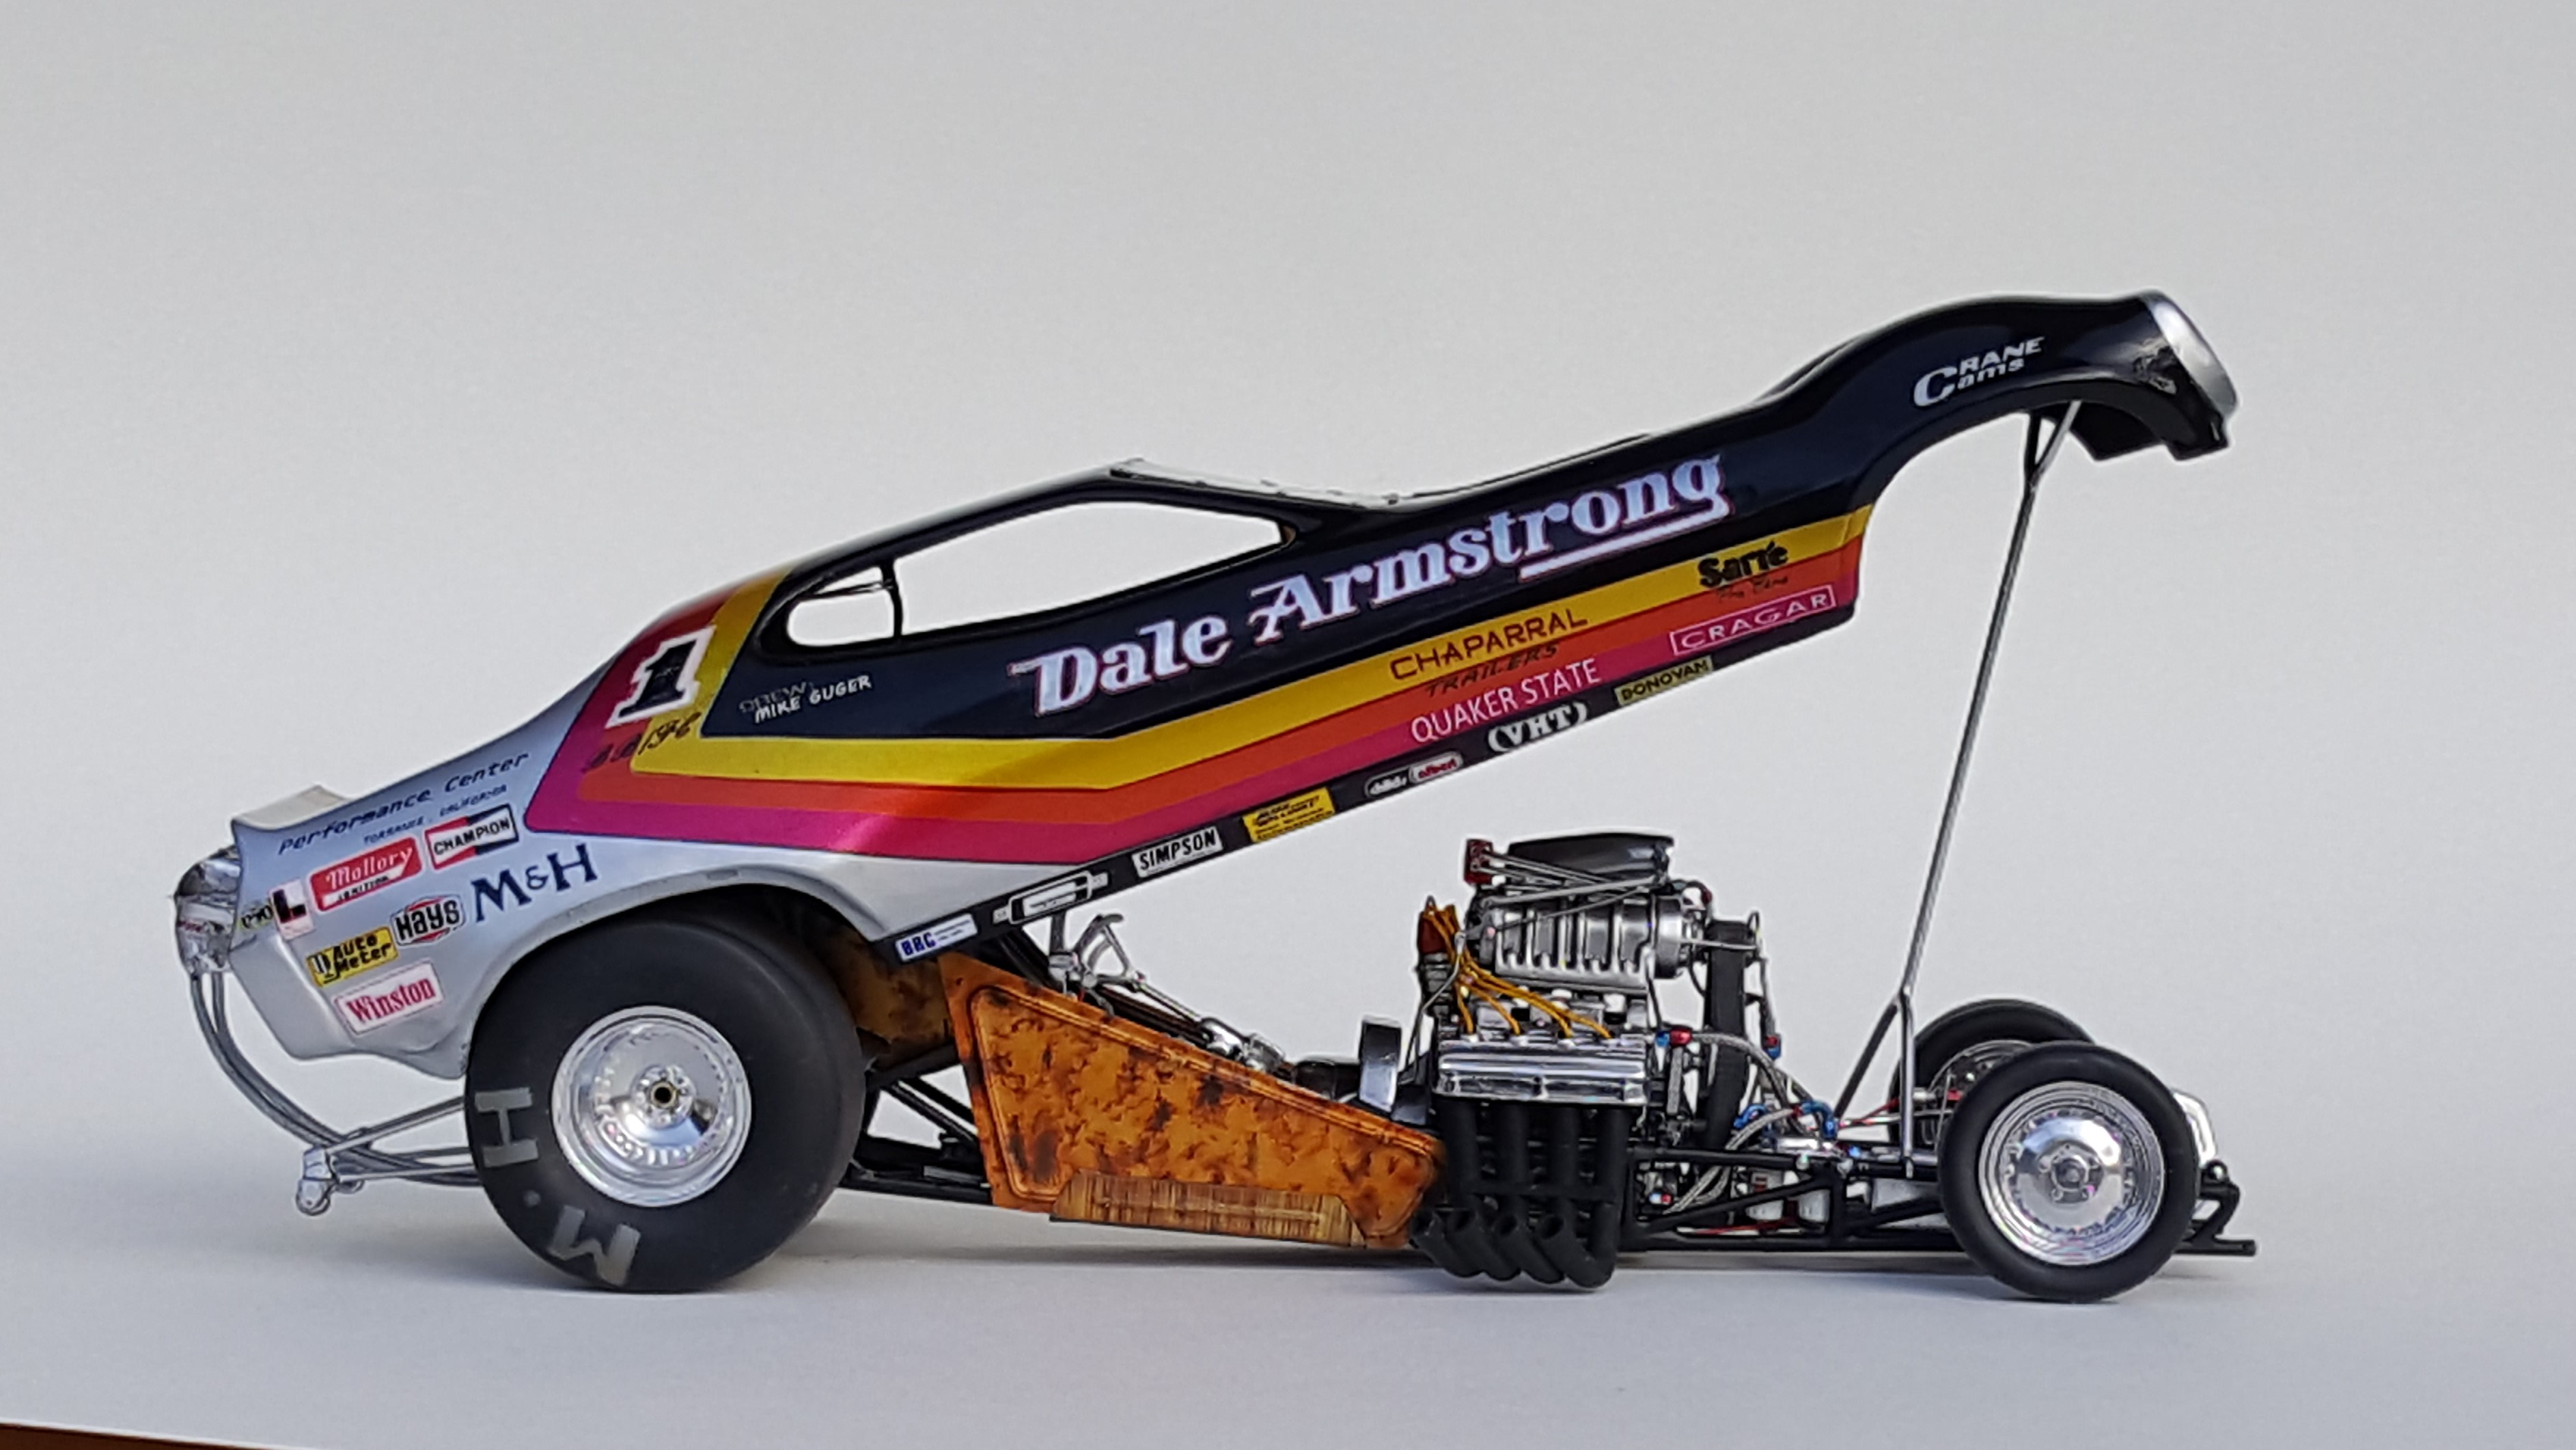
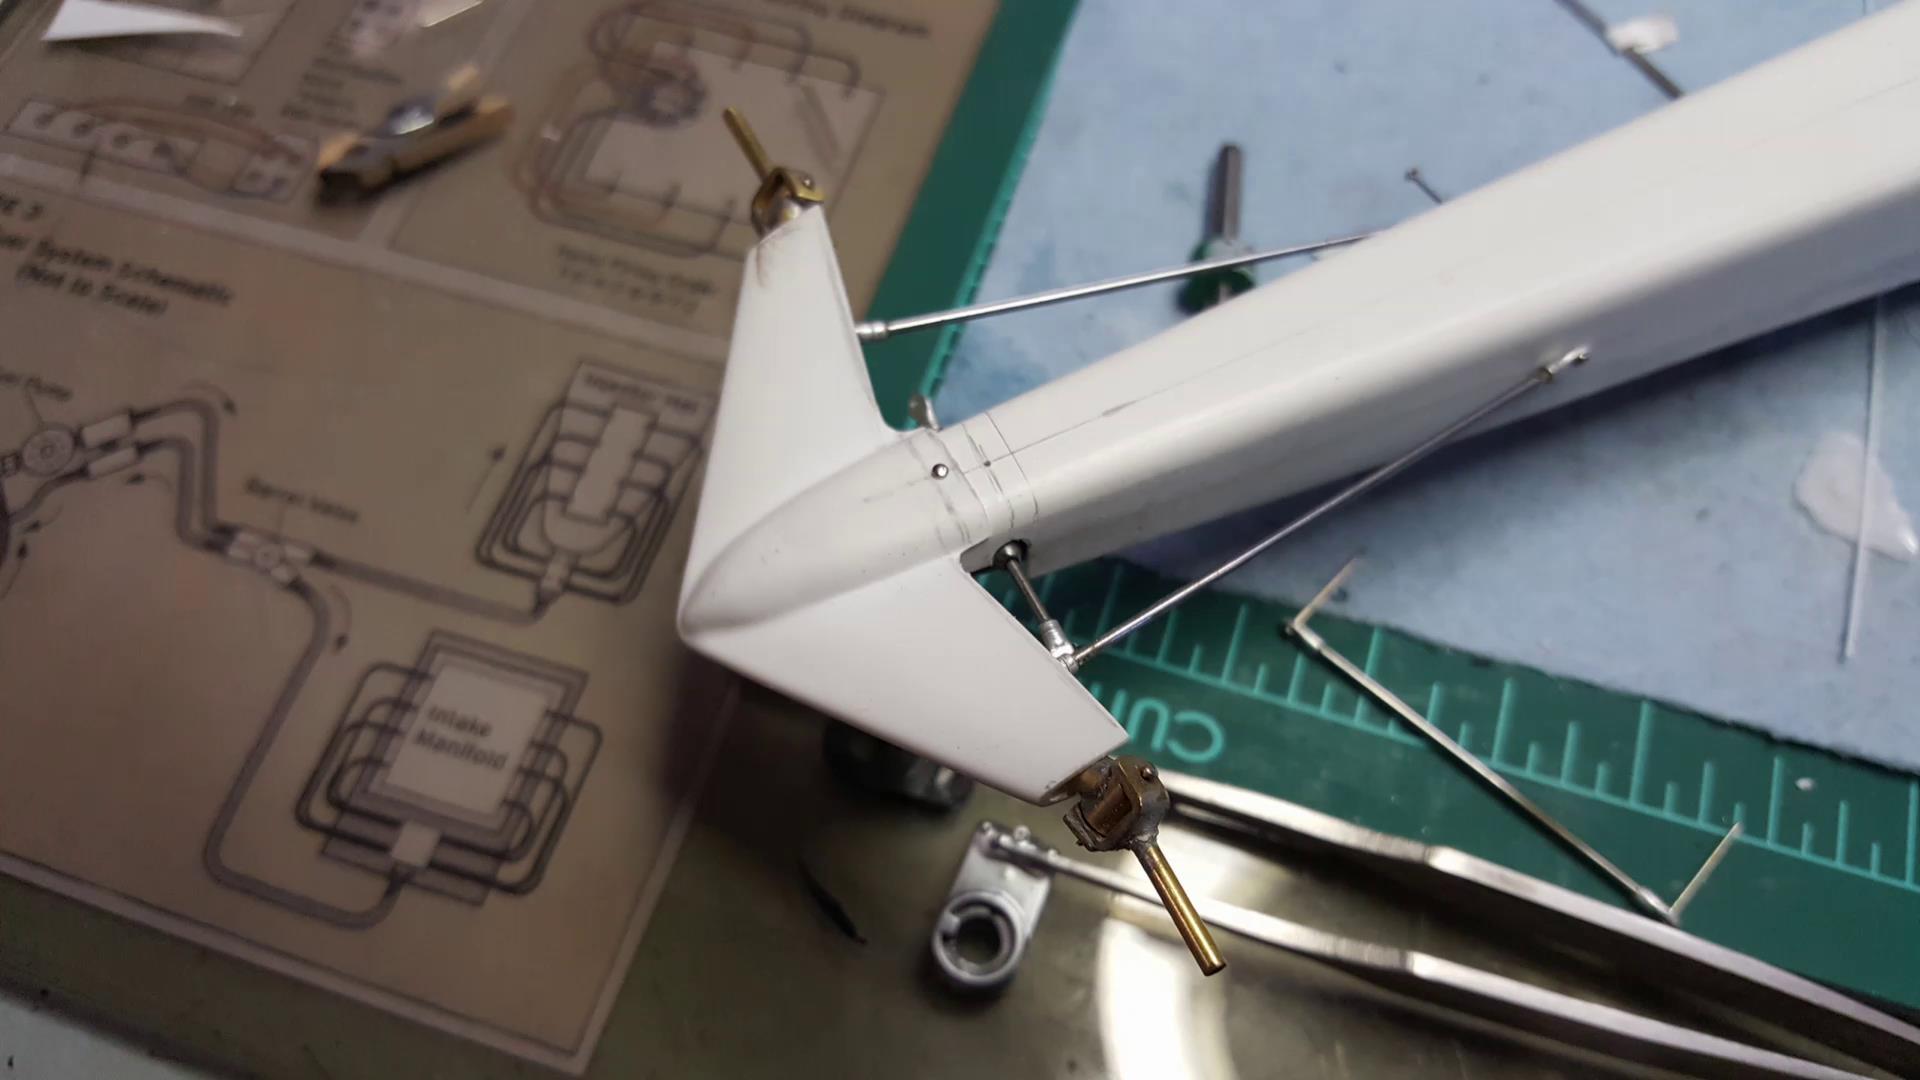
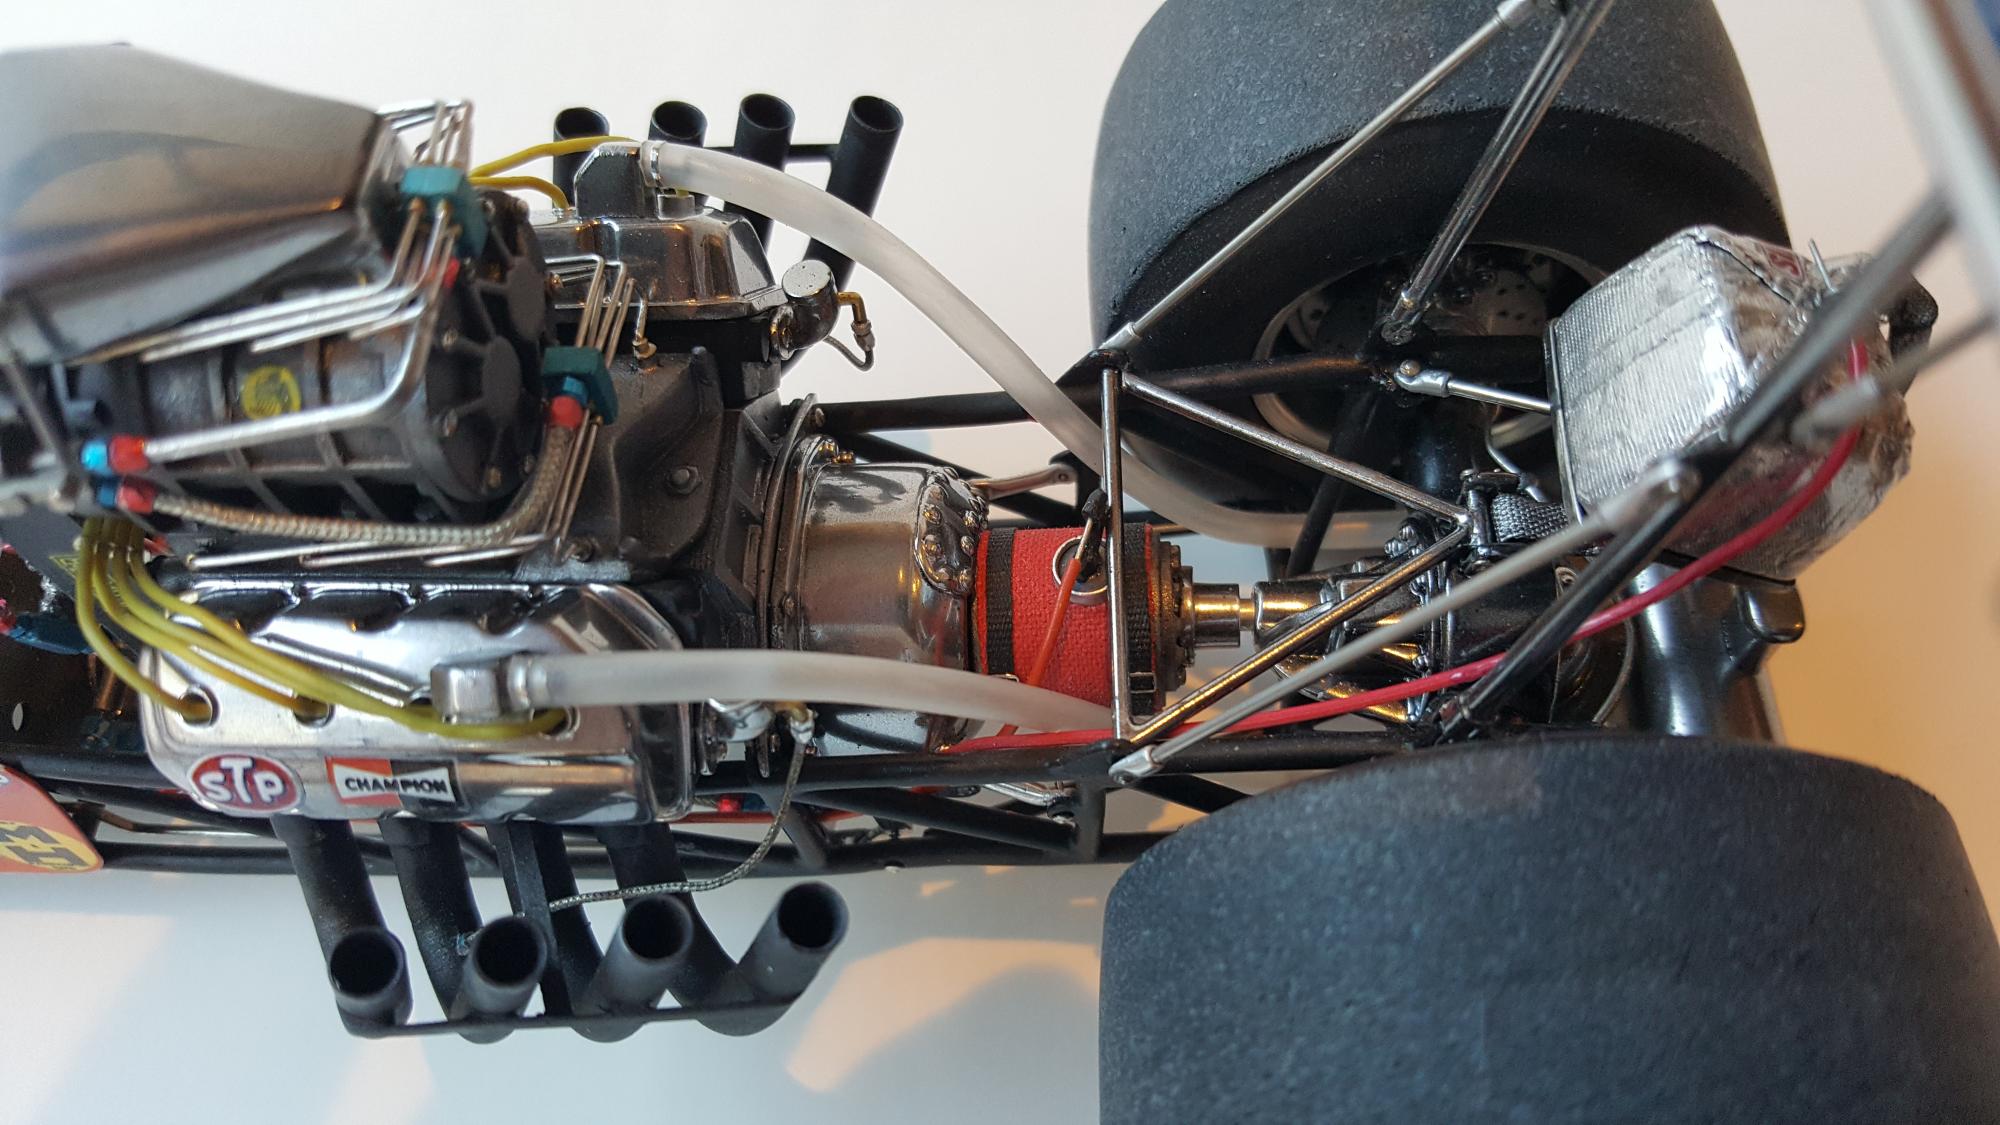
Hi All . I haven't posted anything for awhile but I'm back with my latest build. I decided a nice tribute to Dale Armstrong would be one of his rides and the one I liked most is his Satellite Alcohol funny car.I started with what i think was a Gooch resin satellite body then pruned and tweaked it to get that real slammed look and stance of the body. Made a custom chassis and fabricated a new intake manifold,body tin of coarse, and a hand full of loose parts and bits. Made my own inkjet decals and used Molotow liquid chrome for the rims ,pretty cool paint. I also made a custom fuel cell and chassis tins covered with the' tie dye ' anodizing look with decals Ive made. I'm also working on the companion alcohol dragster he ran at the same time

-
Thanks again for the feedback, it helps me keep going.
-
Thanks to all for such great and fantastic responses I'm glad I can make something that's never been built before ,that's my fun in model making and I hope I can get it worked out to where the decals I made for this can be available through Slixx or some other decal makers that can properly print them on an alps printer. More to follow Thanks again, Mark
-
Thanks for all the wonderful responses, I was asked to put up some WIP pics and some more of the rear drive train .These are what I could find. If anyone wants to know whats wrapped around the engine in a couple of shots It,s wax Parafilm sold my Micro Mark, It helps protect the chrome bits without leaving a film or rubbing the chrome off . Oh and the printer I am using to make my decals is a Canon iP7220 inkjet printer
-
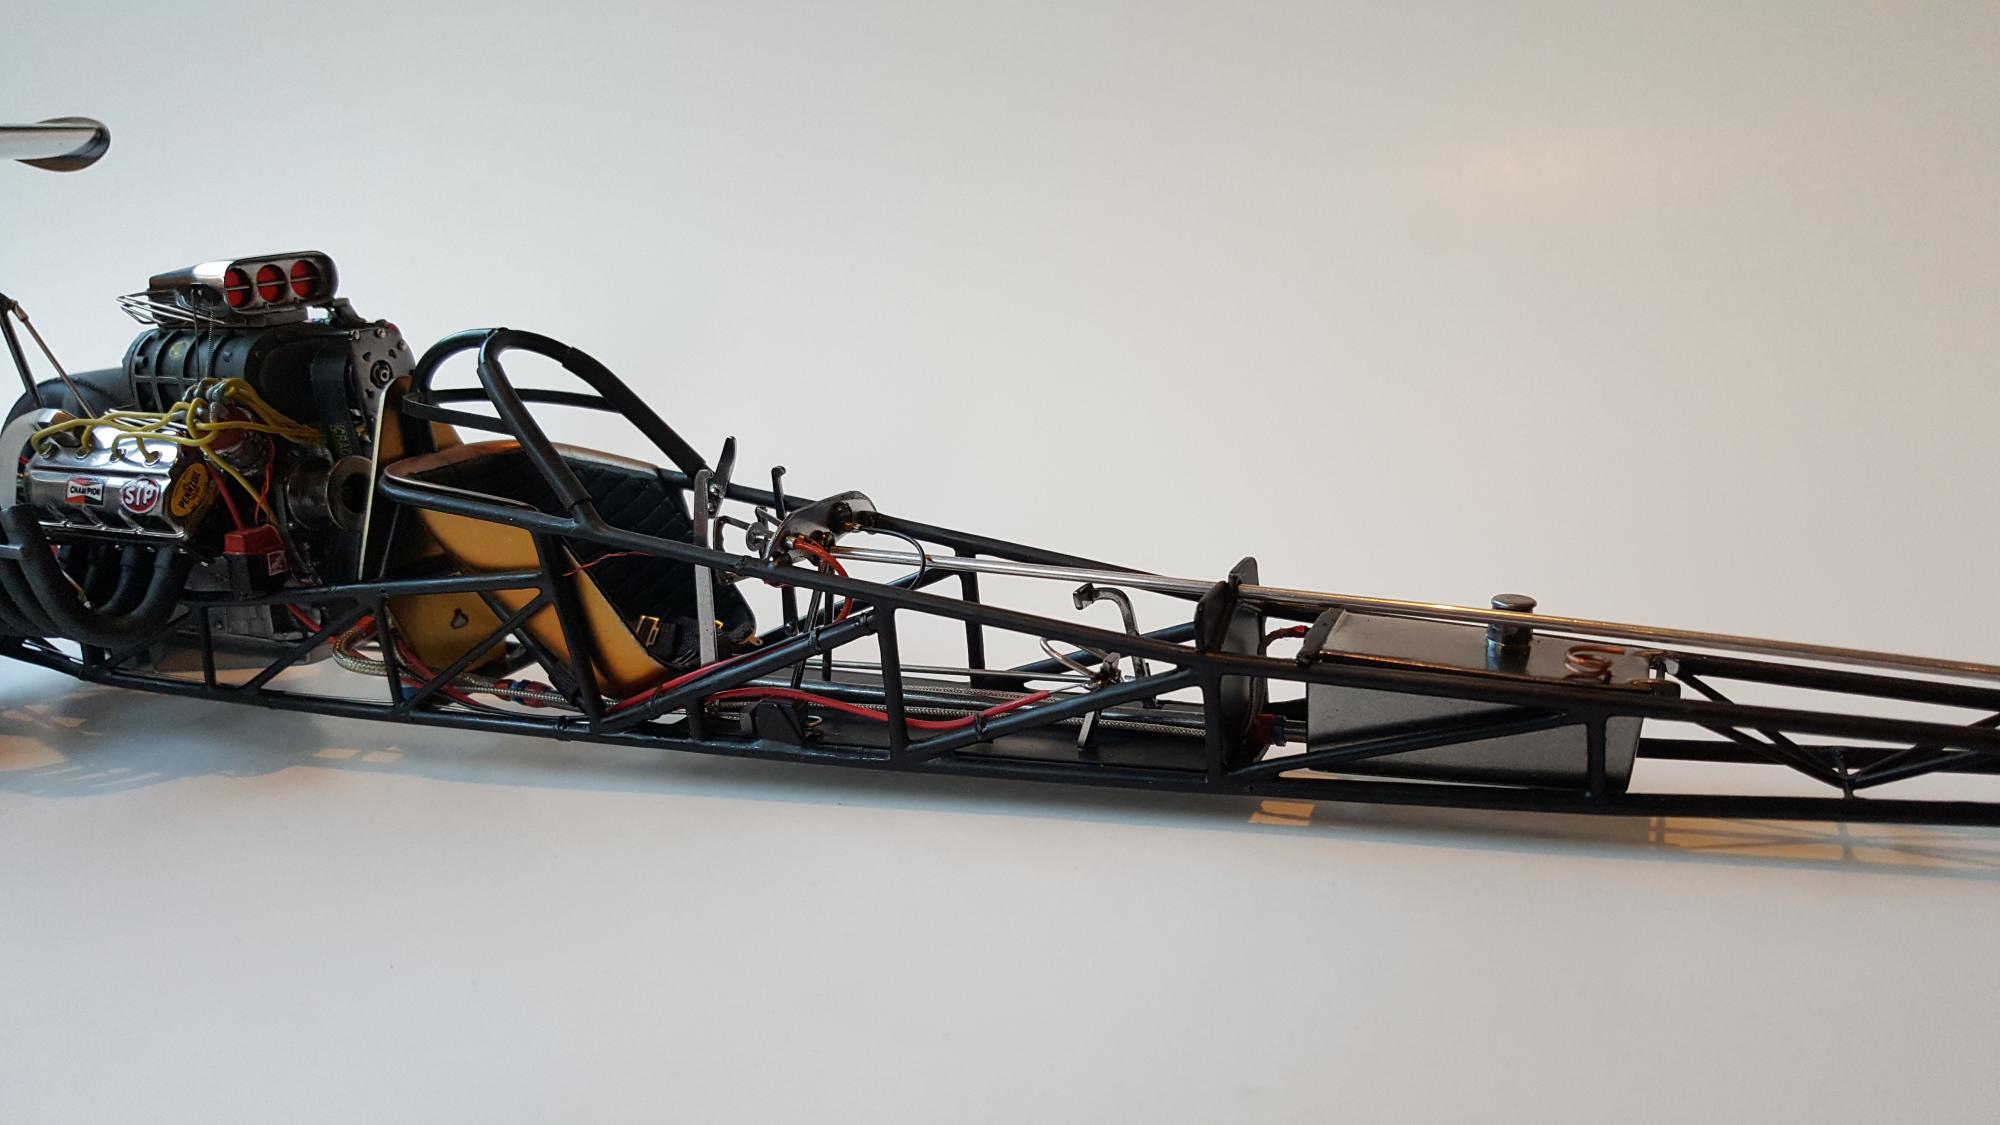
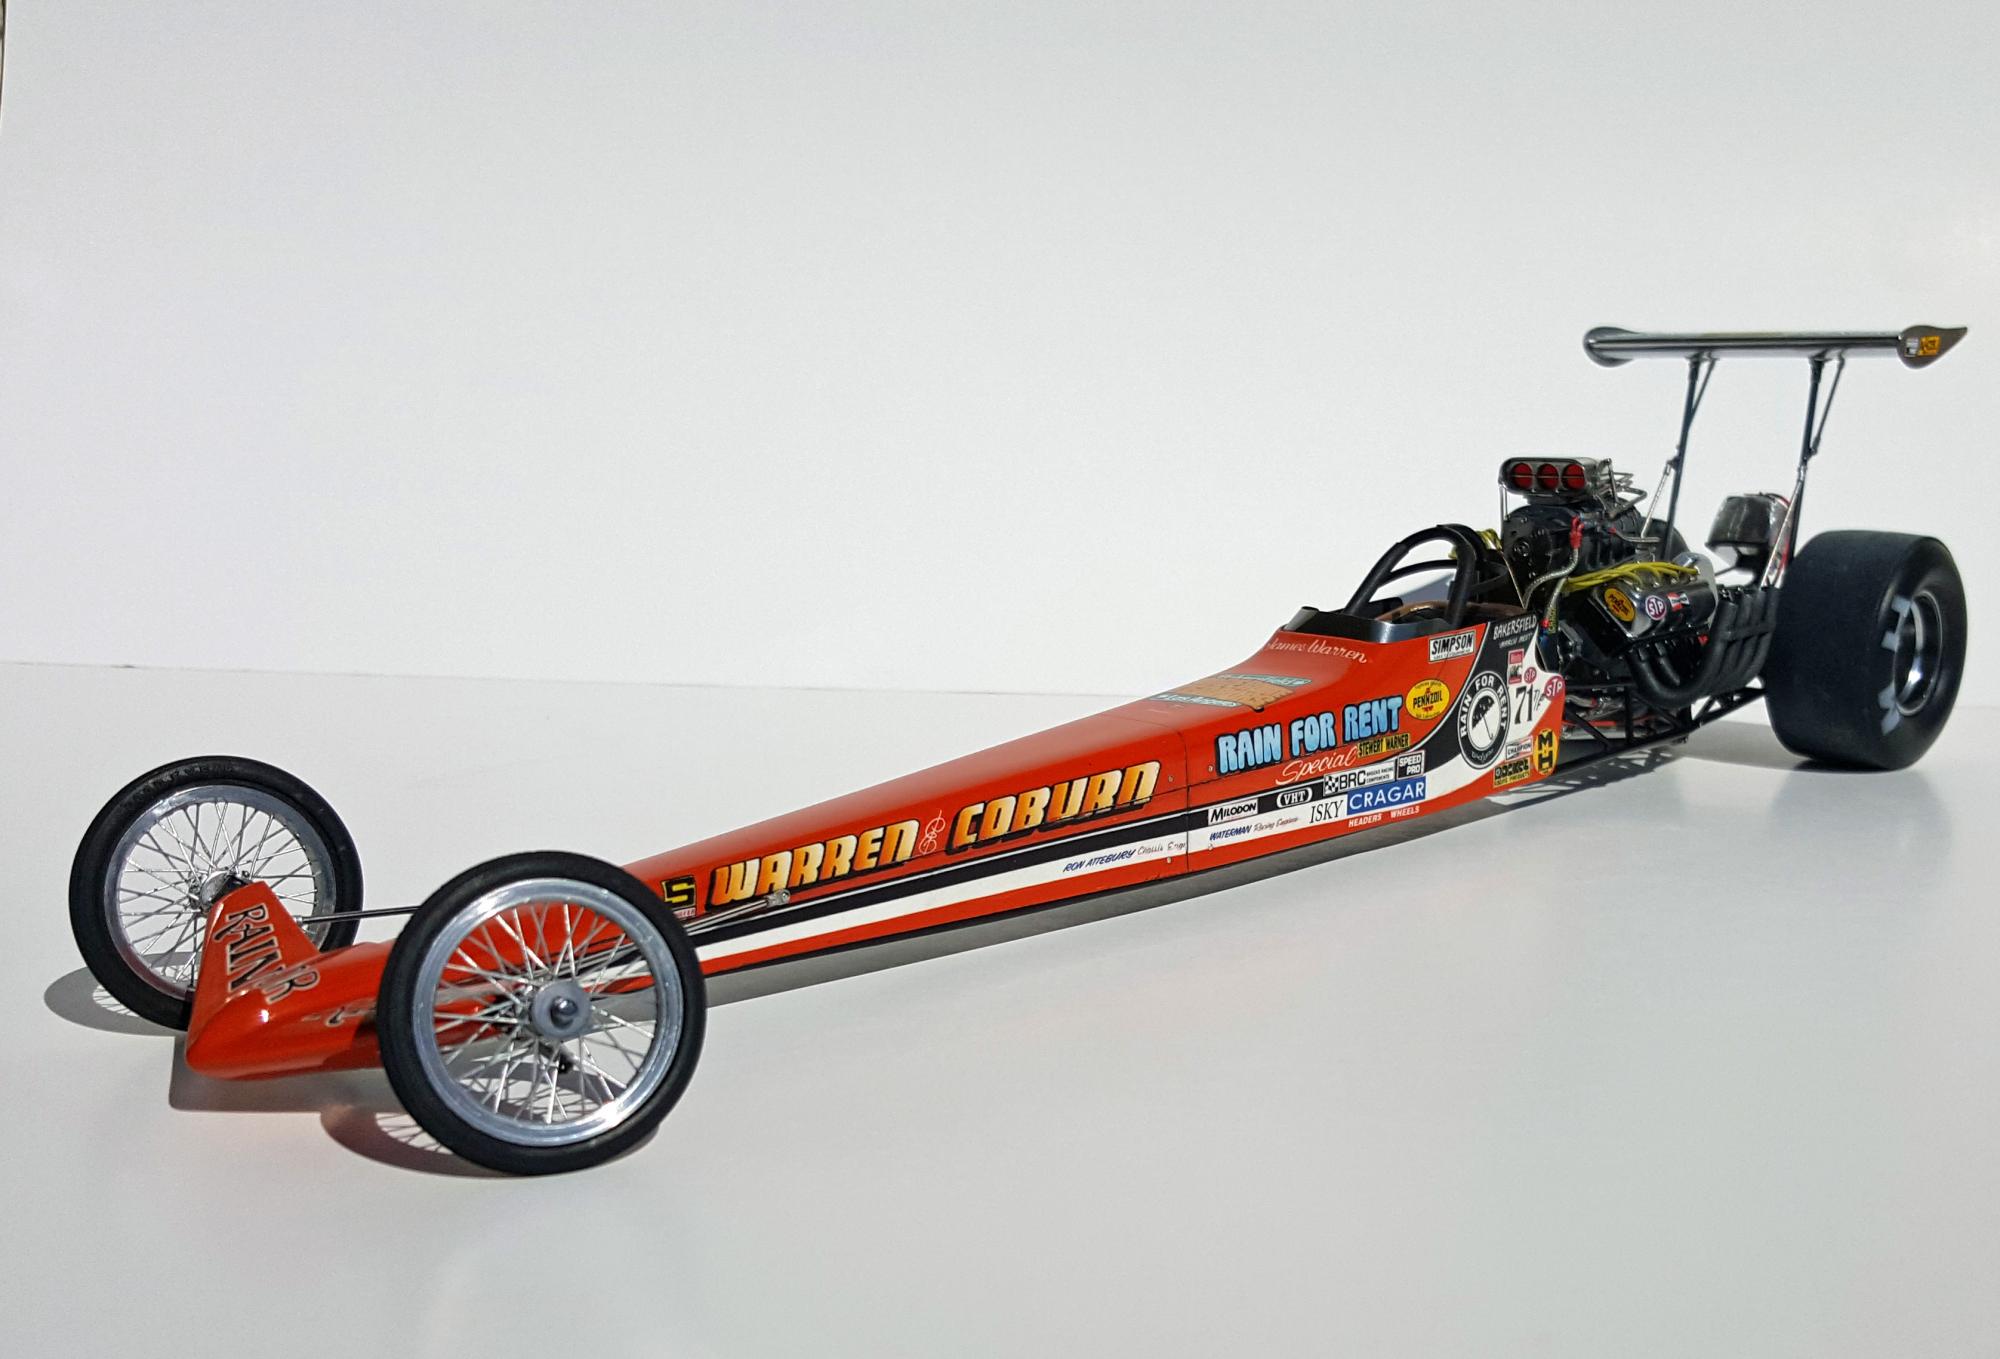
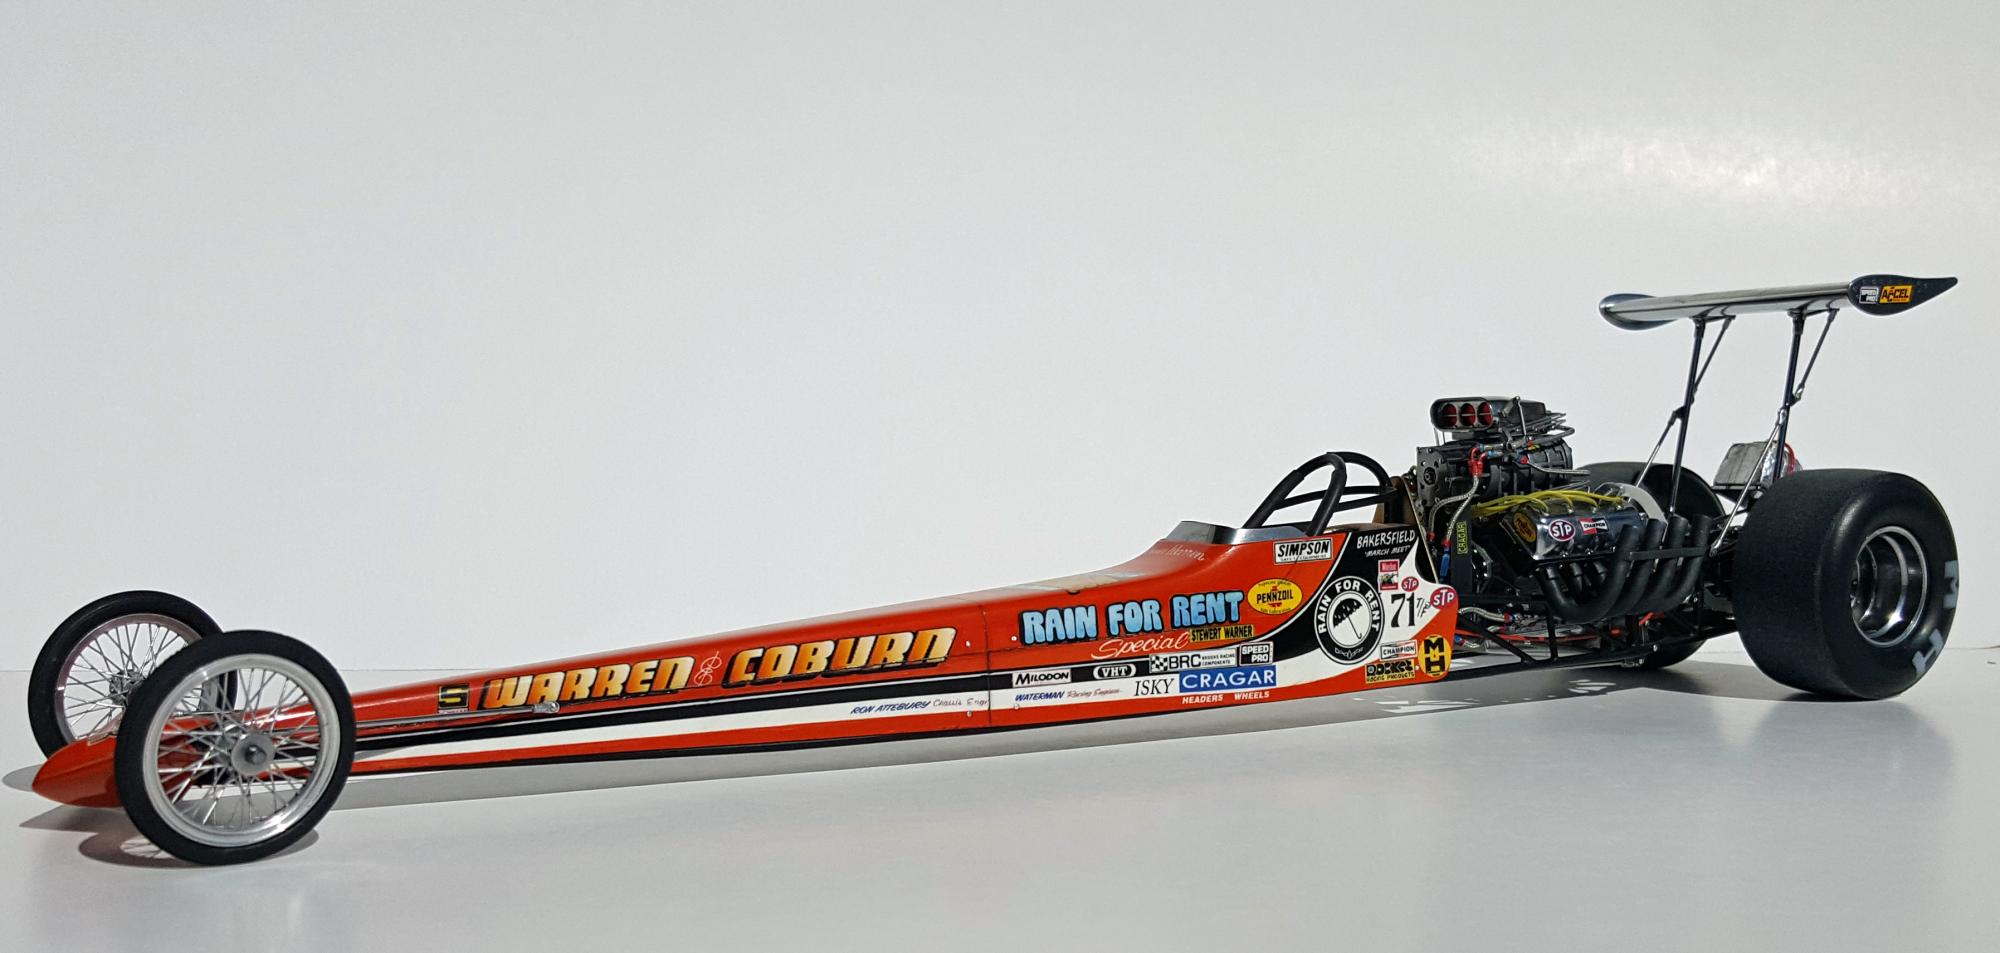
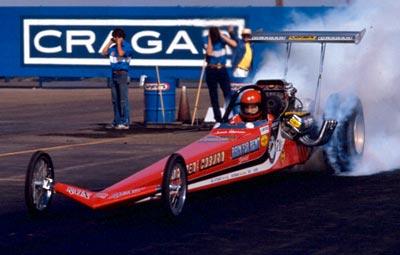
Just finished my first large scale build. I've always wanted to do this build seeing this race all the time when I was a kid. It's based on Revell Prudhomme ARMY dragster. The only scratch stuff is the front axel,( they notoriously break), the wire wheels from I believe Micro Nitro. I built a Dannekas blower and made a new axel fairing connected to a one piece vacuform chassis skin. And I made the decals for this as well. Thanks for lookin, Mark
-
 Great as always, can't wait to see it on the table.
 -
The rear tires are from the later Revell funnycar kits. I put the tire on a mandrill and sand them flat first to get rid of the injection marks then round the side walls to get a fuller look to them.The two half tires that came with the old kits just didn't do it for me. I made a M&H vacuform stencil for the logo just like the company did. thanks
-
Thanks for the great responses,I agree that AMT had some interesting funny cars but I don't ever remember that satellite body ever being a real car.
-
Here are two cars I did not too long ago. I wanted to do a different version of the Trojan Horse and wasn't too thrilled with the AMT kit so I started from scratch. It's a curse most of us modelers are afflicted with. I modified the comp resins mustang body by stretching it a little, adding wheel humps, and changing the angle of the spoiler. Scratch built the chassis, fuel cell, headers,header covers,and all the tinwork.I remolded the body with the alterations and decided to try to make a mini metal flake gel coat body.I sprayed two part urethane clear coat into the silicone mold, spread the metal flake over the clear while its still wet. Then I let the clear coat cure completely removed all the flake that didn't stick to the clear coat then backed the metal flake with black tinted resin. Doing it this way helps keep the outer details intact without wiping everything out with metal flake plus clear over that. I also made the decals cause I like the deep purple blue rather than the AMT black. After going through all this I felt I needed to build the AMT Trojan Horse for a fun pure stock build, also to compare the two when all is said and done. Thanks for looking,Mark
-
beautiful ...just beautiful
-
Send me a PM , I think I can help ya out.
-
One of my favorites and a BLAH_BLAH_BLAH_BLAH fine job, well done
-
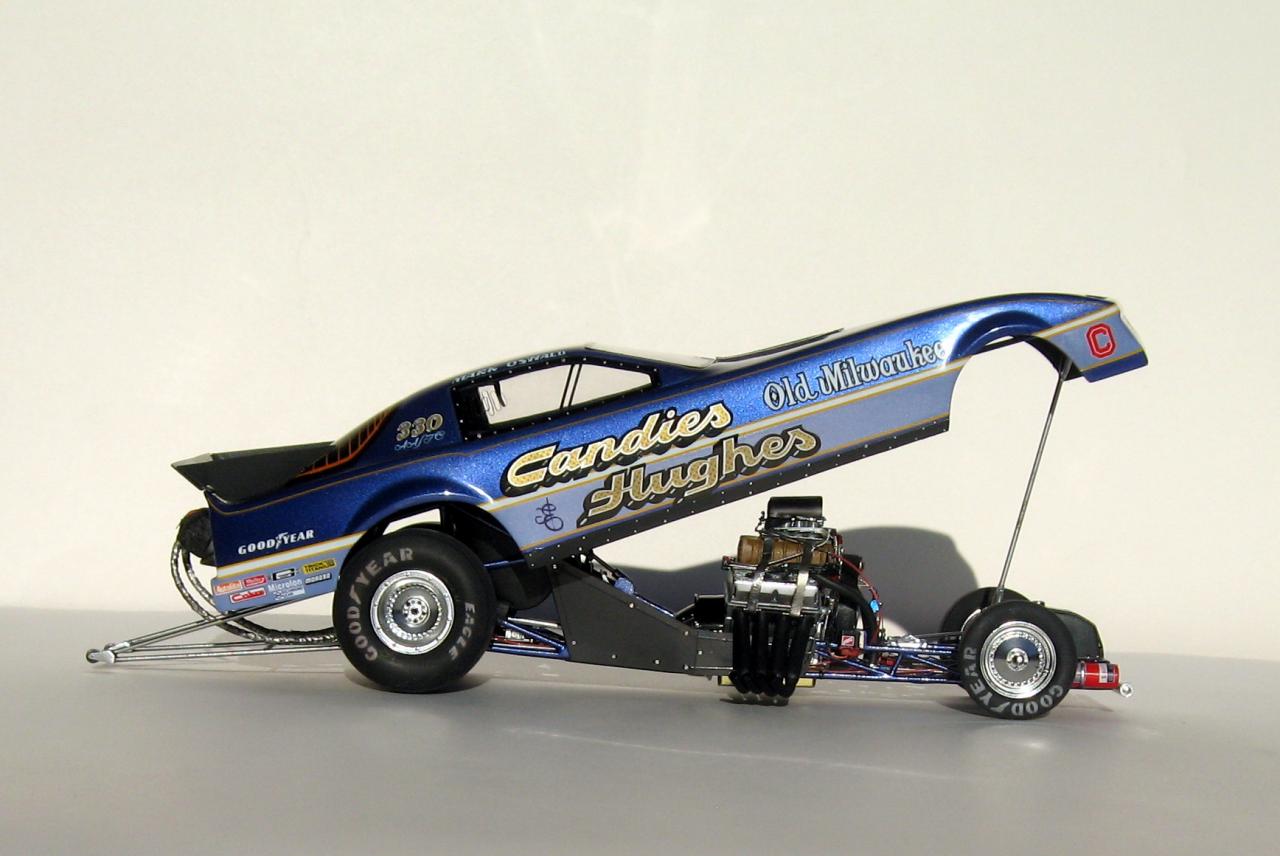
WIP 84 Candies&Hughes funny car 1/24
MoparMark replied to MoparMark's topic in WIP: Drag Racing Models
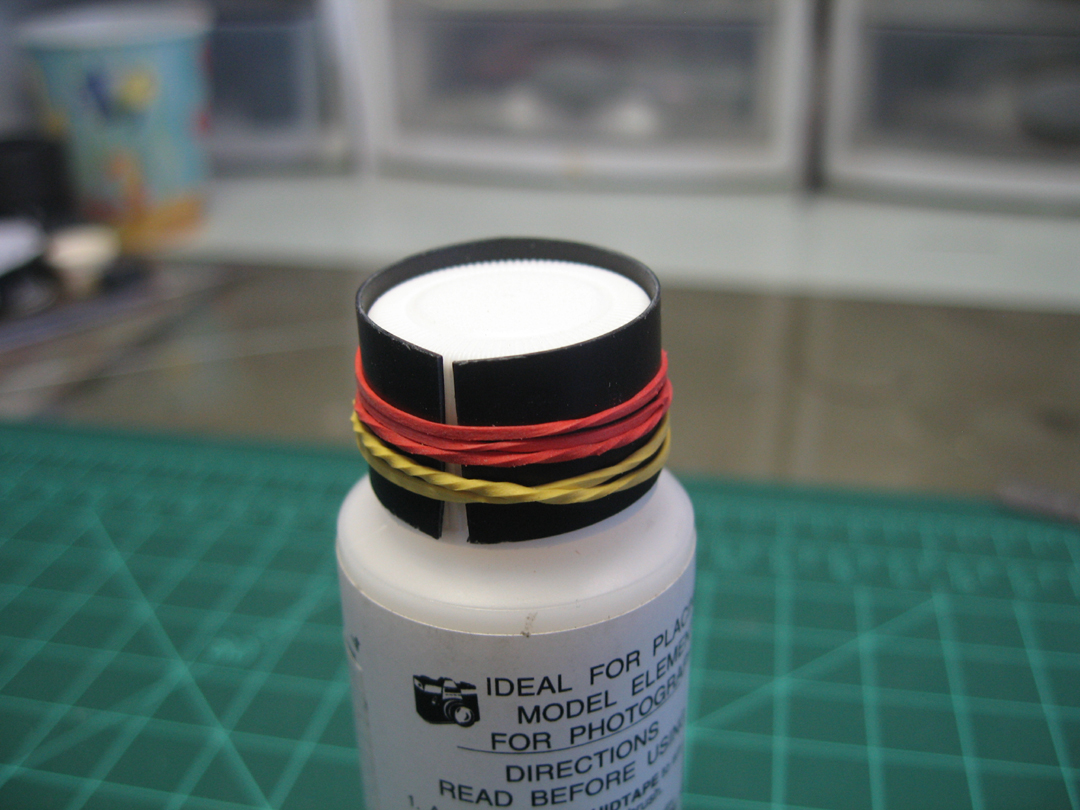
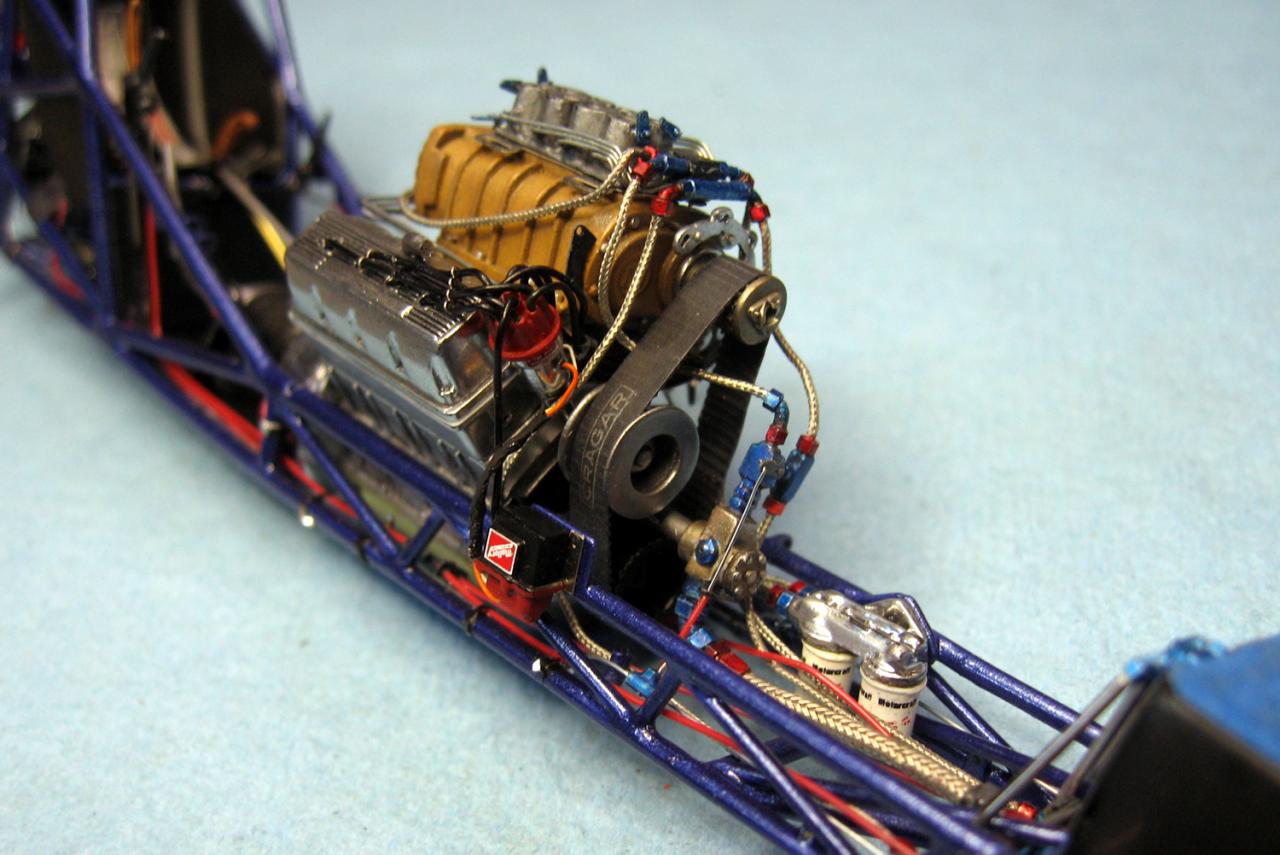
Here's a shot of the underbody for krazyglu. As for the blower belt some of you were asking about, here's how I made it. This may get put in the tips and tricks section but here it goes. First I got Evergreen .020 black styrene sheet, cut a strip to go around a microscale bottle cap. Any polypropelyne cap will do. Wrap it tight with rubberbands and through cappillary action drop liquid styrene cement on the top of the cap and it will fill the v groves from the cap. Let it sit for an hour or two and unwrap. The black styrene will have the impression of the v grove and be quite plieable,you can straighten the strip and get the slight curve out of it as well.Be sure to put it between a small piece of paper towel and then something flat and heavy and leave it for several hours maybe a day to be sure all the styrene glue is evaporated out of the plastic. Once dry I backsand the smooth side to desired thickness and it starts getting much easier to bend around the pullies. Speaking of pullies you can use the excess to wrap around stock tubing to make pullies that will mesh with your belt. It's real easy once you give it a few tries and the light bulb will go on for other uses and larger scale stuff as well. Thanks for the interest
-
WIP 84 Candies&Hughes funny car 1/24
MoparMark replied to MoparMark's topic in WIP: Drag Racing Models
Thanks for all the great comments to all. Charlie, thanks again for the top notch parts, and thank you John, I'm looking forward to seeing your new stunners at the next show and have a good chat as well. I'll try to post some pics of the underbody for ya krazyglu and I hope I have the body supports in the right spots. The guys at the NHRA museum had me firmly wrestled to the ground before I could jump the ropes and get the body up for a look. -
1/16 Scale Army Vega Funny Car - Finished 10/14/2018
MoparMark replied to Mooneyzs's topic in WIP: Drag Racing Models
WOW! This is turning out just amazing. If it's not too big a trouble, could you please if you can, throw a quickie mold on every single solitary part on this beauty. Just the things that are between the front bumper to the end of the wheelie bar, just those areas would be cool, a great boon to modeldom for the ages. If ya wanna, just sayin'. -
WIP 84 Candies&Hughes funny car 1/24
MoparMark replied to MoparMark's topic in WIP: Drag Racing Models
Well I finally got er done. Thanks again to Charlie at Pro-Tech for the braided line,all the fittings, plug wire, and chute kit to help make it look right. I used testors true blue pearl with a little transparent magenta to shift the blue towards the cooler purple tone. I also used Slixx decals and separated the Candies from the Hughes to match the car a little better and also sctatchbuilt the rear air foil as well. Thanks Art for the kudos, there were alot of great builds at the LLC NNL and was happy to be there,I didn't think I had a chance. About the blower belt, dragcarz, I made it myself and I'll post a little somethin' in the tips and tutorials topic in the forum pretty soon. Thanks again for the interest.
-
Hi all, I'm getting together info for my next build. Does anyone have a spec sheet for Larry Fullertons 74 or 75 Mustang II Trojan Horse funny car? I checked Draglists and didn't get anywhere. I'd like to get just the wheelbase if that's allI can get and any ref pics would be a huge help as well. Thanks for any help
-
Looks fantastic so far can't wait to see more. Go Charlie Go.
-
1/16 Scale Army Vega Funny Car - Finished 10/14/2018
MoparMark replied to Mooneyzs's topic in WIP: Drag Racing Models
Just constantly amazed when I check in on this true work of art. -
WIP 84 Candies&Hughes funny car 1/24
MoparMark replied to MoparMark's topic in WIP: Drag Racing Models
Thanks for the great encouragement guys. It's truly a sad day when you hear about another one of the great titans of the sport passing into the book of legendary heroes. RIP Paul Candies -
WIP 84 Candies&Hughes funny car 1/24
MoparMark replied to MoparMark's topic in WIP: Drag Racing Models
Thank you for the comment . I'll have to check it out and get a bunch of em'. thanks again -
WIP 84 Candies&Hughes funny car 1/24
MoparMark replied to MoparMark's topic in WIP: Drag Racing Models
Yeah Mike , I was underwhelmed with what was out there so I made my own vacu-form buck that I can put on a dental 4"x4" vacuum form machine and pull .020 black styrene over it and add the ribs on top before painting -
WIP 84 Candies&Hughes funny car 1/24
MoparMark replied to MoparMark's topic in WIP: Drag Racing Models
Hi All , I haven't been on in awhile so I thought I'd post some updates on my project. I have put in the engine and checking to make sure everything is lining up good Have the engine finished and bolted in still using Pro Tech braided lines and fittingsaand the headers are brass with aluminum tips. I have the chassis done except for the wheelie bars,fuel cell cap,and front hub covers. Did all the body shop work ,pulled the nose out a little bit and took the Revell/Monogram rear spoiler off to put a more correct spoiler to the 1:1 deal. I laid down the paint using Testors aqua colors, Arctic Ice Blue with a little Kandy Scarlet and some PearleX Micropearl powder to give it a bit more of the violet feel I got when I saw the real Magilla at the NHRA museum. I custom mixed the lighter base color on the bottom and dusted a clear coat over that with a Micropearl and a scoach of violet pearlex powders mixed in to the clear Well I can't wait to get into doing all the decals and tinwork, Thanks for lookin'
-
1959 Imperial drag car. COMPLETED 5-26-13
MoparMark replied to am73grand's topic in WIP: Drag Racing Models
Really cool , Great idea!