peteski
-
Posts
8,157 -
Joined
-
Last visited
7 Followers
.thumb.png.e64ca4fead948adbdf6a111229b6cf2f.png)


Recent Profile Visitors
14,238 profile views

.thumb.jpg.e12e5df0ccf757b78eedbb1abdd7fb95.jpg)


peteski's Achievements
MCM Ohana (6/6)
-
I still chuckle that a thread with a very vague click-bait type of subject line, simply warning about a certain type of spray can primer has developed into a mega thread with over 150 replies so far (with many OT responses) and still going strong. Bravo! Fun stuff!
-
Another PM? I find that humerus! Maybe Monty will spill the beans to all of us. I suspect I might know the reason for secrecy.
-
Hmm, might be time to get one of those since I still have the older release from Revell without a windshield. That will make the build easier.
-
I use spray cans and airbrush too. Nobody seems to understand what I'm trying to convey. There are modelers who are simply airbrush-averse. They don't own and don't want to own an airbrush because they say that airbrushes are too difficult and time consuming to clean. That is their whole excuse for not trying none.
-
Any super glue (CA), especially thin viscosity CA should bond vinyl very well. Using accelerator helps too. But you have to make sure the glued surface are very clean (use 99% Isopropanol or Naphtha). There is also the adhesive used by plumbers to weld PVC (vinyl) pipes, but I would not recommend it (too stinky and messy).
-
When someone tells me that they use spray cans because they don't want to deal with the hassle cleaning out the airbrush, to me that is lazy. Period. If you call this "an attitude", so be it. I guess you can argue about this 'til the cows come home. but I'm not changing my mind.
-
I didn't specifically mean you, but I have seen many modelers use the excuse that airbrushes are too much hassle to use when a spray can is easy to deal with. Personally I think it is a poor excuse, but that is what they use. SUre you have to clean the airbrush (which usually involves shooting some lacquer thinner through it - no real hassle), but spray cans aren't perfect either. They can also clog, sometimes with no way to unclog them, and you have very little control of the paint and air pressure, which to me is important when spraying small objects (like model parts). Airbrush is like a scaled down spray gun, so it is perfect for painting miniatures. I used to use Testors and Pactra hobby spray cans in my earlier modeling years, but as my techniques advanced, I switched to airbrush. But when a task requires (for example spraying a body shell of a 1:8 scale model car), I will use a standard spray can of paint. For example I used a large spray can of black epoxy appliance enamel to paint a 1:8 Pocher Mercedes 340K. Using the right tool for a specific task usually gives optimal results.
-

Food Dehydrators & Paint Dryers
peteski replied to JayVee's topic in Model Building Questions and Answers
To me 140 deg. F seems a bit too hot for comfort. I don't run mine for more than around 110-115 deg. Also, some formulations of polystyrene or ABS plastic (and urethane resins) can be more sensitive to temperature than others. -
I wonder if Atlantis added an actual molded windshield, or just give you a small piece of clear styrene sheet?
-
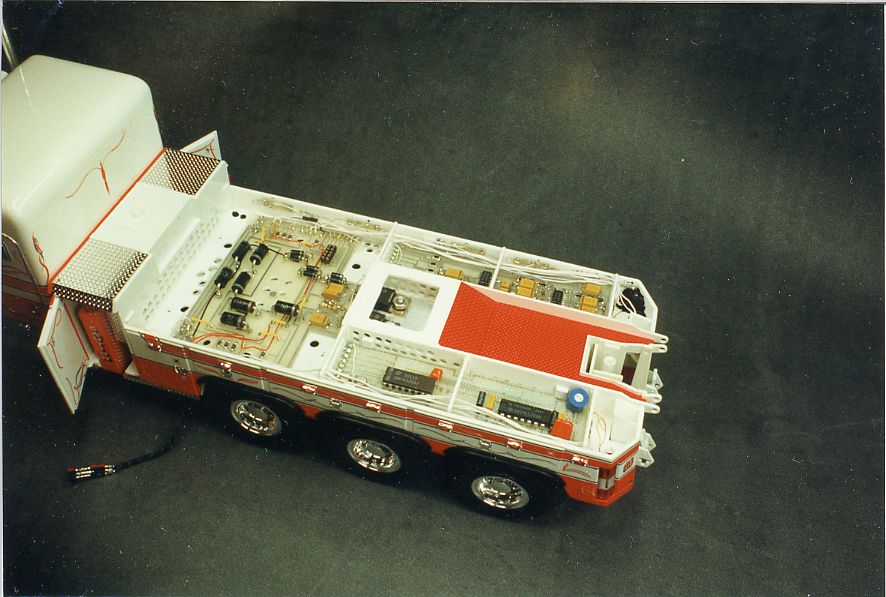
Tutorial: Creating LED wiring harnesses for your builds.
peteski replied to Duddly01's topic in Tips, Tricks, and Tutorials
Now that makes sense (to someone who has been dealing with various LED-based designs, not just for models for over 40 years).
-
Tutorial: Creating LED wiring harnesses for your builds.
peteski replied to Duddly01's topic in Tips, Tricks, and Tutorials
Well, some LEDs (of certain colors have lower forward voltage than others. Without getting too technical, for example a red or yellow LED has a lower forward voltage and will "steal" all the current for for example a white or blue LEDs which have higher forward voltage. in your circuit a resistor shape appears to be visible under the heat shrink right next to the LED. Do you cut those resistors off? -
And lazy, not wanting to clean the airbrush after each color, and after the painting session. I see that excuse mentioned often. But I think it also boils down to the fact that military modelers are more fastidious than average automotive modelers. The seem to strive for better quality and fidelity in the models they build. And like Steve said, many go for a quick build rather than a super-detailed model which takes months to build.
-
Tutorial: Creating LED wiring harnesses for your builds.
peteski replied to Duddly01's topic in Tips, Tricks, and Tutorials
With those, don't forget to use resistors in series with the LEDs. Even Design LEDs have the resistor installed next to each LED (in heat shrink tubing). -
As I understand the old address came directly from a Google search. Google has stale info.
-
That's true, the pictures have to fit the width of the forum window. But you can also resize them within the message. After you add the photo to the message just double click on the photo in the message and that will bring up "Image" popup. There, you can specify the width you want (in pixels) making sure that "keep original aspect ratio" box is checked, then click on "Update" on the bottom of the popup. You can edit the same photo multiple times this way to get the photos in the size you want. And if you uncheck the "aspect ratio" box and start manually messing around with both photo dimensions, you can end up with a distorted image. This process doesn't resize the actual uploaded picture, it just modifies how the picture is displayed in the message. Here's an example. The top pictures (all from the same original link) have been resized to 100, 150, and 200 pixels across, and the bottom picture is the original size as it was uploaded to the forum. With the 3 photos in-line I inserted couple of spaces between them. Here is the distorted photo