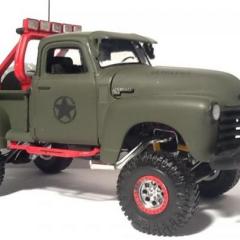
Jay's Customs Posted December 4, 2015 Share Posted December 4, 2015 This is my 1967 Chevelle that I built box-stock except for the wiring. It's the Revell '67 Chevelle ProStreet. Here's a picture of it's box-stock stance. Here's a shot of the rear. Here's one of the interior. This one is the engine and the engine bay. (Box-stock except for the wires) And last but not least, the undercarriage. Feedback is appreciated! Thanks for looking! Jay Quote Link to comment Share on other sites More sharing options...
Jantrix Posted December 4, 2015 Share Posted December 4, 2015 (edited) Feedback is appreciated! Thanks for looking!JayNot to bad Jay. Since you asked for feedback, here goes.That sharp ridge on top of the fender in the first pic. Thats a line left over from the molding process and it should be removed. Try some sanding sticks from the nail care area of your local beauty supply store. If you're not sure what is a mold line and what is a body line a Google search will help you out. Mold lines will be on near every part.30 gauge wire is about the largest wire you can get away with for ignition. This is what I use. https://www.radioshack.com/products/wrapping-wire?variant=5717668293. A little harder to find these days but you can still mail order it. Its available in red, blue and white.Be a little more careful with how much glue you use. Get rid of the orange tube glue if you're using it and switch to a medium thickness CA glue like Zap-a-Gap. Apply it with a toothpick for best control. Use white Elmers glue for headlight lenses and other glass installation. It's water soluable and dries clear.Flat paints are softer when dry than gloss. Handling will scuff or damage the paint. So after the paint is dry, add your decals and coat it with clear dullcoat. It will make the handling that goes on during test fits and assembly a little more forgiving.Putting decals over flat paint is always a pain. the decals tend to "silver" and the edge of the decal shows. After the decal is dry a little dullcoat clear over them should prevent this.Over all it's a good piece. In the future, look into gtetting some Bare Metal Foil for the trim and applying a black wash to the grill and openings in the rims. Both will drastically improve the realism of your work. Shoot me a PM if I can help in any way. Edited December 4, 2015 by Jantrix Quote Link to comment Share on other sites More sharing options...
Jay's Customs Posted December 4, 2015 Author Share Posted December 4, 2015 Thanks for all the feedback! Some of these things I knew, like the mold lines and headlights. Only, this is an older build, so it doesn't really matter to me. Thanks for the painting and wiring tips. The decals were really bothering me, so maybe I will use your trick on them. But, I don't really see what you mean about using too much glue though. Are you just talking about the headlights or something else? Oh, and one more thing. I had tried to blackwash the grill, but it didn't turn out very well, so I removed the paint and left it as it was. Once again though, a huge thanks for all your feedback. Quote Link to comment Share on other sites More sharing options...
TFchronos Posted December 4, 2015 Share Posted December 4, 2015 Awesome build! Quote Link to comment Share on other sites More sharing options...
Jay's Customs Posted December 5, 2015 Author Share Posted December 5, 2015 Thanks! Quote Link to comment Share on other sites More sharing options...
GMCMAN52 Posted December 5, 2015 Share Posted December 5, 2015 nice build the next one always get better then the last. so kept working on your skills Quote Link to comment Share on other sites More sharing options...
Jay's Customs Posted December 6, 2015 Author Share Posted December 6, 2015 nice build the next one always get better then the last. so kept working on your skillsThanks. It's true that my builds will improve (They already have). I actually got this last Christmas and started building it right when I got it. Quote Link to comment Share on other sites More sharing options...
crazyjim Posted December 6, 2015 Share Posted December 6, 2015 Keep on buildin'. Quote Link to comment Share on other sites More sharing options...
Cardz Posted December 6, 2015 Share Posted December 6, 2015 Looks pretty good. The sizecwire you used looks aboit the right size for heater hose. i also use the stuff from Radio Shac, 30 guage. look forward to seein your next one..cheers! Quote Link to comment Share on other sites More sharing options...
Recommended Posts
Join the conversation
You can post now and register later. If you have an account, sign in now to post with your account.
Note: Your post will require moderator approval before it will be visible.