gino Posted January 5, 2016 Posted January 5, 2016 (edited) got the engine assembled. used fine solder for the fuel lines, almost ready to install. Edited March 2, 2016 by gino
Petetrucker07 Posted January 5, 2016 Posted January 5, 2016 That looks really Gino. I may steal the fine solder idea.
cowboy rich Posted January 5, 2016 Posted January 5, 2016 Looks really nice I like the details you've already donr
Old Buckaroo Posted January 5, 2016 Posted January 5, 2016 Nice work on the engine ! It is a purty color - I am anxious to see what you have planned for the truck and chassis.I have been a fan of solder for years making piping and exhaust curves.
gino Posted January 5, 2016 Author Posted January 5, 2016 thanks guys ! engine + exhaust installed in the chassis, waiting for the radiator to dry. now must paint and assemble interior as soon as I decide on a color. i'm thinkin red or brown any suggestions ?
Tesla Posted January 5, 2016 Posted January 5, 2016 Fantastic work Gino! Great job on the engine detailing. I will definitely try the solder.
gatorincebu Posted January 5, 2016 Posted January 5, 2016 Gino, Real nice work on the motor > And I like your paint scheme! Be Well Gator
Chu Posted January 6, 2016 Posted January 6, 2016 Hi Gino, Great job on this KW I like it. I have a question: what kind of tool and wiring did you use for the engine? I'm looking to attempt to the engine of my B.R.B.O project.Thanks Jesus.
jacobus Posted January 6, 2016 Posted January 6, 2016 nice work , like the engine towil see how it comes together , great workjacobus
gino Posted January 7, 2016 Author Posted January 7, 2016 thanks for the kind words guys ! Jesus, the tool I used to drill with is called a pin vise. it's a hand tool that holds small drill bits. i also have many drill bits for just about any small drilling need. for the wire I used .032 solder wire. it's very soft and flexible. hope this helps. please ask if any more questions, I will be glad to help you !
Chu Posted January 7, 2016 Posted January 7, 2016 Thanks Gino That would help to my project I would like to stat with the engine first!! Yours look great!! Thanks once again. Jesus thanks for the kind words guys ! Jesus, the tool I used to drill with is called a pin vise. it's a hand tool that holds small drill bits. i also have many drill bits for just about any small drilling need. for the wire I used .032 solder wire. it's very soft and flexible. hope this helps. please ask if any more questions, I will be glad to help you !
gino Posted February 23, 2016 Author Posted February 23, 2016 hey all, made some progress on this one, been sitting too long should finish it. I got work done on the interior, I used the side door grab handles, the clutch pedal, and the lower dash center with the heater and ashtray from the revel Germany kit to try to spruce things up a little bit. since it's a custom I left the dash in bare metal foil. I painted the steering wheel red and after it dries will install. painted the fuel tanks, I didn't want plated tanks on this truck so I used the kw coe aerodyne tanks I had in the parts box and made the brackets by cutting them off the snap kits tanks. I cut out the tanks ends and will install plated ends from the Louisville short hauler kit. that's it for now.
Old Buckaroo Posted February 23, 2016 Posted February 23, 2016 Very Impressive work there Gino! Those fuel tanks will look really great with the plated ends. I love the headlights on this one.
gino Posted February 23, 2016 Author Posted February 23, 2016 thanks sean ! what started out as a simple work truck ended up being my first custom.didn't know what I was getting myself into but I like the way it's turning out .
Tesla Posted February 23, 2016 Posted February 23, 2016 Nice work Gino! You're doing a fine job on this build.
GearUpJammer Posted February 23, 2016 Posted February 23, 2016 Looking good Gino,sharp paint scheme and colors!
gatorincebu Posted February 24, 2016 Posted February 24, 2016 Gino, Very nice work thus far! i like what I see here. Be Well Gator
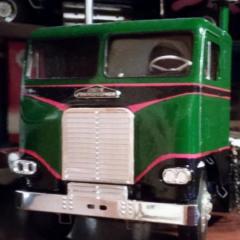
gino Posted March 2, 2016 Author Posted March 2, 2016 latest progess , I spent about six hours on this thing today. started with the foil work on the fuel tanks , the breather tanks, and the breather piping. after the foil was done I installed the fuel tanks on the frame. the next thing was to finish the interior , make the rear window out of acetate, install the front glass, and interior. the cab was installed and the exhaust pipes were installed. I love these pipes (purchased from rhino) I am not a big fan of the big pipes but I like the way these look. next came the breather tanks and the battery box covers. I found the mirrors and brackets from the revell Germany kw 900 kit. these took a while to install and make them look decent. the last thing today was the front bumper (purchased from rhino), I haven't taken the protective film off the bumper yet when these pics were taken. coming down the home stretch on this one, it was fun and I like the way it turned out. a few more details to do and will call this done .
Petetrucker07 Posted March 2, 2016 Posted March 2, 2016 That looks killer. I love the old and new touches to it. Well done man, can't wait to this done.
cowboy rich Posted March 2, 2016 Posted March 2, 2016 The whole truck looks great but the paint job is something else
Old Buckaroo Posted March 2, 2016 Posted March 2, 2016 The whole truck looks great but the paint job is something elseYes indeed, those scallops really make it stand out!
Recommended Posts
Create an account or sign in to comment
You need to be a member in order to leave a comment
Create an account
Sign up for a new account in our community. It's easy!
Register a new accountSign in
Already have an account? Sign in here.
Sign In Now