Randy D Posted March 19, 2016 Posted March 19, 2016 Hi Scott, You are doing a outstanding job on this one my friend!!!!!! Reading thru this thread makes me wonder about your motives convincing me to pick up that Revival kit Keep up the great work. ( Hope the house is getting close) Randy
Twokidsnosleep Posted March 19, 2016 Author Posted March 19, 2016 Hi Scott, You are doing a outstanding job on this one my friend!!!!!! Reading thru this thread makes me wonder about your motives convincing me to pick up that Revival kit Keep up the great work. ( Hope the house is getting close) Randy Hey Randy, great to hear from you The kit was a surprise but I am trying to wrangle it into shape Not many completed Revival kits when you do an Internet search...hmmmm House is at halfway point now...shifting to siding and inside work Cheers pal
Twokidsnosleep Posted March 19, 2016 Author Posted March 19, 2016 Coming along nicelyHey, thanks for looking in on me
Zoom Posted March 21, 2016 Posted March 21, 2016 Scott, I know what you mean.A little mock up make you feel better to, move on.Very nice so far!!
Twokidsnosleep Posted March 21, 2016 Author Posted March 21, 2016 (edited) Wow John, that is a beauty....Type 37 or maybe a Type 59 double overhead cam supercharged straight 8.Those cars were Bugatti's attempt to keep up with Alfa Romeo and Auto Union in the grand prix, but nope the Bugs couldn't keep up.Thanks for the pictures, it really helps to see the 1:1. Where the heck did you see her???Ahh I see spokes in the wheels, probably the Type 59 Edited March 21, 2016 by Twokidsnosleep
Twokidsnosleep Posted March 21, 2016 Author Posted March 21, 2016 Scott, I know what you mean.A little mock up make you feel better to, move on. Very nice so far!! Hi Bo, thanks for that...nice to think of seeing the finish line so don't get bogged down on details
GT4494 Posted March 21, 2016 Posted March 21, 2016 It is a type 59. Saw it when I visited Ray Jones at his house and then shop. Took a bunch of pics but should have taken even more.
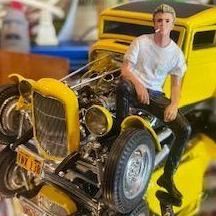
Twokidsnosleep Posted March 27, 2016 Author Posted March 27, 2016 And to prove I am a complete and total idiot, l picked this up for $30 at a local model show. Partially started, but have a look at the wire wheels when I saw the wheels, I was done and for such a great price it was all meant to be
Randy D Posted March 27, 2016 Posted March 27, 2016 Me thinks you need a 12 step program my friend I am so jealous, those wheels are awesome!!!!! Randy
Twokidsnosleep Posted March 27, 2016 Author Posted March 27, 2016 (edited) Me thinks you need a 12 step program my friend I am so jealous, those wheels are awesome!!!!! Randy Hi Randy Yes, I am addicted. Been working on metal for the last two months and it must have affected my brain! I talked with the super nice guy selling and managed to walk away the first time, but those darn wheels are just too gorgeous to pass up. I have seen listings advertise a set of wheels similar to this for $250 USD....so I am way ahead even if I use them on my Protar Ferrari 250 GTO You will probably find your Revival kit a walk in the park with your problem solving and manufacturing skills. Now I gotta get moving of this darn Bug!! Cheers Edited April 13, 2016 by Twokidsnosleep
TomZ Posted March 27, 2016 Posted March 27, 2016 Just discovered this thread. Awesome stuff! Love the details about improving the kit. Some day I'll step up to a kit like that.
Twokidsnosleep Posted March 27, 2016 Author Posted March 27, 2016 (edited) Just discovered this thread. Awesome stuff! Love the details about improving the kit. Some day I'll step up to a kit like that.Hey Tom,thanks for looking inI would never have started these kits withought encouragement of the guys on this site both directly and indirectly by showing their work.The modelling skill demonstrated by Randy, Cato, Harry, Bo.......just to name few, is awesome. When you do a work in progress (wip) it is even more fun as you draw out great help from others.So grab something that fires you up and get out of your comfort zone!! Edited April 19, 2016 by Twokidsnosleep
Cato Posted March 27, 2016 Posted March 27, 2016 It was wise to buy another Revival just for those wheels alone.But don't let it distract you from a real-deal Pocher build next. You're certainly up to speed for it. Finish this nice Bug and clear the decks (a lot) for your first classic Pocher.PLEASE!!
Twokidsnosleep Posted March 28, 2016 Author Posted March 28, 2016 It was wise to buy another Revival just for those wheels alone.But don't let it distract you from a real-deal Pocher build next. You're certainly up to speed for it. Finish this nice Bug and clear the decks (a lot) for your first classic Pocher.PLEASE!! Ok okIn the new workshop, I will have a standing height metal bench just for such Italian beauties. We are looking at August or September occupancy.The only question is which one to start with??I think the complete Alfa kit might be wise, then I can hack the second into a Muletto. I am leaving the Pocher Bugatti for a bit though.Oh and I did spend my time last night after chores taking apart the Revival Mercedes engine.....the seller said he couldn't get it apart as it was cemented?!?!?! Came apart like butter.
Twokidsnosleep Posted April 6, 2016 Author Posted April 6, 2016 (edited) Making parts again This time the shifter handle and the gas cap. These are very prominent and distinctive features of this car, so I wanted some solid metal, especially the gas cap with its's two wings. If I can swing it, I will make threads and have it screw on and off like the real one....have to find my large tap and die set packed deep away for our year long house build Aluminum shaft shifter with brass connector vs the plastic one Time for polish and then cut the top button off the sprue and paint it The gas cap under construction, immediately after soldering the ring to the shaped brass rod end...careful it is freaking HOT!!!! Wings to solder on in comparison with black plastic kit part. My scale looks a bit big, but in reality the kit part is much too small, so I upsized a bit (a lot) Edited April 6, 2016 by Twokidsnosleep
Cato Posted April 6, 2016 Posted April 6, 2016 Nice brass work Scott. You'll have good chrome details on your Pochers.
Twokidsnosleep Posted April 6, 2016 Author Posted April 6, 2016 Thanks Cato I pounded the aluminum flat from a round tube but found you have to be careful with it as it gets crumbly as you file. Maybe should stick with brass, might even re-make it Your chrome plating of parts ups the ante a bit in fabrication I was thinking of looking into a little home brew electroplating...try to re-visit grade 12 chemistry lab work
Belugawrx Posted April 6, 2016 Posted April 6, 2016 The gas cap under construction, immediately after soldering the ring to the shaped brass rod end...careful it is freaking HOT!!!! C'mon Scott,..... let's see your fingers,...? This is coming along beautifully, my man. Keep up the good work. Cheers
Twokidsnosleep Posted April 6, 2016 Author Posted April 6, 2016 C'mon Scott,..... let's see your fingers,...? This is coming along beautifully, my man. Keep up the good work. Cheers Ha ha Bruce, I did learn the hard way how hot and for how long the parts stay hot. Been quenching small parts in water to cool them if I need to touch them early...no burns, my fingers are too valuable for work. Still lots of polishing to get the brass nice again. I have a micro-particle blaster at work I still need to try out on such parts. Will construct all the levers and such and do some finished pics before assembly. I have always liked those photos of models with the finished parts layed out ready for assembly like a jigsaw puzzle
Cato Posted April 7, 2016 Posted April 7, 2016 Polishing for chrome needs to be flawless but you're not (yet) needing that level. But the method is about the same. I do this; fine files, wet / dry papers of 220, 400, 600 then a Dremel buffing wheel (cotton) with favorite 1:1 metal polish. Can use fine compound and even Novis too. Get the practice for those chrome windshield frames and running board strips...
Twokidsnosleep Posted April 11, 2016 Author Posted April 11, 2016 Here is the shifter finished and the brake lever complete Gas cap and brake lever Kit gas cap in place My gas cap with soldered wings Little refinement and some metal paint and all will blend. Not a bad weekend's work
Recommended Posts
Create an account or sign in to comment
You need to be a member in order to leave a comment
Create an account
Sign up for a new account in our community. It's easy!
Register a new accountSign in
Already have an account? Sign in here.
Sign In Now