Intmd8r Posted April 13, 2016 Posted April 13, 2016 Normally I don't care for this kind of build, but I'm really digging this one!Keep up the good work - can't wait to see how this one evolves.
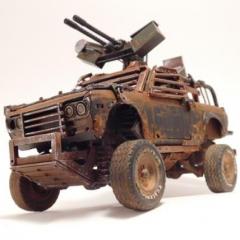
Daxman Posted April 14, 2016 Author Posted April 14, 2016 Great job, love the colors, please explain the hair spray technique, looking forward to seeing this in KC. Mitch, I do plan on having this and a few others at the KC show. I should be able to finish, right? I keep telling myself that.........Hope to see you there. The Hairspray technique. My first time trying it, I was not happy with the results. I built a post-apocalypse truck and I wanted it to be very weathered. I removed way too much paint. The small spots of white paint left behind didn't look natural. I should have made the top of the vehicle the most sun damaged and left more white paint on the sides of the truck. I chalk this one up to my inexperience. First time using the hairspray technique: http:// Here's the same truck using the salt technique. It turned out much better. http:// Here's a video that I watched to learn the hairspray technique. Overall I think the hairspray technique gives you more control. I just need more practice. https://youtu.be/6uUHN6SMQxo Here's the interior I've been working on for the Jet Rod. I added the center console with throttle and a joystick.What color should I paint the interior? http:// The kit comes with orange colored windows. I like the look, but will probably go with tinted clear windows. http:// http:// Thanks for the positive comments!
John Verkerk Posted April 14, 2016 Posted April 14, 2016 VERY KOOOL!!! Well done on the weathering !!!
Lunajammer Posted April 14, 2016 Posted April 14, 2016 So DIESELPUNK. I've got to give one of these a try and see if I can make it as good as yours. Very exciting.
Daxman Posted April 14, 2016 Author Posted April 14, 2016 So DIESELPUNK. I've got to give one of these a try and see if I can make it as good as yours. Very exciting. Dieselpunk........Where the 1940's and 1950's meets future technology. It's a cool genre similar to steampunk. If you had to put a label on the jet rod, it's 90% rat rod with a few elements of dieselpunk.
Daxman Posted April 17, 2016 Author Posted April 17, 2016 Ok more pics! I added 2 heat shields/deflectors under the running boards. I figured running boards melt under the extreme heat. I covered them with a layer of soot. I'll need to add more soot to the lower half of the doors and a little on the front intakes for the rear jet. Made a few rust holes. I also added some wire to the headlights. http:// http:// http:// http://
Daxman Posted April 17, 2016 Author Posted April 17, 2016 Even more pics! I changed up the grill tonight. Very happy with the results.Much more aggressive looking. http:// http://
Daxman Posted April 17, 2016 Author Posted April 17, 2016 I'm thuroughly enjoying your build!So am I!!!!! This one is a total blast to build so far....no pun intended!
mod3l Lover Posted April 18, 2016 Posted April 18, 2016 R2 D2 in the passenger side for the big finish? David S.
Daxman Posted May 12, 2016 Author Posted May 12, 2016 Getting close to completion. I got stuck for a few weeks on the interior. I wasn't too sure where to take it...I didn't want to go overly complicated with too many flight controls. I cut the steering wheel into a flight yoke and added a throttle lever on the center console. It also has a flat screen monitor in place of the rear view mirror. Unfortunately I don't have any good interior close ups!! I thought this was a great shot that showed some of the underside of the car. http:// I added a front window visor and I'm very happy with it. Please forgive the Scotch tape! This model is not glued together yet! http:// http:// http:// http:// Made the tail lights and turn signals by melting the amber and red sprue that was left over, http:// http:// Still got to add the trim pieces, final paint, and final details. Hopefully the next time I show pictures, it will be in the Underglass section.
Dogfish_7 Posted May 8, 2017 Posted May 8, 2017 Absolutely mesmerized by this build. I think if you had gone with some Alclad II aluminums, it would have enhansed it even more. You a great imagination as well as skills. Thanks for sharing with us.
bobthehobbyguy Posted May 8, 2017 Posted May 8, 2017 Wow missed that this had been completed. Nicely done. Great finish. Cool concept.?
Recommended Posts
Create an account or sign in to comment
You need to be a member in order to leave a comment
Create an account
Sign up for a new account in our community. It's easy!
Register a new accountSign in
Already have an account? Sign in here.
Sign In Now