cook_dw Posted April 27, 2016 Share Posted April 27, 2016 (edited) I thought I would start a thread on the Nomad.. Sadly, I did not get pics of the body before paint but I will start from here.. First pic is of where I stopped the build originally back in 2013 due to lack of interest and motivation (plus I was also finishing up my 67 L35 SS/RS Camaro full size ). Here is the most recent when a little more bmf and front bumper and grill finished (minus a little touch-up on the dagmars) Here I am messing with ride height and stance. I've opted for a big block out of a 69 Motion Camaro model I got at an auction for $2.. I then took a tunnel ram from another unknown model and a 6-71 from a Firebird model previously made back many, many years ago.. Also tossed around the idea of mixing old school with new school but I don't think it will go with my vision for this build. Lastly was mocking up the 12 bolt swap from the same Camaro kit onto the Nomad chassis (again still more detail work needed to be done on the chassis but wanted to get color on first). Not sure I like the proportions so I may look into swapping springs from the original and the 12 bolt. Hopefully more to come and thanks for stopping by and looking. Take care, Darrell EDIT: lol I just realized my blower snout was sliding off the blower housing when I took the pic. Ignore that error as I hadn't positioned it for gluing at that point. Edited April 27, 2016 by cook_dw Quote Link to comment Share on other sites More sharing options...
Snake45 Posted April 27, 2016 Share Posted April 27, 2016 Great color! Quote Link to comment Share on other sites More sharing options...
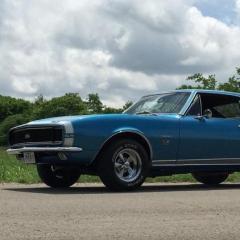
cook_dw Posted April 28, 2016 Author Share Posted April 28, 2016 (edited) Thanks. Finally got the ride height where I want it and I also did a little compound and polishing on the body. And no those are not the wheels I will finish this build with. Stance shots were before compound & polishing. Thanks for looking and if you have comments fire away. Edited April 28, 2016 by cook_dw Quote Link to comment Share on other sites More sharing options...
GTJUNIOR Posted April 28, 2016 Share Posted April 28, 2016 Very nice Nomad. Quote Link to comment Share on other sites More sharing options...
mod3l Lover Posted April 30, 2016 Share Posted April 30, 2016 I think that is going to look real nice! David S. Quote Link to comment Share on other sites More sharing options...
slusher Posted April 30, 2016 Share Posted April 30, 2016 Looking really nice... Quote Link to comment Share on other sites More sharing options...
cook_dw Posted April 30, 2016 Author Share Posted April 30, 2016 Thanks guys. Added decals, installed headlights, cleaned up the hood spears and mounted them, looked at where I'll mount the battery and finally sat the engine in place and I don't think the hood will clear.. Quote Link to comment Share on other sites More sharing options...
Rider Posted April 30, 2016 Share Posted April 30, 2016 Looking good! I like the stance. Quote Link to comment Share on other sites More sharing options...
cook_dw Posted May 1, 2016 Author Share Posted May 1, 2016 Thanks.. Was goofing around and I think this will be the display stance for the car if I can figure out how to hide the prop to keep it into position. Quote Link to comment Share on other sites More sharing options...
cook_dw Posted May 4, 2016 Author Share Posted May 4, 2016 (edited) You know I thought I was an OK model builder back before finding this forum.. Lol boy was I wrong.. Now I know I am nowhere near in the same continent much less the same playing field as many here.. Im almost ashamed to show these as I know I can do better but I keep telling myself that this is practice..Finishing up the engine but it needs a lot more touch up. Where does everyone get their plug wires, dist caps etc..??.. Some place local or do you order online? My wires were made from whatever gauge single strand wire I had (sorry I cant recall what size) and I used a part of an old model tree to whittled out the upper alt bracket . Anyways here is my junky engine.. Edited May 4, 2016 by cook_dw Quote Link to comment Share on other sites More sharing options...
Rider Posted May 4, 2016 Share Posted May 4, 2016 Engine looking good, I have always like the look of a tunnel ram. Supposedly they are a real pita to set up. Quote Link to comment Share on other sites More sharing options...
cook_dw Posted May 4, 2016 Author Share Posted May 4, 2016 (edited) Thanks, it really depends on the engine setup as far as how hard it is to tune.. Edited May 4, 2016 by cook_dw Quote Link to comment Share on other sites More sharing options...
Rider Posted May 4, 2016 Share Posted May 4, 2016 If you are running a tunnel ram isn't it pared with a high lift cam and big intake valves? Been years since I paid any attention to high performance cars and engine tuning. Regardless they sure look awesome. Quote Link to comment Share on other sites More sharing options...
cook_dw Posted May 4, 2016 Author Share Posted May 4, 2016 (edited) Not necessarily.. It depends on what you are wanting to do with the car. If its for looks then you could put a tunnel ram on a mild engine and with tuning make it run great.. I eventually want to add a tunnel ram and 2 4s on my 67 to complete the late 60s early 70s street look.. Leave the hood off and let it go.. Maybe in a few years when I get tired of the current setup. Not to cloud this thread but this is my 67 and a quick video of the baby cam. I also plan to eventually do a model of the car when I feel I have the skills to do it right (which I may never have them.. lol) Edited May 4, 2016 by cook_dw Quote Link to comment Share on other sites More sharing options...
Rider Posted May 4, 2016 Share Posted May 4, 2016 Love it, nice sounding thumps. It has a classic hot rod look. Ram it. Quote Link to comment Share on other sites More sharing options...
charlesdcamden Posted May 4, 2016 Share Posted May 4, 2016 Thanks.. Was goofing around and I think this will be the display stance for the car if I can figure out how to hide the prop to keep it into position. i used to display my gluebombs in wheelie fashion....make sure your rear wheels can turn freely and sand or cut some small flat spots in the bottom of the rear tires. If you want the "frame twist" launch, cut the drivera side a bit larger, or heat the drivers side leaf spring and push down on that corner a bit until the passenger wheel is off the ground (i also used just this sometimes). Then, using quarters or (my favorite) fishing sinkers, add some ballast in the rear until the front end comes up! With normal cars its easy to hide said ballast because the trunks normally dont open. You may have to get creative with the 'Mad lol. Hope this helps! Oh! And make sure to tape or glue that ballast in place lol. Quote Link to comment Share on other sites More sharing options...
cook_dw Posted May 5, 2016 Author Share Posted May 5, 2016 Thanks for the tips!! Really appreciate it. Quote Link to comment Share on other sites More sharing options...
Dave Ambrose Posted May 5, 2016 Share Posted May 5, 2016 Thanks.. Was goofing around and I think this will be the display stance for the car if I can figure out how to hide the prop to keep it into position. If you make a base for it, you can attach some small diameter fishing line to the rear, then drill a hole in the base, route the line through the hole, pull it tight enough, and tie it off below Quote Link to comment Share on other sites More sharing options...
cook_dw Posted May 5, 2016 Author Share Posted May 5, 2016 Another great idea.. Thank you! Quote Link to comment Share on other sites More sharing options...
cook_dw Posted May 8, 2016 Author Share Posted May 8, 2016 So today I had a little mishap.. While trimming some of the chassis the knife slipped and apparently I had a little too much force behind it.. I ended up breaking off part of the most of the front suspension.. Wouldnt have been a big deal but those pieces that broke off ended up going into the abyss of the garage.. Soooo back to the drawing board and decided to make this a gasser.. Little cutting, trimming & we had the front axle. Still need to make the steering linkage but I have some ideas for that. Quote Link to comment Share on other sites More sharing options...
crazyrichard Posted May 8, 2016 Share Posted May 8, 2016 cool , gasser wagon , i dig the look Quote Link to comment Share on other sites More sharing options...
bubbaman Posted May 8, 2016 Share Posted May 8, 2016 i grew up on LONG ISLAND N.Y. and i see on the paper there it say`s BALDWIN MOTION well i guess it`s the same place cause if you wanted to make any thing more powerful you went to MOTION IN BALDWIN Quote Link to comment Share on other sites More sharing options...
hjracing Posted May 8, 2016 Share Posted May 8, 2016 Great build so far! Quote Link to comment Share on other sites More sharing options...
cook_dw Posted May 9, 2016 Author Share Posted May 9, 2016 Thanks. Started on the interior. Quote Link to comment Share on other sites More sharing options...
cook_dw Posted May 12, 2016 Author Share Posted May 12, 2016 Its not pretty but the interior is finished. Quote Link to comment Share on other sites More sharing options...
Recommended Posts
Join the conversation
You can post now and register later. If you have an account, sign in now to post with your account.
Note: Your post will require moderator approval before it will be visible.