Ahajmano Posted April 28, 2019 Posted April 28, 2019 Also using the PE set also from Tamiya. I have not see anyone post any of the Tamiya NSX race cars from the 2000’s so I decided to take a shot. Overall, it is a challenging kit with tons of small parts that require much hand-painting and masking. Some examples to follow. Please enjoy.
Ahajmano Posted April 28, 2019 Author Posted April 28, 2019 So first attempt on the body was a total failure. After masking and applying the EPSON blue (by Zero Paints), the paint started to blister and crack at stress points. The conclusion: non-existent primer etching into the plastic. Either the zero paints primer is a poor product, or I did not apply it correctly. Some have told me I needed to apply a wetter than norma coat to etch Into the plastic. The 400-grit key on the plastic didn’t do anything either. With this in mind, the body was a total loss. Instead of striping the paint, I just bought another kit and started from scratch.
Ahajmano Posted April 28, 2019 Author Posted April 28, 2019 New body. Primer’d with Tamiya white. Ran out, so I tried the new Vallejo “base coat” spray cans. Not a big fan. It seems to be tacky to the he touch 24 hours after application, and also brought out the ghost lines in the mold lines. Honestly, might just stick to the Tamiya products in the future. They are pretty BLAH_BLAH_BLAH_BLAH solid. also already applied the pure white paint to the bottom half of the body. Giving it a few days to dry fully before I mask and apply the blue. Also tried a new primer for the chassis and interior parts. It’s a product by Gravity-colors. So far so good! laid down easily and highlights details nicely. It only came in “grey” though.
Ahajmano Posted April 28, 2019 Author Posted April 28, 2019 Wheels called for “gun metal”, but I wanted to use lacquer so I could maintain as much detail as possible. I used “crystal palladium” left over from my custom 240z.
Tommy124 Posted April 29, 2019 Posted April 29, 2019 (edited) 17 hours ago, Ahajmano said: New body. Primer’d with Tamiya white. Ran out, so I tried the new Vallejo “base coat” spray cans. Not a big fan. It seems to be tacky to the he touch 24 hours after application, and also brought out the ghost lines in the mold lines. Honestly, might just stick to the Tamiya products in the future. They are pretty BLAH_BLAH_BLAH_BLAH solid. As we discussed and (I think?) agreed in the other thread, no real need to go for ZP primer. ZP base and clearcoats, yes, but I'd agree to stick to Tamiya primer cans until something better or just as good (while cheaper) comes along. The trouble with trying out primers, you only find out about them when it's too late. As regards your build of the NSX, I will be following, I still have the Castrol Mugen version in my stash. Edited April 29, 2019 by Tommy124
r60man Posted April 29, 2019 Posted April 29, 2019 Just curious if you washed your model before starting the paint. I never did this, but once I started I discovered it made a huge difference. Tamiya uses a mold release on the plastic that needs to get washed off. I generally use Dawn dish soap. Put all the parts in a Dollar Store plastic shoe box. Just dip the parts in swish side to side a bit, then rinse gently. (I also have a sink strainer in place to catch small pieces that may come off of the sprue). Let them dry a day or two and you should be in really good shape.
Ahajmano Posted April 29, 2019 Author Posted April 29, 2019 Yep. I sanded the body with 400 grit and I always wash the sprues and body with dish soap. ? I will test shoot some of the zero primer applying a wet coat this time and see if there is a difference.
Ahajmano Posted April 30, 2019 Author Posted April 30, 2019 Brakes. Took a before and after applying panel line accent.
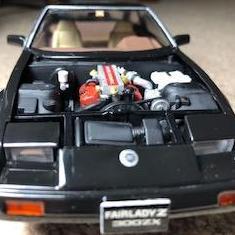
Ahajmano Posted May 1, 2019 Author Posted May 1, 2019 Interior. Kept it more or less factory, but silvered some bolts and switches to make them stand out.
Ahajmano Posted May 2, 2019 Author Posted May 2, 2019 Thanks guys! Also tried a new technique here which I’m happy with. I painted the tub “rubber black” which is a very dark grey. The strategy was to have a slightly different shade of black to contrast with the seat and dash. I think it worked and I will use it again in the future. I think it makes it look a little more realistic to have different shades of he same color for different parts that are obviously manufactured separately.
Ahajmano Posted May 2, 2019 Author Posted May 2, 2019 Naturally, i just destroyed a decal that goes on a placard placed on the dash... Just ordered another kit to replace it. i will save the body for the NSX Dome model that I stole the replacement body for. When comparing to the prices for resin kits, these Tamiya kits are a steal in comparison.
Ahajmano Posted May 5, 2019 Author Posted May 5, 2019 The border decals were pretty tough as they have to straddle the two-tone seam line. They are in and drying with some Tamiya decal solvent. Got the blue on, and still experienced sporadic cracking of the paint. My new strategy is to get the major decals onto the body and hit it with a layer of 2k clear. The hope is that it will set the paint in place and stop anymore random cracking. It will also set the decals which are bordering the cracks so I can mask over them and cover up the cracking. Finally going to hit the whole body with another layer of 2k clear to set everything in place.
Ahajmano Posted May 9, 2019 Author Posted May 9, 2019 (edited) Added some more detail and finished the border decals. Clear coated the body to “fix” everything in place so I can start repairing the cracked blue paint with a new coat. few comments: those Tamiya metal transfer decals are amazing! That Honda symbol came out great. Hand painting on a body is always very difficult for me. The fuel receptive on the hood and the red backing for the emblem took me 1 hour, 30 cotton swabs, and at least 10 re-do’s. It’s still not perfect, but it was good enough for the clear coat. I have a much easier time hand-painting interior and engine parts as they usually have sharper contours and are less visible. ??♂️ Edited May 9, 2019 by Ahajmano
Ahajmano Posted May 19, 2019 Author Posted May 19, 2019 Finally ready for clear coat. All the decals are on and completed all touch-ups.
Recommended Posts
Create an account or sign in to comment
You need to be a member in order to leave a comment
Create an account
Sign up for a new account in our community. It's easy!
Register a new accountSign in
Already have an account? Sign in here.
Sign In Now