QbanFam Posted October 18, 2019 Author Share Posted October 18, 2019 2 hours ago, Anglia105E said: This looks like it is going to be one rusty truck, Yordan....... David The idea is a beat up truck with faded paint and rust showing. Something that has been used and abused in the country. I’m a little intimidated because I have never built a car from scratch and I have never used the airbrush. Quote Link to comment Share on other sites More sharing options...
Anglia105E Posted October 18, 2019 Share Posted October 18, 2019 Very brave to have a go at this , considering it is your first built vehicle and first attempt with the airbrush too. David Quote Link to comment Share on other sites More sharing options...
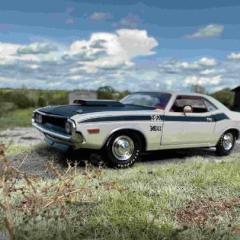
QbanFam Posted October 19, 2019 Author Share Posted October 19, 2019 Chassis, body and other parts ready to get painted with rust color primer. Also, a quick look at what the car will look like on the diorama. Quote Link to comment Share on other sites More sharing options...
QbanFam Posted October 19, 2019 Author Share Posted October 19, 2019 Applied base rust (this was just the base for random rust pattern): 1) Airbrushed Mig Jimenez Rust Color Primer. 2) Once Primer is dried, a) I loaded a ripped piece of make up sponge with light orange acrylic ( I used light rust from Vallejo), and unloaded most of it on a piece of paper to get a dry painting effect. b) I lightly dabbed the sponge, randomly over the body, focusing more on raises areas, edges. Also, hood and roof top. 3) Once dried, I applied a wash of light rust over the whole body. I used Vallejo light rust wash, which has a little bit more orange on it. This is just a wash to tie colors together, somewhat. Coming up next: 1) Seal the base. 2) Prepare for chipping and fading: hairspray and salt application over the body, where rust will be showing. 3) Paint the body and chip away. 4) Apply more light rust wash to blend in the rust showing with the edges of the paint. 5) Rust pigment for texture on the rotting sections. This is it for now. Quote Link to comment Share on other sites More sharing options...
Anglia105E Posted October 20, 2019 Share Posted October 20, 2019 Yordan..... this plastic bodied truck no longer looks like plastic at all..... it actually looks like a metal body. You are the Master of Rust ! David Quote Link to comment Share on other sites More sharing options...
QbanFam Posted October 20, 2019 Author Share Posted October 20, 2019 4 hours ago, Anglia105E said: Yordan..... this plastic bodied truck no longer looks like plastic at all..... it actually looks like a metal body. You are the Master of Rust ! David Thanks David. Still long ways before becoming a master, but thanks. Quote Link to comment Share on other sites More sharing options...
MeatMan Posted October 20, 2019 Share Posted October 20, 2019 Really nice work! Very detailed and realistic! Quote Link to comment Share on other sites More sharing options...
QbanFam Posted October 20, 2019 Author Share Posted October 20, 2019 2 hours ago, MeatMan said: Really nice work! Very detailed and realistic! Thank you for the kind words. Quote Link to comment Share on other sites More sharing options...
QbanFam Posted October 20, 2019 Author Share Posted October 20, 2019 (edited) Painting and chipping almost finished. A few touch ups on some areas before the next stage (more weathering). Already learning from mistakes as I go. I meant to use the salt chipping technique on the roof top and hood. It will be for the next model. Edited October 20, 2019 by QbanFam Quote Link to comment Share on other sites More sharing options...
QbanFam Posted October 21, 2019 Author Share Posted October 21, 2019 (edited) Some more updates. Chipping of the paint didn’t come out how I wanted it. Reason? I failed to seal the rust layer, so had to be extremely careful to not peel it off. I’m already working on the engine, chassis and wheels.There will be more weathering once the model is complete put together. The rest of the diorama will be worked on once the truck is completed. Edited October 21, 2019 by QbanFam Quote Link to comment Share on other sites More sharing options...
WigWag Workshop Posted April 3, 2020 Share Posted April 3, 2020 I couldn't tell if the pictures were the diorama, or if you were showing reference pictures ? Amazing details! I am going to save these to my stash of inspiration photos -Steven Quote Link to comment Share on other sites More sharing options...
dave branson Posted April 7, 2020 Share Posted April 7, 2020 Very realistic looks great Quote Link to comment Share on other sites More sharing options...
Recommended Posts
Join the conversation
You can post now and register later. If you have an account, sign in now to post with your account.
Note: Your post will require moderator approval before it will be visible.