charlie libby Posted July 5, 2020 Posted July 5, 2020 (edited) I am putting my photos I wip as I should have done before .been out of service for awhile but am doing better now.i have been working on finishing parts and assemblies.i have also started modifacations to the body and some body work.i will put some pictures of the body mods and finish work in the near futtre Edited July 5, 2020 by charlie libby wrong wording
stinkybritches Posted July 5, 2020 Posted July 5, 2020 I am definitely keeping my eye on this thread. Looks real.
Phildaupho Posted July 6, 2020 Posted July 6, 2020 Extremely impression fabrications. What scale is this? Looking forward to more.
charlie libby Posted July 19, 2020 Author Posted July 19, 2020 I am adding a few new pictures .I am starting to do a lot of the detail work. parts are beginning to look more realistic I think.
AmericanMuscleFan Posted July 20, 2020 Posted July 20, 2020 FANTASTIC work Charles, looks like a 1:1 car! I noticed that many parts including the water pump housing, alternator bracket and the power steering support were made with brass in the previous photo but now look like aluminum. Have you redone them with aluminum or just painted or plated them, I'm just curious?
charlie libby Posted July 20, 2020 Author Posted July 20, 2020 I just painted with chrome paint and sprayed flat clear on them.i have been looking at all your pictures and have learned a lot that has helped me with my projeact. I learn something everytime I look at them
charlie libby Posted July 30, 2020 Author Posted July 30, 2020 somemore final assembly pictures . i'm glad mister tweez invented tweezers.this is tough on an old man with fat fingers,shaking hands and bad eyes.getting close to painting,thats got me nervous.i have practiced on a 1/24 1957 ford and it looks pretty good.
AmericanMuscleFan Posted July 31, 2020 Posted July 31, 2020 22 hours ago, charlie libby said: this is tough on an old man with fat fingers,shaking hands and bad eyes What would it be if not... it's simply FANTASTIC Charles! Top quality work here!!! Superb job on the instrument panel too, where did you get the gauge faces, did you make them with a drawing software and a inkjet printer or they are available from a hobby supplier?
charlie libby Posted July 31, 2020 Author Posted July 31, 2020 2 hours ago, AmericanMuscleFan said: What would it be if not... it's simply FANTASTIC Charles! Top quality work here!!! Superb job on the instrument panel too, where did you get the gauge faces, did you make them with a drawing software and a inkjet printer or they are available from a hobby supplier? i got them at teds modeling.thanks for the comment.i am doing my best to finish.i am getting close to losind intrest it has taken so long.my next project i am going to learn from studying yours and do a model project with a kit and scratch build parts of it .it makes much more sense.scratch from nothing is so tame consuming.i have another cmplete 1/8 corvette in an unopened box i ant to do as adrg car and i have 1/2 shelby mustang also in the box.i think it would only take a year or so instead of three.details are taking forever.sorry to drg on.look up teds modeling marketplace.com
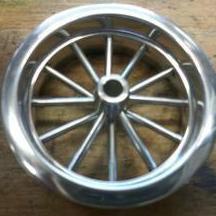
charlie libby Posted August 17, 2020 Author Posted August 17, 2020 have any of you tried rustoleum metallic. i think its great. thats what is on the headers and side pipes, very shiny smooth finish.doing all the details to head for the finish line. got my steering wheel machined and the seat close to finished. getting ready to paint the body.
AmericanMuscleFan Posted August 18, 2020 Posted August 18, 2020 This Rustoleum metallic paint is very convincing to mimic matal, I have never tried it but definitely will if I can find any. Did you apply it straight from the spray can or with an airbrush? Amazing machined parts Charles, this is an extraordinary project that you have invested yourselves in and everything you have done so far is worthy of a museum! Very ingenious technique for machining the steering wheel by the way! Great update, keep doing your great work!!!
charlie libby Posted August 19, 2020 Author Posted August 19, 2020 hi francis, its rustolem spray can and applied straight from the can.i think its great.it goes on nice and you dont need clear over it .i think i will try clear overit on a test piece to see what it does.it is a huge amount of paint for about 5 dollars.just looking at the pictures of your truck agin.i love it.what type o f glue do you use to glue aluminum parts to each other? I use 2 part epoxy.
AmericanMuscleFan Posted August 20, 2020 Posted August 20, 2020 2 hours ago, charlie libby said: hi francis, its rustolem spray can and applied straight from the can.i think its great.it goes on nice and you dont need clear over it .i think i will try clear overit on a test piece to see what it does.it is a huge amount of paint for about 5 dollars.just looking at the pictures of your truck agin.i love it.what type o f glue do you use to glue aluminum parts to each other? I use 2 part epoxy. Thanks for the info on the Rust-oleum paint, it looks great! Great machining technique on the steering wheel. I also use 2 part epoxy to bond aluminum parts together but also cyanoacrylate (the medium thickness) when I need a faster result. Nice new profile photo by the way!!!
ismaelg Posted August 21, 2020 Posted August 21, 2020 Impressive work for sure! Is this the 1/8 '65 Monogram body?
charlie libby Posted August 21, 2020 Author Posted August 21, 2020 yes it is .has a few minor modifications .i am hoping to paint it this week.i have it in primer ready for final sanding. iam startin final assembly on alot of stuff.Ismael,looking at your camaro pictures ,i love it .the sunoco camaro tranam is one of my favorites and this corvette ia going to be yellow and navy blue.the yellow on the hood .thank you charlie
AmericanMuscleFan Posted August 22, 2020 Posted August 22, 2020 Fantastic job Charlie, I'm am sure your happy to start the assembling stade of your build! It is difficult to fully understand the extent of the work that you have already invested in this project but I want to thank you for it, great art!!!
charlie libby Posted August 23, 2020 Author Posted August 23, 2020 i am getting closer to the finish.started on the dry sump oil lines and the fuel lines.in the process of machining the remote oil filter and a few more a/n fittings.a little nervous still about the paint on the body but i am ready to try.i will be two tone yellow on top navy blue bottom.hope to start painting on wednesday.
charlie libby Posted September 3, 2020 Author Posted September 3, 2020 continuing final assy.have run into a couple of minor problems.nothing serious.making a new grill, the one that came with the model was in bad shape.
AmericanMuscleFan Posted September 5, 2020 Posted September 5, 2020 Excellent work Charlie! Superb front grille, great craftsmanship! Every details are absolutely stunning! Did you paint the body?
charlie libby Posted September 7, 2020 Author Posted September 7, 2020 finally got some color on.painted the blue today,yellow 3 days ago.cant wait to finish it has taken so long.i have learned alot along the way. a lot from the forum and you you and your pictures pictures are a great inspiration.looking forward to a new project and hopfully it will happen faster and come out better thn this one.thank for your help francis
AmericanMuscleFan Posted September 8, 2020 Posted September 8, 2020 That's a superb and amazing project Charlie! Very few people can do what you have done and you can be proud of it... incredible craftsmanship!!! I love the colors, can't wait to see it done... the finish line is approaching!
charlie libby Posted September 30, 2020 Author Posted September 30, 2020 i have finally got up the courage to attempt painting. final assembly is going well.
AmericanMuscleFan Posted October 4, 2020 Posted October 4, 2020 Great, great work Charlie! I love it in yellow, It is an extraordinary project that you are in the process of achieving! You are so close to the finish line my friend!!!
Recommended Posts
Create an account or sign in to comment
You need to be a member in order to leave a comment
Create an account
Sign up for a new account in our community. It's easy!
Register a new accountSign in
Already have an account? Sign in here.
Sign In Now