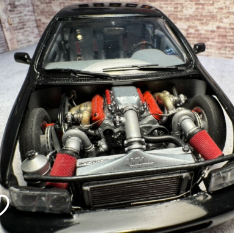
Mattilacken Posted October 14 Posted October 14 (edited) This is a build I started years ago and brought out to Finnish many times.. I tried in the beginning of the year again in this years CBR but changed to a Mercedes diesel but then changed back due to changes in motivation, so this is my 2025 entry to the Cannonball CBR build off that I host this year. When I started this I went ahead and did improvements much like others have recommended here. Among those was correcting the front belly pan and how it attaches to the fender, so it’s corrected to look more like the 1:1. Next up was trying to correct the lights. So the inner lights were plugged and re drilled, and then the bezel was cut in two to be able to move the inner lights closer to the outer. later I trimmed new lenses to fit these bezels. The grill was also opened and a mesh was installed from behind. The turn signals location where grinded out from the rear to be able to mount from the back instead from the front. The lenses were then painted with clear orange and installed from the back with canopy glue, believe it looks good which is enough for me. The door handles was cut and filled since I wanted to make a more modern look when I started this. This also resulted in a molded in wing, or ducktail or what ever you prefer to call it. later the lid was cut out and a edge created to seat it. I was gona hinge the lid, but I just skipped it. I had also trimmed the trim on the side window frames but it did not look good so it was later corrected by ading a strip of styrene and then filed to shape. The rear bumper was cut apart from the license plate and that hole was filled in the body. Front bumper was also modified. I am not a super fan of how the shaker hood looks so I made a new Hood scoop out of a Challenger scoop that was modified to have more angle trailing edge more like the shaker scoop, and then it was devided in two to make it like those two nostrils on the shaker. I did not mold it to the hood since I wanted it to have the look it has, like a scoop that ”floats” or like the shaker. But this one would of course have been suspended my soft rubber to the hood and then have the filter element on the underside and then the carb kind of ”lifting” the scoop when seated, I do have in my head how to make it function 😁 I believe I did some other body mods but can’t remember now. chassi was minitubed but later replaced with a stock chassis from revell Challenger where the more beefy rear end also came from. Which got a custom 4 shock setup and a slight adjustment to the springs. I had made several attempts on lowering the front with bad methods so the front member had to be jigsawed together from several different ones. And then lowered as much as I could but still keeping the pin in the original upright. So the new 2mm pin actually touches the upper Aarm. Could be lower but I believe it’s low enough in the front. Front also got a double shock assembly. Engine was completely replaced and tossed in the bin, due to its larger scale and mixed scales, and missing water pump. The replacement engine come from my parts bin but I believe it was from a Revell ‘67 Charger Hemi. It got some PB headers and an intake from MPC ‘74 Laguna modified to look like the early hemi intakes used in Stock car racing this was done since I had no other intake for that engine so it seemed appropriate. On top I put a printed Holley carb with linkage. The accessories was missing so these are a mix of ‘74 Laguna parts and parts bin parts, fan was a PB find that I had done years ago. In the engine bay several things where cut out and replaced. To make it more interesting I put the gold reflective heat shield on the firewall. I also added a steering box fron the PB to fill out the bay a bit but I know it’s placement is probably wrong. I did not want to go overboard with details in there. Interior wise I replaced the seats with a set of printed ’73-77 Chevy buckets that look better in my opinion. Dash had its gauges cut out and replaced with styrene and a gauge decal. The character was printed and modified heavily to be able to get him to sit right in the car, steering wheel was then glued to his hand before installed in the car. I did not want to cover the new pistol shifter that was printed so he got to hold the CB mic, and the cord goes to the CB under the dash, the mic holder is located on the dash. Since this was the ’70’s and I have heard that every body smoked the passenger floor got some trash cig packs as well as one pack is in his hand ready to pull out a new one after responding on the CB. I Made a water bottle and threw it to the floor. I also added some vintage European mags in there, one on the MB that he was suppose to drive for a better fuel economy, and one about F1 where his countryman Ronnie Pettersson was competing. And there had to be some maps to get to the goal so they are in the passenger seat. And yes he should probably have a co driver.. will se if I ad one sitting on the hood or so but I also had an idea of making it to a diorama.. where I would need to make the car a bit dirty.. we will see. btw the fuel cell in the trunk is an old piece I built ages ago, more than 20 years, so it felt good to finally use it for something! Livery is inspired by the classic JPS F1 cars in the ’70’s that Ronnie drove, the decals was actually planed to be used on my Mercedes 450SLC but decided to ad them to this one instead late in my process. An interesting fact is that the French Chrysler agency used to race these cars until 1975 if I remember correctly. They had the gurney Cuda with hemi as well as some ’71 cudas, al got the 1970 front though. The French racing history inspired me to use the Rolex decals and the gurney car gave me the idea for the Hot Wheels decals. I made it as a Swedish owned car since I first thought it to be like a car Ronnie would have raced the Cannonball in, but then the character looks so much like me, except for the fact that I am not in that great shape! So then it got to be a tribute. Fun fact is that the plate has the first two letters as the old system of plates had here in Sweden where BD stands for Norrbotten, which is as far up you can come in Sweden and big part of Norbotten is above the Arctic Circle. The G is of course because the Cuda is a G body and the number is self explanatory I guess.. the mandatory front license plate is tossed in the trunk for the cannonball along with the first registration in California and the second in France. But over all it’s just a cool build from my head, which is far from perfect or flawless but it’s a cool build that I am glad to wrap up! Comments and questions are most appreciated! Edited October 15 by Mattilacken 9
XYHARRY Posted October 14 Posted October 14 Great looking 'Cuda there Anton, your detail work is exceptional. Well done. 1
Mattilacken Posted October 15 Author Posted October 15 22 hours ago, XYHARRY said: Great looking 'Cuda there Anton, your detail work is exceptional. Well done. Thanks allot 22 hours ago, ChrisR said: Very nice! thanks for your comment Chris! I know my write up got to be extensive.. but hey no need to read it if any one don’t want to
Mattilacken Posted October 16 Author Posted October 16 Wopsie.. I was taking some outdoor pictures, even though it was a bit windy.. it was not to bad but the. Sudently, while securing the base it flopped the base and model around.. so I am in for a big repair!! Fudge!! but I did get some nice pics at least…
Mattilacken Posted October 17 Author Posted October 17 1 hour ago, slusher said: Great looking Mopar! Thank you Carl!
Mattilacken Posted October 20 Author Posted October 20 A rebuild later, after the crash at the test for cannonball the team saw some things that got addressed. 1
Recommended Posts
Create an account or sign in to comment
You need to be a member in order to leave a comment
Create an account
Sign up for a new account in our community. It's easy!
Register a new accountSign in
Already have an account? Sign in here.
Sign In Now