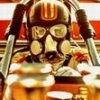
Dragline Posted February 12, 2010 Posted February 12, 2010 (edited) Since a good portion of my projects are in various stages of drying I thought I'd break out this kit and start to work on it. This is a sweet kit. The supplied hat is waaay to small, but one from a Reevell kit came to the rescue. Still not sure about wheels/tires. The Revell Blue Max came with nice one piece tires so I'm most likely going to use those. I have the body all glued up and sanded. Just need to shoot some white primer on it. I'm going with basic Tamiya orange on this. Of course the Heart of any drag build is the motor, so I'm really working this one up. I am using MCG fittings and some rubber tubing for the fuel delivery. I scratch built the barrel valve and distribution blocks. All the injection is done and as soon as I can shoot it I'll cover the new hat with some Metalizer. I have that nice set of PE linkages from MCG so all the throttle and little bits will be from that set. Still have lots to do, but it's coming along. I guess the harsh snow has inspired me since going out is a nightmare. Comments welcomed of course. Bob Edited February 23, 2010 by Dragline
Crusader101 Posted February 12, 2010 Posted February 12, 2010 Beautiful, precise work. You must have the hands of a surgeon!
Bridgebuster Posted February 12, 2010 Posted February 12, 2010 [quote Still have lots to do, but it's coming along. I guess the harsh snow has inspired me since going out is a nightmare. Comments welcomed of course. Bob
disabled modeler Posted February 12, 2010 Posted February 12, 2010 WOW ! That is SWEET! Nice work and the engine!!!
george 53 Posted February 12, 2010 Posted February 12, 2010 At first I thought there were double plugs in that hemi, then I realised that it was a reflection in the Chrome Valve covers!!! Great job on the fuel lines,etc. WISH I had THAT kinda patience! Looks GREAT so far!! PLEASE keep us posted!!!
Dragline Posted February 12, 2010 Author Posted February 12, 2010 WOW, thanks guys.. This is not as hard as some may think. I DO NOT have the hands of a surgeon, I shake a bit. I have to hold my breath when lining up the drill to make a hole. LOL. Some Plastruct and some snow make for long days in the house. I can only play Battlefield II for so long, then I have to do something else. I actually used the side of the kit box for the inspiration in doing this. More to come. Bob
Janne Herajärvi Posted February 12, 2010 Posted February 12, 2010 Very nice looking engine there. Keep up great work
Dragline Posted February 17, 2010 Author Posted February 17, 2010 Made some progress to the Tommy Ivo car here. Motor is almost done. Have to run a wire to the oil pressure gauge and get an acetate face and bezel on it. Still have to attatch the PE throttle as well. Got the body painted in Tamiya orange. Nothing fancy for paint as I've seen it so many hues I think it'll be close enough. Not TOTALLY prototypically correct but very close indeed. I should have decals and clear coat in the next day or so. I buffed out my Reher Morrison car and that's looking pretty good as well. I have that chassis sorted out and the motor details are next. I figure, if I'm doing all the small work and I'm on a roll just keep going. Wheels and tires from a Polar Lights kit. Comments welcomed of course. Bob
Crusader101 Posted February 17, 2010 Posted February 17, 2010 Very, very impressive thus far...looking forward to more!
MADmodelDOCTOR Posted February 19, 2010 Posted February 19, 2010 Great job so far! Engine is very sharp. I don't recall seeing the MCG fittings? later and keep up the good work,
1320wayne Posted February 19, 2010 Posted February 19, 2010 Very nice progress. Excellent detail on the engine.
Mooneyzs Posted February 19, 2010 Posted February 19, 2010 Dragline.... this is looking fantastic, Love all the detail you have done so far. Very Clean
Dragline Posted February 22, 2010 Author Posted February 22, 2010 Made some more progress on this car. Lots of fitment issues as usual with a model of this vintage. The steering wheel is positively HUGE. I installed the engine permanent like. Hooked up the fuel and oil lines. I used a Revell AA/FC oil block out of the Blue Max kit. That kit has been VERY helpful. I have pilfered quite a few parts including the steering wheel for this project. Clear coat is dry enough to lightly play with so I slipped in the frame for these shots. I have a bit of touch-up to do as there are a couple of bubbles there on the top rail. I plumbed the brakes and if you build this kit make sure to elongate the drivers side axle. It's to short. I added a 1/4" to it to make it slide past the body. Not sure what to paint the inside of this. Probably flat grey. An enjoyable kit if you perservere. I'll be buttoning this up in the next few days. Bob
Smart-Resins Posted February 22, 2010 Posted February 22, 2010 That is coming along nicely! It certainly is good material for trackburners! HEHEHE Jody
Dragline Posted February 23, 2010 Author Posted February 23, 2010 Getting close to wrapping this project up. Looks like I have only to polish the clear coat, add the PE throttle, steering bits and water outlets on the heads. I made a new push bar from aluminum tubing with a tee over the kit supplied chome piece. I also made new steering bits from the same tubing. I'm getting fair at making slight bends in the tubing that look very realistic in my estimation. The kit headers were a real chore, since I had no replacements in my rather shallow parts box. Wheels/tires came from a Polar Lights kit but I ran out of tire decals so those will have to wait to be applied. I should be able to polish this in about 3 days. Darn enamels! One day I'll get an airbrush. Comments/Critiques welcomed of course. Bob
Mooneyzs Posted February 23, 2010 Posted February 23, 2010 Bob, She is looking Fantastic.... the paint looks great on the body, all of the detail looks nice. Keep up the great work. Grey would look good for the inside of the body panels or even aluminum since most of the dragster tins are bent from aluminum. Either would look great in my opinion.
Dragline Posted February 24, 2010 Author Posted February 24, 2010 Coupla body on shots. I'm getting antsy to finish this so I can break out the Reher Morrison again. Bob
John Teresi Posted February 24, 2010 Posted February 24, 2010 WOW!!!!!.......for a hard kit to build you nailed this one!!!!!!!.........the detail is outrageous ......color is dead on.......GREAT all around build.
Dragline Posted February 24, 2010 Author Posted February 24, 2010 Thanks John... Coming from a Master, that is high praise indeed. After it is polished and all the little bits are on I will be pleased. You're right about it not being an "easy" kit. Still have to finish my Garlits 1-R build which languishes on the shelf mocking me. This site has taken my building to the next level, and your builds have inspired me so I thank you for that. Bob
Dragline Posted February 24, 2010 Author Posted February 24, 2010 (edited) That looks fantastic, Bob! Two questions ... didn't you say you painted it with Tamiya rattle-can paint? If so, those paints are lacquers not enamels. Also, are those the kit decals, or are you using the Slixx sheet? Yep, I painted it with Tamiya rattle can, but clear coated it with Testors 1814. That's what I'm waiting for to dry. Those are the kit decals on there. VERY thin and take only a few seconds in tepid water to release. Not a bad set of decals all things considered. As opposed to say the Blue Max reissue. Those decals should have been re-done. They are not even long enough for the body. Thanks for nice words. Bob Edited February 24, 2010 by Dragline
catpack68 Posted February 24, 2010 Posted February 24, 2010 sweet work!!! i can't wait to see it finished.
Fuel Coupe Posted February 24, 2010 Posted February 24, 2010 Bob, You are doing a really nice job on this one. Great work, Tommy would love it...
Dragline Posted February 25, 2010 Author Posted February 25, 2010 I am basically finished with this car. I do have to add the throttle bits and they are all mocked up. But I took these pix last night and wanted to show them here. I'm very proud to have this in my collection now, but it's back to the Reher Morrison build for me, then it's a break from Drag Racing cars. I have a Baldwin Motion Camaro and a 67 Impala that I want to build so the Drag cars will be taking a back seat for a while after the RM is complete. I'll post PAU pix with the throttle added in the "Under Glass" section when the work has been done. Thanks for playing along and all the nice commentary. Bob
Mooneyzs Posted February 26, 2010 Posted February 26, 2010 Bob this Looks Fantastic....She is Beautiful. Great job on this kit, It turned out very nice
ratnasty Posted February 26, 2010 Posted February 26, 2010 Hey Bob that car came out great and the detail is super thanks for sharing Chuck
Recommended Posts
Create an account or sign in to comment
You need to be a member in order to leave a comment
Create an account
Sign up for a new account in our community. It's easy!
Register a new accountSign in
Already have an account? Sign in here.
Sign In Now