curt raitz Posted April 22, 2010 Posted April 22, 2010 Making the most of your sabitical I see... model is coming along nicely, like the running boards don't ya "love the smell of modelmaster spray paint in the morning?" ...lookin' forward to seein' this thing in color c'ya
Raul_Perez Posted April 22, 2010 Author Posted April 22, 2010 Your attention to detail is amazing, Raul. I love watching your progress on this build. Thanks, Jim!! Yeah...I like seeing some progress, too!! Making the most of your sabitical I see... model is coming along nicely, like the running boards don't ya "love the smell of modelmaster spray paint in the morning?" ...lookin' forward to seein' this thing in color c'ya Actually, I only took one of the five weeks from by sabbatical... When's your next club meeting? I've got to get down your way and see what's going on... Later,
Raul_Perez Posted April 23, 2010 Author Posted April 23, 2010 (edited) With the lines for the belt line, the grill and the hood panels sorted out, it was time to move on to the running boards. Here's part one of three for completing them; creating the arch on the bottom. With the WagonRod engine and interior having a strong Vette influence, this feature is intended to bring a bit of the early 70s Vette influence to the rocker panel / running board area of the body. To help give it a bit more of a forward leaning stance, the mid-point of the arch was positioned well forward of the center of the running board. I like the way this feature looks with the slanted "B" pillars. To split the difference in fixing the gap between the running boards and the bottom edge of the doors and quarter panels, the second part will be to add 0.04" to the tops of the running boards. The last part will be to add 0.04" of material to the bottom edges of the doors and quarter panels. That will effectively close up that nasty gap and add a slightly modern touch to this portion of the body. Well, that's all for tonight... Later, Edited April 23, 2010 by Raul_Perez
Tumbler75 Posted April 23, 2010 Posted April 23, 2010 Lookin' good! This is gonna be one sharp Rod when you get done! The vette influence is workin' well with it. I can't wait to see more on this build.
camaroman Posted April 23, 2010 Posted April 23, 2010 Man, I am loving this thread... I can't wait to see the finish. And thanks to who ever gave the heads up on the W/R chassis fitting the 51 Chevy's I was modifying the AMT '57 Chevy new issue street machine chassis to fit. This will save a lot of work.
curt raitz Posted April 23, 2010 Posted April 23, 2010 Thanks, Jim!! Yeah...I like seeing some progress, too!! Actually, I only took one of the five weeks from by sabbatical... When's your next club meeting? I've got to get down your way and see what's going on... Later, Saturday, May 1st at Tom McNamara's home in Pruntuckey (Prunedale)
MikeMc Posted April 23, 2010 Posted April 23, 2010 I'm not sure about the arch in the boards.....I don't know what it is though....might be it doesn't look low enough?? The whole project is as always out of this world....keep it coming!!! Mike
Raul_Perez Posted April 24, 2010 Author Posted April 24, 2010 Thanks, guys!! Mike, I may add another 0.10" piece of styrene to the bottom, but not until after I add the piece of 0.04" styrene to the top. I don't want the boards to look too thick, either. I also still need to radius the the sharp corners on the bottom edges to match the original corners...but I'll save for later... I thought of adding a Vette side scoop to the area where the hood side panel and the front edge of the door come together, but I think it would look too busy with everything else... Later,
Raul_Perez Posted April 25, 2010 Author Posted April 25, 2010 Here's the final mods to the running boards. I added 0.04" of styrene strip to the top of the boards and 0.02" to the bottom edge of the doors and quarter panel. I also radiused the corners of the running boards at the wheel openings. All that's left to do the the body is figure out what I'm going to do about the tail lights. Later,
Hornistfuller Posted April 25, 2010 Posted April 25, 2010 All that's left to do the the body is figure out what I'm going to do about the tail lights. I say traditional double round vette lights. i would put a liyyle platform for them to be in tho, so that there not just piking thru the "carbo fibre"
Bernard Kron Posted April 25, 2010 Posted April 25, 2010 Wow! It never occured to me that the space below the body could be filled by adding material to the top of the running board rather inserting a panel into it to bring it flush with the door surface. A far superior solution. I know you kept describing what you intended to do, but it just didn't sink in. The slight thickening of the running board side panel also benefits the overall look. As you so often say to others... keep up the GREAT work!
Raul_Perez Posted April 25, 2010 Author Posted April 25, 2010 The changes you made to the running boards makes the body look a whole lot better. Thanks, Donnie!! I say traditional double round vette lights. i would put a liyyle platform for them to be in tho, so that there not just piking thru the "carbo fibre" Yeah...I'm going to try a couple different versions of tail lights later today. I agree that the round ones from the 60s would go well with the primarily rounded features of the Wagon Rod. Later,
Raul_Perez Posted April 25, 2010 Author Posted April 25, 2010 ...As you so often say to others... keep up the GREAT work! You are too funny!! Thanks for the early morning chuckle!! Later,
Jeff Sauber Posted April 25, 2010 Posted April 25, 2010 Here's the final mods to the running boards. I added 0.04" of styrene strip to the top of the boards and 0.02" to the bottom edge of the doors and quarter panel. I also radiused the corners of the running boards at the wheel openings. All that's left to do the the body is figure out what I'm going to do about the tail lights. Later, Wow, filling in the gaps under the doors really makes a big difference. Looks awesome. This is how the Wagon Rod body should have looked out of the box!! Great work!!
Clay Posted April 25, 2010 Posted April 25, 2010 (edited) This looks simply amazing Raul, I wish I could get back into it. Edited April 25, 2010 by Clay
Raul_Perez Posted April 25, 2010 Author Posted April 25, 2010 Thanks, guys. Well I finally got the tail lights sorted out. I found these in the parts box. I'm not sure, but I think they're off of a '49 Merc. I had to recess the bottom edges of them into the body to keep them from looking like they're pointing down in the side profile view. I also tried putting a set of quad round tail lights from an early 60s Vette down below the rear door, but being that low, they make the upper proportions of the car look even taller. I added the stock tailpipes from the WagonRod, but they probably will get replaced with something a bit less distracting. Later,
curt raitz Posted April 25, 2010 Posted April 25, 2010 I added the stock tailpipes from the WagonRod, but they probably will get replaced with something a bit less distracting. Later, I like the tail lights, you're right about replacing the tailpipes... c'ya
Jeff Sauber Posted April 25, 2010 Posted April 25, 2010 The wrap-around tailights work quite well....I also agree with you on the the exhaust tips. They are cool, but look a bit on the heavy side. I'd probably just go with a pair of simple angle cut tips using polished aluminum tubing or stainless. Great project so far. I've enjoyed following along with the updates.
Raul_Perez Posted April 25, 2010 Author Posted April 25, 2010 Thanks, guys!! Yeah...the more I look at those tailpipes the more hidious they get...they draw too much attention to themselves. Looking at the rear view, I may extend the rear valance panel and the back edges of the rear fenders down just a bit to cover up some of the exposed frame. That will also help bring together the line between lower rear edge of the running boards and the lower front edges of the rear fenders. A little PS magic, Bernard, to see how that would look? Later,
Bernard Kron Posted April 25, 2010 Posted April 25, 2010 Ask and ye shall receive... I think you might have to add a little detail to the enlarged surface (contour, inset license plate, .... something) but basically it goes with the extended running boards and front fenders so I think it works.
Raul_Perez Posted April 26, 2010 Author Posted April 26, 2010 Ask and ye shall receive... I think you might have to add a little detail to the enlarged surface (contour, inset license plate, .... something) but basically it goes with the extended running boards and front fenders so I think it works. Thanks, Bernard!! Yeah...I might move the license plate to the lower valance to soak up some of that expanded real estate...but overall, I like look...It helps sell the lowered running boards and covers up a bit of the exposed frame at the same time. Later,
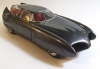
Raul_Perez Posted May 2, 2010 Author Posted May 2, 2010 I finally got time to add a bit of material to the bottom edge of the rear panel and the rear fenders. I also filled in the slot on the rear door for the license plate. I will probably put the plate on the newly extended lower panel. I added it because I didn't like the way the frame was exposed in the rear and the slight misalignment between the rear panel and the rear fenders. I also changed the exhaust tips from those oversized coffee can things that came in the kit to some polished aluminum tubing. BEFORE: NOW: Well, it's about time to start painting the wood grain panels and the interior. Later,
camaroman Posted May 2, 2010 Posted May 2, 2010 Please have someone resin copy... each post is more amazimg than the last. great job!
Recommended Posts
Create an account or sign in to comment
You need to be a member in order to leave a comment
Create an account
Sign up for a new account in our community. It's easy!
Register a new accountSign in
Already have an account? Sign in here.
Sign In Now