mario lucchini Posted March 19, 2010 Share Posted March 19, 2010 A beautiful model of a BMW R 90 S motorcycle, from a Tamiya kit at 1/6 scale standing on a high shelf, came plummeting down during the earthquake... This is what I could find after hours of crawling under desks on the floor... http:// This model was assembled by a son of mine when he was 13, luckily he used styrene cement which as we all know doesn't work very well, so more than destroying or breaking parts, it just disassembled.... After looking arround in the Web, I discovered this is a long time discontinued model, whose prices have been skyrocketing on Ebay, besides it's a very detailed kit, with lots of very well molded parts and with lots of potential for superdetailing.... So I decided to restore it using a Pocherlike approach....why not?....better than crying over the bits & pieces!.... I went searching for prototype data and found a lot of it.... Here's the prototype cycle... And here's a page of the kits manual... We begin the restoration then.....first thing was to completely dissasemble the wreckage...trying to break as little parts as possible.... The first goal was to have the frame assembled correctly, squared, thoroughly sanded and given many coats of acrylic automotive primer....all holes were redrilled and tapped where needed... Some images of the frame, which is yet to be sanded again...priming is essential for detecting surface flaws, besides having a good base for the final color coats... I'm having a real ball with this affair....thanks for looking.... Mario Quote Link to comment Share on other sites More sharing options...
Harry P. Posted March 19, 2010 Share Posted March 19, 2010 Mario, knowing your work, this is going to be spectacular! Quote Link to comment Share on other sites More sharing options...
SSNJim Posted March 20, 2010 Share Posted March 20, 2010 Very nice. A local BMW dealer has one on display, and one for sale. The one on display is that "fadeaway" orange color, and the one for sale is here: http://www.bobsbmw.com/motorcycles/950870.html Looking forward to this build. Old BMW's fascinate me; I had a 1983 R80ST not too long ago, and I still go to that dealer occasionally. They have a pretty awesome museum there, and do a lot of restorations. Unfortunately, they don't have the museum on the website. I now ride a 2007 Honda Gold Wing. Quote Link to comment Share on other sites More sharing options...
Foxer Posted March 20, 2010 Share Posted March 20, 2010 Looks like quite a nice project. Good to see you're building after the quake. Quote Link to comment Share on other sites More sharing options...
GrandpaMcGurk Posted March 20, 2010 Share Posted March 20, 2010 (edited) So where you headed Mario? The "fade-away orange" or the black fade. I've always favored the the black fade version myself. Edited March 20, 2010 by GrandpaMcGurk Quote Link to comment Share on other sites More sharing options...
mario lucchini Posted March 20, 2010 Author Share Posted March 20, 2010 (edited) So where you headed Mario? The "fade-away orange" or the black fade. I've always favored the the black fade version myself. Hey Don!............I'm far away from the painting stage yet....too busy drilling & tapping hundreds of holes for the scale hardware.... however I've been thinking on colors myself...difficult choice.... I personally think the orange version is a little far away from serious for this wonderful piece of machinery....I agree with you in the dark brown... nevertheless I'm thinking in other liveries.... What's up buddy?.... Cheers Mario Edited March 20, 2010 by mario lucchini Quote Link to comment Share on other sites More sharing options...
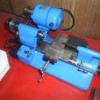
mario lucchini Posted March 28, 2010 Author Share Posted March 28, 2010 We continue our restoration working on some elements of the engine block... A lot of effort was made to insure the engine's block assembly by means of scale hardware, avoiding the use of glue as much as possible...this of course allows the dissasembly of elements any time, great help for fixing details and painting of separate parts... Some images of the bare engine block and cylinders mounted on the frame.... The engine has been attached to the frame by means of specially made 2 mm studs, with nickled hex nuts, for which the holes in the engine block were lined with brass tube, drilled and tapped 2 mm... Back view of the engine showing the clutch and kickstarter cover which has been already treated with polished aluminum paint (I'm using Marson's chrome spray for this effect) Here you can see the 2 mm studs holding the engine to the frame...the 2 front studs are short, the 2 rear studs are longer since they hold not only the engine but also the side pedals and the silencer brackets... http:// A walk arround of the engine out of the frame... The front cover held in place with scale hardware, including scale Allen bolts just as it is in the prototype... The clutch and kickstarter cover in place with rectified and polished scale hardware... No more place for pics....to be continued :blink: Mario Quote Link to comment Share on other sites More sharing options...
mario lucchini Posted March 28, 2010 Author Share Posted March 28, 2010 The 16 ventilation holes made on the block's rear upper section as in the prototype, including micro wire mesh ... The clutch & kickstarter cover out, showing the hardware and the special reinforcements applied to the block to allow drilling & tapping to receive the hardware... The left cylinder being unscrewed from its position on the block... Both cylinders out...1.5 mm round head brass screws were used here, attached to special reinforcements on the block which were tapped accordingly...these screws are way out of scale, but not to worry, they will never be seen once the model is assembled... The reinforcements before mentioned to receive the cylinders... The front cover out with its hardware... The reinforcements made on the central block to receive the intermediate cover... The intermediate cover with its attaching non-scale hardware, used for the same reasons as above.... By the way, all the parts shown have at this stage, received at least 3 coats of primer with sanding in between.... Still having a ball....thanks for looking. Mario Quote Link to comment Share on other sites More sharing options...
GrandpaMcGurk Posted March 28, 2010 Share Posted March 28, 2010 I really enjoy your posts Mario, great source of inspiration for me when the old bones get weary. Quote Link to comment Share on other sites More sharing options...
hot ford coupe Posted April 5, 2010 Share Posted April 5, 2010 Hey guys. Looks like I've been asleep at the wheel like I mentioned in another thread. This is a great restoration. I'm tunned in now. Quote Link to comment Share on other sites More sharing options...
Recommended Posts
Join the conversation
You can post now and register later. If you have an account, sign in now to post with your account.
Note: Your post will require moderator approval before it will be visible.