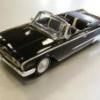
Ron Hamilton Posted March 21, 2010 Posted March 21, 2010 Making the Cutlass Supreme Hardtop From the time I saw this kit, I was determined that I would build one as a Cutlass Supreme Hardtop Coupe with the Hurst/Olds Package. I planned the conversion using another available kit for the roof structure. I used my knowledge about GM cars form the period, and came up with the conclusion that they used the same basic roof for the Cutlass Supreme, Monte Carlo, and Grand Prix, with the major difference being the sail panels and rear window. Cutting up a MPC '69 through '72 Grand Prix would have been fiscal suicide, as those kits are "gold", plus they have moulded in vinyl roofs and "halo" vinyl roof mouldings, so the more common AMT '70 Monte Carlo was the appropriate candidate, as it had a clean top, and I could get one relatively cheap. I cut the whole roof off of the Monte Carlo past the bottoms of the pillars and sail panels so that I had some material to work with. The big difference between the Cutlass Supreme and the Monte Carlo roof is the sail panel, and rear window profile. The Cutlass Supreme has virtually no curvature to it, while the Monte Carlo has a concave rear window. Here is a good side profile shot of a '72 Cutlass Supreme (I want to do one like this one too) Using that photo, I planned out the modifications to the convertible body. I cut the windshield frame from the chromed part that mounts to the Revell body, and attached it to the body. I removed the drip mouldings, as well as the rear window mouldings, as I had to modify the side window profile, as well as the rear window angle with sheet plastic and putty. I referenced the roof fit to the body using the windshield pillars as a guide. I trimmed the bottom of the sail panels bit by bit until I was satisfied with the angle of the roof panel in reference to the body before I attached it permanently. I glued the windshield pillars to the body first, then the modified sail pillars to the body second, after a final trimming. I modified the tulip panel a couple of times with sheet plastic. Once I was satisfied with the work, I puttied and finished the joints prior to the primer stage. I used the Monte Carlo windshield, carefully trimmed at the bottom to fit the Revell windshield wiper base. Once I was satisfied with the work, I added the roof drip mouldings and the rear window mouldings. I made up a rear window moulding as a piece of "c" channel out of 3 pieces of plastic rod, so that the rear window could slip in. the moulding across the tulip panel was a straight piece of plastic strip. All was glued to the roof, and cleaned up. I found several detail photos of a Hurst Olds Hardtop on the web in order to place the vinyl roof mouldings. I ahnd painted the vinyl roof with Flat White paint in a "stipple" pattern to simulate the vinyl used by Hurst on this conversion. This is what I was aiming for in this conversion. I learned quite a bit doing this conversion. Is it perfect? No, but if I were in better physical shape, I could have done better. As I built it for myself and not for a competitive event, I did not bother with any interior modifications other than the package shelf. If I were doing a contest build, I would have removed the dog legs from the interior, widened the rear seat, and finished the inside of the body a little better. The only problem I have encountered in doing that was the final fit between the interior tub and the body. I am very happy with the way the model came out.
Guest 85Biarittz Posted March 21, 2010 Posted March 21, 2010 Turned out real good. Thanks for sharing.
george 53 Posted March 23, 2010 Posted March 23, 2010 Ron, it came out GREAT!!! THANK YOU for posting this how to,it's REALLY appericiated!
paul alflen Posted March 29, 2010 Posted March 29, 2010 (edited) See revell-monogram ,if you dont bring the hardtop out in plastic, we will make it ourselves in resin or plastic. i think i will do one. i have a broken pillared 70 modelhaus monte carlo body that i have been saving. this is cool!!!!!!!!!!!!!!!!!!!!!!!!!!!!!!!!!!!!!!!!!!!!!!!!!!!!!!!!!!!!!!!!!!!!!!!!!!!!!!!!!!!!!!!!!!!!!!!!!!!!!!!!!! Edited March 30, 2010 by paul alflen
Recommended Posts
Create an account or sign in to comment
You need to be a member in order to leave a comment
Create an account
Sign up for a new account in our community. It's easy!
Register a new accountSign in
Already have an account? Sign in here.
Sign In Now