Sergey Posted January 6, 2011 Posted January 6, 2011 I would lift the bumper a little up (to fill big gap). For the rest I like it.
cowboysevens Posted January 6, 2011 Author Posted January 6, 2011 I would lift the bumper a little up (to fill big gap). For the rest I like it. thank you sergey, as dave mentioned it had to be that low so the hood would open. however after staring at it i think next time i put one on i will notch the bumper right under the grill so i will be able to raise it up and shouldent be such a gap.i can see myself biulding a few more of these, it is a nice kit to work with. dennis
drinkone2 Posted January 6, 2011 Posted January 6, 2011 That's a great looking IH! Did you end up using the air brush on it? Once you get it mastered, try using lacquers and you won't believe the difference it makes. Just make sure that the plastic is primed with a lacquer primer or it will come out looking like a raisin. Also, I haven't picked up one of these kits yet, which suspension is in it? Jim
cowboysevens Posted January 6, 2011 Author Posted January 6, 2011 That's a great looking IH! Did you end up using the air brush on it? Once you get it mastered, try using lacquers and you won't believe the difference it makes. Just make sure that the plastic is primed with a lacquer primer or it will come out looking like a raisin. Also, I haven't picked up one of these kits yet, which suspension is in it? Jim thanks jim, i did not use my air brudh yet lol. but i did use laquer rattle can on it. this kit has all spring suspension on it, also check your hood/cab fit before you paint the frame and mount the front axle, it sits too far back the tires almost hit th eback of the fender so i will be shortening the springs on the next one. besides that this is a really nice kit to biuld and im sure i will biuld a few more of these old binders.
highway Posted January 6, 2011 Posted January 6, 2011 thank you sergey, as dave mentioned it had to be that low so the hood would open. It needs more lights, too!!! That way when I'm trying to back in the spot beside you, I can get on the CB and say in true chicken hauler fashion "Driver, could you please turn off your bumper, I can't see!!!"
cowboysevens Posted January 7, 2011 Author Posted January 7, 2011 It needs more lights, too!!! That way when I'm trying to back in the spot beside you, I can get on the CB and say in true chicken hauler fashion "Driver, could you please turn off your bumper, I can't see!!!" lol"driver i know your right" lmao!! matt the only reason i dont have lights on the bumper is because i dont have the right size drill bit to countersink em, the next one will be lit up like a christmas tree
Ben Posted January 7, 2011 Posted January 7, 2011 That looks really cool Dennis!!!! I like the extra lights!!!!! If your interested, Model Trucks and Parts in Germany sells some really awesome photo etch lights. They look VERY realistic! They are little disc's of photo etch nickle silver and the have a "lens" pattern on them. Then they are coated with a colored resin to replicate the lens itself. They just recently added milled styrene "grommets" to put the lights in so it looks like that have a perfect little gasket around them. They have all kinds of shapes and sizes.
highway Posted January 7, 2011 Posted January 7, 2011 That looks really cool Dennis!!!! I like the extra lights!!!!! If your interested, Model Trucks and Parts in Germany sells some really awesome photo etch lights. They look VERY realistic! They are little disc's of photo etch nickle silver and the have a "lens" pattern on them. Then they are coated with a colored resin to replicate the lens itself. They just recently added milled styrene "grommets" to put the lights in so it looks like that have a perfect little gasket around them. They have all kinds of shapes and sizes. Got a link!?!? Me likey my shiny stuff all lit up too!!
Ben Posted January 7, 2011 Posted January 7, 2011 https://ssl3.world4you.com/modelmakershop/index.php?cat=c73_Photo-Etched-Lights.html&XTCsid=rulgqcpl2g2bbajuvo9vdvd8t5 I hope this works?
cowboysevens Posted January 7, 2011 Author Posted January 7, 2011 https://ssl3.world4you.com/modelmakershop/index.php?cat=c73_Photo-Etched-Lights.html&XTCsid=rulgqcpl2g2bbajuvo9vdvd8t5 I hope this works? it works just fine, thank you very much ben
cowboysevens Posted January 7, 2011 Author Posted January 7, 2011 (edited) i got the drop visor biult and on also put the antenna's on. had a lil oopsy and got a couple small dings in the metalizer but it will have to wait for repairs, its time to get this one off the bench and move on. when we get some sunny weather i will post outside pics. thanks for all the help along the way with this biuld dennis Edited January 7, 2011 by cowboysevens
truckman1981 Posted January 7, 2011 Posted January 7, 2011 Visor looks great a well thought out build. looks Great!!
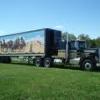
cowboysevens Posted January 8, 2011 Author Posted January 8, 2011 well its finally all done, i know i still have alot of things to improve on so please dont be bashfull about reminding me of things ive missed. thanks now i just need to find a trailer for it, maybe a flatbed or an end dump.
highway Posted January 8, 2011 Posted January 8, 2011 Nice job Dennis! I do have a suggestion and a couple questions, though. The suggestion is maybe a black wash on the hood and grille emblems so the lettering stands out better. Since I'm normally not good at washes, I never seem to make them thin enough or make them too thin, I usually paint the deep areas and wipe any paint off the raised lettering with a paper towel while the paint is still wet. Also, are the headlights clear in the kit? I haven't opened my yet, but they seem too white to me. If they are clear and not plated, what type of glue did you use for them? Oh, by the way, where did you get the "rookie bars" or did you make them yourself? I need a few!
cowboysevens Posted January 10, 2011 Author Posted January 10, 2011 Did you have to scratchbuild the daycab panel or is it an option on the kit along with the sleeper? the sleeper has a crawl thru hole not a sit down so ya dont have to do anything except put the window in it. this really is a nice kit to biuld, i will defenately biuld a few more of these. dennis
cowboysevens Posted January 10, 2011 Author Posted January 10, 2011 So what you are saying is it has a blank panel with the kit and all you have to do is cut the hole? Sorry I'm a little confused at times. lol no the cab is 1 peice, it has a hole between the seats , and the driver would have to ether crawl thru the small hole to get into the bunk or get out and use the sleeper door; hense the ol nikname "crawl thru" sleeper. you gotta remember way back in the day having a sleeper was a luxury and alot of them were added later. if youve ever been in an old conventional that had a roll up back window than it probably had a crawl thru sleeper on it at one time. later years they cut out the back of the cab so the driver could just sit down into his bed, hense the nikname "sit down" sleeper, or if it was a big sleeper it was called a "walk in" sleeper because the driver could walk into the sleeper and sit down on his bed. sit down and walk in sleepers are the trucks that need a replacement back panel if they pull the sleeper off because it will leave a big hole on back of the cab. i hope i helped, lol dennis
Missing in Action Posted January 10, 2011 Posted January 10, 2011 GREAT LOOKIN' TRUCK DENNIS!!! You said don't be bashful...The tires look "too new",sanding or scuffing makes the tires look real and goes a long way in details(I've left a few "shiney"tires myself LOL).I'm gonna start posting some pic's of some of my builds and brace for the laughs...But hey,Great job...Keep up the great work!!! '
Wagoneer81 Posted January 11, 2011 Posted January 11, 2011 (edited) Dennis ol' buddy! Since you asked for critique, and since I was feeling froggy today, I decided to take a shot at your 4300... I went over your pictures with a fine toothed comb and can say this... Well done! I see no glaring problems or issues with this build. After a few paint issues early on, you laid down a very nice paint job, all the rubber meets the road, it's a well built model by someone who paid close attention to 'Basic Building Techniques' and took it a step further with the visor, bumper and trailer umbilicals. This is a build to be proud of, I know I'd be proud to have it in my collection! The ONLY things that I could see that would enhance this build, Highway and Roy Lingefelt already hit on them, scuffing of the tire treads and the use of a black wash behind the letters on the hood emblems and the grill logo to make the lettering stand out. These aren't criticisms by any means because it is a fine build and I look forward to seeing more of your stuff in the future. For black wash, over chrome, I use Testors Enamel Detail Enhancer, I don't even remember where I got it but it's in a 1/4 oz. bottle, No. 2790... Ohh, and I do like that front snowplow...err, uhh... bumper! I want to make one for a Pete I'm working on. Edited January 11, 2011 by Wagoneer81
Recommended Posts
Create an account or sign in to comment
You need to be a member in order to leave a comment
Create an account
Sign up for a new account in our community. It's easy!
Register a new accountSign in
Already have an account? Sign in here.
Sign In Now