Dragline Posted July 17, 2010 Author Share Posted July 17, 2010 Got some paint on her and did some additional work to the chassis. I bought a 5 way Detail Master harness off Norm Veber at the MAMA meeting today. This thing is schweet! Good thing I made the slot wider at the shoulder point. Shot the body in 97 degree heat with Tamiya bright red. It's already dry but I'll wait over night befre I mask the white portion. I have the decals cut out tight to the edge for a clean edge when I mask it. The white I'm using is Testors Model Master Classic White. A laquer that I have used over Tamiya with good results in the past so no worries there. Still struggling with the port injection but I have it 1/2 done and it looks good. I had to make a bracket for the idler pully since it was like a kit alternator, just floating out in space. Stole some blower restraints from my Inagural AA/FC kit. Got the chutes done and mounted on their plate as well. Also mounted the extinguishers. Robbing the decals from the other kit for those as well. Thanks to Dave Zinn for bringing some red spark plug wire to the meeting. Saved my vittles broski. Thanks Making progress even after todays MAMA meeting which was Awesome. Thanks for looking. Bob Quote Link to comment Share on other sites More sharing options...
bsoder Posted July 18, 2010 Share Posted July 18, 2010 Hey Bob your making forward progress! the lines came out looking great man..... Quote Link to comment Share on other sites More sharing options...
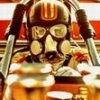
Dragline Posted July 19, 2010 Author Share Posted July 19, 2010 Got the white, decals and one coat of clewar on her today. This dry heat is perfect for painting projects like this so I'm getting it done while I can. It needs another coat of clear before I buff it out but it sure did come out pretty cool. This pic was shot with the flash. I never use the flash so I though it was a throw away but it really is bright. Back to the chassis. Bob Quote Link to comment Share on other sites More sharing options...
brett Posted July 19, 2010 Share Posted July 19, 2010 looking really good Bob. Following along for when I do mine,hopefully it'll turn out half as good as yours Quote Link to comment Share on other sites More sharing options...
whale392 Posted July 19, 2010 Share Posted July 19, 2010 Very nice! I remember watching that car run as a kid and I believe I still have the autographed poster of that car somewhere in my stash. 1985 U.S. Nationals is where I believe I saw Kenny run it (forgive me, I was 10 and my memory might be a slight bit hazy!). Quote Link to comment Share on other sites More sharing options...
Fuel Coupe Posted July 21, 2010 Share Posted July 21, 2010 Lookin Good Bob... Quote Link to comment Share on other sites More sharing options...
Dragline Posted July 22, 2010 Author Share Posted July 22, 2010 Got her all polished up so I thought I'd share a few pics. I am obsessing over the port injection so I took a break to do some other tasks. I got most of the safety harness in but not buttoned down to the attachment points yet. I finished the mag and swiped a coil from my top fuel donor kit. As soon as I'm happy with the injection I'll be sure to post it. I'm also in the middle of fabricating the barrel valve and throttle bracket. There is plenty to keep me busy while I regroup for the injection finale. Thanks for hanging in there with me. And thanks for the encouragement. Bob Quote Link to comment Share on other sites More sharing options...
John Teresi Posted July 22, 2010 Share Posted July 22, 2010 Bob......sure is looking good...........you`ll have her done in no time. Quote Link to comment Share on other sites More sharing options...
brett Posted July 22, 2010 Share Posted July 22, 2010 OHH man that paint is looking sooo sweet ! as is the rest of the build Quote Link to comment Share on other sites More sharing options...
Dragline Posted July 23, 2010 Author Share Posted July 23, 2010 Finally got the port injection completed. Looks like I'll have to tweak a few to look crisper and straighter but that's the easy part. It looks like I tweaked a couple of the hat lines but I'll get those as well. For the most part it's done.......... [wipes brow] I'm currently working on the barrel valve and if I like that throttle bracket or not. It's a standard bracket used for many years but it may be a tad thick so I may spend some time thinning it down a bit. The barrel valve is done, and it is the best one I ever made. Next up is braided lines for the fuel. I also have to finish the oil system but the filters are drying and since they have enamel on them it'll take another day before I can get to them. Thanks for watching. Bob Quote Link to comment Share on other sites More sharing options...
Dragline Posted July 26, 2010 Author Share Posted July 26, 2010 (edited) <BUMP> Looks like this project will stall a bit till I get some Pro Tech line coming in. I have almost enough fittings but the generic line I have doesn't fit. It came in 5 sizes and they are all to small or to big. So I have to wait till I get some dough for some of that Pro tech stuff. It looks so good and I've been meaning to get some so now I'll have to. But I figured I'd bump this thread and take a few shots with the body on. I also finished the chutes so I snapped one of them. Till I get some Pro Tech braid!!!!! Bob Edited July 26, 2010 by Dragline Quote Link to comment Share on other sites More sharing options...
bsoder Posted July 26, 2010 Share Posted July 26, 2010 Body looks killer man...it's comin' along Quote Link to comment Share on other sites More sharing options...
brett Posted July 26, 2010 Share Posted July 26, 2010 Very very ,well nice barely cuts it so great work Bob. Hope Charlie dosnt take too long. Quote Link to comment Share on other sites More sharing options...
Smart-Resins Posted July 26, 2010 Share Posted July 26, 2010 I some how have missed this one until now. Terrific job! Great attention to detail. Looks wonderful! Your skills are great! Quote Link to comment Share on other sites More sharing options...
DWR Posted November 22, 2010 Share Posted November 22, 2010 Hi..........fantastic work. Can you tell me what size of wire you used for the hat hardline? Thanks Quote Link to comment Share on other sites More sharing options...
baddgass Posted November 23, 2010 Share Posted November 23, 2010 Got the white, decals and one coat of clewar on her today. This dry heat is perfect for painting projects like this so I'm getting it done while I can. It needs another coat of clear before I buff it out but it sure did come out pretty cool. This pic was shot with the flash. I never use the flash so I though it was a throw away but it really is bright. Back to the chassis. Bob Very nice look forware to see it finish. Quote Link to comment Share on other sites More sharing options...
charlie@mrtractorsales.com Posted April 4, 2013 Share Posted April 4, 2013 Bob, I think the work you did with the fuel lines is great, can you tell me how you did them? I am working on the radici & wise car and would like to make hard lines like you have done. I have made only the black ruber ones. thanks, Charlie Quote Link to comment Share on other sites More sharing options...
Truck parts Posted April 9, 2013 Share Posted April 9, 2013 BoB, Great work on this on this build. Quote Link to comment Share on other sites More sharing options...
Pro Tech Posted April 9, 2013 Share Posted April 9, 2013 Bob looking good! will look out for your order and look forward to seeing some Pro Tech products on there Charlie Pro Tech Quote Link to comment Share on other sites More sharing options...
Dookoo Posted April 16, 2013 Share Posted April 16, 2013 Great Awsome work loving it may i ask How ? did you make that barrel valve and Fuel Distibutor Block Thats Perfect ! Quote Link to comment Share on other sites More sharing options...
Dragline Posted April 16, 2013 Author Share Posted April 16, 2013 Gosh, this project has been in the box for so long. I made it with Plastruct and a small hobby sized miter box. Pretty simple really. I pulled this out a while back and was thinking of finishing it. For the life of me I cannot remember why I put it up when I did. Bob Quote Link to comment Share on other sites More sharing options...
Recommended Posts
Join the conversation
You can post now and register later. If you have an account, sign in now to post with your account.
Note: Your post will require moderator approval before it will be visible.