SpreadAxle Posted November 23, 2010 Author Posted November 23, 2010 Thanks everyone. The paint came from a CAT dealership. If you want to get a can for yourself, just be aware it's not cheap. $8 a can.
SpreadAxle Posted November 25, 2010 Author Posted November 25, 2010 Today was mostly a day of sanding. I sanded the cab, hood, and sleeper and lightly primed it again with some more DupliColor Primer. The cab plug I made had given the cab slight "humpback look" that I was able to correct. My main mod 2day was to the hood. I have a photoetch detail set that was meant for the Revell AG W900, but I kept thinking it would look good on this kit. I wasn't sure if it would work, but it just kept nagging at me. So, with the knowledge that I have a spare hood and grille at home, I went ahead and opened up the hood and grille. After the cuts were made, I did some more test fitting and found the new grille fits real nice. I'll show that when it's mounted.
SpreadAxle Posted November 27, 2010 Author Posted November 27, 2010 I completed the dash last weekend. I just couldn't get my camera to grab a decent pic until 2day when I put it on my trailer deck. I added a few things. The defroster vents were cut from an AMT K100 Aerodyne dash. Under the dash are the heater controls and what-not from the AMT W 925 dash. I added turn signal and highbeam indicators to the instrument panel. Still needs a bit of a touch up.
mackinac359 Posted November 27, 2010 Posted November 27, 2010 Do you have any Future Floor Finish? If you do (or a similar clear acrylic), pour some in a bowl, dip a tiny brush in and apply a dab of Future or clear to the faces of the dials on the dash. Let it cure. The clear will make the dials 'pop' with a look of having a glass face. Tim
SpreadAxle Posted November 27, 2010 Author Posted November 27, 2010 Thanks Tim, I'll have to try that. Sounds like a simple trick.
Aaronw Posted November 28, 2010 Posted November 28, 2010 Seeing this inspired me to have a look at the kit, I am much more interested in building it as a daycab, but the built in high top sleeper made that seem unlikely. I've changed my mind seeing yours, not a simple conversion but very do-able. However it also made me realize why no one has made a resin day cab for this kit, the rest of the conversion would be almost as much work, cutting down the interior tub and sleeper base molded to the frame. Anyone willing to take that on can probably do the cab as well. Then there is the cost even a modestly priced cab would double the price of the kit. I have one favor to ask, could you tell me the measurements of the back window and how far above the bottom of the cab the bottom of the window is? Thanks
Jim B Posted November 28, 2010 Posted November 28, 2010 Aaron, so you know, all of Gary Wallace's Kenworth kits are based on this cab.
Aaronw Posted November 28, 2010 Posted November 28, 2010 I'm not saying anything bad about the kit, just that after really looking at it I realized making it into a day cab involves a lot more than just cutting off the sleeper and adding a back wall. Having looked at it though and seeing what is being done here, I am now even more positive I want to make it into a daycab.
Jim B Posted November 28, 2010 Posted November 28, 2010 Oh, I'm not knocking the kit. It's a really nice kit, and I like how it fits together. You could also make it a Aerodyne II sleeper by replacing the square sleeper doors with the round sleeper doors from the AMT T600 kit.
SpreadAxle Posted November 28, 2010 Author Posted November 28, 2010 You could also make it a Aerodyne II sleeper by replacing the square sleeper doors with the round sleeper doors from the AMT T600 kit. Hmmmm....IDEA!!!!
SpreadAxle Posted November 28, 2010 Author Posted November 28, 2010 Aaron, here are the measurements you asked for. I took my 1/25 Scale Card and measured, so these are in scale inches. Bottom of window to bottom of cab, 33". Top of window to bottom of window, 18". Window side to side, 29".
Jim B Posted November 28, 2010 Posted November 28, 2010 Ray, if you did that, would you have to switch the hood to make it a W900B? I'm thinking that you'd have to.
Aaronw Posted November 29, 2010 Posted November 29, 2010 Aaron, here are the measurements you asked for. I took my 1/25 Scale Card and measured, so these are in scale inches. Bottom of window to bottom of cab, 33". Top of window to bottom of window, 18". Window side to side, 29". Thanks, that will help. Thanks for the inspiration too, I finally have an idea for this kit.
SpreadAxle Posted November 29, 2010 Author Posted November 29, 2010 Ray, if you did that, would you have to switch the hood to make it a W900B? I'm thinking that you'd have to. Yes, it would be a W900B. I was going to use the Aerodyne roof from this project on a T600 sleeper for a later year Aerodyne. Your idea sounds cool, too. It would be for a W900B. The earliest W900B's had the square corner doors on the sleeper like the Snap kit. The round corner doors started appearing around '85 or so. I have a Gary Wallace W900B kit that I plan on using with a Snap kit to model an early W900B.
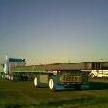
SpreadAxle Posted June 28, 2011 Author Posted June 28, 2011 It's been awhile since I updated this thing, but it's still going. Here's a mockup now that she's been painted and striped. The color is DupliColor Classic White. The stripes are made by Special Appearance Decals available through STS. These are the Movin' On kit stripes redone in red and black. As for the mods, I used the fuel tanks from a Revell AG Kenworth W900 kit. They were the perfect size for my shortened frame. The Visor came from an AMT W925. To install it, I notched the corners of the cab and thinned the visor. I got the idea from the Revell AG kit, since the cab in that kit is notched where the visor goes. Since this is the 1991 re-issue of this kit with the "self stripping chrome", I went ahead and painted the bumper, wheels, and battery boxes with Model Master Aluminum Plate buffing laquer. They still need another coat, I just wanted to see how it looked. Thanks for looking.
matilda66 Posted June 28, 2011 Posted June 28, 2011 got one of these kits a few years ago paid a fortune for it from the states to australia the orange issue never even built it dont even know were it went. but i see there is some serious cutting going on here ,love the paint job on those rims... MMM i might be to old before i see a new kenworth kit PLEASE W900L
SpreadAxle Posted June 29, 2011 Author Posted June 29, 2011 got one of these kits a few years ago paid a fortune for it from the states to australia the orange issue never even built it dont even know were it went. but i see there is some serious cutting going on here ,love the paint job on those rims... MMM i might be to old before i see a new kenworth kit PLEASE W900L If you should find your kit, know this: The chrome was poorly laid onto the plastic. The orange always shows through on sharper edges. Other issues of this kit didn't seem to have this problem. I had to coat the wheels again. I guess I got carried away when buffing, because in the pix, I see orange around the edges. And yes, I would love to see a W900L kit.
Kostas Parchas Posted June 29, 2011 Posted June 29, 2011 Nice pait theme, looking forward to see it done. Kostas.
SpreadAxle Posted July 3, 2011 Author Posted July 3, 2011 Well, every truck needs a trailer, so I got started on that. It will be a frameless Fruehauf Dump. I took the remaining section from another dump that was cut down for a Michigan Pup, and added it to this one. Here's where it's at for now.
cowboysevens Posted July 3, 2011 Posted July 3, 2011 oh this one is getting better and better!! i like it alot ray, good idea for sure it will be right at home on the back of that ol KW
SpreadAxle Posted July 12, 2011 Author Posted July 12, 2011 While digging through a parts box I bought on ebay last summer(lots of gems in there), I found 2 steer axles from old Ertl Internationals. One is complete but the other was broken along with the tie rod. I hated the idea of throwing it away, so I came up with this.... First, trim the broken axle ends down and cut the ends off the KW axle, then, put the operational ends on the KW axle. The tie rod ends were still attached, so a brass tube replaces the tie rod. I need to play with it a little to strengthen it, but here's where it's at for now.
SpreadAxle Posted October 11, 2011 Author Posted October 11, 2011 Still a little left to do to it, but I installed the photetch grille. The kits headlight bezels were modified by cutting off the marker light and positioning it in the correct spot. I still have to add the 3 vertical bars.
SpreadAxle Posted October 14, 2011 Author Posted October 14, 2011 Here's the nearly completed hood. I added some turn signals from the spares box.
BigBad Posted October 14, 2011 Posted October 14, 2011 Here's the nearly completed hood. I added some turn signals from the spares box. That is one nice grill! Where is that from?
scale trucker Posted October 15, 2011 Posted October 15, 2011 where did you get the stallion for the hood ornament..??
Recommended Posts
Create an account or sign in to comment
You need to be a member in order to leave a comment
Create an account
Sign up for a new account in our community. It's easy!
Register a new accountSign in
Already have an account? Sign in here.
Sign In Now